
How to Connect ProLINE Free with ClickFunnels
Published: Updated:
ProLINE Free is a marketing automation tool for LINE Official Accounts. Connecting it with ClickFunnels links a contact’s email address with their LINE identity, so the people who opt in on your funnel and the people who add your LINE account as a friend become one list. In this article, you’ll learn what the integration does, how to connect ProLINE Free to your ClickFunnels workspace, and how to set up your funnel so the email a visitor submits on your opt-in page is passed to ProLINE Free when they add your LINE account.
Requirements
Section titled “Requirements”-
An active ClickFunnels account
-
A ProLINE Free account with LINE Login integration (LINEログイン連携) turned on
-
A funnel with an opt-in page and a thank-you page
What the ProLINE Free Integration Does
Section titled “What the ProLINE Free Integration Does”-
Links email and LINE identity: A visitor opts in with their email address on a ClickFunnels page, then adds your LINE account as a friend through a ProLINE Free add-friend URL. That URL carries the email address, so ProLINE Free receives it at the moment the friend is added.
-
Stores the ProLINE Free user ID on the contact: After the friend is added, ProLINE Free writes its user ID to the ClickFunnels contact with the same email address. The ID is stored as a custom attribute that is displayed on the contact as Proline User (API name
proline_user_id), which lets you tell which contacts are also LINE friends. -
Lets ClickFunnels workflows move contacts to ProLINE Free scenarios: With the ProLINE Free user ID on the contact, a Webhook step in a ClickFunnels workflow can call a ProLINE Free scenario-move URL. ProLINE Free then moves the contact to that scenario, which can send LINE messages.
Connecting ProLINE Free to ClickFunnels
Section titled “Connecting ProLINE Free to ClickFunnels”You connect the two accounts from inside ProLINE Free, not in ClickFunnels. The connection uses OAuth, so you sign in with your ClickFunnels account from the ProLINE Free settings. ProLINE also describes these steps in its own manual, How to Connect ProLINE with ClickFunnels (in Japanese).
-
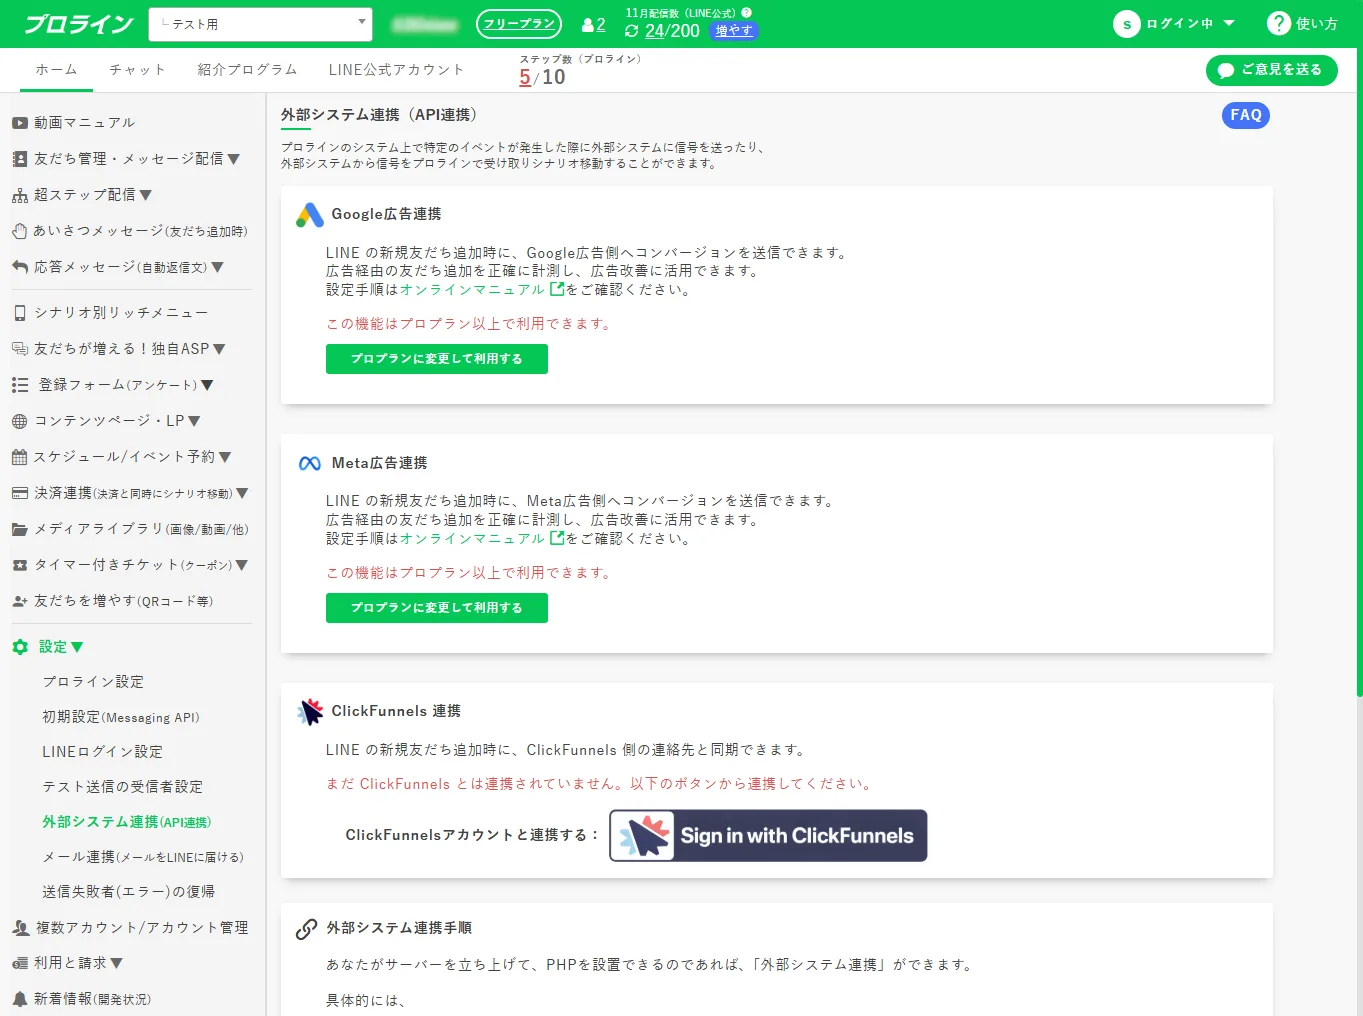
Log in to ProLINE Free. In the left menu, open Settings (設定) and click External System Integration (API Integration) (外部システム連携(API連携)). While you are logged in, you can also open the page directly at https://autosns.jp/setting/push-html.
-
On the External System Integration (API Integration) page, find the ClickFunnels Integration (ClickFunnels 連携) card. The card says that when a new LINE friend is added, they can be synced with the contact in ClickFunnels.
-
Next to Connect with a ClickFunnels account (ClickFunnelsアカウントと連携する), click the Sign in with ClickFunnels button.
-
Sign in with your ClickFunnels account.
-
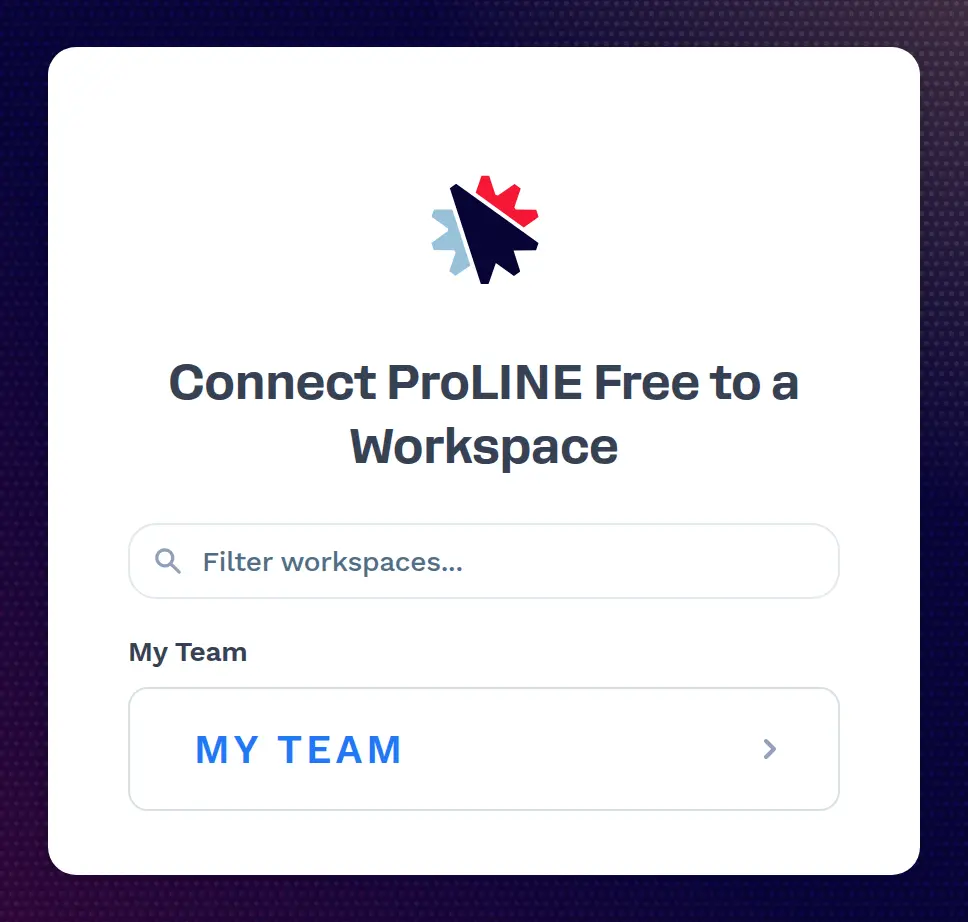
ClickFunnels asks which workspace to connect ProLINE Free to. Click the workspace that contains your funnel.
-
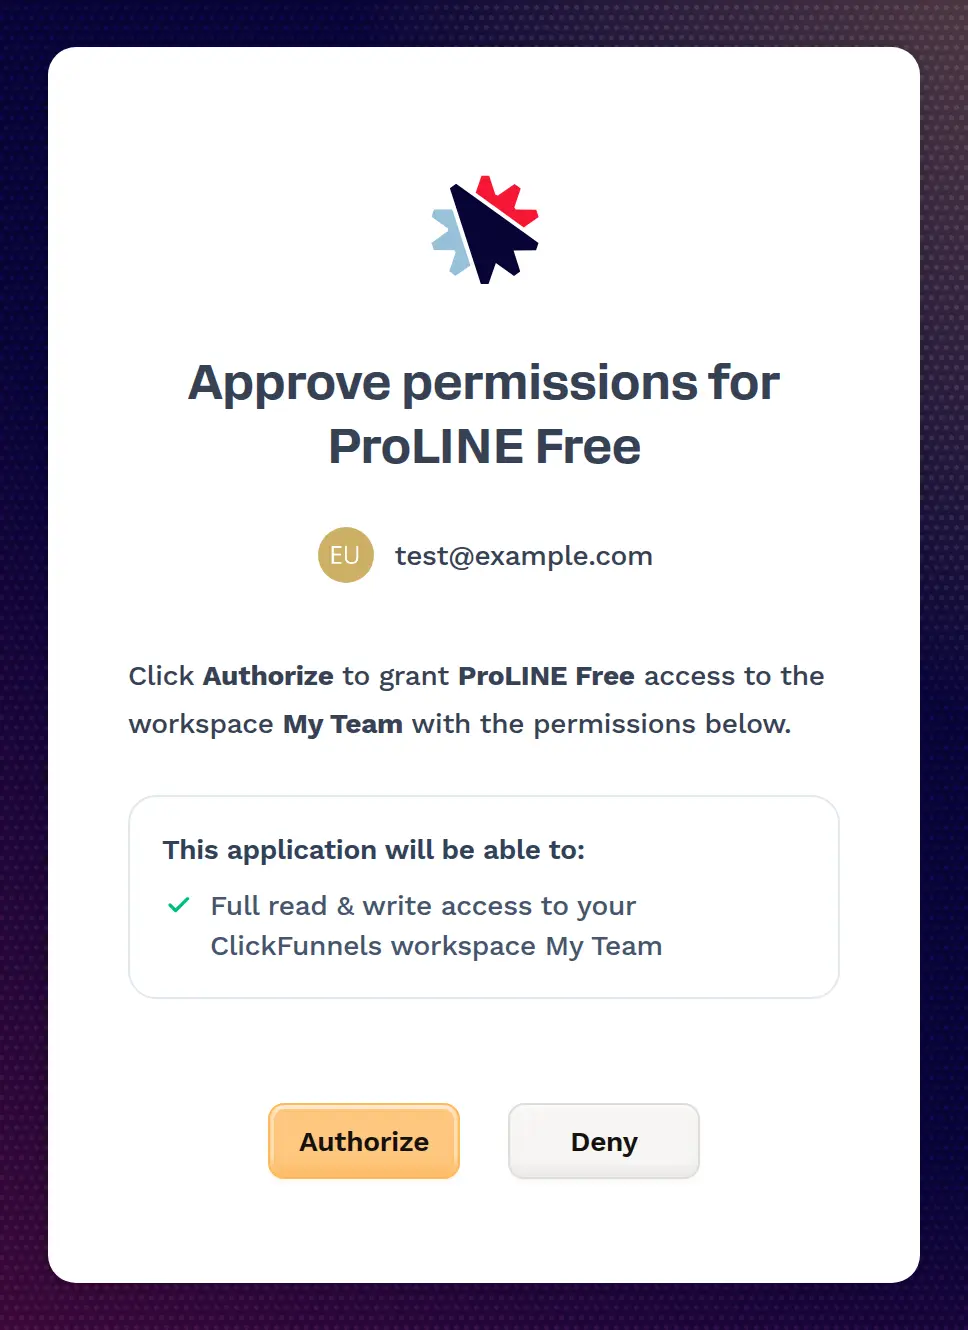
On the Approve permissions screen, check the workspace name and the permissions, then click Authorize.
-
ProLINE Free shows a message that the ClickFunnels account was connected successfully. When the connection is complete, the ClickFunnels Integration card shows Connection status: Connected (連携状態:連携済み) with the date and time, and Workspace name (ワークスペース名) with the name of the connected ClickFunnels workspace. Make sure it is the workspace that contains your funnel.
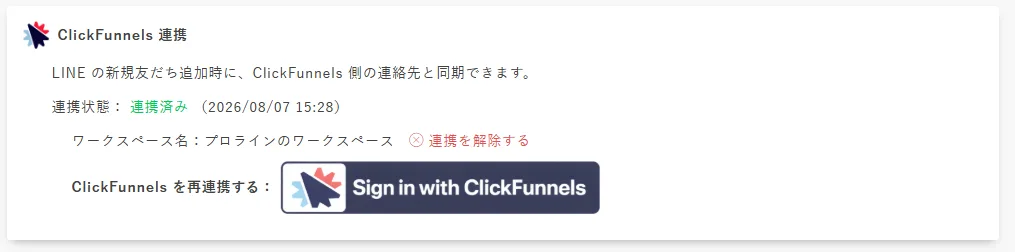
After you connect, the button on the card is labelled Reconnect ClickFunnels (ClickFunnels を再連携する). To disconnect ProLINE Free from ClickFunnels, click Disconnect (連携を解除する).
Each ProLINE Free account needs its own connection. If you run more than one ProLINE Free account, connect each of them.
Setting Up the Email-First Flow
Section titled “Setting Up the Email-First Flow”In the email-first flow, a visitor submits their email address on your opt-in page, lands on your thank-you page, and clicks a button there to add your LINE account as a friend. A short script on the thank-you page adds the visitor’s email address to the ProLINE Free link. ProLINE’s manual for this flow is Email First: How to Link ClickFunnels and ProLINE Free Customer Information (in Japanese).
Step 1: Set the Opt-In Button to Submit the Form
Section titled “Step 1: Set the Opt-In Button to Submit the Form”-
Open your opt-in page in the page editor. The page needs an email field and a button.
-
Click the button to open its settings panel and scroll to Button action on click.
-
Select Submit Order/Form.
-
Leave Enable Redirect Override unchecked. The button then submits the form and advances the visitor to the next step in the funnel.
To learn more about button actions, see Setting Up Actions for Buttons, Text, and Images in ClickFunnels.
Step 2: Make the Thank-You Page the Next Funnel Step
Section titled “Step 2: Make the Thank-You Page the Next Funnel Step”Place the thank-you page directly after the opt-in page in the same funnel. Keep both steps in the same funnel and on the same domain. The contact information that the script reads is carried from one step to the next only within the same funnel and domain.
Step 3: Add the Add-Friend Button
Section titled “Step 3: Add the Add-Friend Button”-
In ProLINE Free, copy your add-friend URL. Its domain ends in
.autosns.app. Where you find it depends on which scenario new friends should start in:-
The initial registration scenario: open Get More Friends (QR Codes, etc.) (友だちを増やす(QRコード等)) and copy the URL under Promote on social media or by email (SNSやメールで宣伝する).
-
A specific scenario: open Super Step Delivery (超ステップ配信) > Step Delivery Scenarios (ステップ配信シナリオ), select the scenario, click QR codes, etc. that register people to this scenario (このシナリオに登録するQRコード等), and copy the URL under Promote on social media or by email.
-
-
On the thank-you page, add a button and set its action to Go To…, then choose Custom URL.
-
Enter your ProLINE Free add-friend URL. Do not add
{contact.email}or any other merge tag to it.
Step 4: Add the Footer Script to the Thank-You Page
Section titled “Step 4: Add the Footer Script to the Thank-You Page”-
In the page editor for the thank-you page, go to Settings > Show Code and select the Footer Code tab. For more detail, see Adding JavaScript and Tracking Code for Advanced Features.
-
Paste the following script.
<script>(function () {var contact = window.sessionData && window.sessionData.contact;var email = contact && (contact.email || contact.email_address);if (!email) return; // visitor hasn't opted in yet, so leave links untouched// Match links that point at your ProLINE Free add-friend domain, then append the email.document.querySelectorAll('a[href*="YOUR-PROLINE-DOMAIN"]').forEach(function (a) {var url = new URL(a.href, window.location.origin);url.searchParams.set('e', email);a.href = url.toString();});})();</script> -
Replace
YOUR-PROLINE-DOMAINwith the domain of the add-friend URL you copied from ProLINE Free. The domain is the part betweenhttps://and the next/, and it ends in.autosns.app. -
Save the page.
The script reads the email address the visitor submitted from window.sessionData.contact.email and adds it to every link on the page that points at your ProLINE Free domain. It adds the address as the e parameter, which is the parameter the ProLINE Free add-friend URL reads the email address from. If the visitor has not opted in, the script leaves the links unchanged.
This is the approach described in the ClickFunnels developer guide Using window.sessionData between pages.
Step 5: Test the Flow
Section titled “Step 5: Test the Flow”-
Open the published opt-in page and submit a test email address. Do not open the thank-you page directly, because the email address is available only after an opt-in is submitted.
-
On the thank-you page, check the address of the add-friend button, for example by right-clicking it and copying the link. It should end with
?e=followed by the email address you submitted, with@written as%40.
Step 6: Check That It Worked
Section titled “Step 6: Check That It Worked”-
On the thank-you page, click the add-friend button and add your LINE account as a friend, using a LINE account you can test with. Test with the LINE app on a smartphone; ProLINE notes that LINE for PC has limitations that can affect the result.
-
In ClickFunnels, click Customers in the left-hand main menu, then click Contacts.
-
Open the contact with the email address you submitted.
-
On the Overview tab, look under Custom Attributes for Proline User. Its value is the contact’s ProLINE Free user ID. If it is there, and it matches the friend’s User ID (ユーザーID) in ProLINE Free, the email address and the LINE friend are linked. In ProLINE Free, the friend’s information also shows the email address you submitted.
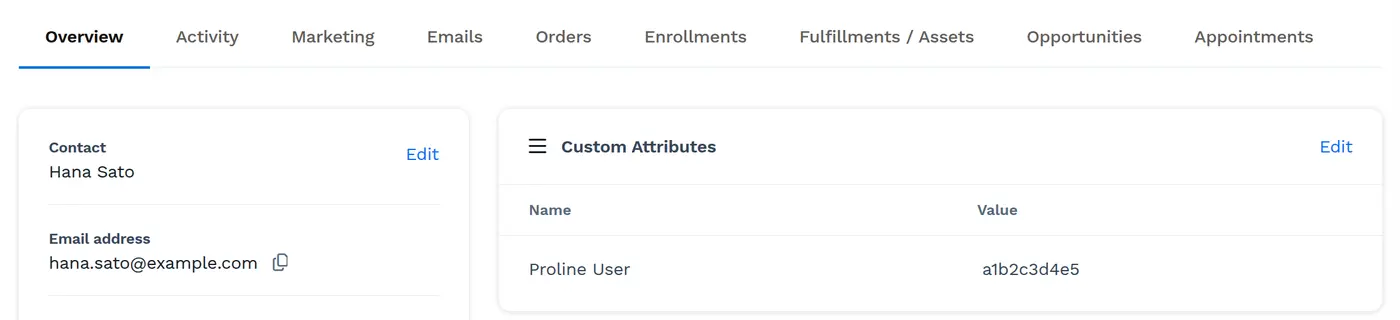
To learn more about the contact page, see Contacts Profile Overview.
Linking People Who Are Already LINE Friends
Section titled “Linking People Who Are Already LINE Friends”The link is made when someone adds your LINE account as a new friend. Someone who was already a friend before you connected ProLINE Free, or who is already linked and opts in again with a different email address, is not linked by default. To link them too, turn on Register to the scenario even if already added as a friend (既に友だち追加済みの場合でも、シナリオ登録する) for the scenario the add-friend URL registers people to. In ProLINE Free, open Super Step Delivery > Step Delivery Scenarios, select the scenario, and click QR codes, etc. that register people to this scenario. For the initial registration scenario, the option is hidden: click ▼Read the explanation for advanced users▼ (▼上級者向けの説明を読む▼), then ▼Show special QR codes, etc. after reading the explanation▼ (▼説明を読んだ上で、特殊なQRコード等を表示▼). ProLINE’s email-first manual shows each screen.
Moving Contacts to a ProLINE Free Scenario from a ClickFunnels Workflow
Section titled “Moving Contacts to a ProLINE Free Scenario from a ClickFunnels Workflow”Once a contact has the Proline User custom attribute, a ClickFunnels workflow can move that contact to a ProLINE Free scenario, and the scenario can send LINE messages. You set this up with a Webhook step that calls a scenario-move URL from ProLINE Free.
-
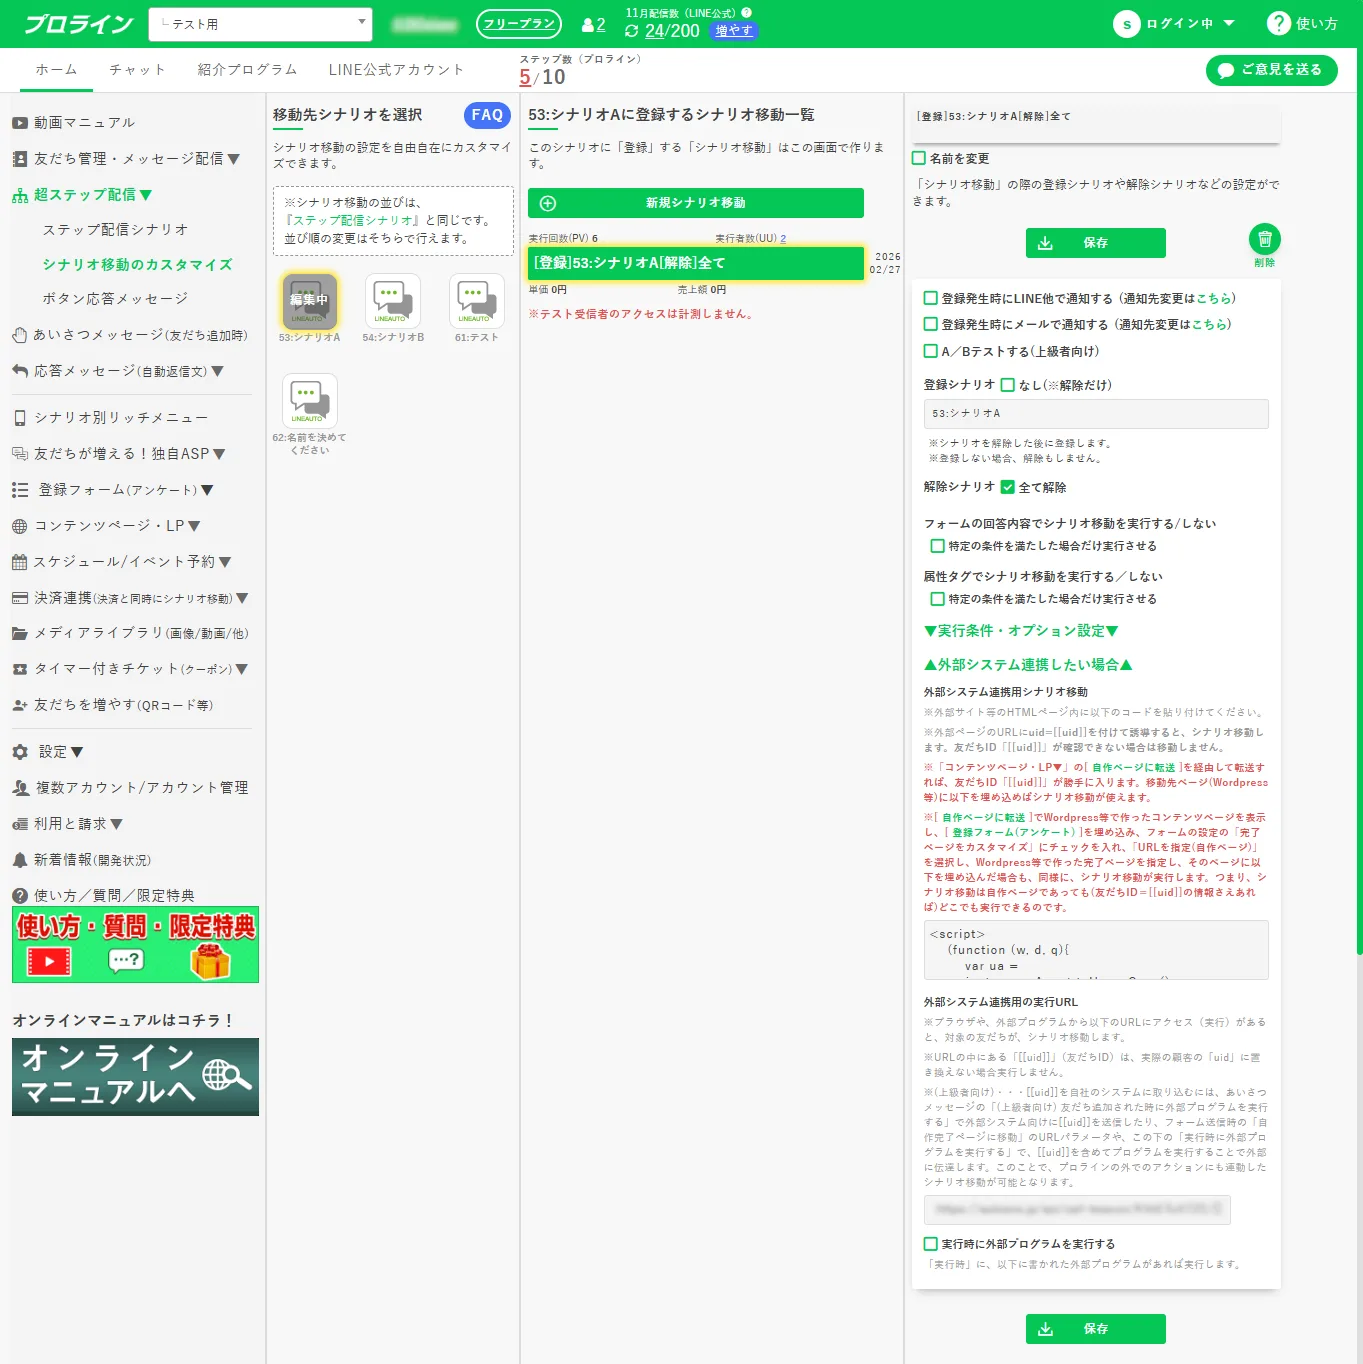
Log in to ProLINE Free. In the left menu, open Super Step Delivery (超ステップ配信) and click Customize Scenario Moves (シナリオ移動のカスタマイズ).
-
Select the scenario move you want to run.
-
Open the ▼If you want to integrate with an external system▼ (▼外部システム連携したい場合▼) section (once it is open, its arrows point up) and copy the URL in the Execution URL for external system integration (外部システム連携用の実行URL) field. The URL has the form
https://autosns.jp/api/call-beacon/XXXXXXXXXX/[[uid]], whereXXXXXXXXXXis a random string of letters and numbers.
-
In ClickFunnels, open the Automations app and add a Webhook step to a workflow. To learn how to add and configure the step, see ‘Webhook’ Step - Streamline Complex Data Transfers.
-
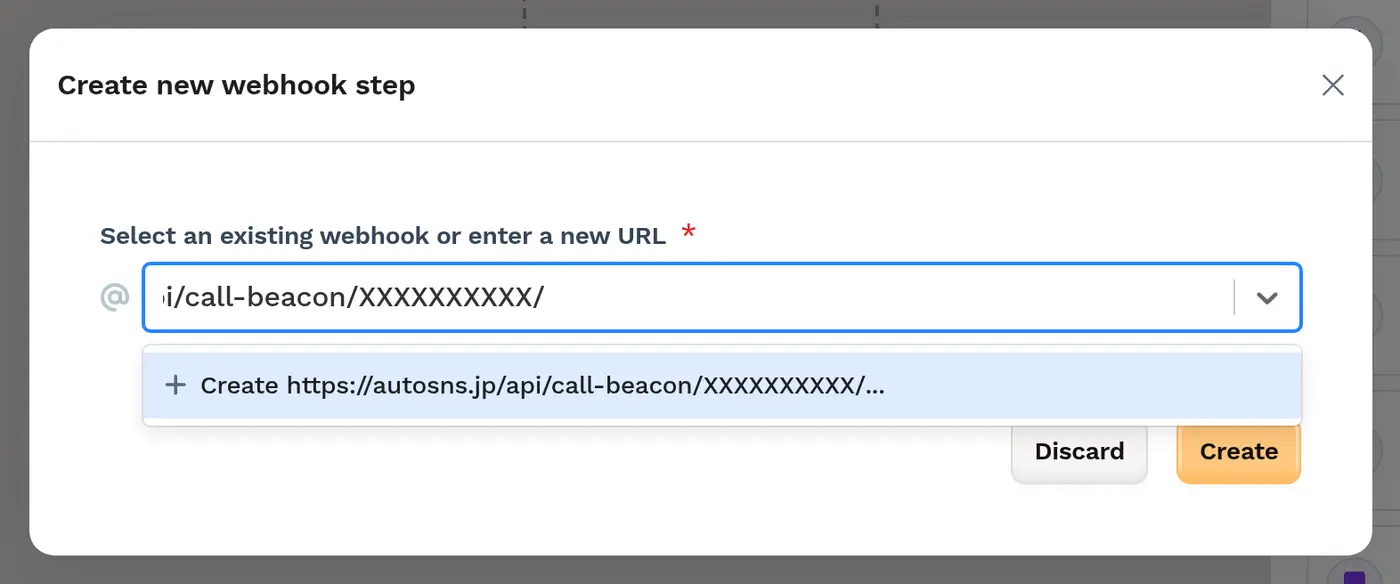
Paste the URL you copied into Select an existing webhook or enter a new URL, and remove
[[uid]]from the end. The URL then ends with a slash, for examplehttps://autosns.jp/api/call-beacon/XXXXXXXXXX/(it also works without the final slash). ProLINE Free identifies the friend from the ClickFunnels contact instead, as described below. Select the suggestion that creates a webhook for the URL, then click Create.
-
Set the workflow’s trigger to the event that should move the contact, for example a tag being added. Then enable the workflow: open the workflow’s Settings, turn on Status, and click Update Workflow. A new workflow is disabled until you do.
How It Works
Section titled “How It Works”-
ClickFunnels sends the webhook to the ProLINE Free URL.
-
The webhook payload contains the ClickFunnels contact ID.
-
ProLINE Free asks the connected ClickFunnels workspace for that contact.
-
ClickFunnels returns the contact, including its custom attribute values.
-
ProLINE Free identifies the LINE friend from the ProLINE Free user ID and moves them to the scenario.
Because of this, the contact must already have the ProLINE Free user ID (the Proline User custom attribute) when the step runs. Without it, ProLINE Free cannot identify the friend.
Checking That the Scenario Move Ran
Section titled “Checking That the Scenario Move Ran”-
In ClickFunnels: open the contact and click the Activity tab. A Deliver webhook step entry means the webhook was sent.
-
In ProLINE Free: open Customize Scenario Moves and look at the scenario move’s run count (実行回数). If it went up, the move ran.
If you test the same move more than once, two ProLINE Free settings can stop it from running again:
-
A friend who is already in the destination scenario, and still in progress, is not moved again. Remove them from that scenario in ProLINE Free before you test again.
-
By default, the same friend has to wait 6 hours before the same scenario move runs for them again, unless they are the account’s test recipient. You can change the wait in the scenario move’s ▼Run conditions and options▼ (▼実行条件・オプション設定▼) section.
LINE-First Flow
Section titled “LINE-First Flow”ProLINE Free also supports the reverse order: the visitor registers on LINE first, and their email address is collected afterwards. That flow is set up in ProLINE Free and is not covered in this article.
Troubleshooting
Section titled “Troubleshooting”-
The LINE link shows
{contact.email}instead of the email address.
Merge tags such as{contact.email}are not replaced inside page links. The page sends the text to the visitor’s browser exactly as you typed it. Remove the merge tag from the link and use the footer script in Step 4 instead. -
The email address is not added to the LINE link.
Check the button on your opt-in page first. If it is a plain link to the thank-you page instead of Submit Order/Form, the form is never submitted, the contact is never identified, and the script has no email address to add. Set the button action to Submit Order/Form as described in Step 1. -
The opt-in button is set correctly, but the link still has no email address.
Check the following:-
You tested by submitting the opt-in page, not by opening the thank-you page directly.
-
The opt-in page and the thank-you page are in the same funnel and on the same domain.
-
The domain in the script matches the domain of your ProLINE Free add-friend URL.
-
-
The thank-you page URL contains
?email={contact.email}.
This happens when a link to the thank-you page includes the merge tag. It is not replaced there either, so it stays in the address as plain text. Remove it from the link. The script does not need it, because it reads the email address from the page itself. -
The contact has no Proline User custom attribute after the friend is added.
Check the following:-
In ProLINE Free, the ClickFunnels Integration card shows Connection status: Connected, and Workspace name is the workspace that contains the contact.
-
The add-friend link you opened ended with
?e=followed by the email address, as described in Step 5. -
You are looking at the contact with the same email address that was in the link.
-
LINE Login integration is turned on in ProLINE Free.
-
The person was not already a LINE friend. If they were, see Linking People Who Are Already LINE Friends.
-
ProLINE’s Own Documentation
Section titled “ProLINE’s Own Documentation”ProLINE publishes its own manuals for this integration. They are in Japanese.
-
How to Connect ProLINE with ClickFunnels: connecting ProLINE Free to your ClickFunnels workspace.
-
Email First: How to Link ClickFunnels and ProLINE Free Customer Information: the email-first flow and moving contacts to a scenario from a ClickFunnels workflow.