Element actions in ClickFunnels define what happens when users interact with buttons, text, or images, allowing you to guide them through tasks like navigation, form submission, or triggering popups. ClickFunnels provides a user-friendly interface to set up these actions, ensuring smooth interactions across your pages. In this article, you will learn how to configure actions for Button, Text, and Image elements to enhance interactivity.
Requirements
An active ClickFunnels account
A page created in your workspace
Configuring Button Actions
Adding a Button Element
Inside the page editor, add a Section where you want to place the element.
Add a Row within that section.
Click the orange + Plus or Add New Element button inside the row to insert a new element.
From the Form category, select the Button element.
.png "image(102).png")
Hover over the button element; its border will be highlighted in orange. Click on the Gear ⚙️ icon or click directly on the element to open its settings panel.
Scroll to the Button Action section to set the button action.
Available Button Actions
This setting lets you define what happens when a visitor clicks the button. The available actions include:.png "image(268).png")
Nothing Happens: Selecting the Nothing Happens option does nothing when clicking the button.
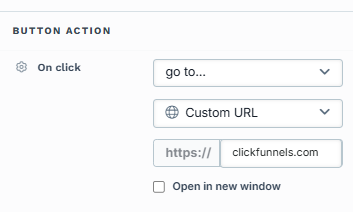
Go to: When you select the Go to action, two additional fields will appear, allowing you to choose between Custom URL and Custom Action Link for redirection.
Custom URL: This option lets you enter a specific URL (a “hard link”) to which the button will redirect upon clicking. This can be an external website or any URL you want to send the user to. You may also choose the option "Open in new window." This indicates that when the button is clicked, the link will open in a new tab in the browser.
Custom Action Link: Instead of linking directly to a hard-coded URL, you can use a relative path or a custom action command (e.g.,
#open-popupor/terms-and-condition). This flexibility allows you to create dynamic links within your page that trigger actions such as opening a pop-up or navigating to a page that matches the path name associated with the same domain. You may also choose the option "Open in new window." This indicates that when the button is clicked, the link will open in a new tab in the browser.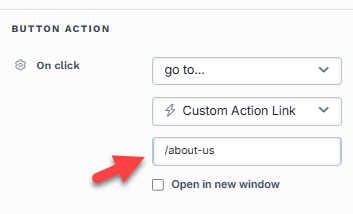
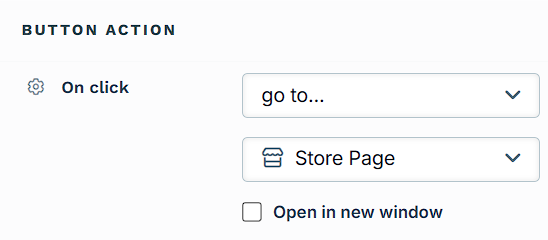
Store Page: This option links directly to your funnel’s connected storefront page. It’s useful for buttons that need to take users to product listings or shop-related content. You may enable Open in new window to launch the store page in a new tab.
Blog Home Page: This option redirects the user to the main blog page of your site. It’s ideal for promoting or linking back to your blog content. The Open in new window checkbox is also available for this option if you prefer the blog to open in a separate tab.

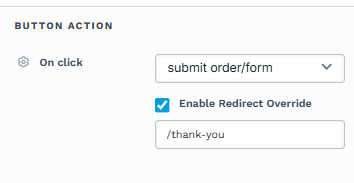
Submit Form: When you select Submit Order/Form as the button action, you can control the post-submission redirection with the Enable Redirect Override option:
Default Behavior: If the Enable Redirect Override box is left unchecked, the button action will follow the default behavior by advancing users to the next step in your ClickFunnels funnel. If the funnel does not have a next step, the form will be submitted, and the page will reload to the current URL.
Enable Redirect Override: By checking this box, you can input a custom URL or a relative path to a page URL in the field. When enabled, the button will redirect users to this specified URL after the form submission instead of progressing to the next step in the funnel.
Scroll to: Selecting Scroll to as the button action allows you to create smooth navigation by scrolling to a specific part of the page when the button is clicked. After selecting Scroll to, a dropdown menu will appear where you can choose the target element, such as a Section, Row, or specific Element. For easier identification, you can change the container's title (Section, Row, Flex, and Element) where you want users to scroll. This feature is useful for guiding users to relevant content on the same page, improving the user experience by reducing the need for manual scrolling.

Show/Hide: The Show/Hide action allows you to toggle the visibility of specific elements on the page when the button is clicked. After selecting Show/Hide, two dropdown menus appear:
Show...: Choose elements, sections, or rows that will be displayed when the button is clicked.
Hide...: Select elements, sections, or rows that will be hidden when clicking the button.
Learn more about showing and hiding content by clicking on a button in the article How to Show / Hide Contents on Button Click.
Open Pop-up: Opens the page pop-up window, which could contain additional information, forms, or calls to action.
Close Pop-up: Closes the active pop-up window.
Mark Complete: Marks the current lesson as complete in a course and automatically advances the user to the next lesson in the sequence.
Go Back to Previous Lesson: Selecting this action allows the user to return to the previously viewed lesson within a course flow. This action does not alter the completion status of the current lesson, making it useful for revisiting earlier content without resetting progress.
Restart Lesson: This action reloads the current lesson and resets all associated progress. It is particularly useful in course lessons where users may need to repeat the material from the beginning for better understanding.
To learn more about editing and customizing course pages, refer to Using the Page Editor to Design Your Course.Redirect to Next Step: When clicking the button, this action automatically takes the user to the next step in your funnel sequence. It’s a quick way to guide visitors through the funnel progression without manually specifying a URL.
Note:
The Redirect to Next Step action is not intended for form submissions. Selecting this action will not submit any form data; it only triggers a redirection to the next funnel step upon clicking. If you need to capture form information before moving users forward, select the Submit Form action instead, as it will properly submit the data and then direct users as specified.
Configuring Image Actions
Adding an Image Element
Inside the page editor, add a Section where you want to place the element.
Add a Row within that section.
Click the orange + Plus or Add New Element button inside the row to insert a new element.
From the Media category, select the Image element.
.png "image(71).png")
Hover over the image element; its border will be highlighted in orange. Click on the Gear ⚙️ icon or click directly on the element to open its settings panel.
Scroll to the Link Action or URL option to set the button action.
Available Image Actions
The Link action or URL field lets you specify what happens when a user clicks the image. You can choose from several predefined actions, insert a custom URL or relative path of a page URL. Here’s a breakdown of the available options: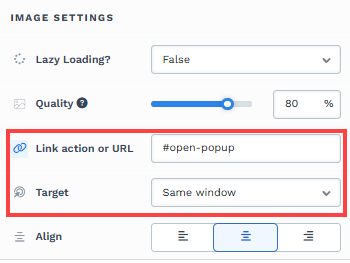
#open-popup: Clicking the image will trigger the page popup to open.
#submit-form: This option submits an opt-in form when clicking the image.
?next_funnel_step=true: Clicking the image will redirect users to the next page in your funnel.
#close-popup: This action will close an already opened popup, functioning as the opposite of the open popup action.
?page_action=mark_complete: If you're using the image in a course lesson editor, selecting this action will mark the lesson as completed when clicked.
You may optionally select the Target field as either Same Window or New Tab. Choosing the New Tab option will open the action or URL in a new tab within the browser.
Configuring Text Actions
Text actions in ClickFunnels refer to hyperlinking text to trigger specific user interactions, such as redirecting to a blog post, navigating to a section, or opening a popup. These actions can be applied to various text elements like Headline, Sub Headline, Paragraph, and Bullet List, giving you the flexibility to guide user engagement effectively within your page design.
Steps to Configure Text Actions
Select the text you want to hyperlink.
Click the Link Chain
🔗 icon in the text editor toolbar.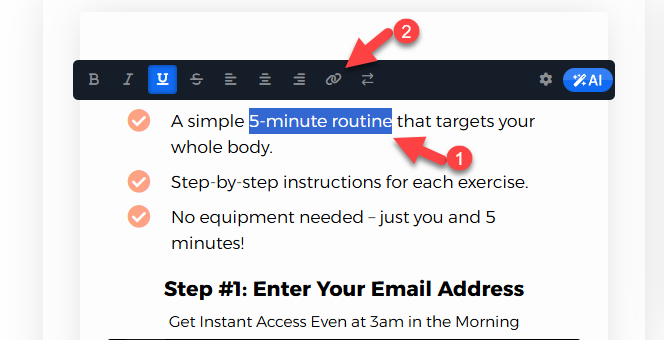
Paste the URL or action in the Link URL… field.

Click the Arrow icon to choose whether the link should open in the same or a new tab.
Use the Color Picker to change the hyperlink color and match it with your design.
If the selected text is linked, click the Unlink Chain icon to remove the hyperlink.
Click the Bell icon to unlink any click event listeners. This is useful if you have automation triggered by link clicks but want to exclude this specific link from triggering those actions. It is particularly handy for adding external references, buttons, or calls to action within your content.
Custom Actions:
#open-popup: Clicking the text will trigger the page popup to open.
#submit-form: This option submits an opt-in form when clicking the text.
?next_funnel_step=true: Clicking the text will redirect users to the next page in your funnel.
#close-popup: This action will close an already opened popup, functioning as the opposite of the open popup action.
?page_action=mark_complete: Adding this action will mark the lesson completed when the text is clicked.
#scroll-[ID]: Adding Link or Text action as
#scroll-[ID]will enable a seamless scroll to the specified content on the page. Please ensure to replace the [ID] with the actual ID of the container (section, row, flex, or element). For example, you may navigate to a section CSS code area to generate an ID (e.g., #id-6Z-8oepNL-481) and link a text to #scroll-id-6Z-8oepNL-481 to scroll that particular section. It is essential to assign the ID generated by the system for smooth scrolling to function correctly. If you type a custom ID into that container, the smooth scrolling feature will not operate as intended. Alternatively, you may utilize a button if you need a custom ID.
Note:
ClickFunnels also includes the Link element that can be used to add linked text in the editor, allowing users to create interactive and engaging content. This feature is particularly useful for enhancing user experience by providing easy navigation options within the page. Learn more about the Link element in the article Link: Add Anchor Links.
Adding Click-to-Call and Email Links
ClickFunnels allows you to add actions to text, buttons, or images that enable users to call a phone number or send an email directly by clicking the element. When a user clicks a phone number link, it automatically opens the dialer app on their device with the number pre-filled, ready for a call. Similarly, clicking an email link launches the default email client on the user’s device, pre-populated with the specified email address. These features provide a seamless way to enhance user engagement and ensure quick, hassle-free communication.
Phone Number Links: Use
tel:+1234567890to create a click-to-call action. Replace+1234567890with the desired phone number.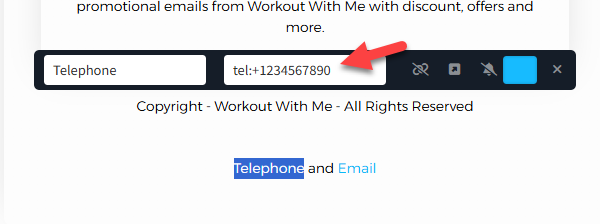
Email Links: Use
mailto:email@domain.comto create an email link. Replaceemail@domain.comwith the target email address.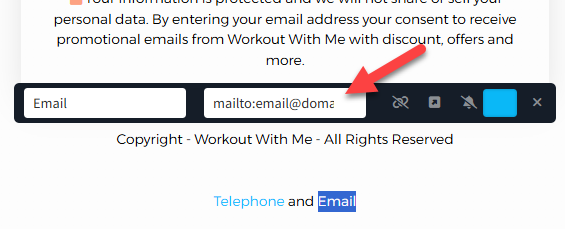
These links can be applied to any clickable element, such as text, buttons, or images, giving users easy access to call or email functionality.
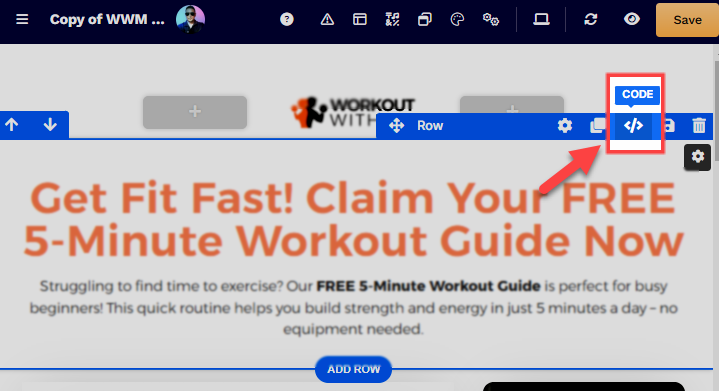
Changing Container Title
In the page editor, hover over a container (Section, Row, Flex, or Element).
Click the Code <> icon.
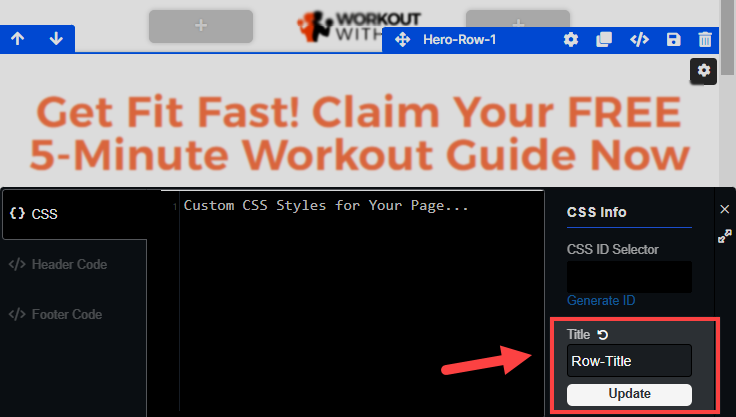
In the code editor, navigate to the CSS Info section
In the Title field, add the container's Title.
Tips:
A clear and concise naming convention (e.g., Section-hero, Row-slider, Element-checkout, etc.) will facilitate the identification of containers across various use cases, such as configuring button actions to scroll to specific sections or referencing an element in your custom CSS code.
Click Update to save changes.