
Adding Workflows to Funnel Steps
Published: Updated:
Automating your funnel steps can help you nurture leads, engage contacts, and streamline your follow-up process—without lifting a finger. ClickFunnels makes it easy to trigger Automation Workflows (formerly Follow-Up Funnels) directly from specific funnel steps, allowing you to deliver personalized emails, apply tags, send internal notifications, and more. In this article, you’ll learn how Funnel Automation works and how to connect Workflows to your funnel steps.
Requirements
Section titled “Requirements”-
An active ClickFunnels account
-
A Funnel created in your workspace
-
The Automations app added to your workspace
What is Funnel Automation
Section titled “What is Funnel Automation”Funnel automation allows you to automatically perform marketing actions—such as sending email sequences or tagging contacts—based on your users’ behavior in your funnel. It reduces manual tasks and ensures your leads receive timely communication throughout their journey.
Example:
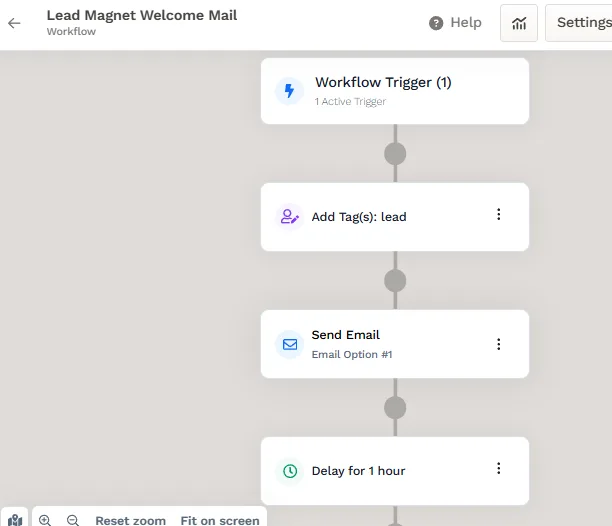
If someone opts in on your lead capture page, you can automatically trigger a workflow that sends a welcome email, applies a tag, and notifies your team—all without needing to do it manually.
ClickFunnels uses Workflows to power automation inside your funnels. In ClickFunnels Classic, workflows were previously known as Follow-Up Funnels. With workflows, you can create a sequence of actions that run when a contact reaches a funnel step.
Typical automation tasks include:
-
Sending a series of emails (email sequences)
-
Tagging contacts based on their actions
-
Delivering digital assets
-
Enrolling in a course
-
Sending contacts to 3rd-party apps (e.g., Mailchimp, AWeber, Active Campaign, HubSpot, etc.)
-
Sending internal notifications
Creating a Workflow
Section titled “Creating a Workflow”A workflow is a series of steps that automatically run when a contact enters the workflow. You can customize these steps using actions, delays, conditions, and more. You can create a new workflow right from your funnel, and it is attached to the funnel step as soon as it’s created.
-
From your workspace navigation, click the Funnels menu and open your funnel.
-
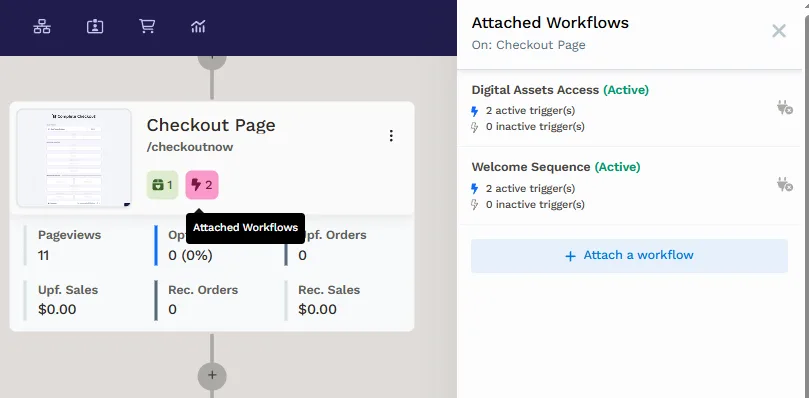
On the funnel step where you want the workflow to run, click the Lightning Bolt (⚡) icon. If the step already has workflows attached, click + Attach a workflow in the Attached Workflows panel.
-
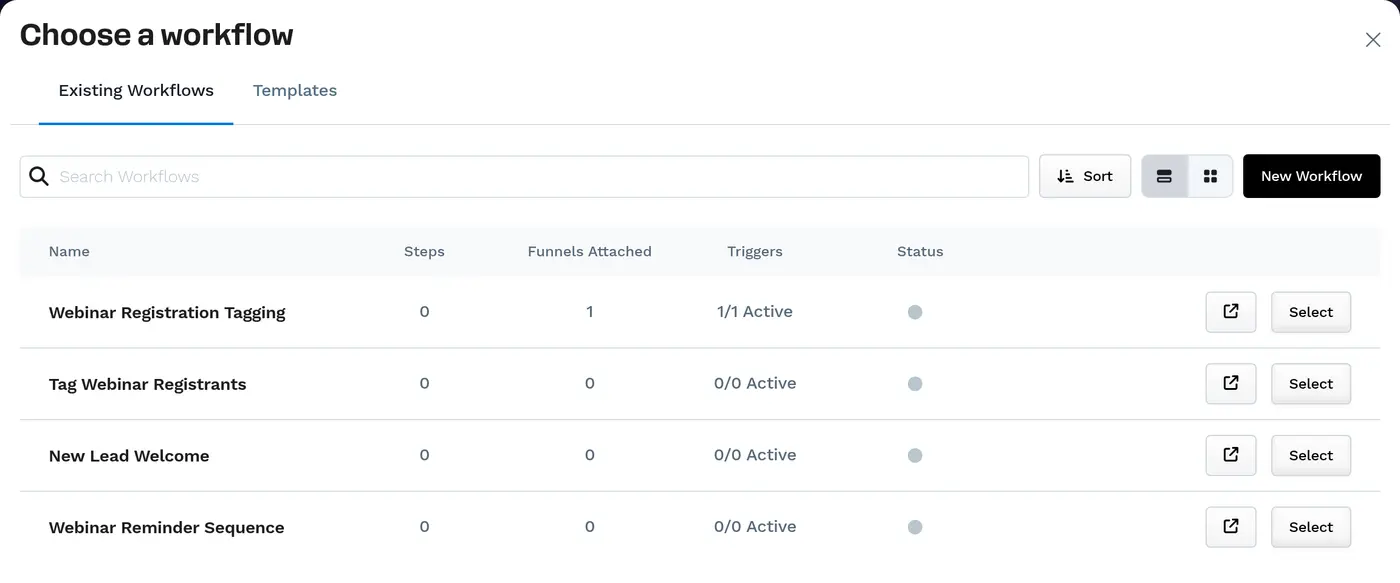
In the Choose a workflow dialog, click New Workflow. On the Templates tab, you can start from a ready-made template instead, or click Start from scratch to open the same form.
-
In the Create a new workflow dialog, enter a Name and choose the Event Types that should trigger the workflow (for example,
Opt-InorPageview).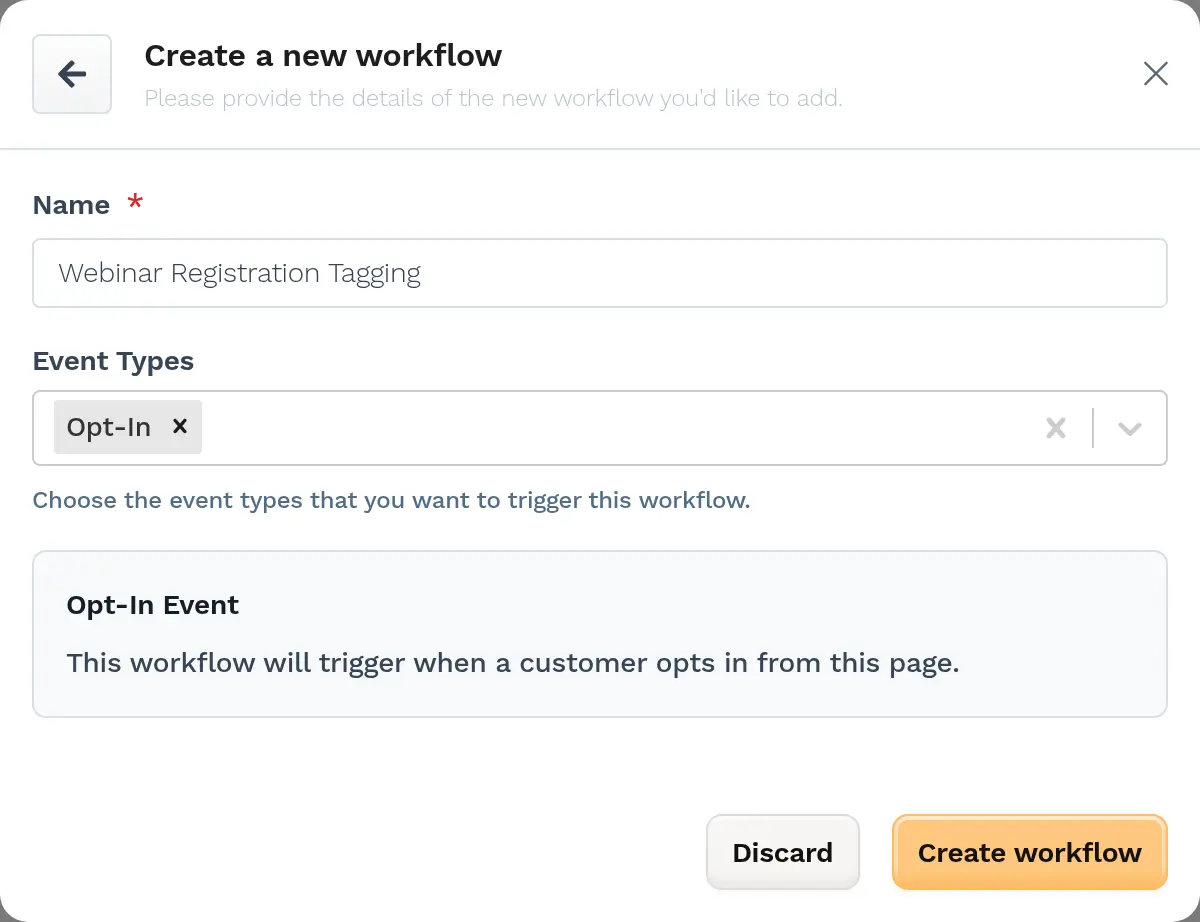
-
Click Create workflow. The workflow is created and attached to the funnel step with the events you selected.
-
To add actions, click the workflow in the Attached Workflows panel to open it in the workflow builder on the funnel’s Workflows tab. For the full steps to build out your workflow, refer to How to Create a Workflow.
Triggering a Workflow from Funnel Steps
Section titled “Triggering a Workflow from Funnel Steps”Once your workflow is ready, you can connect it to your funnel step to run automatically when a visitor reaches that funnel step.
-
From your workspace navigation, click the Funnels menu and access the funnel with which you wish to link the workflow.
-
Choose the specific Funnel Step (e.g., Opt-In page, Order page) where you want the workflow to be triggered.
-
Click the Lightning Bolt (⚡) icon to add a new or existing workflow. This will open the Choose a workflow dialog, where you can select the appropriate workflow from the list.
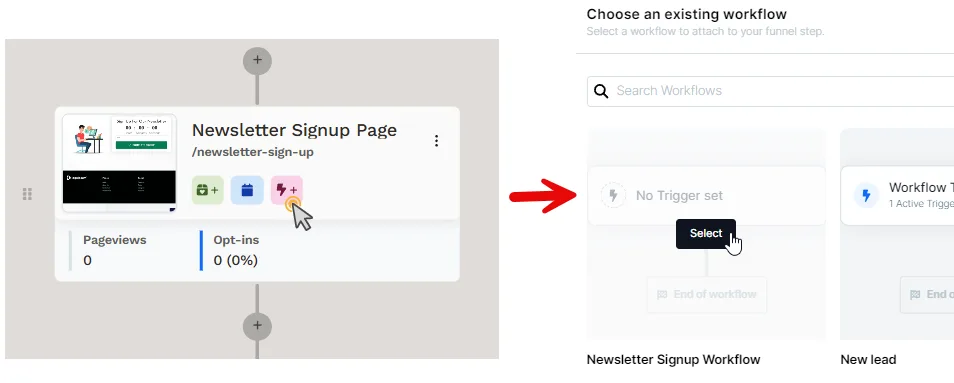
-
Alternatively, you may select the Workflows menu at the top and attach a workflow to a chosen funnel step by clicking the Attach Workflow button. The workflow editor will appear on the right side, allowing you to navigate between funnel pages using the left navigation.
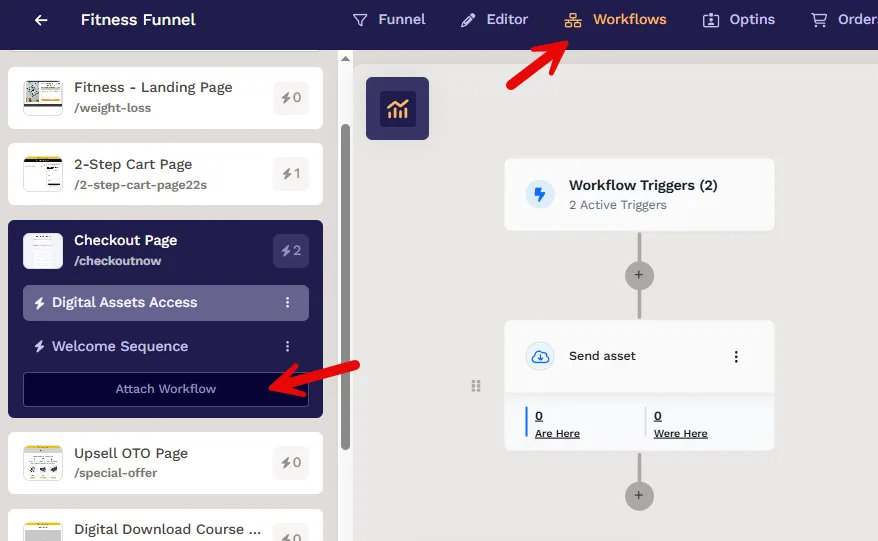
-
In the open prompt, select one or multiple Events triggering the workflow. For instance, if you wish to initiate the workflow when an individual submits an opt-in form or visits the funnel step, you may select
Opt-In&Pageviewas the trigger events.
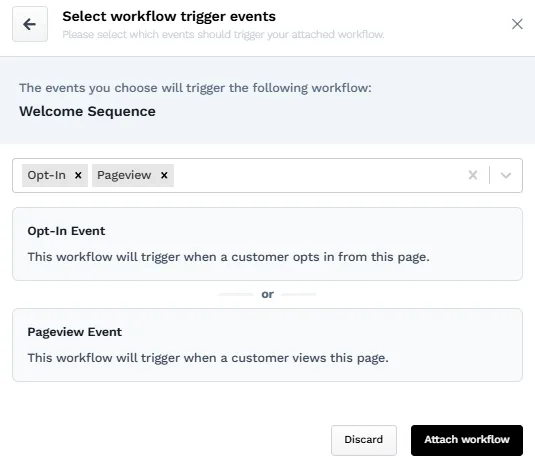
-
Click Attach workflow. The workflow is attached to the funnel step, and the trigger(s) will be automatically added to the workflow.
Triggering Multiple Workflows
Section titled “Triggering Multiple Workflows”ClickFunnels significantly simplifies the process of triggering multiple workflows from the same funnel steps for various events. For example, on an order page, you can initiate one workflow for submitting an opt-in form and another workflow for completing the purchase. To add multiple workflows, please follow the steps outlined below:
-
Navigate to the Funnel Step, where you want to attach multiple workflows.
-
Click the Automation (⚡) icon.
-
Click + Attach a workflow.
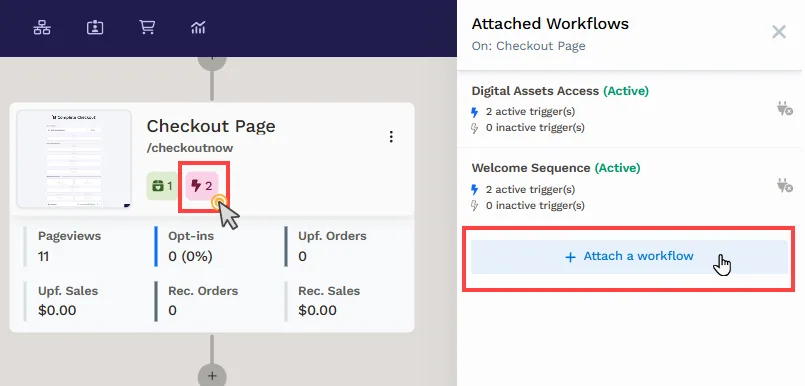
-
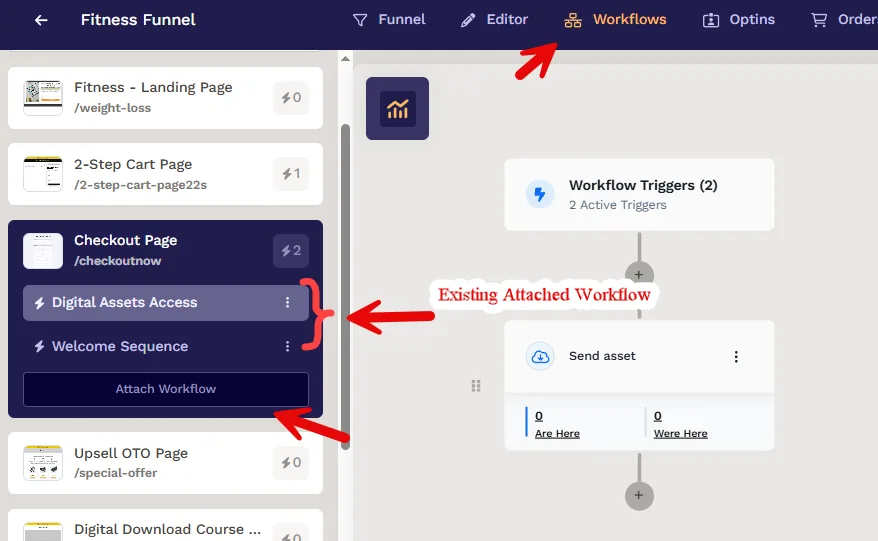
Alternatively, you may select the Workflows menu at the top and attach a workflow to a chosen funnel step by clicking the Attach Workflow button. You can also click on existing workflows to edit them in the workflow editor or add a new one.
-
This will open a dialog where you can select the appropriate workflow from the list.
-
In the open prompt, select one or multiple Events triggering the workflow.
-
Once selected, another workflow will be added to the funnel step.
Removing a Workflow from the Funnel Step
Section titled “Removing a Workflow from the Funnel Step”-
Navigate to the Funnel Step from which you want to remove a workflow.
-
Click the Automation (⚡) icon.
-
Select the workflow you want to disconnect.
-
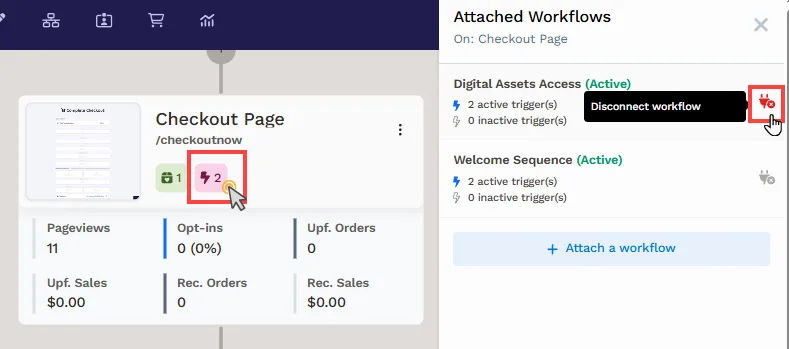
Click the adjacent Disconnect workflow (unplugged plug) icon to disconnect it from the funnel step.
-
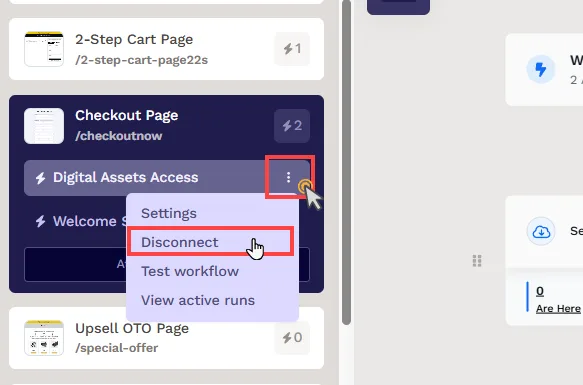
Alternatively, you may select the Workflows menu at the top and choose a workflow to remove. Afterwards, click the Three-Dot icon adjacent to a workflow and click Disconnect.
-
The selected workflow will be detached from the funnel step, and the trigger will be removed from it.