Building an online business can feel overwhelming, especially when you're unsure where to start. ClickFunnels simplifies the process by providing ready-to-use tools for creating funnels, capturing leads, selling products, and automating follow-ups. In this article, you'll get a clear path to start using ClickFunnels with confidence.
What is ClickFunnels
ClickFunnels is a web-based application that operates as a Software as a Service (SaaS) platform. It provides powerful tools to help businesses create high-converting sales funnels, websites, landing pages, and more. Designed to streamline online business operations, ClickFunnels integrates sales, marketing, and customer engagement tools into a single, easy-to-use platform.
Why Choose ClickFunnels
Comprehensive Solution: ClickFunnels eliminates the need for multiple software tools by offering a unified platform to create, manage, and optimize your sales and marketing efforts.
Ease of Use: With its drag-and-drop builder and pre-designed templates, you can quickly create professional funnels and websites without requiring technical expertise.
Automation Capabilities: From sending emails to managing complex workflows, ClickFunnels simplifies automation, allowing you to focus on growing your business.
Scalability: Whether you’re a small business or a large enterprise, ClickFunnels adapts to your needs, making it an excellent choice for businesses of all sizes.
Integrated Tools: ClickFunnels provides built-in tools for email marketing, course creation, appointment scheduling, and more, ensuring that you have everything needed to manage your online business in one place.
Start with a Free Trial
Explore everything ClickFunnels has to offer with a free 14-day trial. Sign up at www.clickfunnels.com to create your account and build your business online. No commitment is required, and you can cancel anytime.
Understanding ClickFunnels Team and Workspace
Your Team Workspace is where collaboration happens. Here’s what you need to know:
What is a Team
A Team is essentially the main ClickFunnels account. When someone signs up for ClickFunnels, a team is automatically created. The team becomes the main business account, or the "headquarters.”
Each ClickFunnels account has only one team.
A team can have multiple team members (like designers, marketers, or developers) invited to collaborate.
What is a Workspace
A Workspace is like a sub-account within the team/main account. It’s where the actual work happens, such as building funnels, setting up automations, or publishing pages.
Workspace = where ClickFunnels features live.
Depending on the ClickFunnels plan, a team can create multiple workspaces.
Navigating Your Workspaces
After logging into your ClickFunnels account, navigate to the bottom left corner of the dashboard. Click on the name or icon next to the current workspace name to view the team and all associated workspaces. From this menu, you can select a different workspace or click on 'Team Settings' to manage the team name and add or remove workspaces as needed.

Helpful Resources:
Adding Your Workspace Marketing Contact Address
Your marketing contact address, also called your business address, is a vital component of your ClickFunnels workspace. This address is used for compliance with email marketing regulations and ensures that your communications meet branding and legal standards. Including your business's physical address in marketing emails is crucial for legal compliance, building trust, and maintaining brand consistency. Laws like the CAN-SPAM Act require a valid postal address in emails to identify the sender and prevent fraudulent communications. Displaying your address enhances credibility, demonstrating that your business is legitimate and transparent. It also reinforces your brand identity by providing a consistent point of contact for customers.
How to Set Up Your Marketing Contact Address
Log in to your ClickFunnels account.
Navigate to Workspace Settings » Email Settings » General Settings.
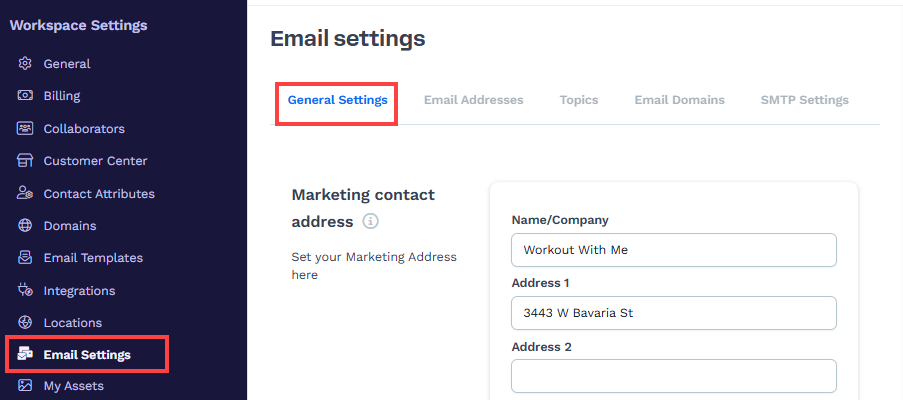
Enter your business address in the designated fields in the ‘Marketing contact address’ section.
Save your changes to ensure the address is applied to all marketing communications.
For a detailed walkthrough, refer to our article Email Settings - General Settings.
Creating Your First Funnel
A funnel is a series of steps designed to guide visitors toward a specific goal, such as making a purchase, signing up for a service, or downloading a resource. Creating your first funnel in ClickFunnels is designed to cater to various business needs while remaining simple and intuitive.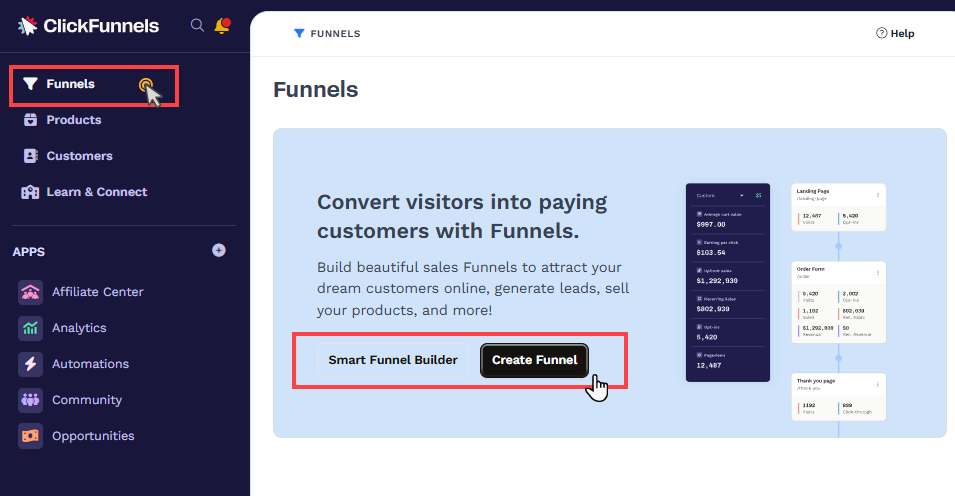
Creating Funnels from Templates
To begin, access the Funnels menu from the left-hand navigation panel. Click on the "Create Funnel" button to get started. You can select from various templates, such as lead funnels, summit funnels, book funnels, or cart funnels. Each template is tailored to a specific purpose, helping you get started quickly. Alternatively, you can build your funnel from scratch for complete customization, ensuring it aligns with your unique goals.
Smart Funnel Building with AI
ClickFunnels also offers the innovative Smart Funnel Builder, an AI-powered tool that simplifies funnel creation. With this tool, you can specify the funnel type, select branding colors and styles, choose image types, and add content preferences. The AI then generates a customized funnel based on your inputs, saving you time and effort while ensuring the design matches your business needs.
Helpful Resources:
Editing Pages in ClickFunnels
The ClickFunnels Page Editor is a powerful tool designed to help you build and customize pages with ease. This intuitive editor provides a drag-and-drop interface, allowing you to effortlessly add and rearrange elements like headlines, images, videos, and buttons. With real-time previews, you can see your changes instantly, ensuring your page looks exactly as you envision..png "image(576).png")
Beyond basic customization, the Page Editor offers advanced features to enhance your workflow and creativity. You can tweak styles, set animations, and even add custom HTML or CSS for complete control over the page design. The editor also includes pre-built elements and templates, enabling you to create professional pages in minutes without requiring any technical expertise.
With the Page Editor, you can quickly design landing pages, sales pages, and thank-you pages that perfectly align with your branding and business objectives. In ClickFunnels, you can create various types of pages, including site pages, course pages, landing pages, funnel pages, store pages, blogs, and more. To modify a page in the editor, navigate to the specific page you wish to personalize and select the “Edit Page” option, which will launch the page editor for your adjustments. Utilize the block elements and containers to structure and style your pages. After completing your edits, click the “Save” button to apply the changes.
Helpful Resources:
Adding Apps in ClickFunnels
Apps in ClickFunnels are designed to enhance your workspace's functionality by catering to specific business needs. Apps enable you to perform specialized tasks, from email marketing to managing an online store, ensuring that your workspace is equipped with everything required for success. Apps can be added based on your specific requirements. For example, if you plan to offer free and paid courses, you’ll need the Course App to manage your lessons and the Payments AI or Stripe app to handle transactions seamlessly.
To add an app, navigate to the left-hand sidebar and click the + Add Apps button under the Apps section. You’ll see a variety of apps tailored to different needs. Select the apps relevant to your business needs to optimize your workspace.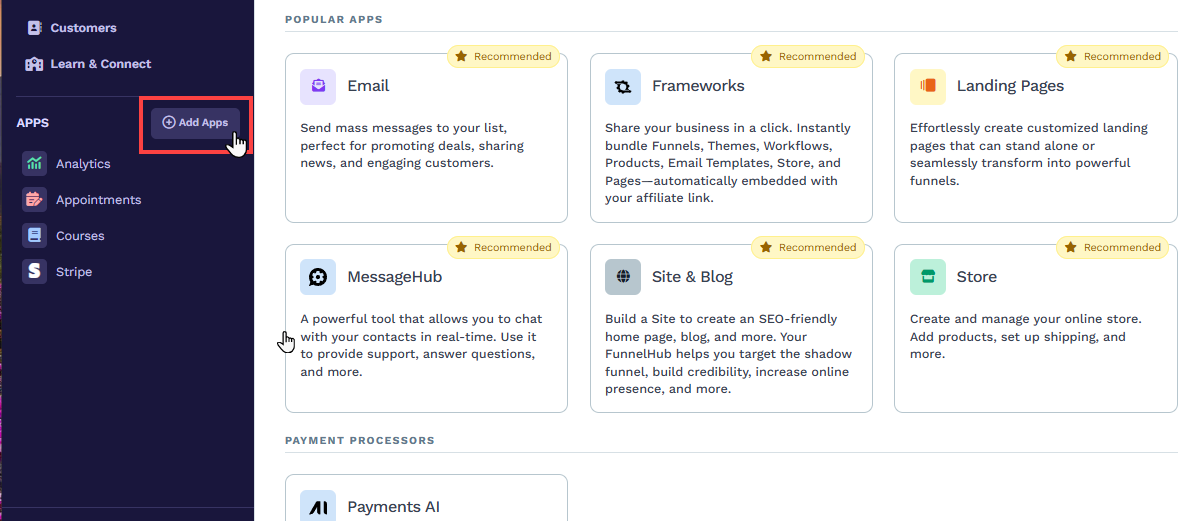
For further information, refer to our comprehensive guides on Adding Apps to Your ClickFunnels Workspace.
Setting Up Your Website in ClickFunnels
ClickFunnels allows you to build and host your website seamlessly within its platform, eliminating the need for external web hosting services. This feature enables you to manage your entire online business—including funnels, websites, blogs, and customer centers—all in one place.
Navigating the Site & Blog App
To get started, navigate to the Site & Blog app from the left-hand sidebar and click Overview to view the site settings. This section provides an overview of your website, including recent posts, site pages, and links to essential tools like blogs and customer centers. From here, you can manage every aspect of your site in one central location.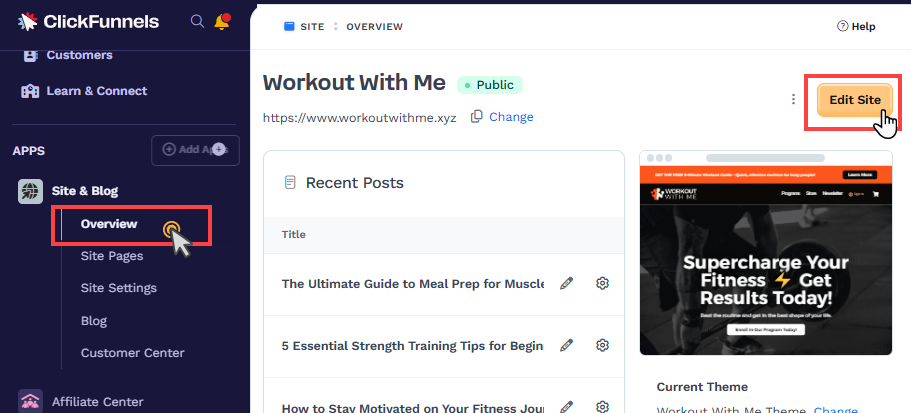
Customizing and Designing Your Website
Click the Edit Site button to open the page editor and fully customize your website. The Page Editor allows you to design your site easily using drag-and-drop functionality, pre-built templates, and advanced styling options. You can tailor every element of your website to match your brand, ensuring a cohesive and professional online presence.
Helpful Resources:
Connecting Your Domain
ClickFunnels simplifies the process of connecting your domain, offering two methods to suit your preferences and technical expertise: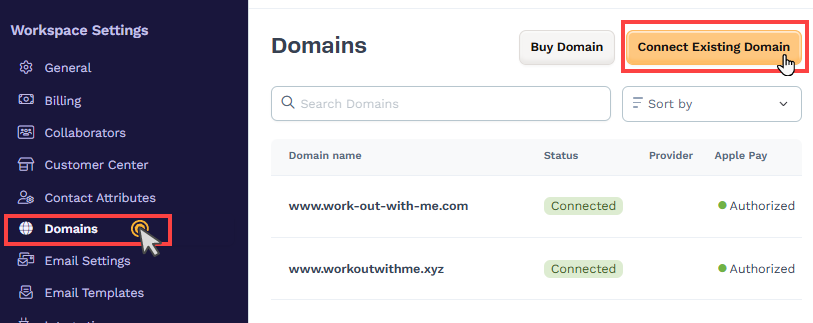
Automatic Method: Navigate to Workspace Settings > Domains, select "Connect existing domain," and type your domain name. Authorize the connection with your domain’s DNS provider. ClickFunnels will automatically handle all the required DNS records, ensuring your domain is set up correctly and providing free SSL.
Manual Method: If you prefer more control, you can manually add the necessary DNS records to your domain’s DNS provider. Once the records are added, verify your domain in ClickFunnels and enable SSL.
Default Subdomain
When you create a ClickFunnels account, a default subdomain (e.g., yourbusiness.myclickfunnels.com) is automatically provided. This subdomain is ideal for testing and exploring ClickFunnels features, but is not recommended for live business operations. Connecting a custom domain ensures your brand maintains a professional and credible online presence.
Helpful Resources:
Setting Up Automation
ClickFunnels provides the powerful Automations app that allows you to create Workflows and Quick Actions to streamline your business processes. These automation tools help you link various apps within your workspace to trigger specific events, saving you time and ensuring efficiency.
Workflows are comprehensive automation sequences that perform a series of actions based on specific triggers and conditions. For instance, if you have a sales funnel selling supplements, you can set up an abandoned cart sequence in a workflow. This workflow triggers when a customer adds a product to their cart but doesn't complete the purchase, initiating a series of reminder emails or follow-ups to encourage completion. This helps retain customers and boost sales.
Quick Actions, on the other hand, are immediate, single-step tasks executed in response to specific events. For example, when a customer completes a purchase, a quick action can instantly send a confirmation email or update the customer’s status in your CRM. These actions are perfect for straightforward processes requiring prompt responses.
Helpful Resources:
Sending Emails From ClickFunnels
ClickFunnels allows you to send marketing and automated emails without requiring any external email hosting or additional email servers. Using the powerful Email app and Automation Workflows feature, you can send emails directly from a custom email address associated with your domain.
Sending Emails with the Email App
The Email app is ideal for one-time email broadcasts to your audience. This app makes it simple whether you need to share updates, promotions, or announcements. You can send emails immediately or schedule them for a future date, ensuring your communication reaches your audience at the perfect time.
Sending Emails with Automation Workflows
Automation Workflows take your email strategy to the next level. You can add "Send Email" steps within a workflow to automate personalized communication. For instance, you can set up a workflow that sends a welcome email when a customer subscribes or a reminder email if they abandon their cart. This ensures timely and relevant interactions with your audience, boosting engagement and conversions.
For example, imagine you have a sales funnel for supplements. If a customer adds a product to their cart but doesn’t complete the purchase, a workflow can trigger a series of reminder emails to encourage them to finalize their order, helping you retain customers and drive sales.
Helpful Resources:
Creating Your First Course or Membership Site in ClickFunnels
The ClickFunnels Courses app enables you to create, manage, and deliver online courses effortlessly.
Adding the Courses App
To begin, ensure the Courses app is added to your workspace. This app serves as the foundation for building and organizing your course content. Once added, you’re ready to start creating your course.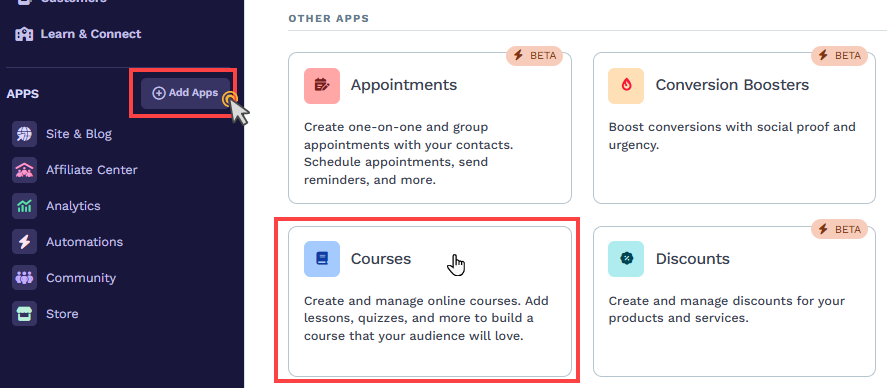
Selecting Course Type
ClickFunnels offers three primary course types to suit your needs. Start by selecting the Simple Course option, which automatically provides a ready-made layout. This includes modules and lessons optimized for mobile responsiveness and design—you won’t have to worry about layouts or technical configurations. For more flexibility, choose the Custom Course type. This allows you to customize the templates for modules and lessons, giving you full control over the course’s appearance and structure.
For instance, if you’re offering a fitness training program, you can create modules for different workout routines, include instructional videos, and provide downloadable meal plans for your students. The Course app ensures a professional and engaging learning experience while keeping the setup simple and efficient.
Helpful Resources:
Setting Up Payments
ClickFunnels makes it easy to start collecting payments online without needing custom code or complex integrations. To process payments, you can connect a supported payment gateway directly to your ClickFunnels workspace. Currently, ClickFunnels supports two popular options: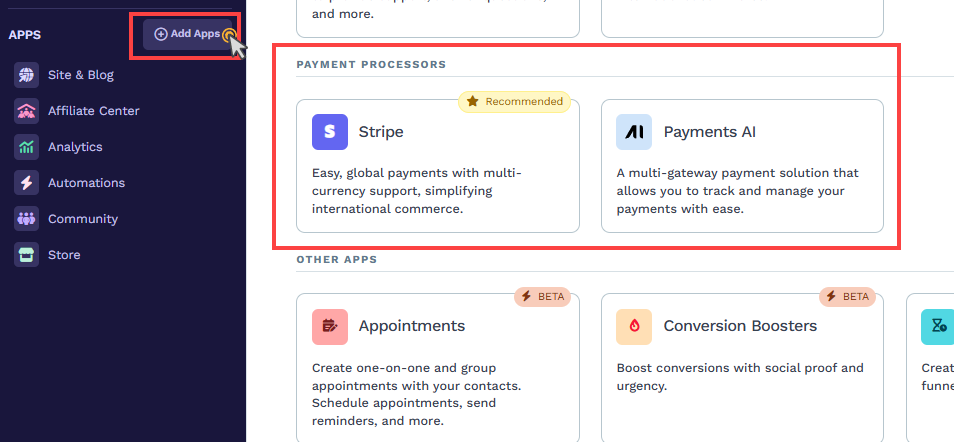
Stripe
Payments AI
Both external platforms can be connected using a simple app within your workspace. Once connected, ClickFunnels takes care of the checkout experience, so you can confidently sell your products or services. Through the Checkout element, customers can pay using:
Credit or debit cards
Apple Pay
PayPal (via Payments AI)
Link (via Stripe)
Creating and Selling Products
After setting up a payment gateway, you can create products and attach them to your funnels or store. Whether you’re selling digital products, physical goods, or subscriptions, the integration ensures that your payment process is smooth and reliable. For example, you can connect a product to a checkout page in your sales funnel, allowing customers to complete their purchases effortlessly.
Helpful Resources:
Creating Products
Products in ClickFunnels signify the main offerings you deliver to your customers. Whether you are marketing digital goods, physical items, or subscriptions, the method of setting up and managing products in ClickFunnels is straightforward and designed to enhance your sales process. Creating products globally allows you to manage your inventory, pricing, and details all from one central hub. This enables you to use the same product across different funnels and the store, ensuring consistency and saving time when making updates. For example, if you adjust the price of a product globally, it will immediately update across all linked funnels and the store.
Creating a New Product
To create a product, navigate to your workspace and access the Products menu. Click Create Product to create a product from scratch or Add from Zendrop to import a product from a Zendrop account.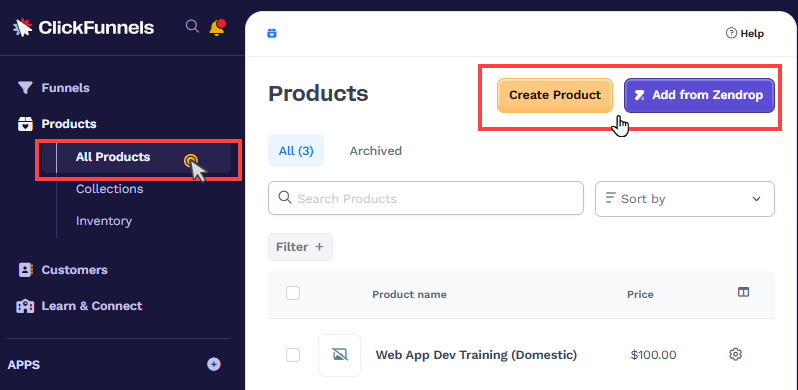
Attaching Products to Stores and Funnels
Once your product is created, you can attach it to your funnel pages or make it visible for the workspace store app. For a store, simply turn on the sales channel visibility in the product settings. For funnels, link the product to a checkout step to enable customers to purchase it directly. This seamless integration ensures your products are visible and accessible wherever your audience interacts with your business.
Helpful Resources:
Upgrading to a ClickFunnels Plan
ClickFunnels offers a 14-day free trial that allows you to explore all its features without limitations. During this period, you can test out funnels, automation, email marketing, and more to see how ClickFunnels can support your business.
To continue using ClickFunnels after the trial, you must upgrade to a plan. Upgrading ensures you can maintain access to your projects, keep your workflows active, and continue building and scaling your online business. It’s not about unlocking new features but about ensuring continuity and growth for your business.
For detailed information on plans and pricing, visit the ClickFunnels Pricing Page.
ClickFunnels FAQs
Can I use ClickFunnels for free?
ClickFunnels offers a 14-day free trial that allows you to explore all its features. You can cancel anytime within the trial period without being charged.
Do I need a hosting service?
No. ClickFunnels provides hosting for all your funnels, websites, and resources at no additional cost.
Can I create a website in ClickFunnels?
Yes. You can create a fully functional website using the Site & Blog app in ClickFunnels.
What is the price for ClickFunnels?
For detailed pricing information, visit our pricing page.
Can I invite others to manage my workspace?
Yes. ClickFunnels allows you to invite team members to your ClickFunnels account. The Team and Workspace feature helps you manage user access and collaboration. Learn more about inviting someone to become a subuser in the How to Add Team Members or Subusers for Collaboration article.
Can I create blogs in ClickFunnels?
Yes. You can create and manage blog posts in the Site & Blogs app. Learn more in the article How to Create and Manage Blog Posts.
How many domains can I connect?
There is no limit to the number of domains you can connect to your ClickFunnels workspace.
How many funnels can I create?
There is no limit to the number of funnels you can create in ClickFunnels.
Can I integrate third-party applications with ClickFunnels?
Yes. ClickFunnels provides robust integration capabilities, allowing you to connect with popular applications such as ActiveCampaign, HubSpot, AWeber, and many others. Beyond native integrations, ClickFunnels offers a custom Webhook feature for real-time data transmission and an API enabling advanced users to send and receive data securely between ClickFunnels and external platforms. These options ensure flexibility and scalability for your business workflows.
I want my customers to book an appointment with me. Is that possible in ClickFunnels?
Yes. With the Appointments app, you can create events and embed them in your pages to manage bookings seamlessly. Learn more in the article Appointments - Getting Started with ClickFunnels Appointments.
Can I send emails from ClickFunnels?
Yes. Use the Email app for one-time broadcasts or Automation Workflows to send personalized, triggered emails.
How many emails can I send?
You can send unlimited emails once your domain is verified with email DNS records. However, temporary email addresses provided by ClickFunnels (e.g., @clickfunnelsmail.com) are limited to 100 emails and are only for testing purposes.
Can I create a survey for my audience?
Yes. Use the Survey Workflows app to create simple or complex surveys with automated workflows. Learn more in the article Getting Started with Survey Workflows.
Can I create a membership site or a course?
Yes. You can use the Course app to build free or paid courses. Learn more in the article Getting Started with Courses.
Can I accept payments using PayPal?
Yes. You can integrate your PayPal Business account into Payments AI, making it easy to accept PayPal payments. Learn more about accepting PayPal as the payment method in the Enable PayPal in ClickFunnels Checkout article.
I want to allow others to promote my products and offer them commissions based on sales. Can I create an affiliate program with ClickFunnels?
Yes. Use the Affiliate Center app to set up and manage an affiliate program for your products, including setting commissions and tracking sales. Learn more about the Affiliate Center app in the Affiliate Center - Create Your Affiliate Program in the ClickFunnels article.
Can I promote ClickFunnels?
Yes. Learn more about promoting ClickFunnels in the CF Affiliate - Overview article.
How do I contact support?
Use the Help widget in your workspace. You can ask questions directly in the widget or use the "Contact Support" option for further assistance. Learn how to contact support in the Contacting ClickFunnels Customer Support article.