Stripe can be seamlessly integrated with ClickFunnels, enabling you to connect your Stripe account directly to your workspace. This integration allows you to process payments for your products and services efficiently. In this article, you will learn how to integrate your Stripe account with ClickFunnels and enable it as a payment gateway.
Requirements
An active ClickFunnels account
A Stripe account
Connecting Your Stripe Account to ClickFunnels
Step 1 - Add the Stripe App to Your Workspace
Log in to your ClickFunnels account and navigate to the Apps section from the left-hand menu.
Click on + Add Apps to navigate to the Apps page.
Locate the Stripe app in the list of available integrations.
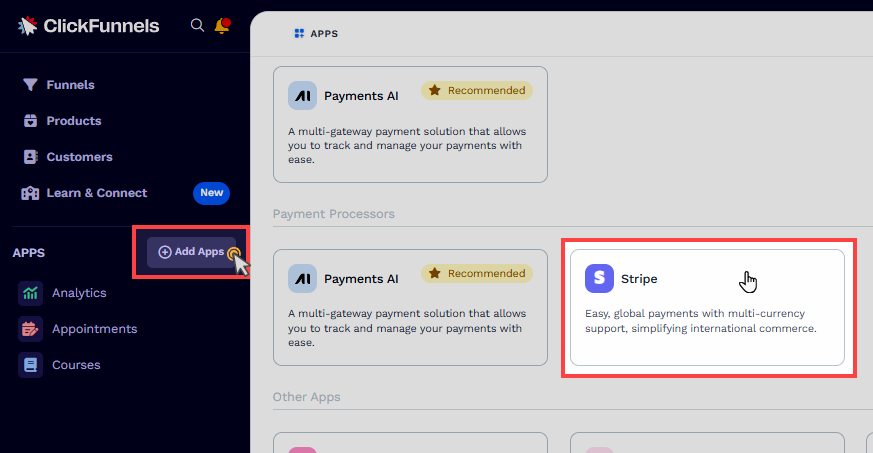
Click Add App to proceed to the installation page.
Step 2 - Connect Your Stripe Account
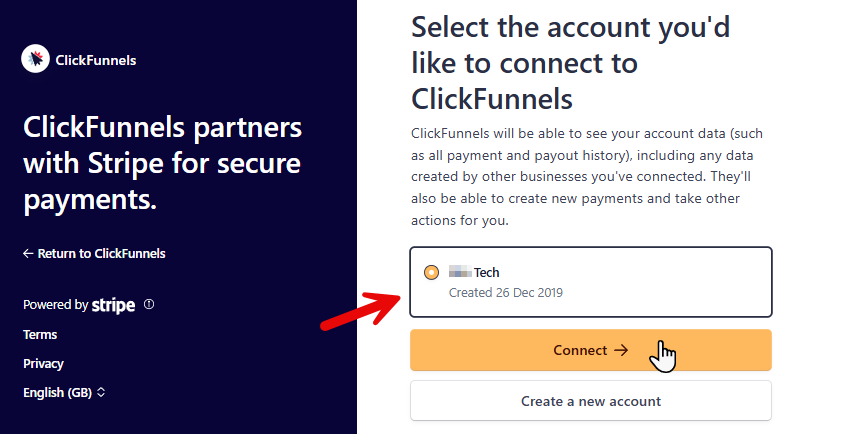
After clicking Add App, you will be redirected to the Stripe installation page.
Enter your Stripe account Username and Password to log in to the account. If you are already signed into your preferred Stripe account in the browser, ClickFunnels will automatically recognize the session, so you won’t need to log in again.
Choose one of the following options:
Select an Existing Business Account:
If you have more than one Stripe business, you can select an existing business from the list provided. Once you have selected, click the Connect button to proceed with the installation. As soon as you do this, your Stripe business account will be seamlessly linked to your ClickFunnels account, allowing for a smooth integration between the two platforms.
Note:
Your Stripe business must be verified in the Stripe account prior to integration.
If Stripe tax was not previously enabled in the existing business, you need to activate it in your Stripe account to collect sales tax during the checkout.
Create a New Business in the Stripe Account:
If you choose not to link an existing Stripe business with your ClickFunnels workspace, you may select “Create a New Account” to establish a new business within your Stripe account. Creating a new account indicates that you are setting up a new business in your existing Stripe account.
Business Type:
Choose the business location (country) where you intend to operate, as well as the type of business entity (sole proprietorship, limited company, or any other relevant classification) you wish to establish on the Business Type page. It is essential to carefully consider both the geographical location and the legal structure of your business, as these factors can significantly impact tax obligations and overall success.
Personal Details:
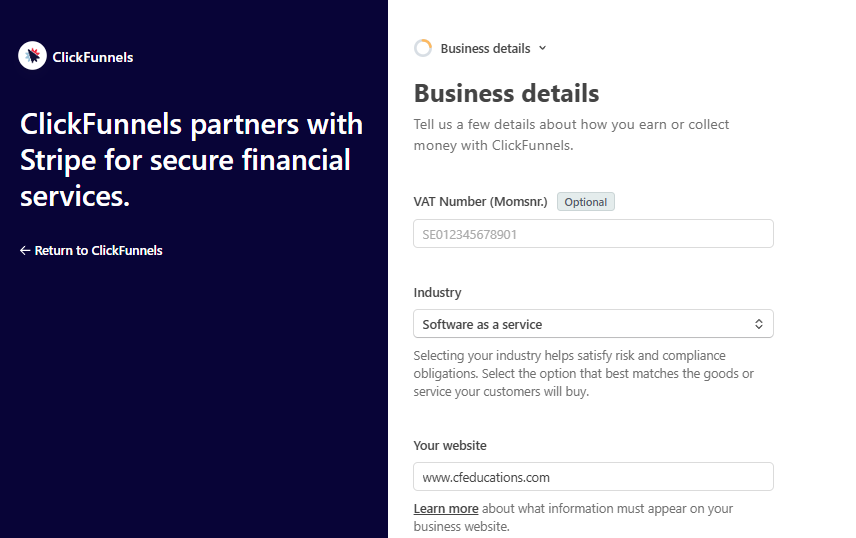
On the Personal Details page, provide your personal information, including your name, email address, residential address, date of birth, and phone number.Business Details:
On the Business Details page, you may input pertinent information regarding your business, including the VAT number (optional), industry type (e.g., consulting, retail, software, training, etc.), website URL, and product description. It is essential to provide this information accurately, so please ensure careful entry.
Provide Bank Details:
On the Bank Details page, provide your banking information, including your account number, IBAN, and other relevant details. The bank details page will display the supported currencies and banks based on the country selected on the Business Type page.
Add Public Descriptor Details:
Provide the information regarding your business that will be publicly displayed, such as on order receipts.
Opt-in for Stripe Tax (Optional):
You may opt in for the Stripe tax to facilitate the sales tax collection during the ClickFunnels checkout process. Select the appropriate options (e.g., digital goods, services, or physical goods) and click Opt-in to Stripe Tax, if applicable. If you are uncertain about tax collection, you have the option to configure Stripe tax at a later time within your Stripe account.
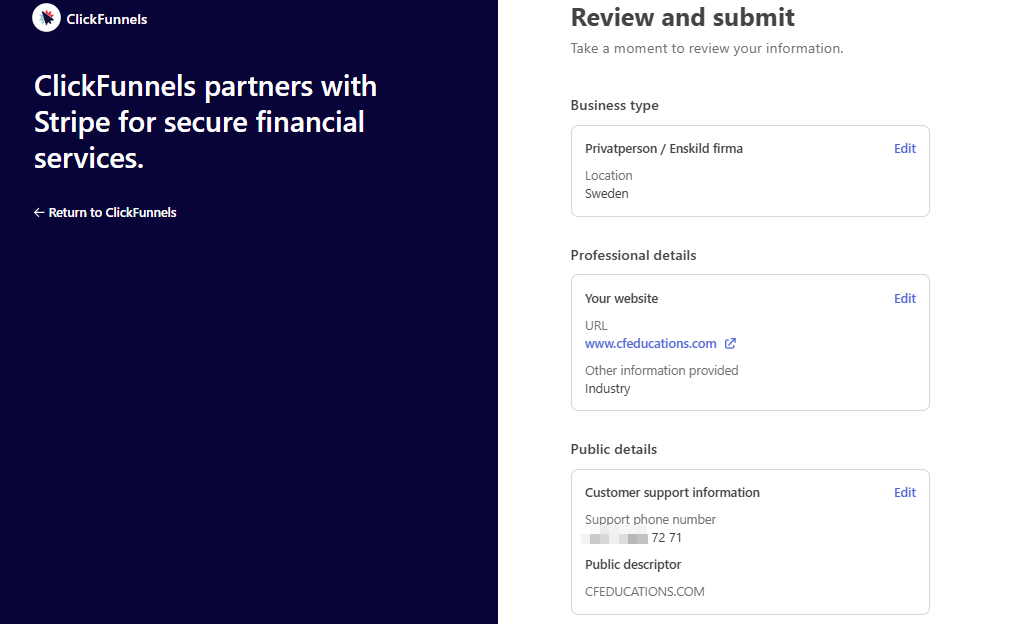
Review and Submit:
Review all the information you have submitted regarding your business on this page, and click Agree and Submit to establish a new business within your Stripe account.
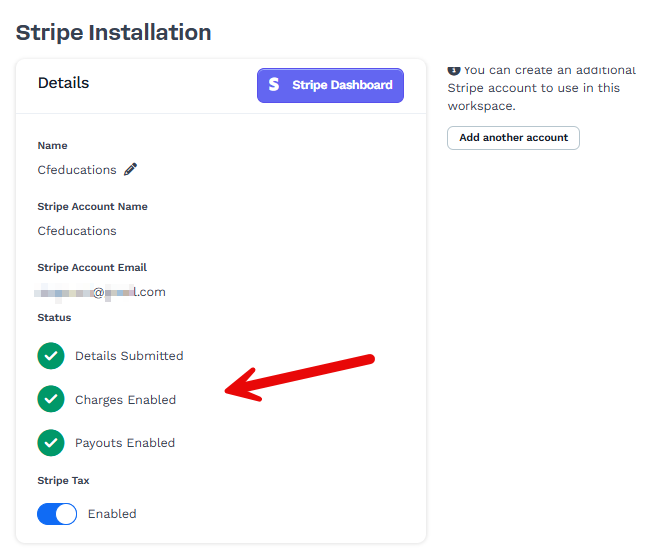
Upon completing any of the options in step 3, the system will redirect to the Stripe installation page within ClickFunnels. Verify the integration status. A successful integration is indicated by the Green Markers confirming the setup is complete.
Preparing Your ClickFunnels Workspace to Accept Payments
To start accepting payments in your ClickFunnels workspace, ensure the following settings are configured in the workspace settings: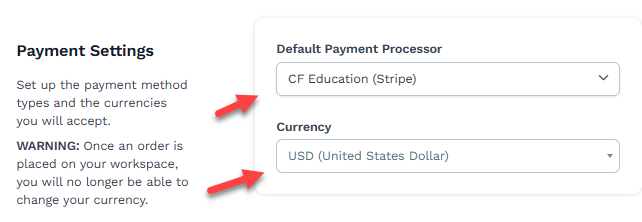
Set the Default Payment Processor and Currency
Navigate to Workspace Settings from the left-hand menu and select the General tab.
In the Payment Settings section, locate the Default Payment Processor dropdown.
Select your Stripe account from the list to set it as the default processor for handling transactions.
Set the workspace currency under the Currency dropdown.
Note:
The "Default Payment Processor" selector will be displayed only if your workspace has multiple payment processor accounts connected, such as two Stripe accounts or a combination of one Stripe account and the Payments AI account.
Creating a Product
Before you can accept payments, you need to create the products that customers will be purchasing:
Navigate to the Products menu and select All Products.
Click Create Product to create a new product, or choose Add from Zendrop to import a product from your Zendrop account.
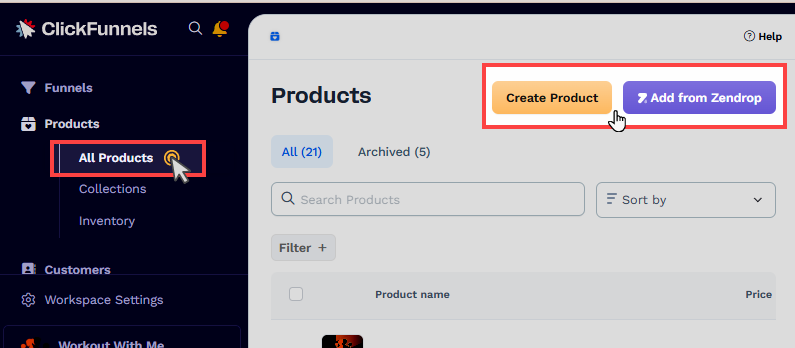
Complete the necessary fields, such as product name, pricing, variations, etc, and save the product.
Configuring products accurately is crucial for a seamless checkout process. For more detailed guidance, refer to our existing article on Products - How to Create and Manage Products for more comprehensive guidance.
Accepting Payments in the Store
Once your product is created, you can make it available in your ClickFunnels store:
Enable ‘Sales Channel Visibility’: In the product settings, enable the Online Store option to make the product available in your store.

In the Store app, access the store editor by clicking the Customize Store option.
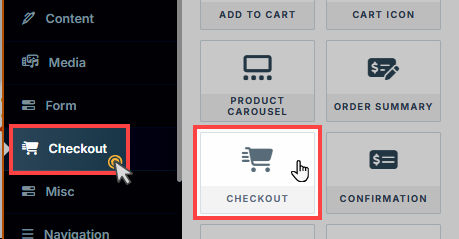
In the left-side navigation, expand the Store Front menu and select the Product page. When customers click on a product in the storefront, they will be redirected to the product page.
Ensure the product page contains a Checkout Element to enable payment collection.
Once these steps are complete, customers can visit the store and purchase your product using the connected Stripe account.
Note:
The Store app in ClickFunnels uses the default payment processor configured within the workspace settings.
Accepting Payments in a Funnel
Payments can also be collected through funnels:
Access to a Funnel:
Navigate to the Funnels menu in the ClickFunnels dashboard.
Create a new funnel or access an existing one.
Select a Payment Processor:
In the Funnel Settings, select Stripe as a payment processor. If Stripe is already designated as the default processor in the workspace settings, you do not need to select it again here manually.
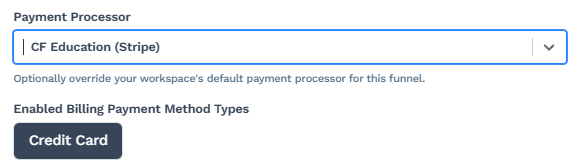
Note:
The "Payment Processor" selector will be displayed only if your workspace has multiple payment processor accounts connected, such as two Stripe accounts or a combination of one Stripe account and the Payments AI account.
Add a Page to the Funnel:
You can use a pre-built Order Page Template with a Checkout element.
Alternatively, you can add a Checkout element manually using the page editor. Do not use the Legacy Checkout element.
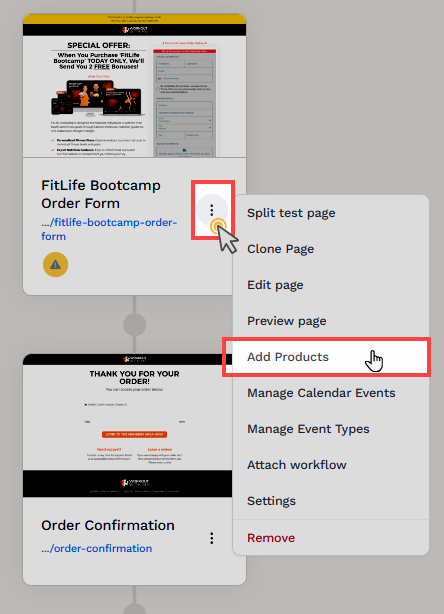
Attach a Product to the Funnel Page:
Click the three-dot icon on the funnel page, select Add Products, and link an existing product from your workspace.
Set Funnel to Live Mode:
In the funnel settings, switch Test Mode to “No” to make the funnel live.
Once these steps are complete, you can share your funnel, and users can make purchases.
Direct Payments for One-Time Orders
By default, ClickFunnels creates a Stripe invoice for every order. For one-time purchases (not subscriptions or payment plans), you can enable Direct Payments, which skips the invoice creation step and processes the payment directly through Stripe. This can result in significantly faster checkout times and avoids Stripe’s 0.4% invoicing fee on one-time transactions.
Note: Subscriptions and payment plans always use Stripe invoices, regardless of this setting.
Default Behavior:
Existing Stripe Installations: The “Issue Invoices for One-Time Orders?” toggle is Enabled by default, meaning your workspace will continue using Stripe Invoices for one-time orders as before. There are no behavior changes until you manually disable the toggle.
New Stripe Installations: The toggle is Disabled by default, meaning Direct Payments are active out of the box for one-time orders. If you prefer invoice-based checkout, you can enable the toggle after connecting.
How To Enable Direct Payments:
Navigate to the left-hand menu and select your Stripe installation.
Click on the Stripe account you want to configure.
Locate the “Issue Invoices for One-Time Orders?” toggle.
Set it to Disabled (Toggled Off) to turn On Direct Payments.
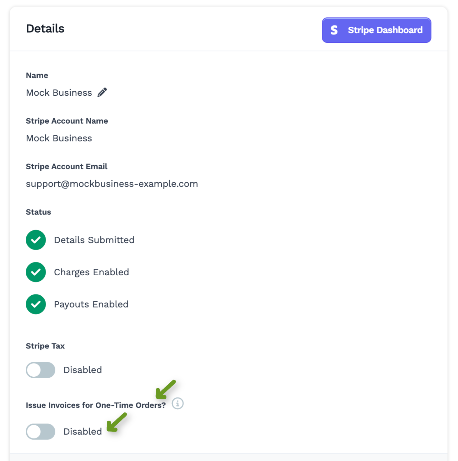
When disabled, one-time orders will be processed using Stripe PaymentIntents directly instead of going through Stripe’s invoicing system.
Tip: You can toggle this setting On or Off at any time per Stripe installation
What Changes for Customers:
Checkout is faster, with fewer steps happening behind the scenes.
All payment methods (credit cards, Apple Pay, etc.) continue to work the same way.
Discounts and taxes are still calculated and applied correctly.
What Changes for You:
One-time orders will no longer have a corresponding Stripe Invoice in your Stripe Dashboard. Instead, you will see a PaymentIntent/Charge directly.
Subscriptions and payment plans are not affected and will continue to generate Stripe Invoices as before.
Dynamic Payment Methods (DPMs)
Dynamic Payment Methods (DPMs) give your customers more flexibility and convenience at checkout. With Stripe connected, ClickFunnels can display a range of digital wallets and buy now, pay later (BNPL) options alongside traditional card payments. These options adapt to the customer’s device, region, and account eligibility, helping increase conversion rates.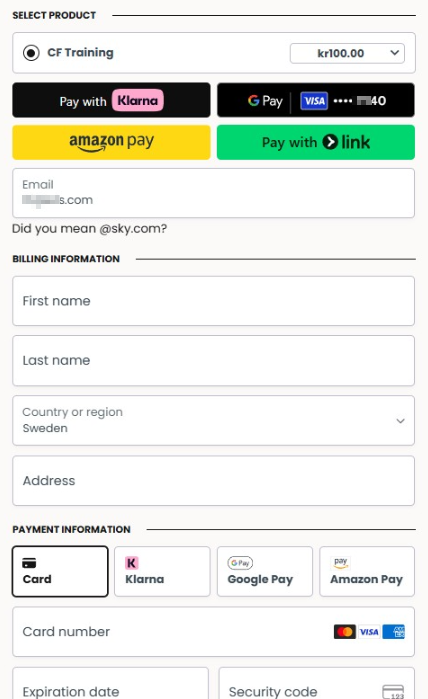
Default Payment Methods:
The following methods are automatically active when Stripe is integrated into your ClickFunnels workspace. You don’t need to configure these options further in Stripe. They’re ready to use as soon as Stripe is connected.
Credit Card:
Credit card payments are enabled by default and require no additional setup. Customers can pay using most major credit or debit cards, including MasterCard, Visa, AMEX, etc.
Apple Pay:
Apple Pay is automatically offered as a payment option for customers using Apple devices during checkout. No manual setup is required within your funnel or Checkout element. However, to ensure Apple Pay functions correctly, the domain used for your checkout page must be linked to your Stripe account. For further information on Apple Pay, please refer to the article "Enable Apple Pay in ClickFunnels Checkout."
Link Payment:
Link is Stripe’s fast checkout option. It allows users to pay securely using saved payment information. This method is also enabled by default when Stripe is active, so no additional configuration is required.
If a customer has a Link account, they can pay by clicking the Pay with Link button. You can customize the visibility of this button within the Checkout element settings.
To manage the “Pay with Link” button:
Open the Checkout page in the ClickFunnels editor.
Add the Checkout element to the page.
Click the Gear
⚙️ icon on the Checkout element to access its settings.Select the Payment Method option.
Use the toggle to control the visibility of the “Pay with Link” button:
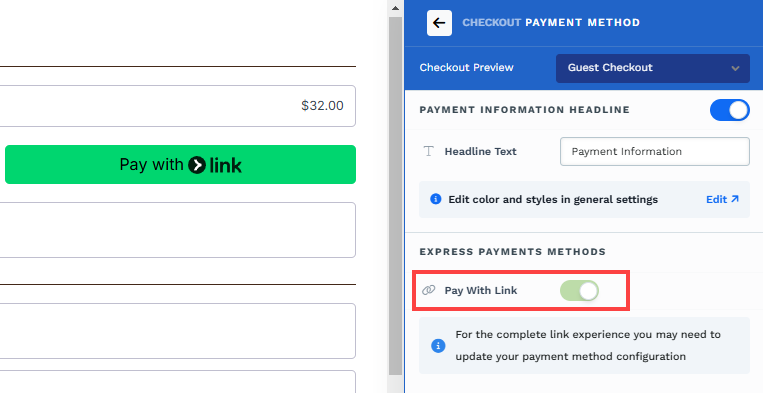
Toggle On: The “Pay with Link” button is visible immediately when the Checkout element loads.
Toggle Off: The “Pay with Link” button will only appear after the user enters their email address and the email is associated with a Link account. Stripe will send a verification code to their email or phone. Upon successful verification, they can complete the purchase with their Link account.
Tips:
Ensure ‘Pay with Link’ option is enabled if you want the button to appear by default and offer Link as a payment method.
Click Save to save changes in the editor.
Additional Payment Methods:
Other DPMs need to be turned on manually in your Stripe Dashboard. Once enabled, they will appear automatically in your ClickFunnels Checkout when available to the customer.
Supported methods include:
Amazon Pay – Customers can use their Amazon account for a trusted, streamlined checkout.
Cash App Pay – Lets customers pay directly from their Cash App balance.
Google Pay – Quick checkout for Android and Chrome users with saved payment methods.
Klarna – Offers installment plans or deferred payments, popular in Europe and beyond.
Afterpay / Clearpay – Lets customers split purchases into four interest-free payments.
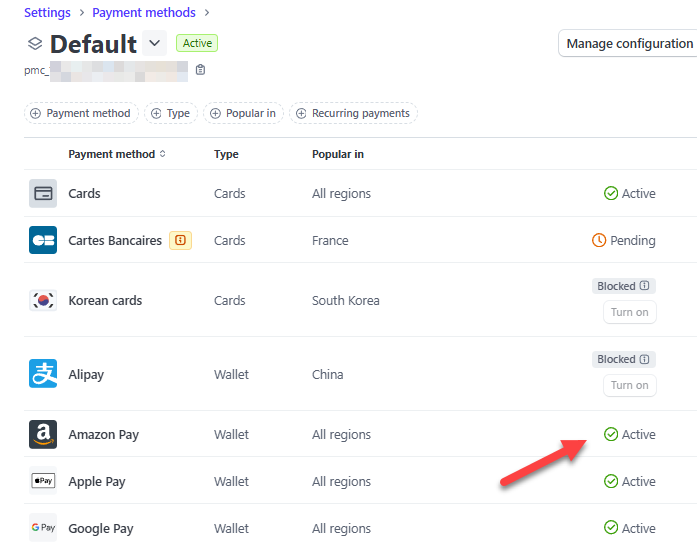
How to Activate Stripe Payment Methods
To activate these additional methods:
Log in to your Stripe Dashboard.
From the left-hand navigation, go to Settings » Payments » Payment Methods.
From the list of available payment methods, click on the configuration with the title “ClickFunnels Configuration”.
Important:
Be sure to select the type: “ClickFunnels account”, with payment configuration of “Default”
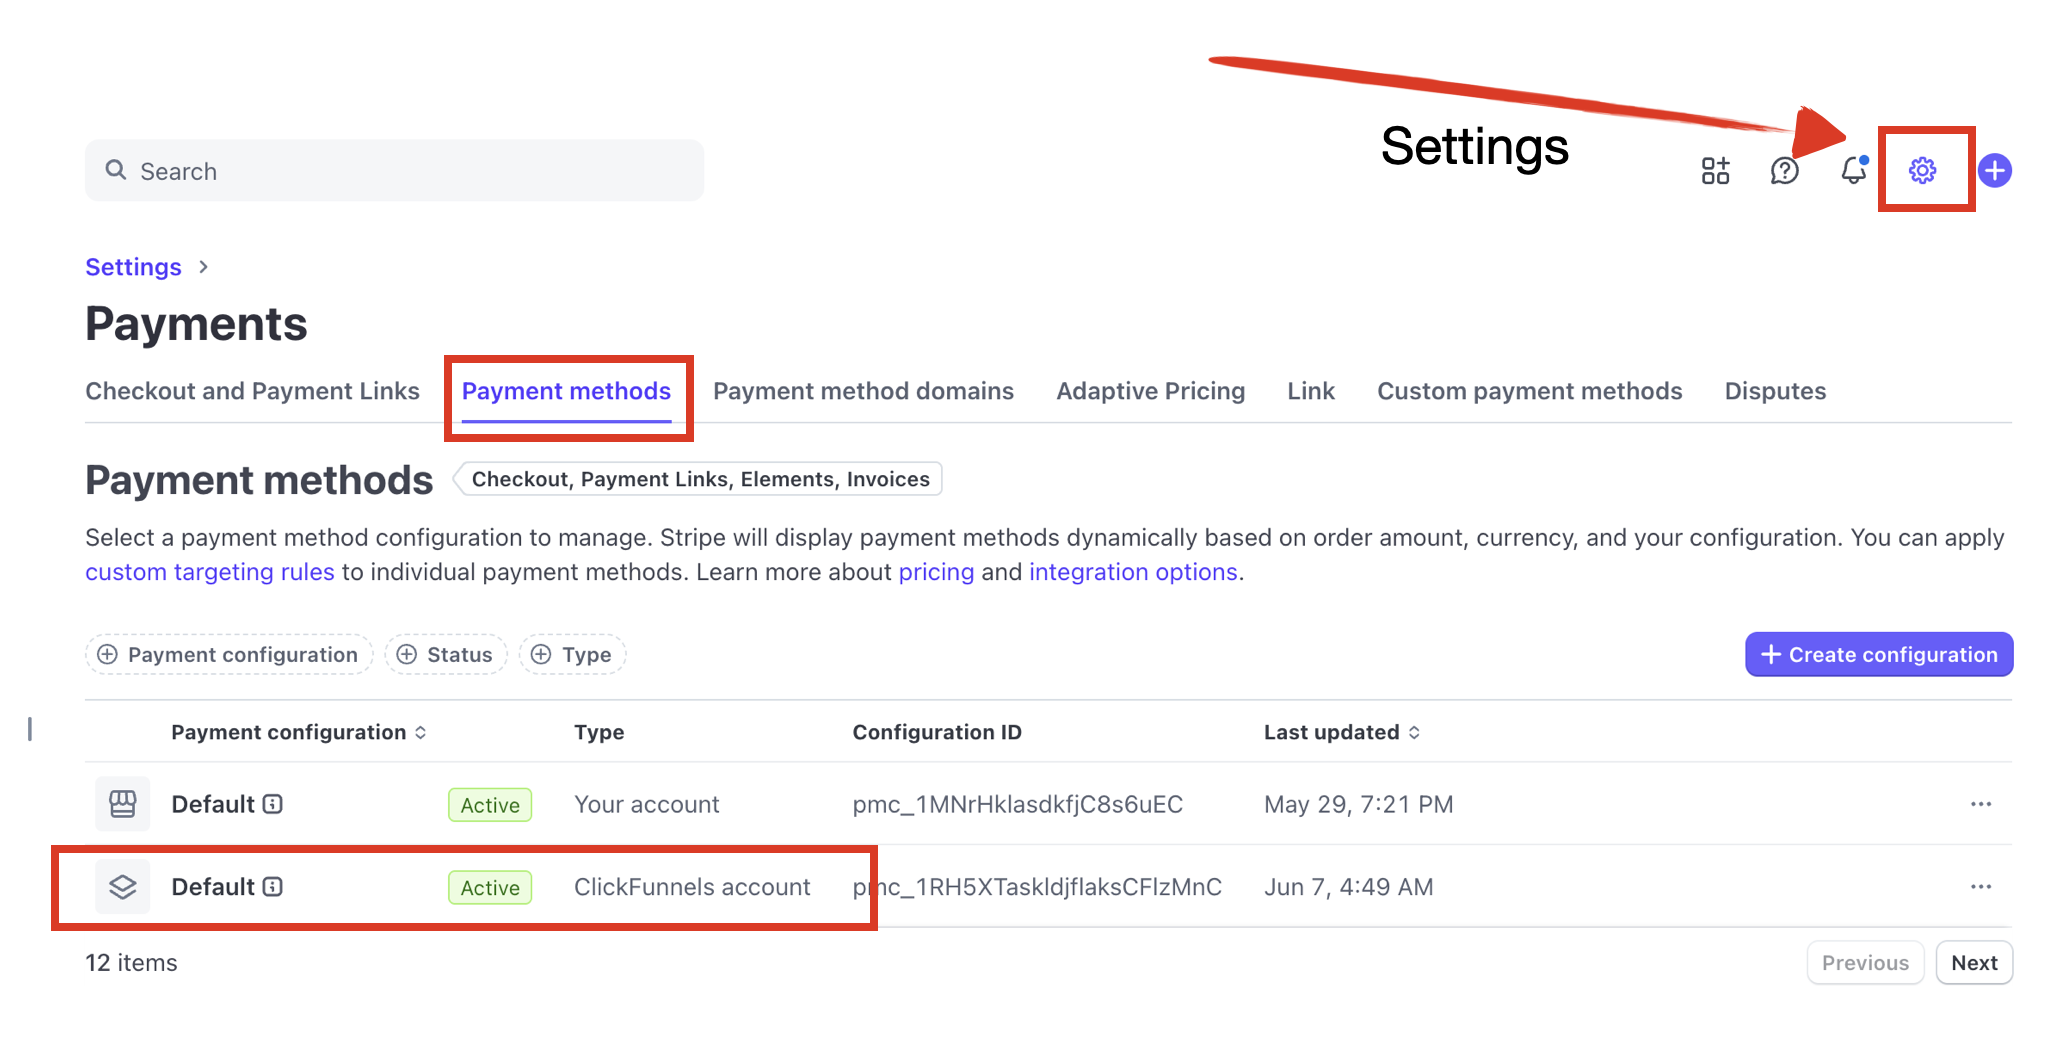
Toggle On for the methods you want to support (Amazon Pay, Cash App Pay, Google Pay, Klarna, Afterpay/Clearpay).
Stripe will guide you through any required setup steps (such as account verification or agreements).
Once activated, the methods are automatically available in your ClickFunnels Checkout when customers meet the requirements.
Klarna (and other payment methods):
Please note: some payment methods (such as Klarna) may not appear as Active to some buyers as it will only show the applicable payment methods to the end-user if they feel they are likely to convert. The additional payment method MAY not show to buyers in different countries (other than the country where the Stripe account is setup).
Enabling DPM in ClickFunnels Workspace
In ClickFunnels, navigate to Workspace Settings from the left-hand menu and select the General tab.
In the Stripe Settings section, toggle “Disable saving Stripe payment methods for future use on one-time orders.” Enabling this option ensures that specific dynamic payment methods are rendered correctly in the checkout process, as some require payment details not to be saved for one-time orders.
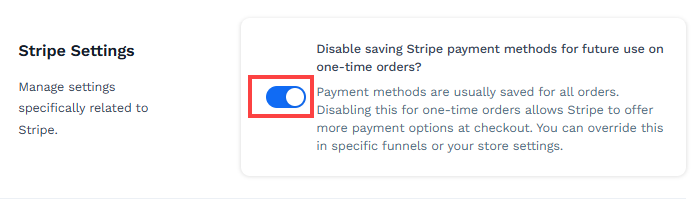
Click Update Workspace.
Enabling DPM in a Funnel
Payments can also be collected through funnels:
Navigate to the Funnels menu in the ClickFunnels dashboard.
From the list, select a funnel and click the adjacent Gear
⚙️ icon.In the “Disable saving payment methods for future usage on one-time orders” option, select "Yes." If this feature is already enabled in the workspace settings, you may choose "Same as Workspace."
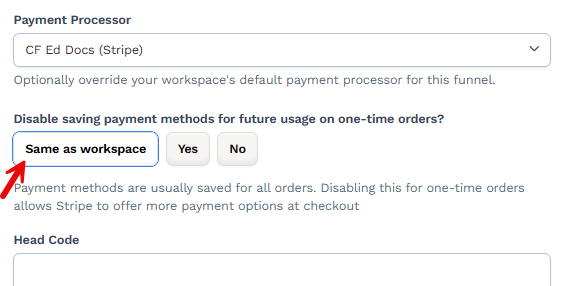
Click Update Funnel to save settings.
Note:
All DPM transactions are billed according to Stripe’s standard pricing for that payment method. There are no additional fees from ClickFunnels beyond what Stripe charges. Transaction fees may vary by provider and region (for example, Klarna and Afterpay/Clearpay use BNPL pricing models).
💡 For the most current fee details, refer to Stripe’s official pricing page: Stripe Local Payment Methods Pricing.
Payment Gateway Options
The table below presents a side-by-side breakdown of supported payment gateways in ClickFunnels. It is designed to help you evaluate options and select the most suitable solution for your business requirements.
ClickFunnels charges no additional fees beyond the standard processor rates listed below.
Stripe | Payments AI |
|---|---|
Accept and Optimize Payments Globally. | Multi-Gateway Payment Processing |
✔️ Standard Stripe Fees (2.9% + $0.30) | ✔️ Standard Base Fee (2.9% + $0.30) |
✔️ Stripe Billing: +0.8% (optional) | ✔️ Billing/Tax/Invoicing++ (0.5% all inclusive) |
✔️ Invoicing: +0.4% (standard) | ✔️ Provides backup of all payment methods |
✔️ Stripe Tax: +0.5% (standard) | ✔️ Gateway Routing rules & Backup gateway support |
✔️ Bring your existing Stripe Account (optional) | ✔️ Supports PayPal Integration |
✔️ | ✔️ Bring existing gateways ( |
✔️ Dynamic Payment methods (coming soon) |
Stripe FAQs
Can I use both Stripe and Payments AI simultaneously in my ClickFunnels workspace?
Yes. You can integrate both Stripe and Payments AI into your ClickFunnels workspace. However, you may designate only one as the default payment processor for the workspace. The Store app utilizes the default payment processor set in the workspace. Additionally, each funnel is restricted to using a single payment processor at any given time. It is advisable to create separate funnels for each payment processor.
Is there an additional fee for using Stripe with ClickFunnels?
ClickFunnels does not charge extra for using Stripe. However, Stripe’s standard transaction fees apply.
What is the “Issue Invoices for One-Time Orders?” setting ?
By default, ClickFunnels creates a Stripe invoice for every order. Disabling this setting for one-time orders switches to Direct Payments, which processes payments faster by skipping the invoice creation step and avoids Stripe’s 0.4% invoicing fee. Subscriptions and payment plans are not affected; they always use Stripe Invoices. Existing Stripe installations default to invoices enabled (no change), while new installations default to Direct Payments enabled automatically.
Can I connect multiple Stripe businesses in the same ClickFunnels workspace?
Yes. To add a new business, navigate to the Stripe app in ClickFunnels and click the “Add New Stripe Installation” button.
Can I use the same Stripe business in multiple ClickFunnels workspaces?
Yes. Once your Stripe account is connected to your ClickFunnels account, all available businesses from the Stripe account will be accessible. You can select which business account to connect with the workspace. Navigate to the Stripe app in ClickFunnels and click the “Add New Stripe Installation” button to add a new business.
How many Stripe business accounts can I connect with a ClickFunnels workspace?
There is no limitation.
What happens to existing subscriptions if I change the default payment processor from Payments AI to Stripe?
Ongoing subscriptions processed initially through Payments AI will continue to be handled by Payments AI, even if you change your workspace's default payment processor to Stripe. These subscriptions will remain active at their current pricing and will not be affected by VAT or pricing changes introduced under the Stripe configuration.
Can I use PayPal with Stripe in ClickFunnels?
Currently, PayPal can only be used with Payments AI in ClickFunnels. It is not available with Stripe integration.
Can I collect tax (Sales Tax, VAT, GST) with Stripe in ClickFunnels?
To collect sales tax using Stripe, you must enable Stripe Tax in your Stripe account during or after the business setup process. ClickFunnels will use your Stripe tax configuration to apply the appropriate tax during checkout. For detailed instructions, refer to our help article Setting Up Tax Collection (Sales Tax, VAT, or GST) in ClickFunnels Products.
Can I use Stripe with a specific product in ClickFunnels?
In ClickFunnels, you do not assign a payment processor to individual products. Instead, payment processors are defined at the funnel settings. When a funnel is connected to Stripe, all products within that funnel will use Stripe for processing. Therefore, to use Stripe with a specific product, ensure the product is added to a funnel where Stripe is selected as the payment processor.
Will enabling DPMs add extra fees in ClickFunnels?
No. ClickFunnels never charges extra fees for payment methods. Only Stripe’s standard fees for each method apply.
If a customer uses Klarna or Afterpay/Clearpay, do I receive my funds immediately?
Yes. Stripe pays you the full purchase amount upfront (minus fees). Klarna and Afterpay/Clearpay then collect installments from the customer directly.
Why do I need to enable the option “Disable saving Stripe payment methods for future use on one-time orders” in ClickFunnels?
Some dynamic payment methods (e.g., Klarna, Cash App Pay) require that payment details are not saved for one-time orders. Enabling this option in Workspace Settings » General » Stripe Settings ensures these methods render correctly in checkout.
Can I decide which methods appear in Checkout?
Yes. You can enable/disable a method in Stripe settings. You must log in to your Stripe Dashboard » Settings » Payment Methods, locate the ClickFunnels Configuration, and toggle them on or off.