A Style Guide helps you maintain consistency in your page's design by applying predefined styles to fonts, colors, buttons, and other design elements. Instead of manually adjusting individual components, the Style Guide allows you to apply changes quickly and uniformly across the entire page. This article explains what a Style Guide is, how it benefits you during page editing, and the different ways to apply or access it within your ClickFunnels page editor.
Requirements
An active ClickFunnels account
A page created in your workspace
What is a Style Guide?
A Style Guide is a centralized tool that allows you to define and manage design settings—such as fonts, colors, spacing, and other visual styles—across all pages that are using the same guide. Instead of customizing each element individually, the Style Guide ensures consistent design rules are applied automatically, creating a cohesive and professional appearance.
For example:
If your brand uses specific colors for headings, buttons, and links, you can set these preferences in the Style Guide.
If you update your font or adjust button styles, the changes will automatically apply to all pages connected to the same Style Guide, saving you time and effort.
Learn more about the style guide in the article Getting Started with Styles.
Where Can Style Guides Be Applied?
Style Guides can be applied to various areas to maintain consistent branding and design. Here's a breakdown:
Entire Site: Apply a Style Guide to the entire site to ensure all pages, including system pages (e.g., Home Page, Blog Home, Storefront, and Course Home), reflect the same styles.
Funnels: Assign a Style Guide to all pages within a specific funnel, such as opt-in, sales, or thank-you pages, to ensure a cohesive design.
Courses: Apply a Style Guide to your course home, modules, and lessons for consistent course styling.
Blogs: Use a Style Guide to style the Blog Home page as well as individual blog posts.
Store Pages: Assign a Style Guide to the Store Home (storefront) and individual product pages for a seamless shopping experience.
Landing Pages: To meet unique design requirements, apply a Style Guide to specific pages (e.g., About Us or Contact).
How to Apply a Style Guide
Applying a Style Guide to your pages is simple and ensures your design remains consistent across different parts of your website or funnel. Here’s how you can apply a Style Guide in various contexts:
Applying a Style Guide to the Entire Site
From your workspace, click on the Site & Blog app in the left-hand menu.
Select Site Settings.
Scroll down to the Advanced Settings section in the Site Settings panel.
Locate the Style dropdown under Advanced Settings.
Click the dropdown and select the desired Style Guide (e.g., "Default Style Guide" or a custom Style Guide).
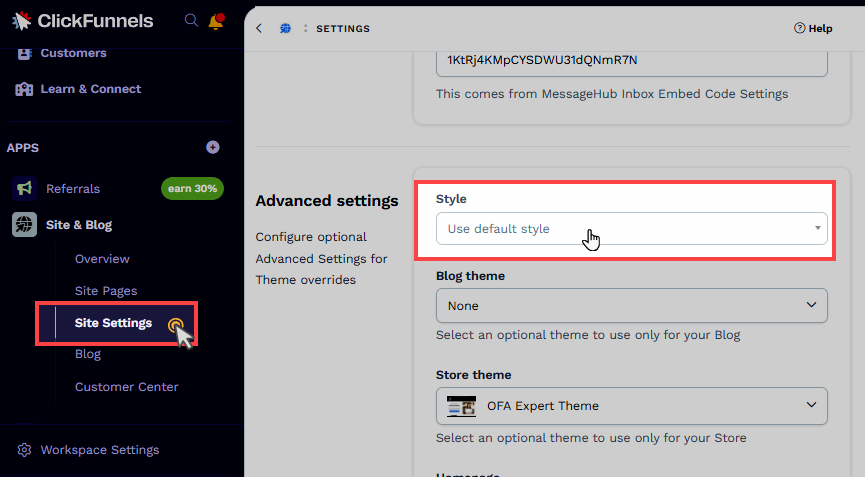
Click Update Site at the top or bottom of the page to save your changes.
Applying a Style Guide to a Funnel
Navigate to the funnel you want to customize from the Funnels menu.
Click the Gear ⚙ icon located at the right of the funnel.
.png "image(463).png")
Scroll down to the Style dropdown in the Funnel Settings panel.
Select the desired Style Guide from the dropdown menu.
Click Update Funnel to apply the Style Guide to all pages within the funnel.
Applying a Style Guide to an Individual Funnel Page
Go to the funnel containing the page you want to customize.
Locate the desired page in the funnel workflow.
Click the Three Dot (⋮) icon next to the page.
Select Settings from the dropdown menu.
.png "image(464).png")
Find the Style Guide dropdown and select the Style you want for that page.
Click Submit to apply your changes.
Applying a Style Guide to a Course
Navigate to the Courses app in the left-hand menu of your dashboard.
Find the course you want to edit from the list.
Click the Gear ⚙ icon next to the course title.
In the course settings, scroll down to the Advanced Settings section.
Click Configure next to Advanced Settings.
.png "image(468).png")
Locate the Style dropdown in the settings panel.
Select your desired Style Guide from the dropdown menu.
Click Update course to apply the selected Style Guide to the entire course.
Applying a Style Guide to a Blog
Navigate to the Site & Blog app.
Select Blog.
Click the Gear (⚙) icon located at the top-right of the blog dashboard.
.png "image(469).png")
In the Blog information section, find the Style dropdown.
Select the Style Guide you want for that page.
Click Update Blog to apply your changes.
Applying a Style Guide to Blog Pages
Navigate to the Site & Blog app.
Select Blog.
Locate the desired blog post and click the Edit icon (⚙ ) to the right of the page.
.png "image(466).png")
In the Advanced Settings section, locate the Style dropdown.
Choose the desired Style Guide and click Update page.
Applying a Style Guide to Store Pages
Go to the Store app and navigate to Overview.
Click the Customize Store button in the top-right corner.
In the store editor, select the store page (e.g., Storefront, Product, or Checkout) to which you want to apply a style guide.
Click the Gear ⚙ icon next to the page name to open its settings.
.png "image(467).png")
In the Advanced Settings section, locate the Style dropdown.
Choose your desired Style Guide from the dropdown menu.
Click Update page to apply the selected Style Guide to that page.
Applying a Style Guide to Landing Pages
Navigate to the Landing Pages app from the left-side menu.
Locate the desired landing page and click the Gear icon (⚙ ) next to it.
.png "image(465).png")
In the Advanced Settings section, locate the Style dropdown.
Choose the desired Style Guide and click Update page.
Accessing Style Guides from Sections, Rows, and Elements
You can directly access and update Style Guides from your page's individual sections, rows, or elements.
Warning
Any changes made to the Style Guide will automatically update all other areas of your site that use the same Style Guide.
Accessing the Style Guide from a Section
In the editor, hover over a Section until its outline highlights.
Click the Gear ⚙ that appears on the Section border.
In the settings panel, locate the Paint dropdown.
Click Edit Style Colors under the dropdown.
.png "image(472).png")
The Style Guide panel will open, allowing you to make updates directly from the page editor.
Accessing the Style Guide from a Row
In the editor, hover over a Row until its outline highlights.
Click the Gear ⚙ that appears on the row border.
In the settings panel, locate the Paint dropdown.
Click Edit Style Colors under the dropdown.
The Style Guide panel will open, allowing you to make updates directly from the page editor.
Accessing the Style Guide from an Element
Select any element (e.g., headline, button, image) on your page.
In the element’s settings panel, look for the Edit Style option. Depending on the element type, this may appear under different settings (e.g., Typography, Button Style, etc.).
.png "image(474).png")
Click Edit Style to update the element’s appearance according to your Style Guide.