A webinar funnel helps you get people to sign up, show up, and take action after your live event. It automates emails, reminders, and follow-ups, so you don’t have to do everything manually. This article will show you how to set up a live webinar funnel in ClickFunnels with the right pages, events, and automations. You’ll learn how to customize the funnel, connect key steps, and make sure everything runs smoothly.
Requirements
An active ClickFunnels account
An account with a webinar platform (e.g., Zoom, GoToWebinar, or WebinarFuel)
A product created in the Products section (only needed for paid webinars or funnels with an offer)
A payment gateway integrated within the workspace (required if you're collecting payments)
How a Webinar Funnel Works
A webinar funnel is a step-by-step process that moves people from registration to attending your webinar and then to making a purchase if you have a paid offer. Instead of just sending a link and hoping for the best, it keeps everything organized with automated emails, tags, and workflows.
A typical webinar funnel starts with a registration page where people sign up. For free webinars, attendees register and get instant access to event details. For paid webinars, access is only given after payment. From there, they receive confirmation emails, and links to join the webinar. After the event, the funnel guides them to an offer page with a limited-time deal, followed by follow-up emails to encourage action.
Businesses use webinar funnels for different goals. A coach might offer a free training that leads into a paid program. A software company could run a demo webinar and invite attendees to sign up with a special discount. Others may charge upfront for an exclusive masterclass. No matter the approach, the right funnel helps turn viewers into customers.
There are two main ways to deliver a webinar in ClickFunnels: live webinars and evergreen webinars.
Live webinars are presented in real time on a specific date and time. These are ideal for time-sensitive launches, interactive presentations, or high-conversion events where you want to engage with your audience directly. This approach allows you to build anticipation, create urgency, and answer questions during the session. If you're running a single event or limited-time offer, a live webinar format is typically the best choice.
Evergreen webinars, on the other hand, are pre-recorded presentations delivered on a recurring schedule. These are structured to feel live to the viewer but don’t require the presenter to be there. Evergreen funnels are useful when the goal is automation by delivering the same experience to each visitor without manually hosting every session. This format works well for ongoing lead generation, product demos, or training that stays relevant over time.
This article focuses on how to build and launch a live webinar funnel.
If you're looking to create a webinar that runs on a recurring or on-demand schedule, refer to How to Create a Webinar Funnel for step-by-step instructions on building an evergreen experience.
Understanding the Webinar Funnel Structure
A webinar funnel is made up of several pages that guide visitors from signing up to watching the webinar and taking action. Each page plays a key role in keeping attendees engaged and moving them toward the final goal.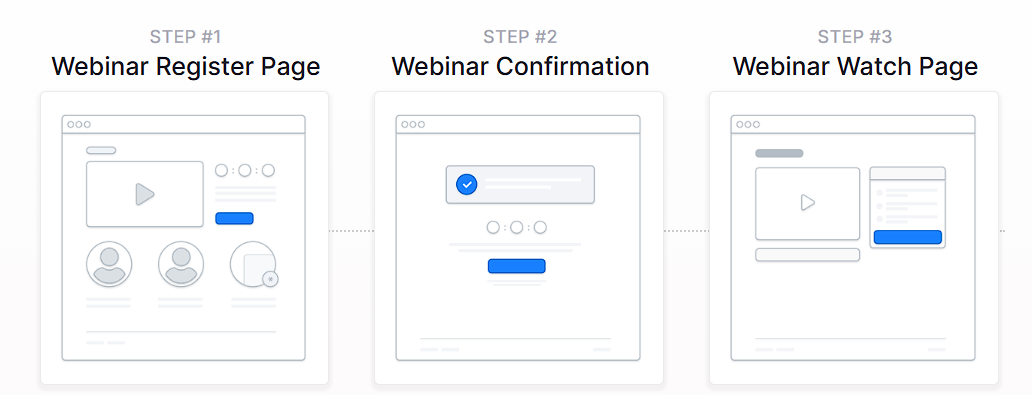
Here’s how the main pages work:
Webinar Registeration Page: This is where visitors sign up for the webinar by entering their information. It’s the first step in the funnel and captures leads.
VIP Upgrade Page (Optional): After registering, attendees may see an optional upgrade offer, such as a paid VIP pass for exclusive content, early access, or bonus materials.
Webinar Confirmation Page: Once registered, attendees land on this page to confirm their spot. It provides event details and next steps, such as adding the webinar to their calendar.
Webinar Watch Page: This is where the live or pre-recorded webinar happens.
Order Form Page: If the webinar includes an offer, this is where attendees make a purchase. It contains the product details, pricing, and payment options.
Order Confirmation Page: After purchasing, attendees see a confirmation page with a receipt and instructions on what happens next.
Setting Up Your Webinar Funnel
There are two ways to build a webinar funnel in ClickFunnels:
Create a funnel from scratch: Manually add each page and set up the automation yourself. If you prefer this method, check out How to Create a New Funnel for step-by-step guidance.
Use a pre-built framework: Import a ready-made webinar funnel with all the key pages, events, and automation already set up.
For a faster setup, we’ve created a Webinar Funnel Framework that you can import directly into your workspace. This includes all the key pages, events, and automation to help you get started quickly. To claim the framework, follow these steps:
Open a web browser and paste the shared link into the address bar.
If you’re not logged in, sign in to your ClickFunnels account. If you don’t have an account, you’ll need to create one.
Choose the workspace where you want to import the framework. You can also create a new workspace if needed.
ClickFunnels will import all the resources, and once the process is complete, a success message will appear.

Setting Up the Webinar Countdown Events
A countdown event ensures that your webinar starts on time and that key deadlines, such as cart close, trigger the right automations. You can either create your countdown events manually or use the ones included in the framework. If you want to set up your own, follow the steps in How to Create and Manage Countdown Events.
If you imported the Webinar Funnel Framework, it already includes a Webinar Event Start countdown and multiple Webinar Close Cart events. The reason you see multiple close cart events is that they are assigned to different funnel pages. At this time, ClickFunnels doesn’t allow sharing a single countdown event across multiple pages in a framework.
Setting Up the Webinar Event Start Countdown
In your ClickFunnels dashboard, go to Countdown Funnels > Countdown Events.
Look for Webinar Event Start and click on it to open the settings.
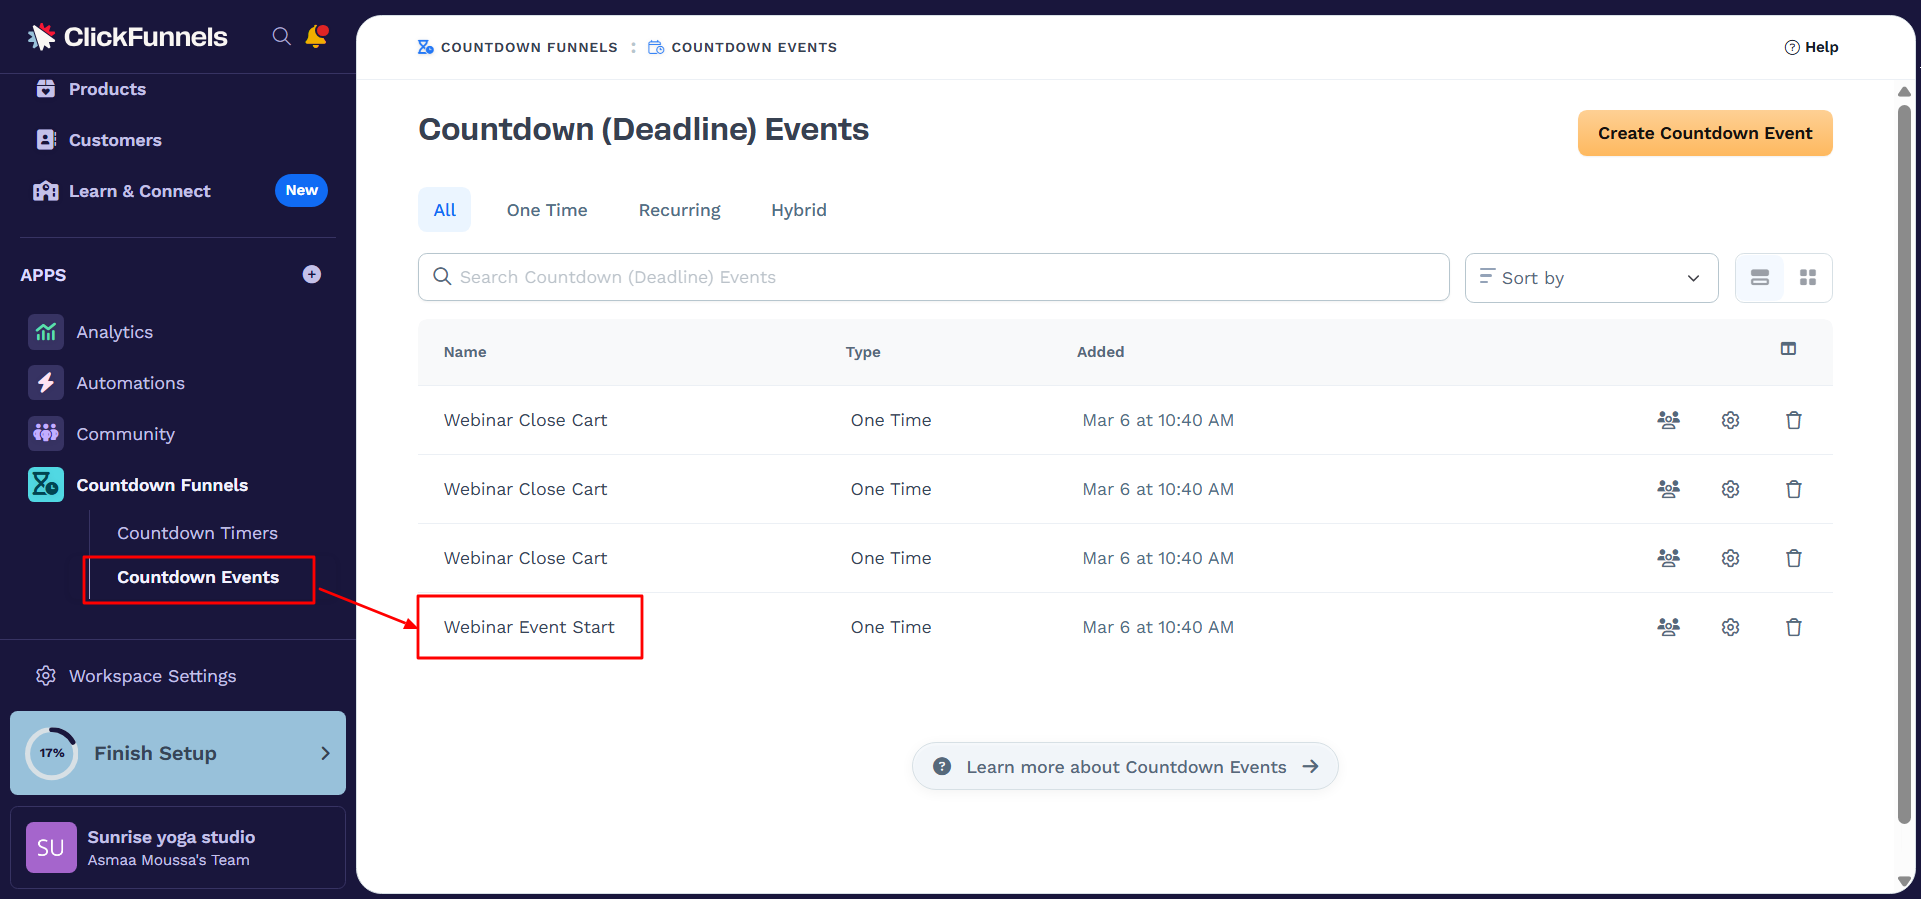
Set the correct date, time, and time zone for when your webinar will begin.
Click Update Countdown Event to save your changes.
A confirmation message will appear warning that changes may affect workflows. Click Proceed to continue.
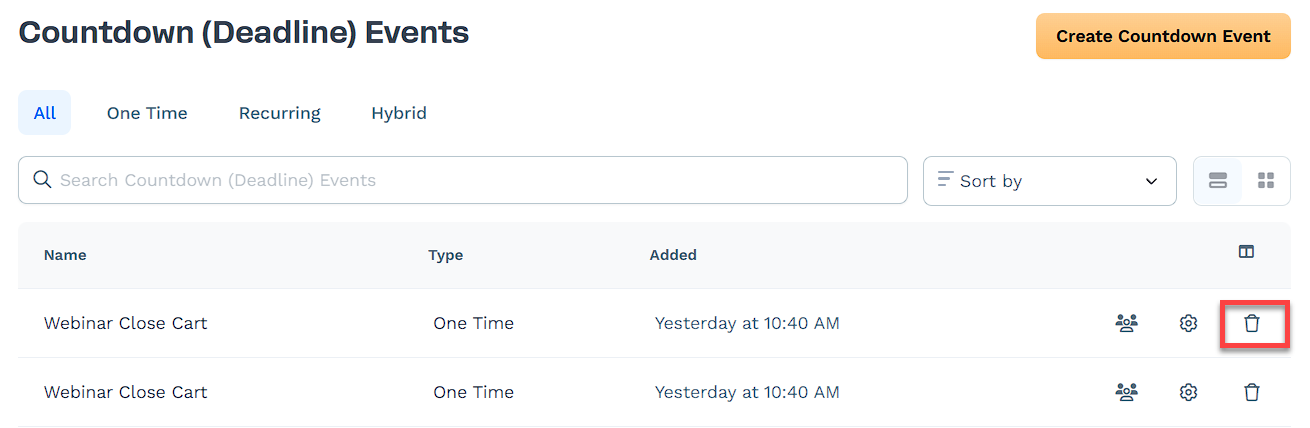
Managing the Webinar Close Cart Countdown Events
Return to Countdown Events page.
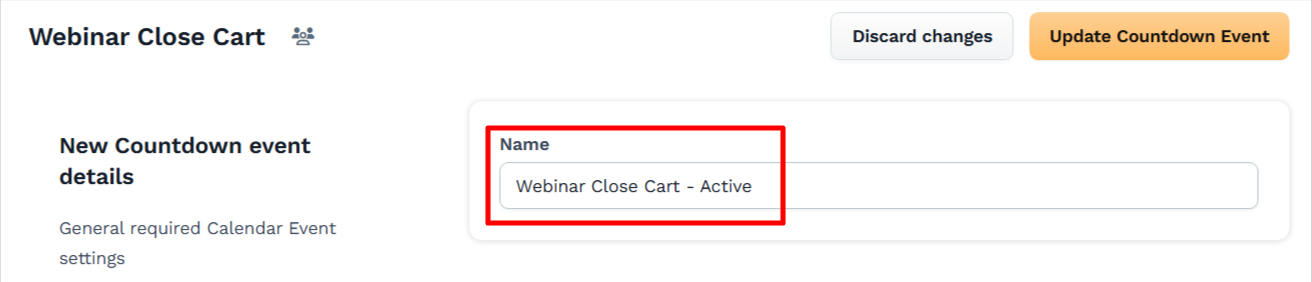
Identify the three Webinar Close Cart events.
Choose one to keep and rename it to indicate it’s the active version and update its settings.
Adjust the following details:
Start date to the night your offer expires.
Time to 11:59 PM (typically in Pacific Time to cover all time zones).
Click Update Countdown Event to save the changes.
Replacing and Deleting Extra Close Cart Events
In your ClickFunnels workspace, Navigate to the Funnels menu.
On the Funnels index page, select your webinar funnel.
In the funnel workflow builder, locate the pages where the countdown events are assigned.
Click the three dots on each page and select Manage Calendar Events.
If a page is using one of the duplicate countdowns, click the settings icon (⚙️) in the bottom-left corner of the event card.
In the Edit Attached Calendar Event window, select the active Calendar Event from the dropdown.
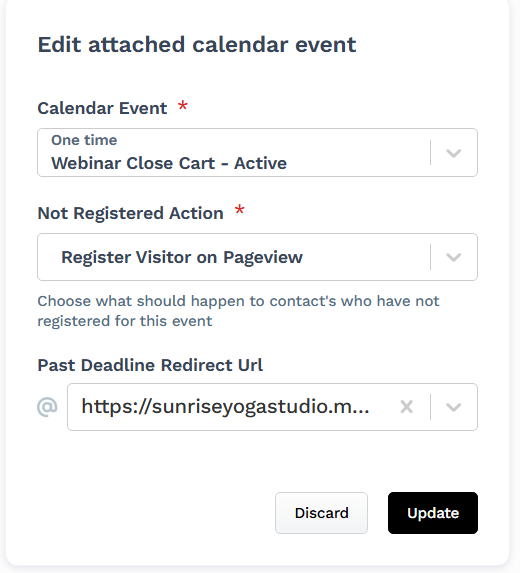
In the Past Deadline Redirect URL field, select a page where users should be redirected after the event deadline.
Click Update to save your changes.
Ensure all pages using a countdown event are now linked to the active version.
After confirming the correct countdown is assigned everywhere, return to Countdown Events and delete the two extra Webinar Close Cart events to keep things organized.
Configuring Webinar Funnel Workflows
Workflows handle automated emails, tags, and automations for your webinar funnel. You can either create them manually or use the pre-built workflows included in the framework. If you want to build your own, follow the steps in Getting Started With Workflows.
If you imported the Webinar Funnel Framework, it includes four workflows:
Event Confirmation Sequence: Sends a confirmation email when someone registers.
Event Countdown Sequence: Sends reminder emails leading up to the webinar.
Offer Confirmation Sequence: Sends a purchase confirmation email.
Offer Closedown Sequence: Sends final reminders before the offer expires.
Some workflows are triggered when someone lands on a funnel page, while others are triggered by calendar events.
Updating Workflows Triggered by Funnel Pages
These workflows activate when visitors land on specific pages in your funnel.
Workflows to Update:
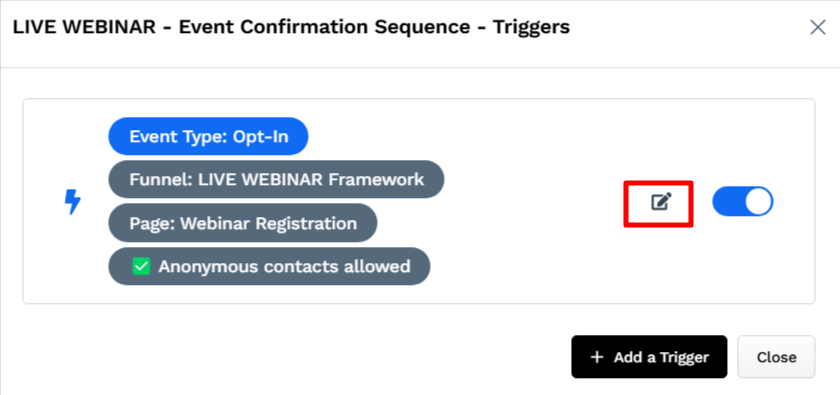
LIVE WEBINAR - Event Confirmation Sequence (Triggers on the registration page).
LIVE WEBINAR - Offer Confirmation Sequence (Triggers on the order form page).
Steps to Update:
Open your webinar funnel and find the workflow icon on the registration page.
Click the workflow icon to view attached workflows.
Click the LIVE WEBINAR - Event Confirmation Sequence to manage the workflow.
Add a tag to track attendees. Tags help categorize users based on their actions, such as registering for the webinar. Note that tags do not carry over from Frameworks, manually adding them ensures proper tracking.
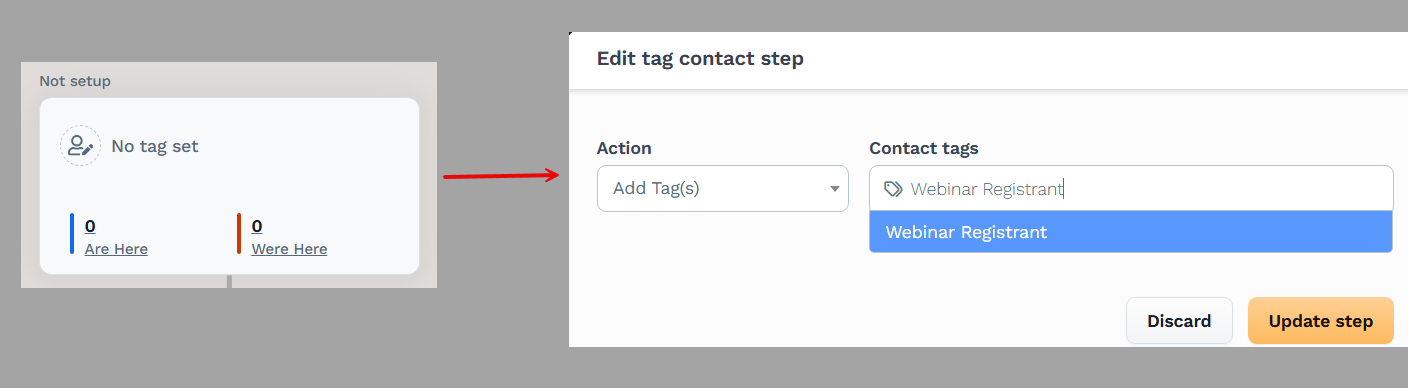
Click Update Step to save the tag.
Edit the confirmation email sequence to match your webinar details.
Click Save to apply changes.
Repeat these steps for LIVE WEBINAR - Offer Confirmation Sequence on the order form.
Updating Workflows Triggered by Events
These workflows activate when a calendar event (like webinar start or cart close) is triggered.
Workflows to Update:
LIVE WEBINAR - Event Countdown Sequence (Sends reminders before the webinar).
LIVE WEBINAR - Offer Closedown Sequence (Manages final sales push before cart closes).
Steps to Update:
Go to Automations > Workflows from the left navigation menu.
NOTE
If this is a new account, you’ll need to update your business details, including your address and from email address, before continuing.
Locate LIVE WEBINAR - Event Countdown Sequence and open it.
In the workflow editor, you’ll see "No Trigger set." Click on it, then select + Add a Trigger to open the trigger settings.
Set the trigger type to Calendar Event - Contact Registered and select Webinar Event Start.

Click Save Changes to activate the workflow.
Repeat these steps for LIVE WEBINAR - Offer Closedown Sequence, but select Webinar Close Cart Active as the calendar event.
Setting Up a Paid Webinar
If you want to set up a paid webinar, you’ll need to adjust the funnel and workflows so that only paying customers receive confirmation emails and event details. Follow these steps to modify the funnel and workflows accordingly.
1. Replace the Opt-In Form with an Order Form
The default framework uses an opt-in page to register users for the webinar. For a paid webinar:
Remove the opt-in form and add an order form instead.
If using a pop-up, update buttons to open a pop-up containing the order form.
2. Add a Webinar Product to the Order Form
In your LIVE WEBINAR Framework funnel, locate the Webinar Registration page.
Click the three-dot icon and select Add Products.
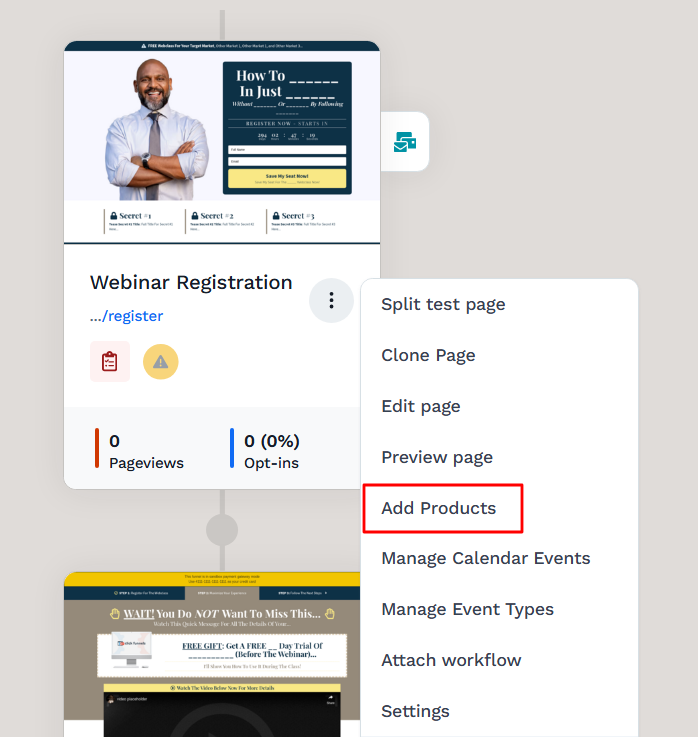
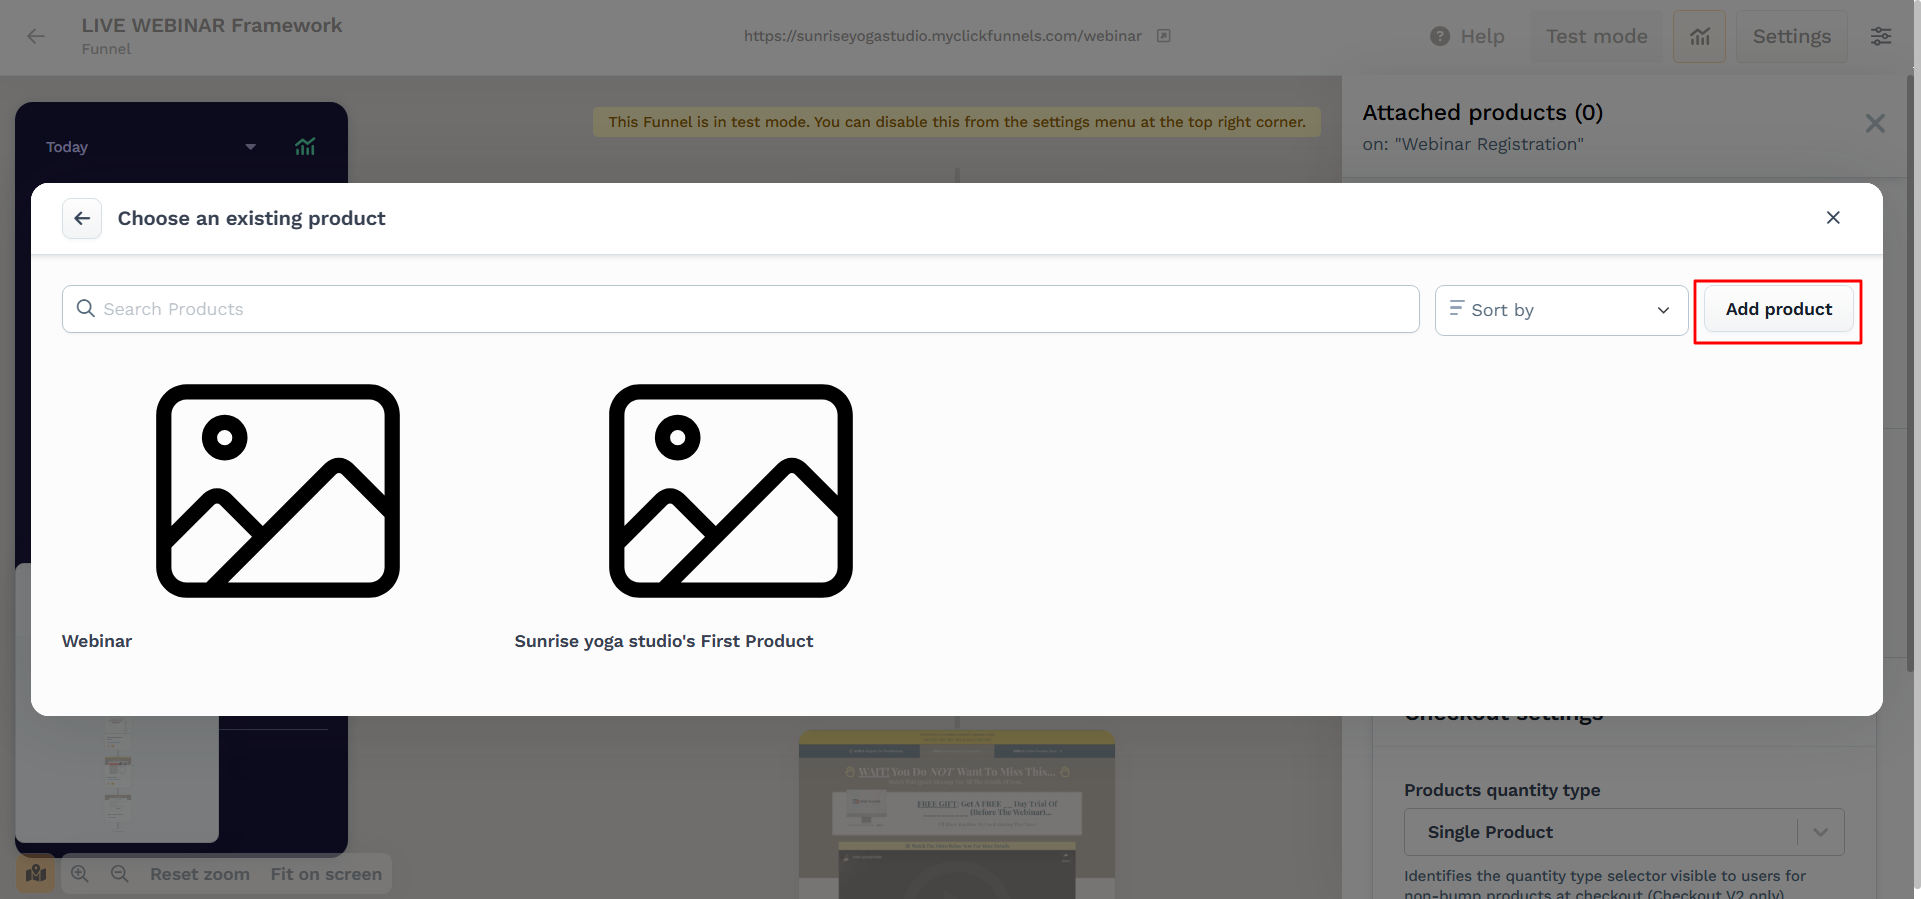
In the Attached Products panel, click + Add product.
If you have an existing product, hover over it it and click Select product.
To create a new product:
Click Add Product.
Choose Digital, enter a Product Name, and click Create product.
Select a Price Type (One-time, Subscription, or Payment Plan).
Enter the price amount and click Set price.
Once created, select the product and click Select Product to attach it to your funnel.
See How to Add and Manage Products in a Funnel Step for step-by-step guidance.
To learn more about creating products How to Create and Manage Products.
3. Update the Event Confirmation Workflow
Since the default setup triggers the Event Confirmation Sequence when someone opts in, you need to:
Go to Automations > Workflows and click the LIVE WEBINAR - Event Confirmation Sequence workflow.
In the Triggers section, click the edit icon to modify an existing trigger.
If prompted, click Yes, unlock it to allow updates to the trigger.
Change the trigger from opt-in to successful purchase.
Set it to activate only when the Paid Live Webinar product is purchased.

Ensure the Active toggle is turned on.
Ensure anonymous contacts are not allowed to prevent incomplete registrations.
Click Save Changes to finalize the trigger setup.
4. Prevent Non-Paying Users from Receiving Webinar Details
By default, anyone who submits the page is added to the event, even if their payment fails. To prevent this:
Go to Automations > Workflows and open LIVE WEBINAR - Event Countdown Sequence.
In the workflow editor, locate where you want to add the restriction and click the + icon to add a new step.
From the menu, select Until Triggered to pause the workflow until a specific action occurs.
In the configuration panel:
Set the Event Type to Order - Successful Purchase.
Under Product, select Paid Live Webinar.
Set a Duration (e.g., 30 days) to define how long the workflow should wait for the purchase.
Under After Max Wait, choose Complete Run to prevent non-paying users from receiving webinar details if they don’t complete the purchase.

Click Save Changes to finalize the setup.
5. Restrict Offer Confirmation to Paying Attendees
If you have a post-webinar offer, ensure only verified attendees receive it:
Apply the same purchase-based restriction in the Offer Confirmation Sequence workflow.
Customizing the Funnel for Your Webinar
Before launching your webinar, customize the funnel to match your branding, messaging, and event details. This includes updating page content, configuring automations, and testing the full experience to ensure everything runs smoothly.
Update page content: Edit the registration page, webinar watch page, and order form with your branding, text, images, and videos. Ensure call-to-action buttons are clear and countdown timers align with your event schedule. Learn more in Getting Started with the ClickFunnels Page Editor.
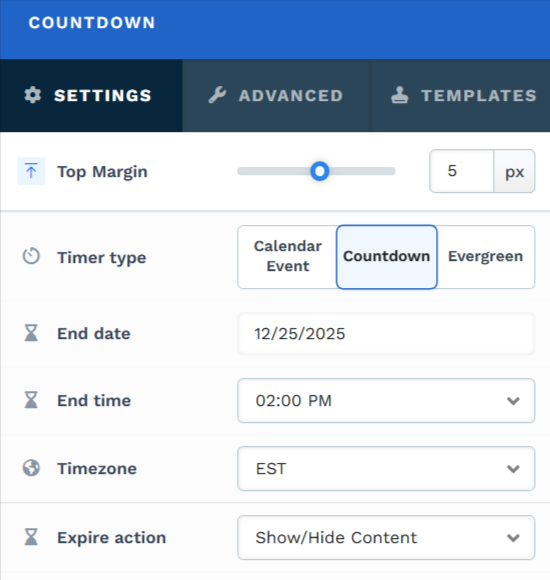
Ensure the countdown element is set correctly: Verify that the countdown timer element on your pages is counting down to the correct webinar date and time. If needed, update the settings in the page editor to reflect your event schedule. Refer to the Countdown: Display a Countdown Timer on Your Page for more details.
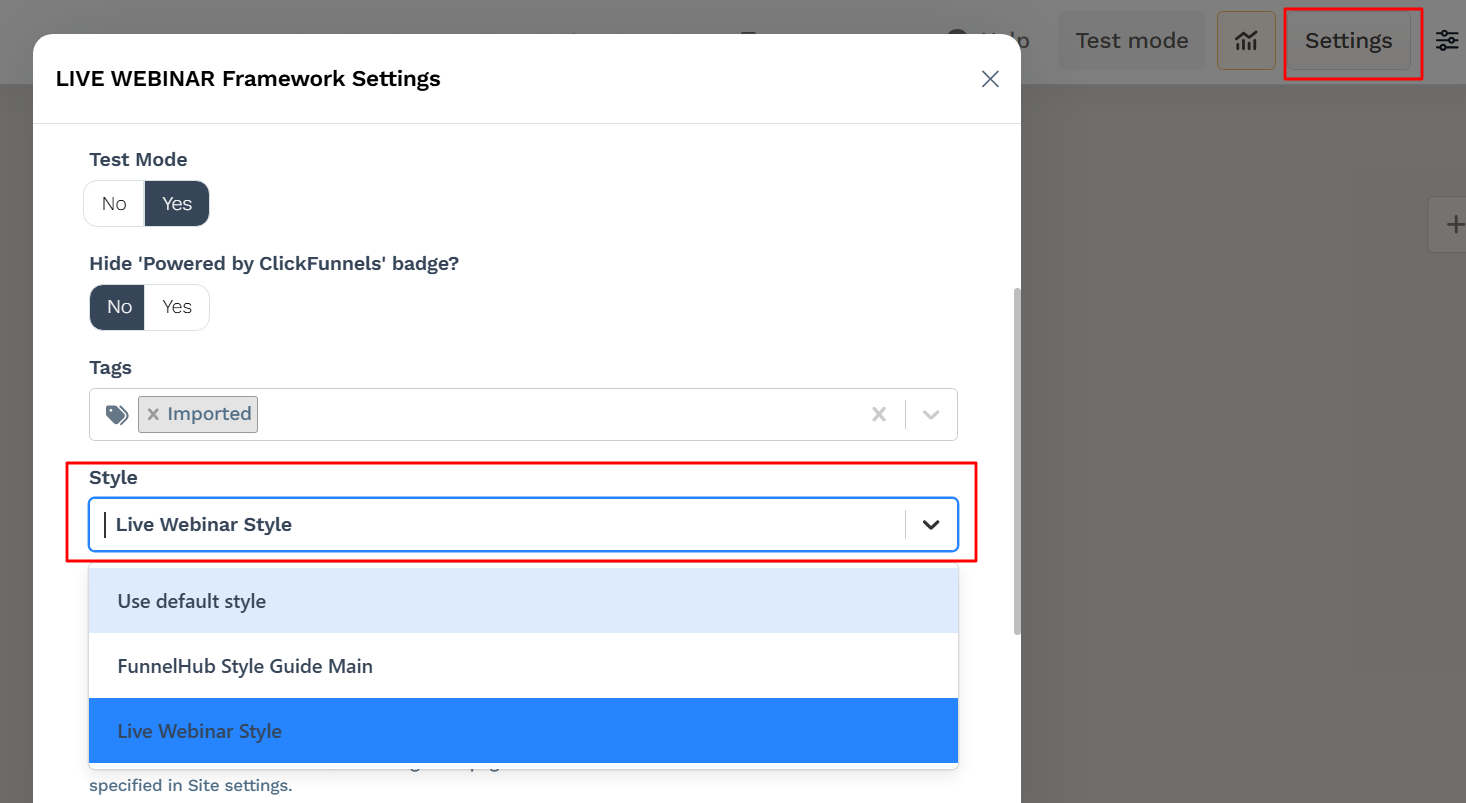
Select a funnel style: The framework comes with the "Live Webinar Style" by default, but you can customize it or choose another style that better fits your brand. To update the style, click Settings in the top right, then scroll to the Style dropdown and select your preferred style. To create and manage styles, see Getting Started with Styles.
Add your webinar product to the order form: If your webinar includes a VIP upgrade or requires payment, ensure that the correct product is added to the order form. If you don’t have a product set up, see How to Create and Manage Products and How to Add and Manage Products in a Funnel Step.
Configure the checkout element: Make sure the checkout form is correctly set up so users can complete their purchase. Adjust fields, payment settings, and styling as needed. For more details, see Checkout: Enable Users to Complete Their Purchase.
Review email sequences and automations:Ensure that confirmation emails, reminders, and follow-ups are triggered at the right times. Edit the email content to match your webinar details and offer.
Test the funnel: Go through the entire process as a participant:
Register for the webinar to confirm the form works and you receive the correct emails.
If offering a paid webinar or VIP upgrade, complete a test purchase to verify the checkout and confirmation pages.
Ensure countdown timers, automations, and page redirects function as expected.
Check email sequences to confirm messages are sent at the right times.
Hosting Your Webinar
Once your funnel is set up, you need to decide how you will deliver your webinar to attendees. ClickFunnels provides multiple options:
Using the built-in Broadcast Room Page: Add your webinar link or embed a live stream.
Hosting on a third-party platform: Use Zoom, GoToWebinar, oWebinarFuel and integrate it with ClickFunnels.
Using the Broadcast Room Page
The Broadcast Room Page allows you to embed a live or pre-recorded webinar. You can use YouTube, Vimeo, Wistia, or other supported platforms.
To add your webinar video:
Open the Broadcast Room Page in your funnel editor.
Click on the video element to open the settings.
Under Video Settings, paste your video URL. Supported formats include YouTube, Vimeo, Voomly, Wistia, HTML5, and custom embeds.
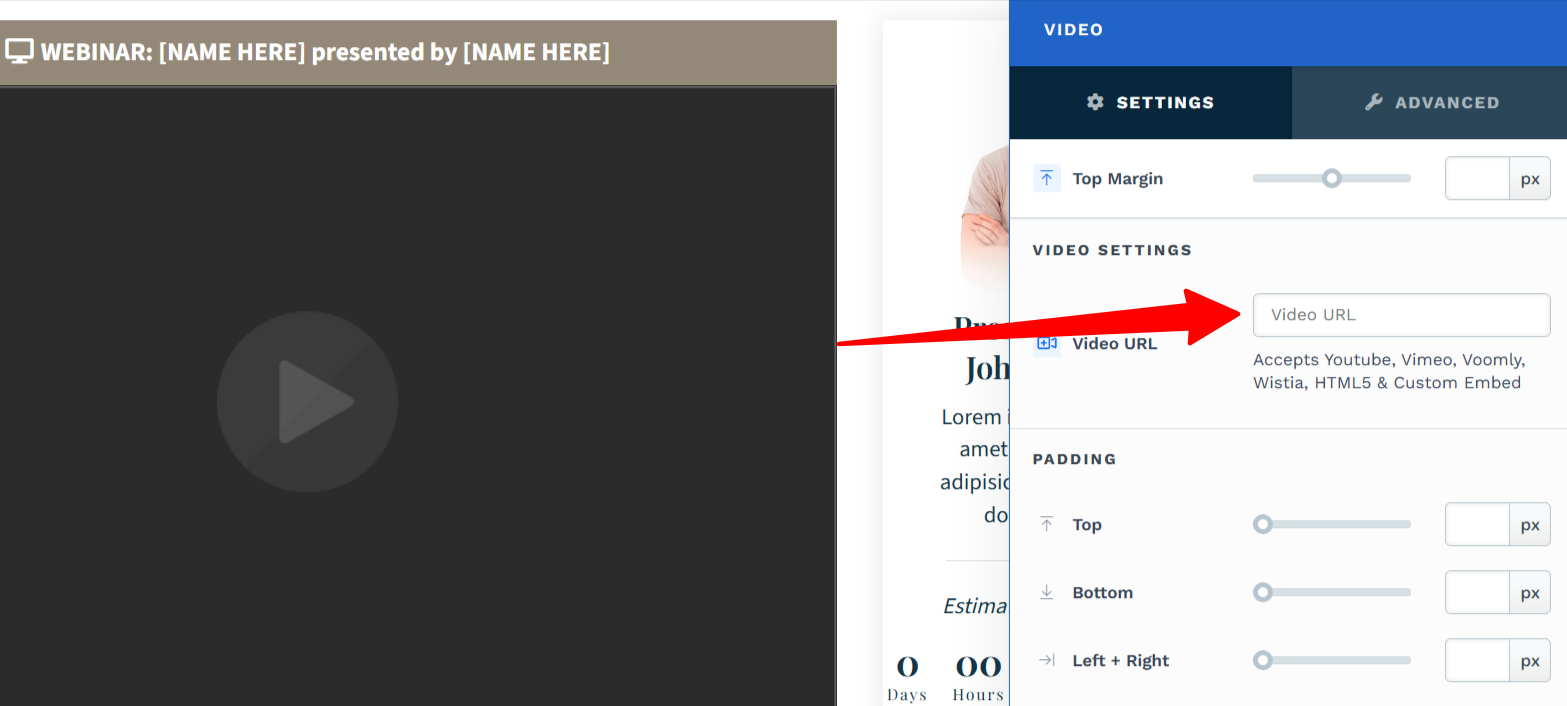
Save your changes.
This option works well if you want to keep everything inside ClickFunnels and provide a seamless attendee experience.
Integrating a Third-Party Webinar Platform
If you plan to use Zoom, GoToWebinar, or WebinarFuel, you can connect your account and automatically register attendees for the event.
Step 1: Connect Your Webinar Platform
Go to Workspace Settings > Integrations.
Search for the webinar platform (e.g., Zoom) and select it.
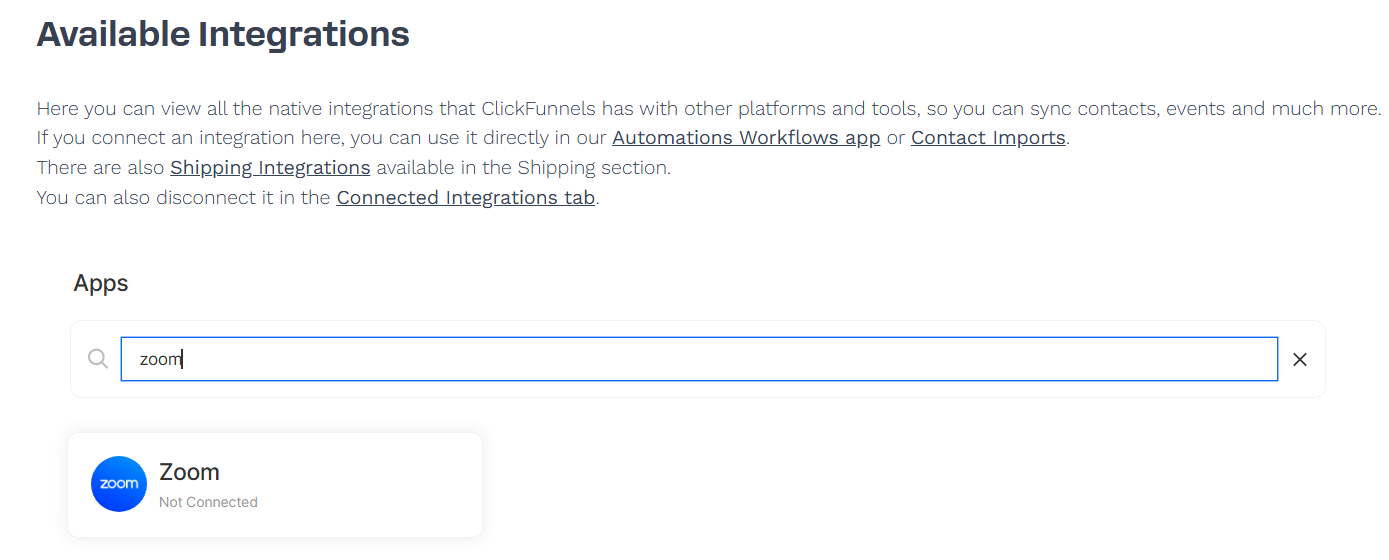
Click Proceed and sign in to your webinar account.
Grant ClickFunnels the necessary permissions to integrate.
IMPORTANT
A Zoom account can only be connected to one ClickFunnels workspace at a time. If you have multiple workspaces, ensure you connect it to the correct one.
Step 2: Register Attendees Automatically
Before setting up the automation, ensure your webinar event is created in your selected platform (Zoom, GoToWebinar, etc.), so it appears when selecting the event in ClickFunnels. This step is necessary because ClickFunnels pulls in existing events, and only those that are already set up will be available for selection.
Navigate to the Automations app from the left-side menu.
Open the Workflows tab and find the LIVE WEBINAR - Event Confirmation Sequence workflow.
Click the plus (+) icon to add a new action.
Select 3rd Party Integration from the list.
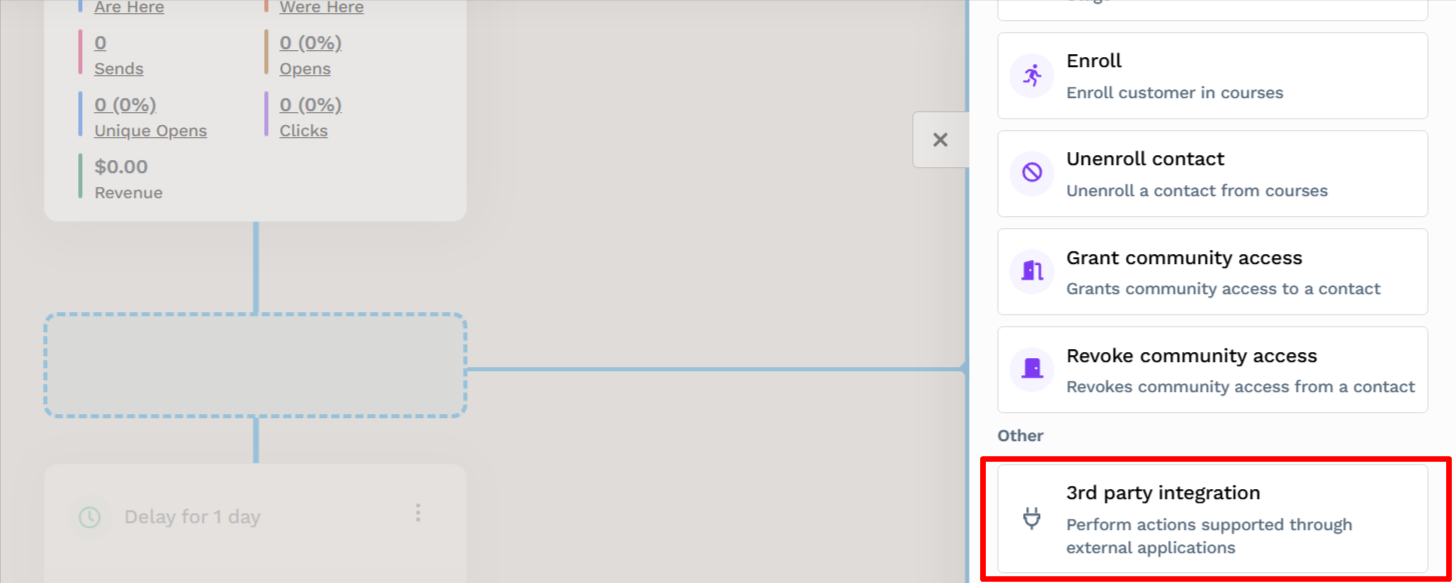
Choose the connected webinar platform.
Select the webinar or meeting from your account.
Save the changes.
To learn more about integrating Zoom with ClickFunnels, refer to the Integrating Zoom Meetings and Webinars with ClickFunnels article.
This ensures that when someone registers or purchases access, they are automatically added to the webinar event in your third-party platform.
How to Enable Instant Affiliates for Your Webinar
Set Up Your Affiliate Program
Before enabling Instant Affiliates, you must have an affiliate program in place. If you haven’t set one up yet, follow our guide: Create Your Affiliate Program in ClickFunnels
From the main menu on the left, click on + Add an App to navigate to the Apps page.
Add the Affiliate App in ClickFunnels.
Set up a Default Commission Plan (e.g., 30% recurring commission).
Toggle Default ON, so all new affiliates are automatically assigned to this plan.

In the Commission Plan Settings, click the three-dot menu (⋮) under Commission Plan Default and select Edit.
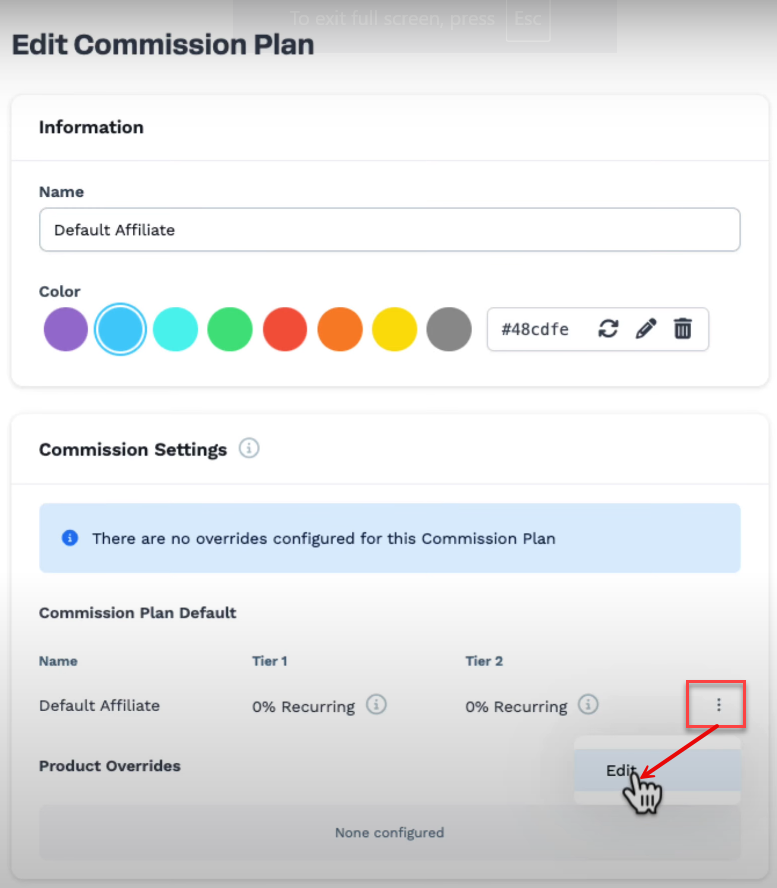
Set Tier 1 Commission (e.g., 30% recurring).
If you want a second-tier commission, enter a percentage under Tier 2.
Click Create to apply the changes.
Create an Affiliate Campaign for Your Webinar
Once your affiliate program is active, you need to create a campaign specifically for your webinar.
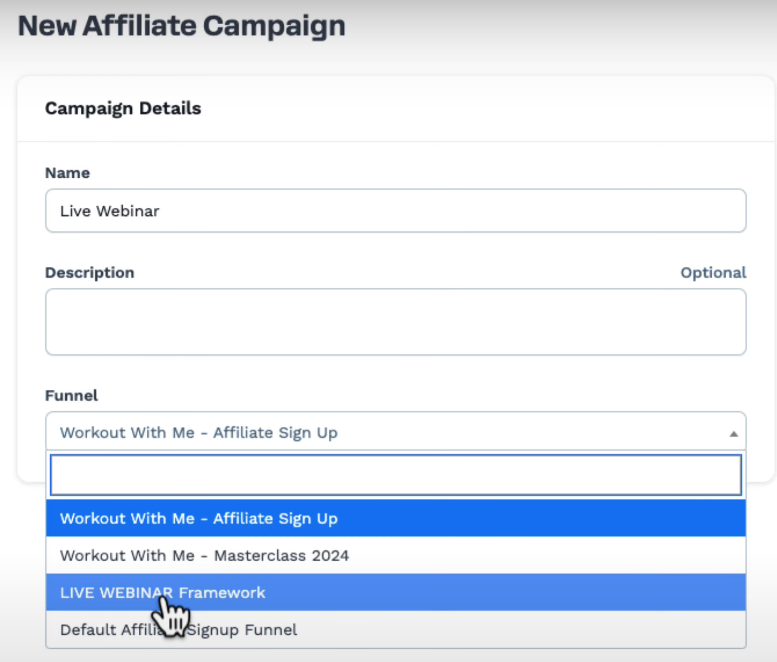
Go to Campaigns in the Affiliate Center app and select Create Campaign.
Name your campaign (e.g., "Live Webinar Referral Program").
Select the webinar funnel you want affiliates to promote.
Add an Asset URL (optional) if you want to provide affiliates with marketing materials.
Assign a commission plan, ensuring affiliates earn on purchases made through their referral link.
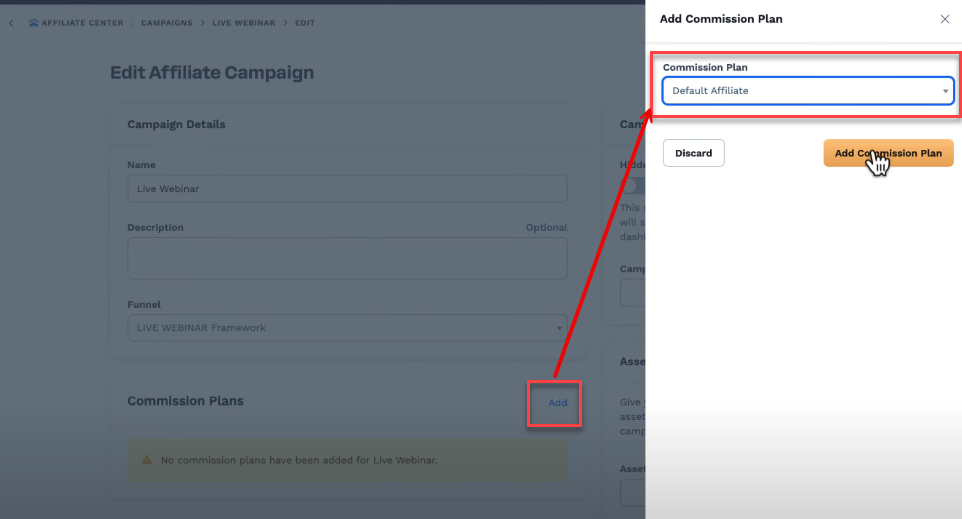
Click Add Commission Plan to finalize the setup.
To learn more about creating affiliate campaigns, refer to the Affiliate Center - How to Create an Affiliate Campaign article.
Add the Instant Affiliate Link to Your Webinar
Now that your affiliate campaign is set up, you need to allow attendees to instantly access and share their referral link.
Import the Instant Affiliate Registration Funnel from the Frameworks Library.
Open the Instant Affiliate Confirmation Page in the imported funnel.
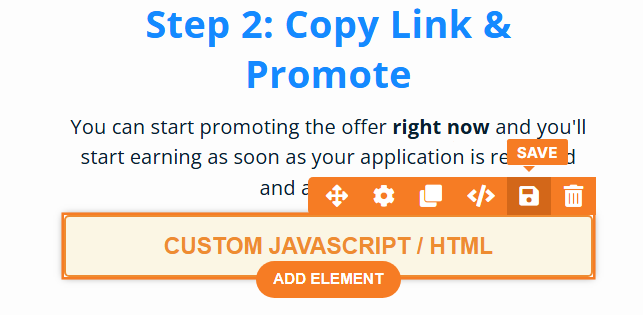
Locate the custom JavaScript/HTML element containing the referral link.
Hover over the element until the save icon appears, then click to save it for future use.
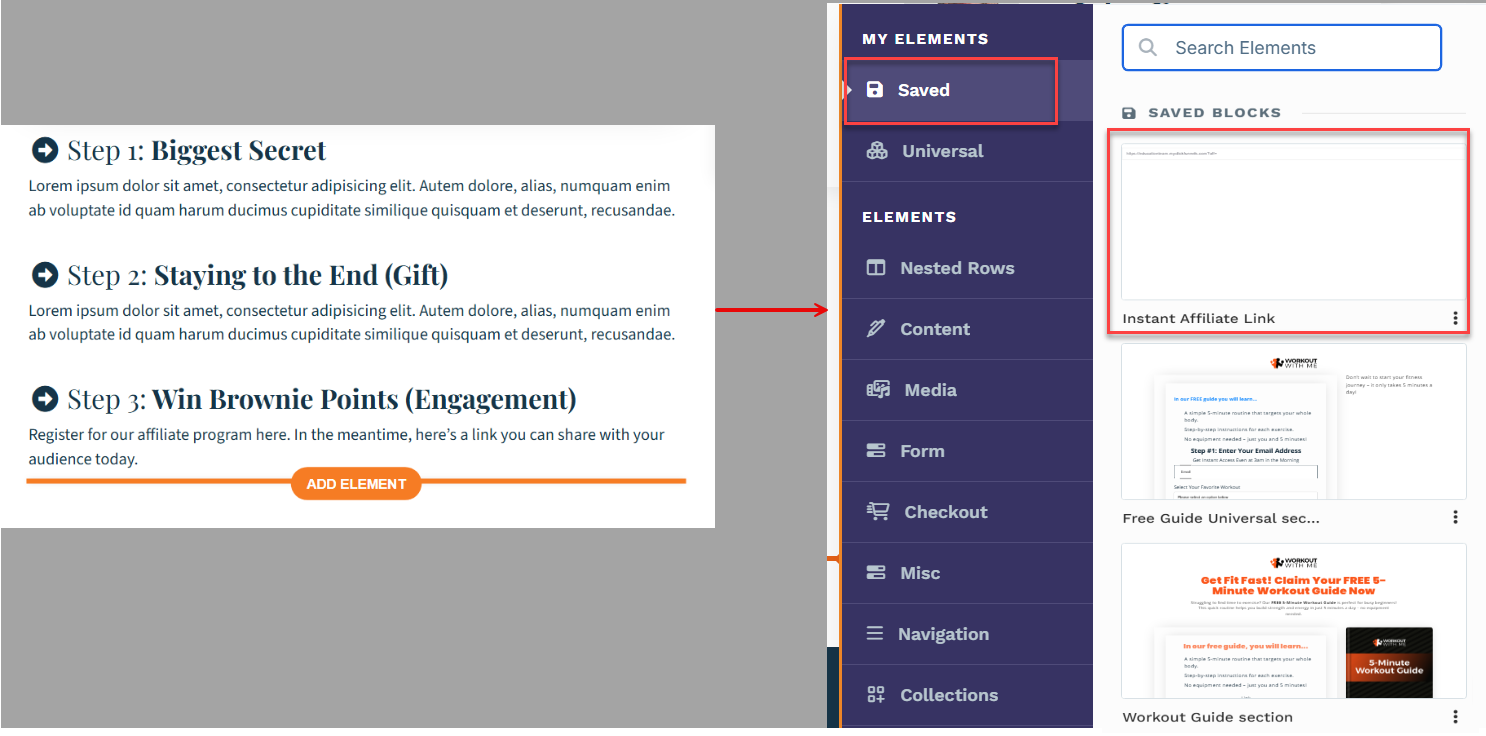
Open your Webinar Funnel and navigate to the Registration Confirmation Page (or any page where you want to provide the affiliate link).
Click Add Element and select Saved Elements from the side menu.
Locate the Instant Affiliate Link you previously saved and click to add it to your page.
Click on the element, select Open Code Editor, and DELETE the highlighted portion of the code as shown in the image below:
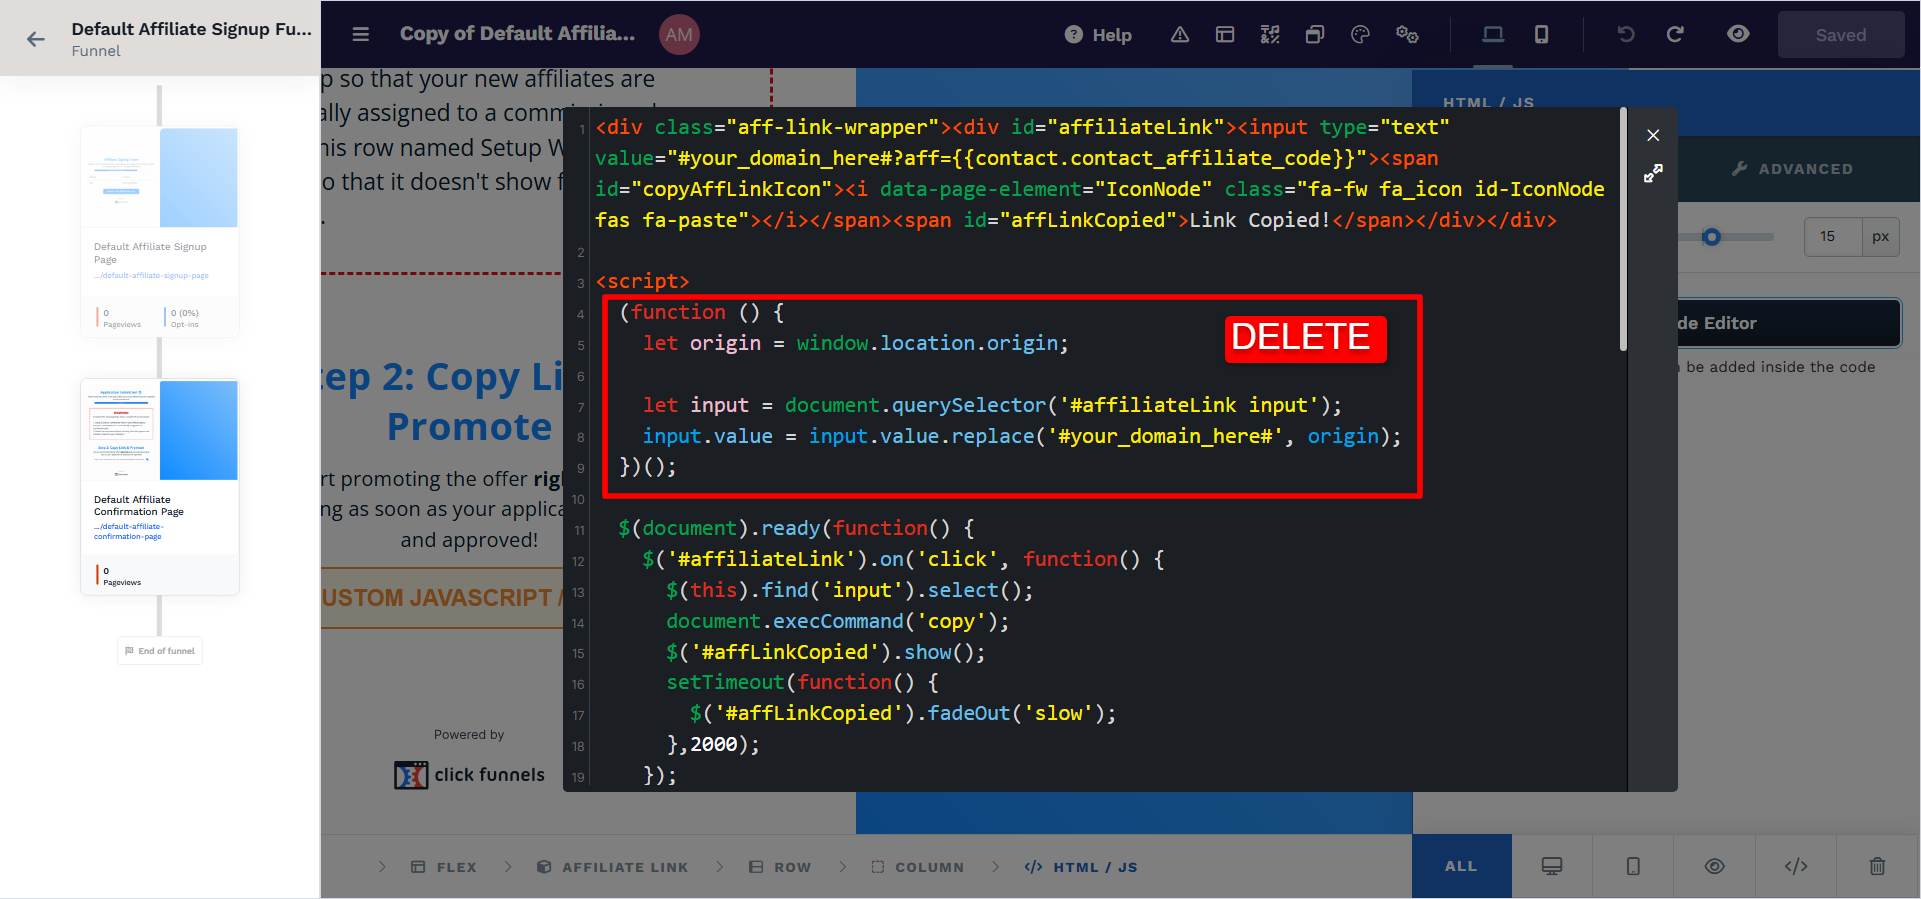
Replace the placeholder URL (
your_domain_here) with your actual webinar URL.
Click Save to apply the changes.
Now, when someone registers for your webinar, they will instantly receive a referral link with their unique affiliate tracking code, allowing them to promote your webinar and earn commissions.
Funnel Builder Support Options
For additional support building your funnel, explore the Funnel Builder Coaching & Certification Program. The program offers step-by-step training and live coaching for members who want to build with guidance.
To hire a certified funnel builder, visit the Funnel Builder Directory to connect with a verified expert.