A One-Time Offer (OTO) is a follow-up offer shown to customers immediately after they complete a purchase. OTOs can be used as upsells, encouraging customers to add higher-value or complementary products to their order. They can also act as downsells, offering a lower-priced option to customers who decline a previous offer.
OTOs give you a chance to increase the total value of each sale while providing customers with options that align with their needs. This article will walk you through what OTOs are, why they’re helpful, and how to set them up in your funnel..png "image(584).png")
Requirements
An active ClickFunnels account
What is a One-Time Offer (OTO)?
A One-Time Offer is an additional product or service presented after a customer completes a purchase. It’s designed to fit naturally into the buying process and can be customized to fit your goals:
Use an upsell to encourage customers to upgrade their purchase or add complementary items.
Use a downsell to offer a less expensive alternative for customers who decide not to take the original upsell.
Why Use an OTO?
OTOs are a proven strategy to:
Increase revenue per customer by offering complementary or exclusive products.
Build trust by showcasing deals that feel like a special opportunity.
Tap into impulse buying behavior with urgency and scarcity.
Examples of OTO Use Cases:
A customer buys a fitness program, and you offer a personalized meal plan as an add-on.
Provide a subscription trial upgrade to an annual plan at a reduced cost.
If a customer declines an annual subscription upgrade, you offer them a monthly subscription at a discounted rate.
Adding an OTO Page to Your Funnel
Navigate to the Funnels menu and open the funnel where you want to add the OTO.
Click on the funnel you wish to add a step to open the Funnel Workflow Editor.
From the Funnel Workflow Editor, hover over and click on any of the circles to add a new step at that spot.
.png "image(585).png")
Click on Page on the open widget.
Select the OTO (Upsell/Downsell) Page category, and click the Choose button on your preferred template. If you prefer to build a page from scratch, click the New Page button at the top right instead. For detailed instructions on creating and customizing a page, refer to the Getting Started with the ClickFunnels Page Editor article.
Important
If you are building a custom page, make sure to include a Checkout Element to enable purchases. For more information on adding and configuring this element, see the Checkout Element article.
Add page information as needed and click Create page.
To learn more about adding funnel steps, refer to the How to Add and Manage Funnel Steps article.
Attaching Products to the OTO Page
In the funnel step, locate the OTO page and click the three dots next to the OTO page.
Select Add Products from the dropdown menu.
.png "image(582).png")
In the Attached Products modal, click Add product to select the one you want to use for the OTO.
Hover over the desired product and click Select Product, or use the Add Product button at the top right to create a new product.
Customizing the Upsell (OTO) Page
Open the Funnel Editor by hovering on the page thumbnail, then click Edit.
customize the OTO page content. This includes adding a headline, supporting text, and a video element if you want to present your upsell through video.
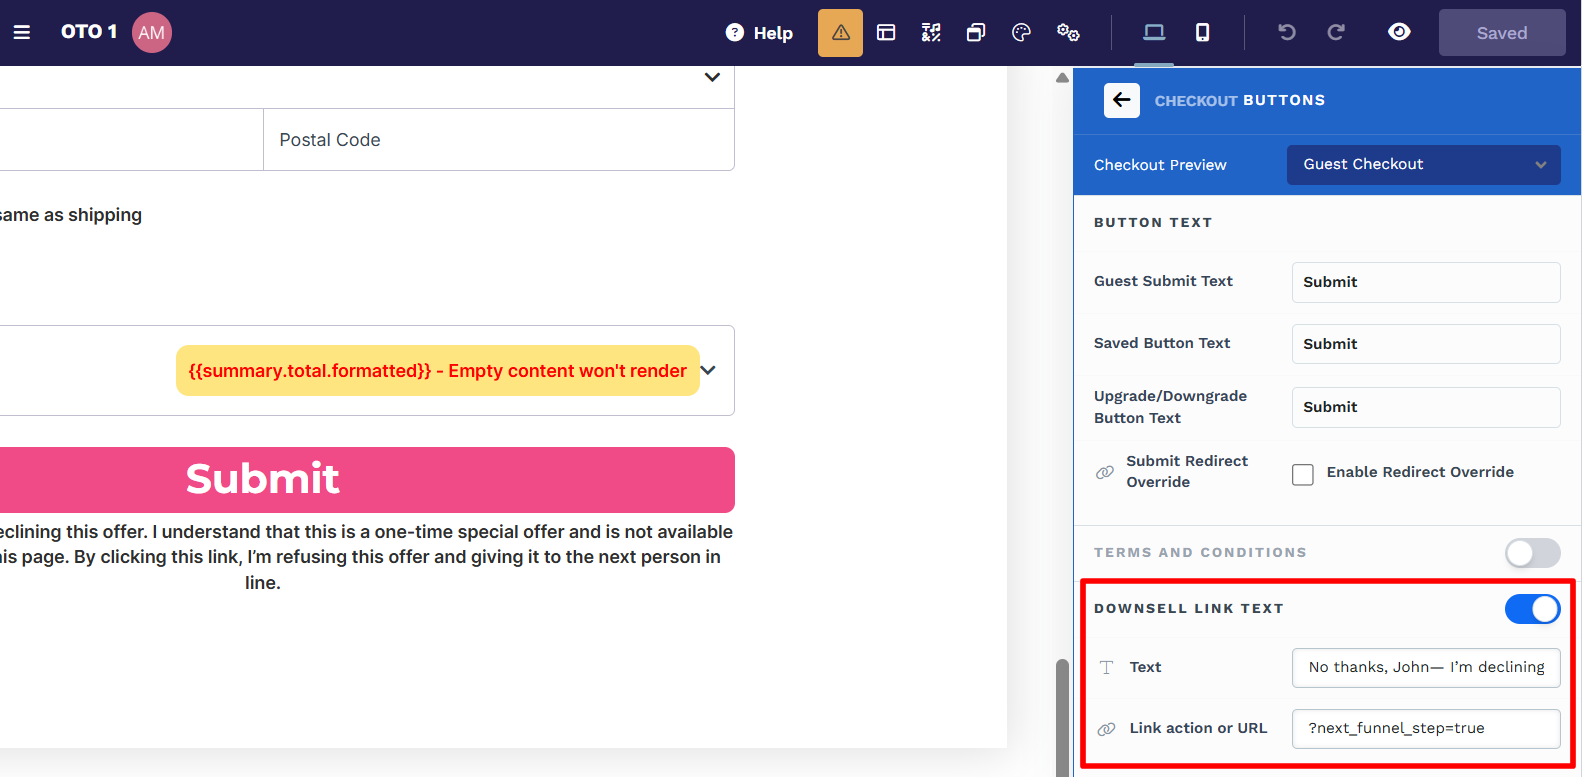
Enable the Downsell Link to provide an alternative option for customers who do not want the upsell. To do this:
Click on the Checkout element in the Funnel Editor.
In the right-side menu, select Buttons.
Scroll down to the Downsell Link Text section and toggle it on.
Customize the link text (e.g., "No, I don’t want this") and set the link action to "?next_funnel_step=true".
Testing Your OTO Flow
Use the Preview option in the funnel to view the OTO as customers will see it.
Complete a test purchase to ensure that the OTO page appears after the initial purchase and the product is correctly added to the customer’s order. Learn more in our How to Test Funnel Checkout in Test / Sandbox Mode article.
Adjust funnel settings or page content as needed if issues arise.
FAQ
Can I have multiple OTO pages in one funnel?
Yes, you can include multiple OTO pages in a funnel, such as an upsell followed by a downsell. Just add each OTO step to the funnel and customize them as needed.
What happens if a customer declines the OTO page offer?
If a customer skips the OTO page or declines the offer, the system processes their original order as usual. The OTO product will not be included in their purchase.
Can I offer multiple OTO products on the same page?
An OTO page typically focuses on a single product to avoid overwhelming the customer and maintain clarity. However, you can create separate upsell/downsell steps for additional products in your funnel.
Can customers see OTO details before reaching the page?
No, OTOs are designed to be revealed only after the initial purchase is completed. This surprise offer technique helps maintain focus on the initial checkout while increasing the likelihood of upsell conversions.
Can I customize the text on the buttons shown in my OTO?
Yes, you can customize the button text and appearance to align with your branding. To do this, click on the Checkout Element in the editor to open its settings. From there:
Select the Buttons option under the Checkout settings.
Update the Upgrade/Downgrade Button Text for the "Yes" option.
Modify the Downsell Link Text for the "No" option.
Click Save at the top right of the funnel editor to apply your changes.
For more detailed instructions, check out the Checkout Element article.
Can I edit an OTO product after it’s been added to the page?
Yes, you can edit the product by clicking the three dots next to the OTO page in the Funnel Workflow Builder. and selecting Manage Products. Click the gear icon (⚙️) next to the product to update its details. If you need to remove the product entirely, click the red X icon.
What happens if I don’t include a Checkout Element on my custom OTO page?
Without a Checkout Element, customers won’t be able to complete their purchase on the OTO page. Make sure to add this element if you’re building a page from scratch. Refer to the Checkout Element article for guidance.
What should I do if my OTO page isn’t showing in the funnel?
If the OTO page isn’t appearing:
Confirm that the page is in the correct sequence in your funnel.
Verify that a product is attached to the OTO page.
Ensure the page includes a Checkout element if it was built from scratch.
If the issue persists, review your funnel flow and test the setup again.