A Video Sales Letter (VSL) Funnel is one of the most effective ways to sell products and services online. It delivers a clear, engaging sales message through video, guiding potential customers toward making a purchase. Many businesses use VSL funnels to boost conversions and simplify the buying process. With the right setup, it keeps prospects focused and encourages action.
In this article, we’ll cover how a VSL funnel works, how to set one up, and how to customize it for your needs.
Requirements
An active ClickFunnels account
How VSL Funnels Work
A Video Sales Letter (VSL) Funnel takes the power of traditional sales letters and brings them to life through video. Instead of asking potential customers to read a long page of text, it delivers the message in a way that’s easier to absorb and more engaging. This format keeps their attention, builds trust faster, and makes it easier for them to take action.
Businesses use VSL funnels to sell everything from online courses and coaching programs to physical products and event tickets. A well-crafted video allows you to connect with your audience on a personal level, explain the value of your offer, and overcome objections before they even arise. Someone watching your VSL isn’t just reading about your product, they’re hearing the passion behind it, seeing proof that it works, and feeling confident that it’s the right choice for them.
For example, a fitness coach selling an online training program can use a VSL to explain the struggles most people face with weight loss, share client success stories, and introduce a step-by-step system that gets results. A company selling a marketing tool can walk potential customers through the biggest challenges businesses face and show exactly how their software solves those problems. The goal isn’t just to sell, it’s to educate, build trust, and make the decision process as smooth as possible.
A VSL funnel follows a simple structure that keeps the buying journey clear and distraction-free.
Understanding the VSL Funnel Structure
A VSL funnel typically includes four key pages: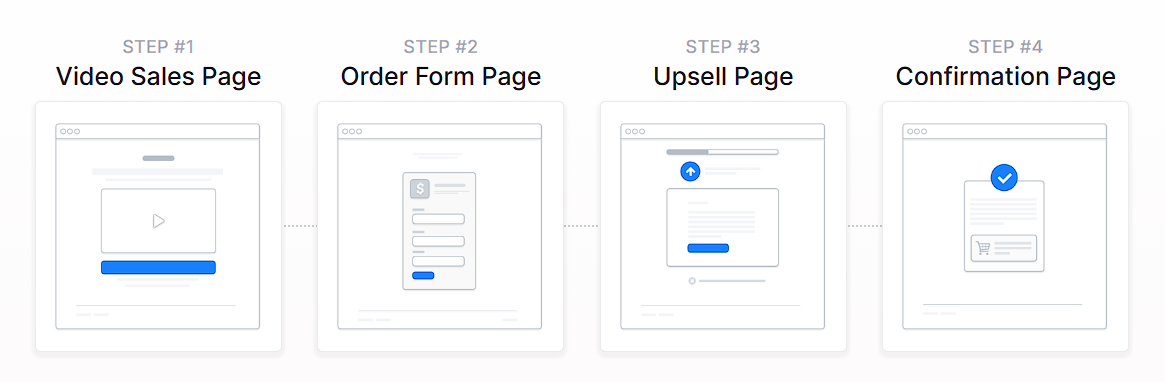
Sales Page: The main page where visitors watch the video and see a call-to-action button inviting them to take the next step.
Order Form: The checkout page where they enter their details and complete the purchase.
Upsell Page (Optional): An additional offer that complements their initial purchase, giving them a chance to upgrade or get more value.
Order Confirmation Page: A final page confirming their purchase, providing access to the product, and outlining the next steps.
Creating a VSL Funnel
A Video Sales Letter (VSL) Funnel can be built quickly using ClickFunnels' pre-designed templates. Instead of starting from scratch, you can choose a template that matches your needs, customize it with your content, and launch your funnel in just a few steps.
In ClickFunnels, go to the Funnels section from the left navigation menu.
Click the Create Funnel button.
Browse the available funnel types and select a Video Sales Letter Funnel. This category is designed specifically for selling through video.
Each funnel type includes a training section with:
Overview: Understanding how a VSL funnel works.
Strategy: Learning how to structure your video and offer for maximum impact.
Implementation: A step-by-step guide to customizing your funnel.
You can also watch the full training video at the top of this article. It covers all three parts in one walkthrough.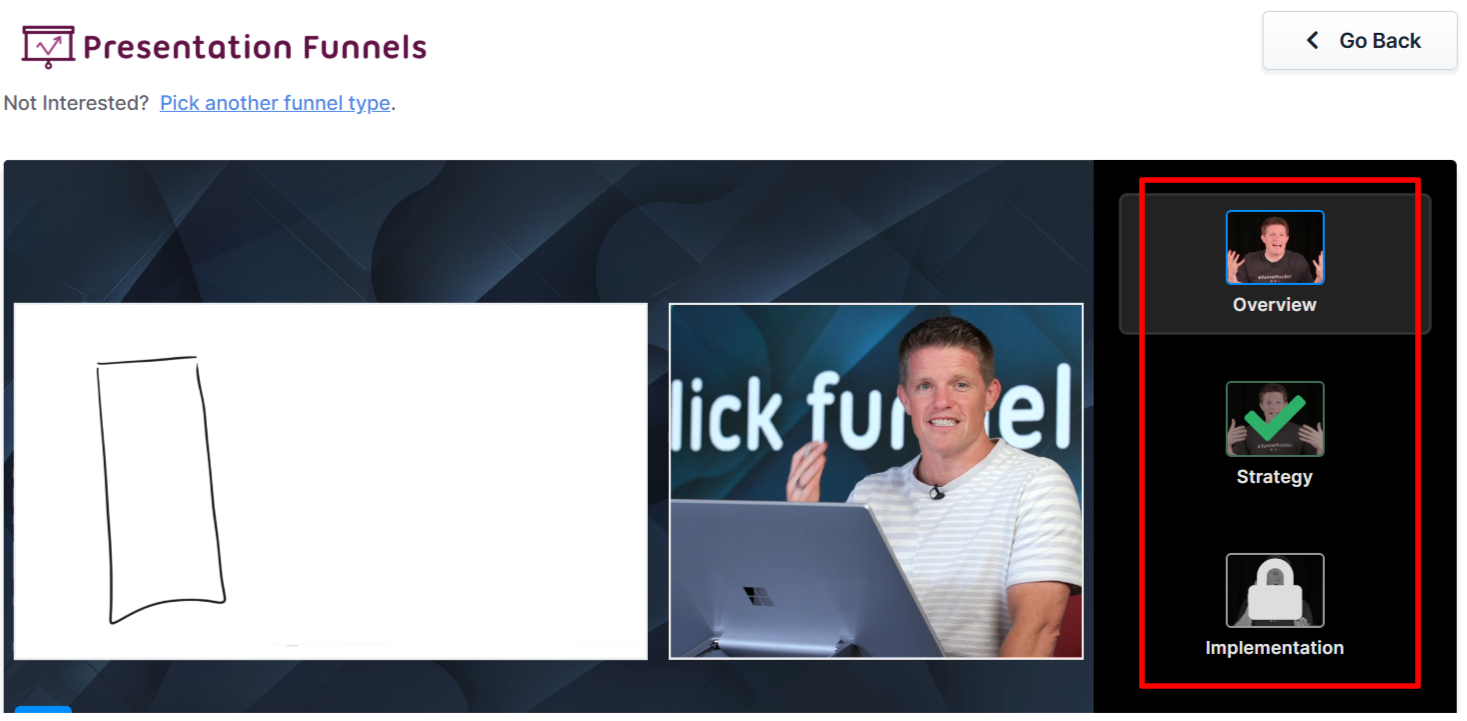
If you prefer a completely custom setup, click Start from Scratch to build your VSL funnel manually. Refer to the How to Create a New Funnel article for instructions.
Scroll through the available templates and click Select Funnel under the one that best fits your business.
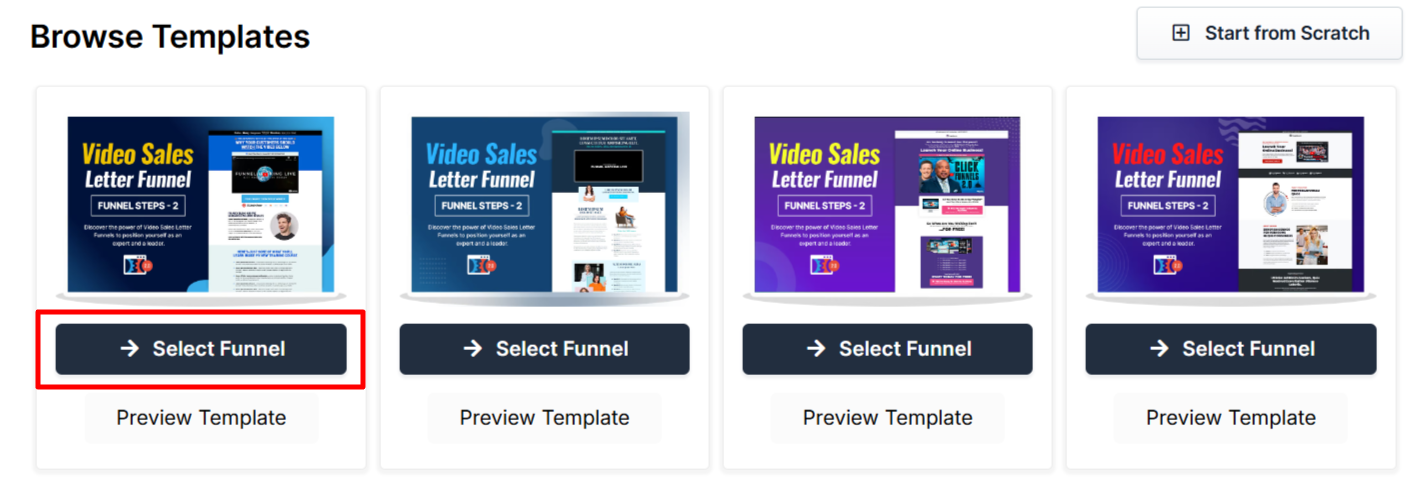
Wait for the funnel to install, then:
Click Close to exit the installation window.
Or click Customize Now to start editing your pages, upload your video, and adjust your call-to-action.
Once the template is loaded into your workspace, you can begin customizing it to fit your product, audience, and sales message.
Editing VSL Funnel Pages
Once your VSL funnel is installed, you can start customizing it by clicking Customize Now on the installation screen or by navigating to the Funnels section in your dashboard. From there, select your Video Sales Letter Funnel to access the page editor.
Open the Funnel Workflow Editor by clicking on the funnel. Find the page you want to edit, hover over it, and click Edit.

Each page is built using sections, columns, rows, and elements. For a VSL funnel, key areas to customize include:
Video Element: Upload or embed your sales video to deliver your message.
Call-to-Action Button: Ensure your button stands out and directs users to the next step.
Headlines & Sales Copy: Keep your messaging clear and persuasive.
Testimonials or Social Proof: Add credibility to your offer by including success stories.
Click Save at the top right to keep your changes.
Use the Preview option to see how your funnel looks before publishing.
NOTE
Remember to view your funnel on mobile devices to ensure it looks great on all screens. For detailed instructions, check our article on Mobile Optimization Techniques.
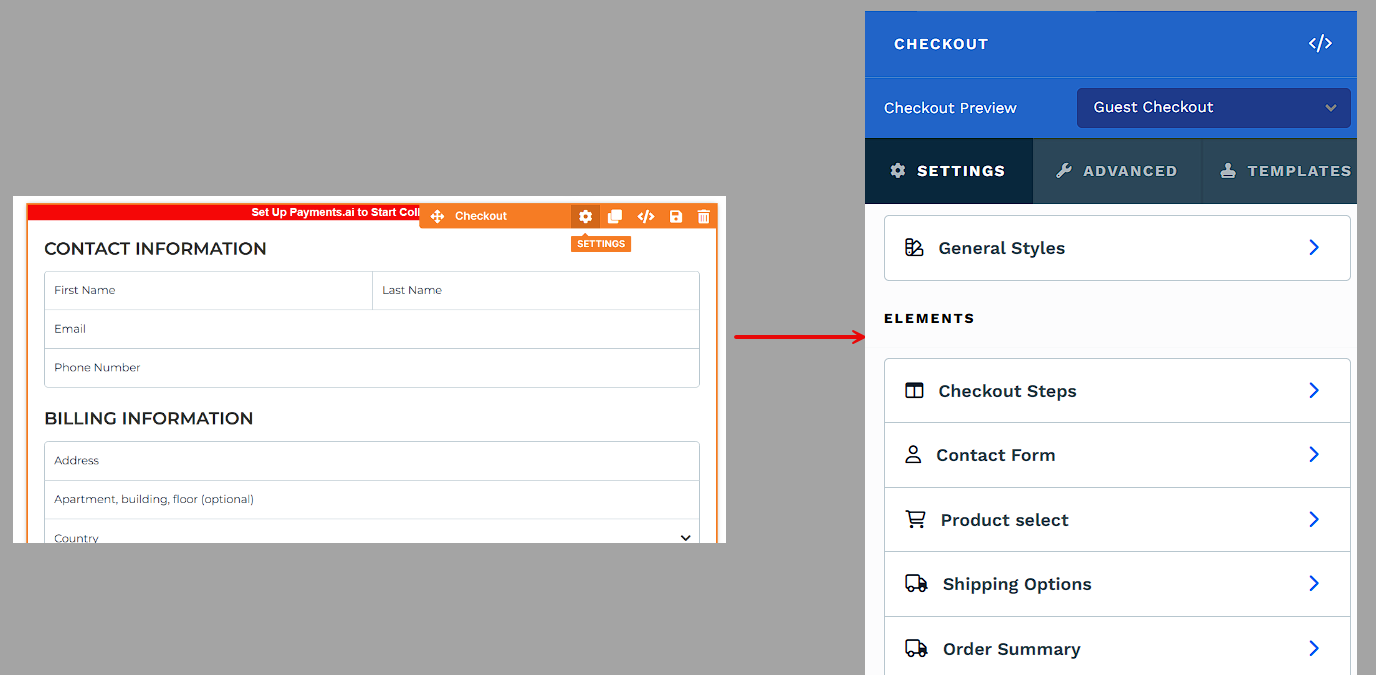
Configuring the Order Form
Once potential customers watch your Video Sales Letter and decide to buy, they’ll be directed to the order form page. This step is critical because any friction or confusion here can lead to lost sales. A well-optimized order form keeps things simple, clear, and focused on completing the purchase.
Scroll to the Order Form Page in the funnel workflow editor.
Click the Edit button on the order form page to open it in the editor.
Click on the Checkout element in the page editor to edit its settings. For instructions on customizing the checkout element refer to Checkout: Enable Users to Complete their Purchase article.
Click Save, then use the Preview option to test the checkout process. Make sure the pricing, payment options, and order bump work correctly. Refer to the How to Test Funnel Checkout in Test / Sandbox Mode for more information.
For a more detailed breakdown of order form page settings, refer to How to Add a Checkout (Order Form) Page in a Funnel article.
Setting Up the Upsell (OTO) Page
After accepting the main offer, customers are directed to an Upsell or One-Time Offer (OTO) page. This is an opportunity to offer an additional product, whether as an upsell (a premium upgrade or related product) or a downsell (a lower-cost alternative if they decline the first offer). You can add multiple OTO pages to present different offers at various stages of the funnel.
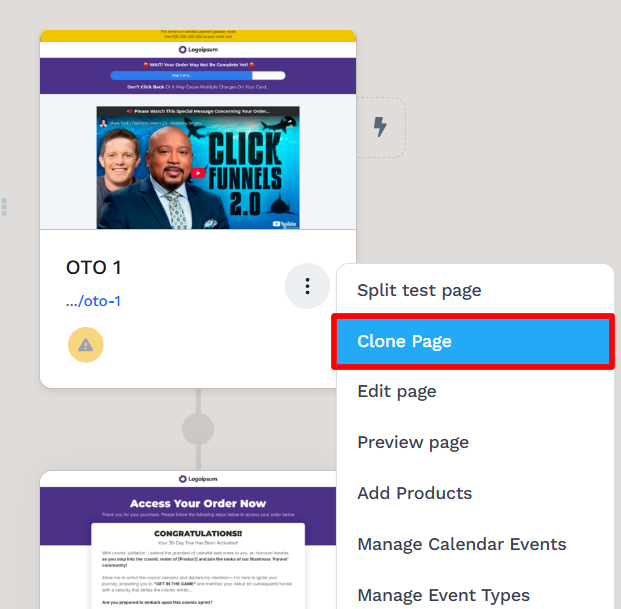
Most VSL Funnel templates already include an OTO page, which you can customize to fit your offer. If you need additional upsell or downsell pages, the easiest way to maintain consistency is to clone an existing OTO page:
In the funnel workflow editor, locate an existing OTO page in your funnel.
Click the three-dot menu (⋮) on the page and select Clone Page.
Rename the cloned page and adjust its settings to reflect the new offer.
To configure the OTO page:
Open the page editor and customize the page content. This includes adding a headline, supporting text, and a video element if you want to present your upsell through video.
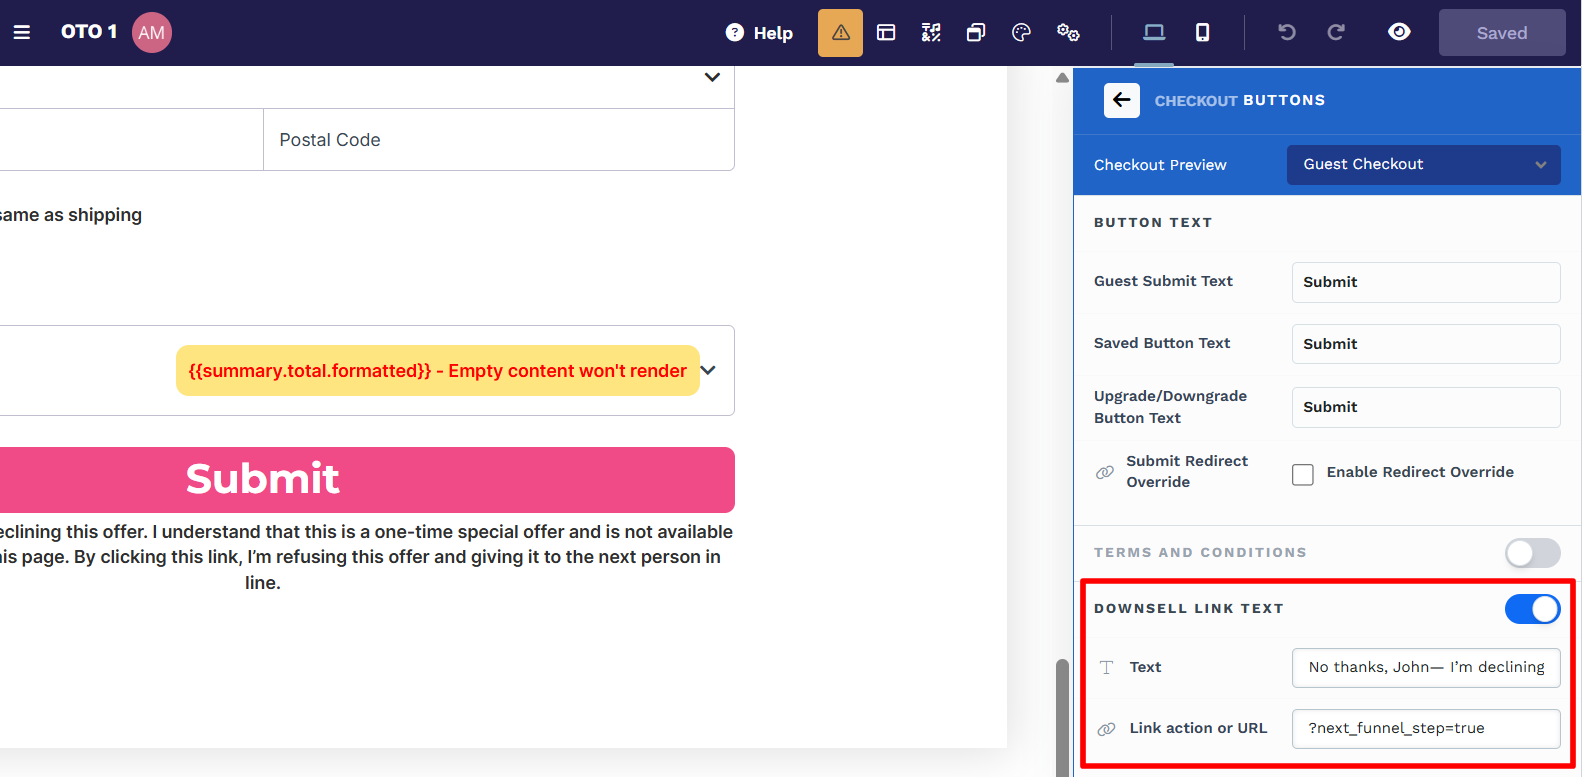
Enable the Downsell Link to provide an alternative option for customers who do not want the upsell. To do this:
Click on the Checkout element in the Funnel Editor.
In the right-side menu, select Buttons.
Scroll down to the Downsell Link Text section and toggle it on.
Customize the link text (e.g., "No, I don’t want this") and set the link action to "?next_funnel_step=true" to direct customers to the next step in the funnel.
Test the upsell/downsell flow by clicking Preview to ensure customers are taken through the correct sequence when they accept or decline the offer.
Helpful Resources:
Customizing the Order Confirmation Page
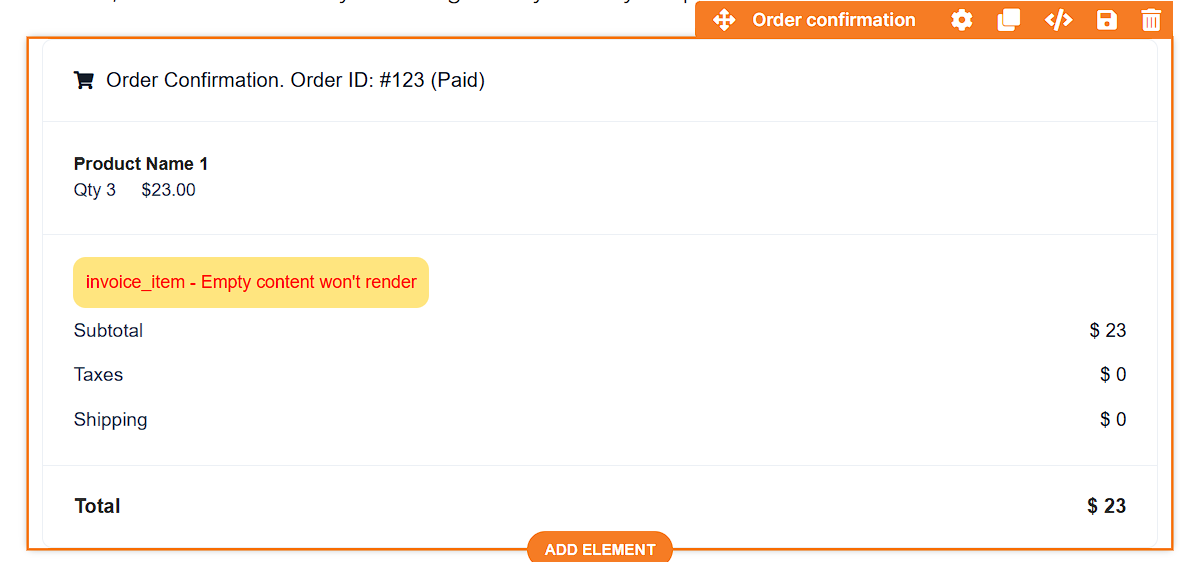
The order confirmation page is the final step in the VSL funnel, providing customers with a summary of their purchase. This page reassures buyers that their order was processed successfully and gives them clear instructions on what happens next.
Hover over the Order Confirmation Page in the funnel workflow editor and click Edit to customize it.
If the page includes a Confirmation element, it will automatically display a summary of the customer’s purchase. To adjust its settings, refer to the Confirmation: Display Order Confirmation and Summary article.
Customize the headline and thank-you message to match your brand.
To include support details, refund policies, or FAQs, use text elements or buttons to display the necessary information.
Click Save, then use the Preview option to check that all order details and next steps are clearly displayed.
Adding Products to Funnel Pages
To ensure the checkout process works properly, each funnel page where a purchase occurs requires at least one product. This allows customers to complete their purchases and ensures any additional offers are processed correctly.
Scroll down to the Order Form page in the funnel workflow editor.
Click the three-dot (⋮) icon beside the page and select Add Products.
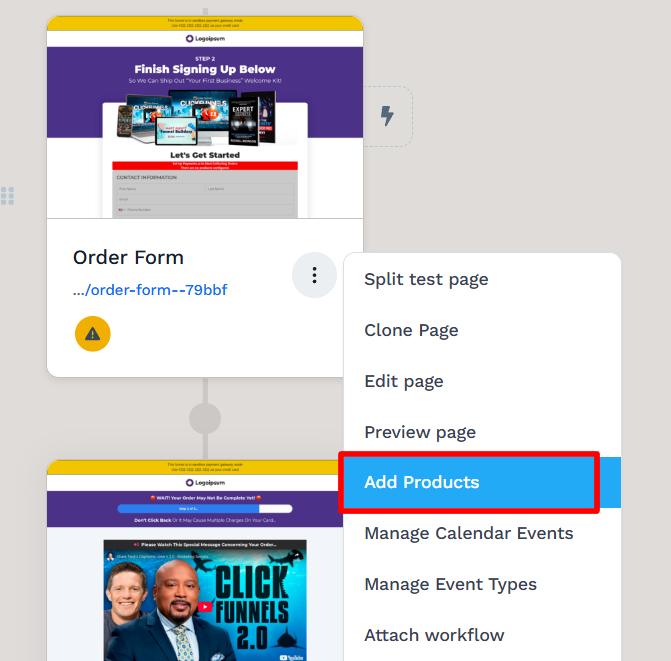
Click + Add Product to open the product selection window. Hover over the product you want to attach and click Select Product, or create a new product by clicking Add Product at the top right.
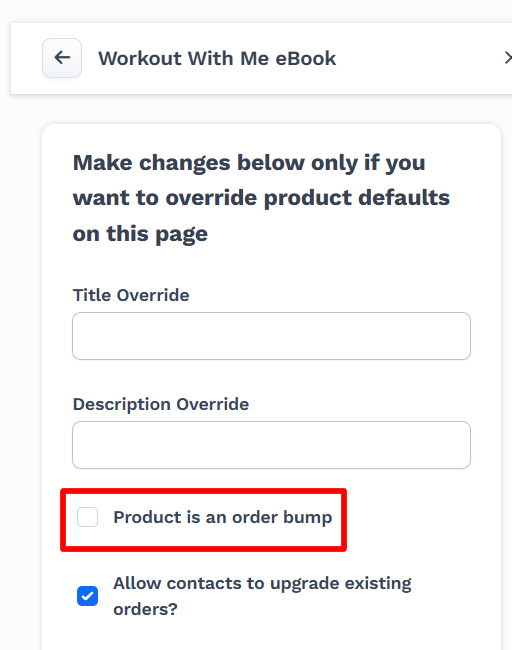
Once the product is added, click the Gear ⚙ icon next to it to access product settings. Here, you can override the title and description if needed.
To add an Order Bump, enable the "Product is an Order Bump" checkbox or drag the product into the Order Bump section. Add a preheadline to highlight the offer and click Update Included Product to save changes.
Adjust the Checkout Settings to define product selection rules. Choose between:
Single Product: Customers can only purchase one product at a time.
Multiple Products with Quantity: Allows customers to add multiple products and select quantities.
Multiple Products with Checkbox: Customers can select multiple products without quantity selection.

Click Update to save the changes.
Helpful Resources:
Automating Follow-Ups with Workflows
Workflows allow you to automate follow-ups and actions based on customer behavior. Instead of manually managing emails, product access, or customer segmentation, workflows handle these tasks automatically.
With workflows, you can:
Send Order Confirmation Emails: Automatically email customers with purchase details.
Deliver Digital Products or Assets: Provide links to downloads or membership access.
Enroll Customers in a Course: Add buyers to an online course or members-only area.
Tag Customers Based on Behavior: Segment users based on purchases or actions.
Trigger Additional Offers or Sequences: Set up follow-up emails or SMS campaigns.
To create a workflow:
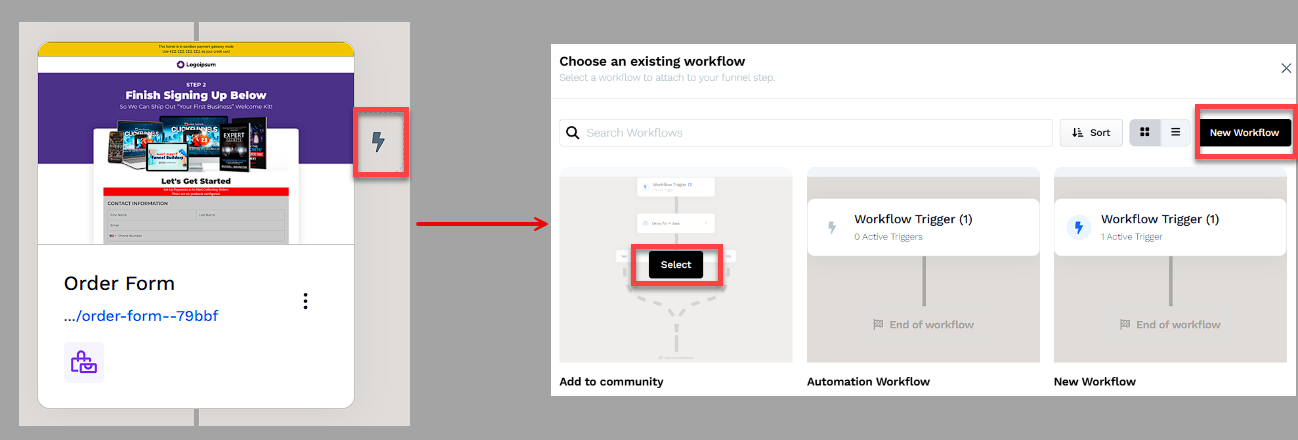
Locate the funnel step where you want to trigger the workflow.
Click the Lightning Bolt icon next to the step to add a new or existing workflow.
Select an existing workflow from the list or create a new one.
Click + (Plus Icon) to add actions such as Send an Email, Send an Asset, Enroll in a Course, or Tag Contact.
(Optional) Add a Delay to space out follow-up actions over time.
In the top right corner of the workflow navigation, find the Status option.
Toggle the status option. The workflow status will change from disabled to active.
Helpful Resources:
Testing and Publishing Your Funnel
Before making your funnel live, it’s important to test its functionality to ensure everything works as expected.
Test the Funnel
Verify that all pages are connected in the correct order.
Check buttons, forms, and links to confirm they function properly.
Test the funnel on different devices and browsers for a smooth experience.
To run a full checkout test, follow the steps in How to Test Funnel Checkout in Test / Sandbox Mode.
Enable Live Mode
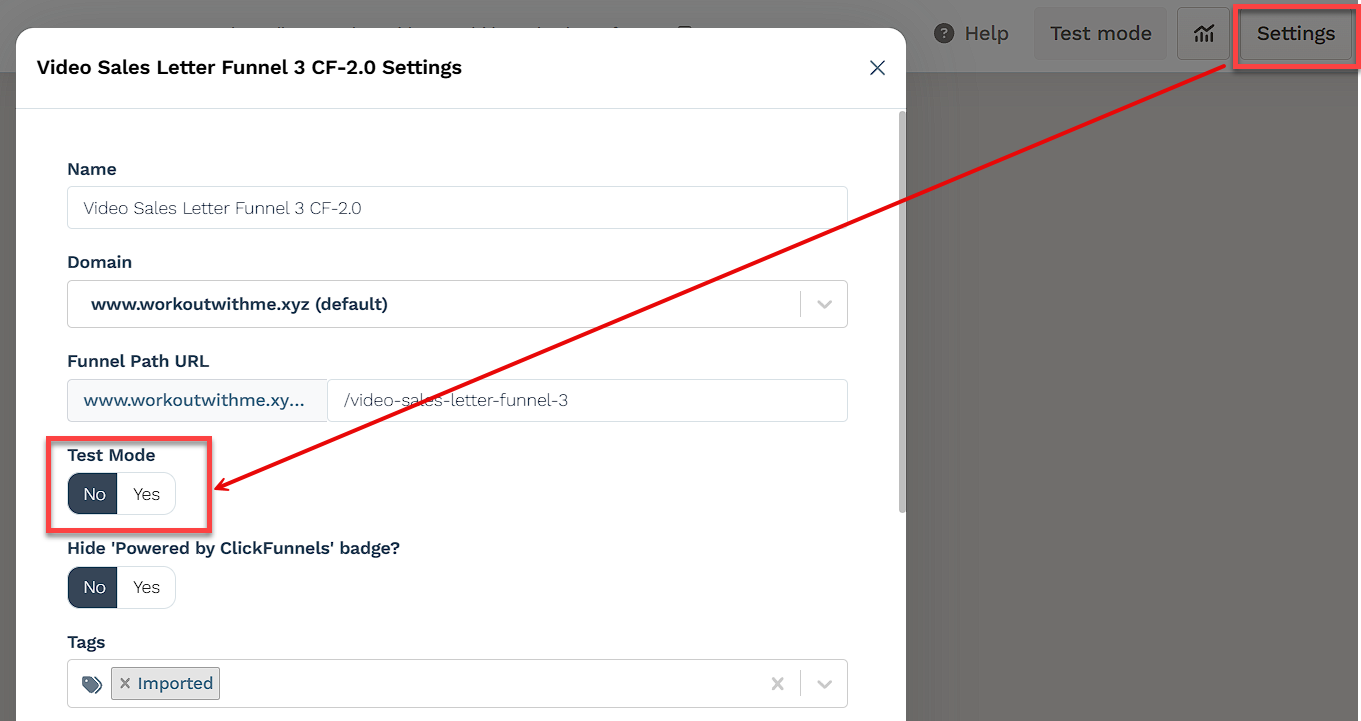
Click the Settings button at the top-right corner of the funnel workflow editor to open the funnel’s settings.
Set the funnel to Live Mode to make it accessible to customers.
Copy and Share Your Funnel URL
Hover over the URL at the top of the funnel workflow page and click to copy.
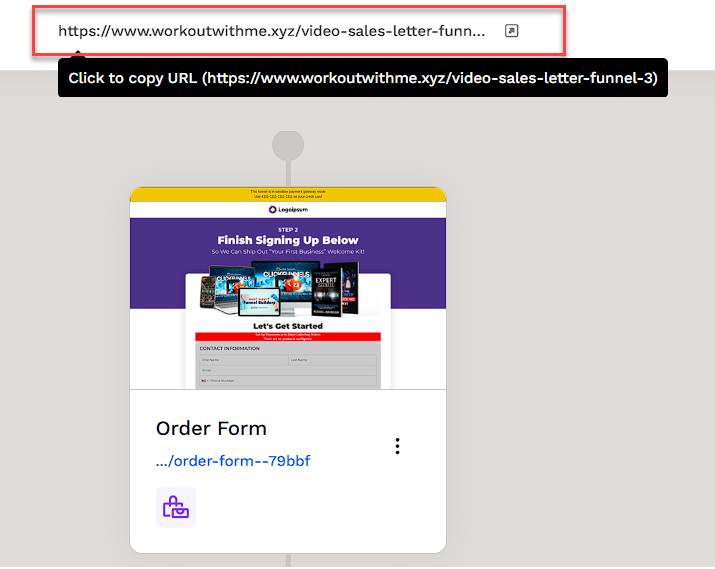
Share the link via your website, social media, or email campaigns.
Learn more about publishing and sharing your funnel in this article.
Funnel Builder Support Options
For additional support building your funnel, explore the Funnel Builder Coaching & Certification Program. The program offers step-by-step training and live coaching for members who want to build with guidance.
To hire a certified funnel builder, visit the Funnel Builder Directory to connect with a verified expert.