A Cart Funnel is designed specifically for e-commerce businesses and physical product sellers to showcase one core product, offer strategic upsells, and drive conversions—without overwhelming visitors with too many options. In this guide, we’ll walk you through the process of creating your own Cart Funnel in ClickFunnels using our pre-built templates.
Requirements
An active ClickFunnels account
Products created in your ClickFunnels workspace
A payment processor (e.g., Payments AI, Stripe) connected to the workspace
What is a Cart Funnel
A Cart Funnel is a pre-structured sales funnel designed to help you sell physical or digital products online. It focuses on offering a single front-end product and uses strategic follow-up pages to maximize each customer's value.
Unlike a traditional e-commerce store that showcases many products at once, a Cart Funnel simplifies the shopping experience by guiding your customers step by step toward a purchase decision, minimizing distraction and increasing conversions.
This type of funnel is ideal for sellers who want to highlight one core offer, make additional recommendations, and streamline the checkout process.
Example: Selling a Physical Product with a Cart Funnel
Imagine you're selling a premium water bottle. Instead of directing visitors to a storefront with multiple items, you guide them to a dedicated Order Page highlighting the water bottle with engaging copy, a product video, and a two-step order form.
After entering their information, customers see an Order Bump offering a cleaning brush specifically designed for the bottle. With one click, they can add it to their purchase. Next, they’re taken to an Upsell Page promoting a discounted bundle of three additional bottles—ideal for family or travel use. Finally, they land on a Confirmation Page that thanks them for their purchase and provides an order summary.
This structure keeps the buying process focused and encourages additional purchases along the way.
Cart Funnel Structure
A traditional Cart Funnel includes a series of core pages that work together to guide your customers through a focused sales process, present additional offers, and confirm their purchase.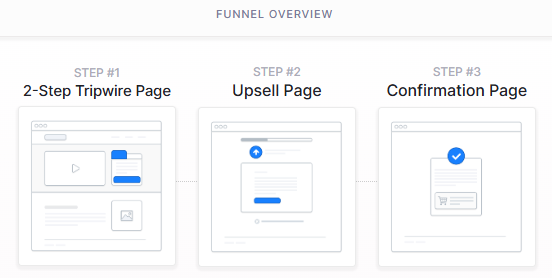
Funnel Overview:
Each Cart Funnel template in ClickFunnels includes a pre-configured page structure that supports your sales strategy. This structure typically includes:
Order Page (2-Step Tripwire Page) – Captures customer information and showcases your core offer. You can also include an optional order bump.
Upsell Page – Offers an additional product after the initial purchase using a one-click upsell feature.
Confirmation Page – Confirms the customer's order and provides purchase details or next steps.
Note:
The structure of your Cart Funnel can vary based on your business strategy and sales goals. For example, you may choose to include multiple Upsell Pages after the Order Page to present additional offers or bundle options.
Creating a Cart Funnel in ClickFunnels
Follow these steps to quickly create your Cart Funnel using one of the available templates:
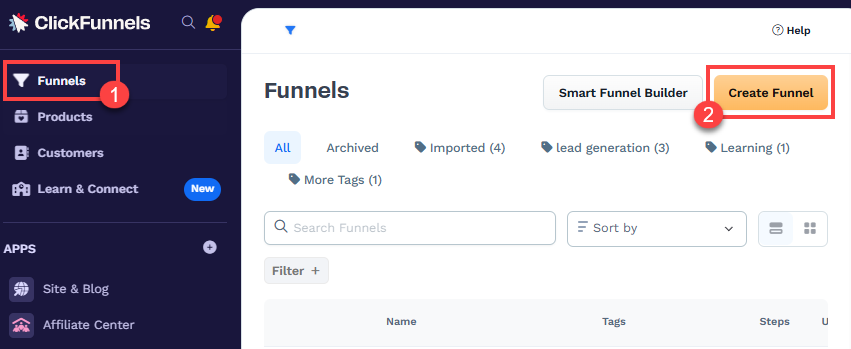
In your ClickFunnels workspace, Navigate to the Funnels menu.
In the top right corner, click the Create Funnel button.
On the Unboxing Funnels section, click Select under the Cart Funnel card.
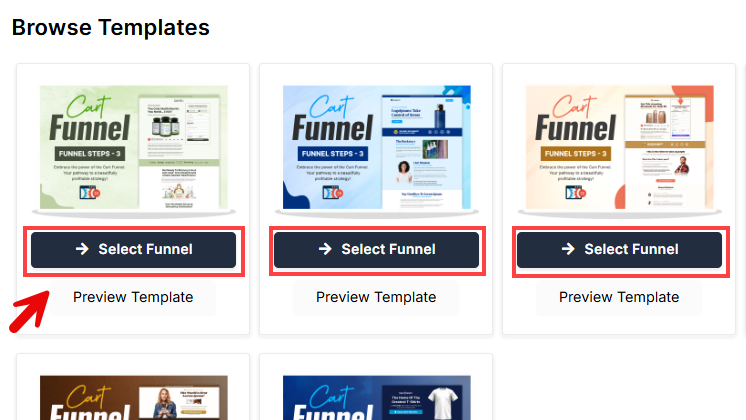
Scroll through available Cart Funnel templates.
Click Preview Template to view the layout or Select Funnel to create the funnel in your workspace. The imported funnel includes the 2-step tripwire, upsell, and order confirmation pages.
Once your funnel is created, update each page by editing the text, images, videos, and connecting products where needed.
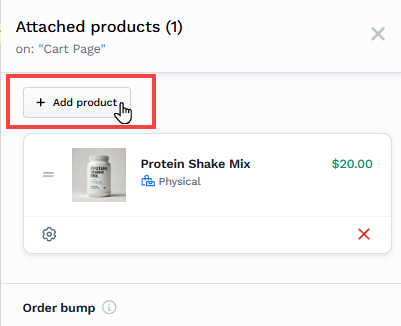
Adding Products to the Order Page
Adding products to your Cart Funnel is an essential step that allows you to process payments and fulfill orders. Without connecting a product to your Order Page, your order form will not function, and customers won’t be able to complete their purchase.
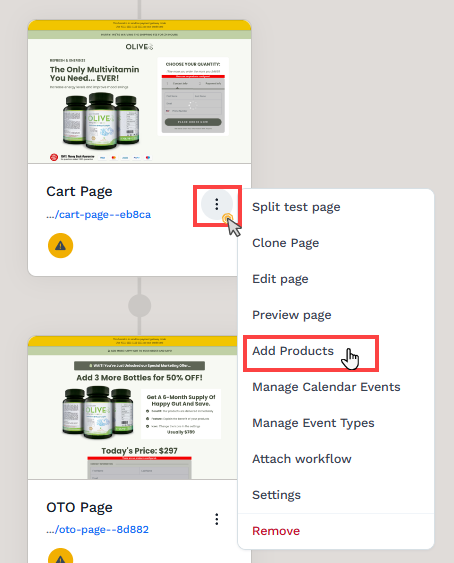
Navigate to the Cart Funnel.
Locate the Order (Cart) Page in your funnel.
Click the Three-Dot Menu (⋮) beside the page.
Select Add Products.
Click + Add Product to open the product selection window.
Hover over the desired product and click Select Product, or use the Add Product button at the top right to create a new product.
To add more products, click the Add Product button again to open the product selection window.
The Cart Funnel template features an upsell page that also requires product additions. Please repeat the previously mentioned process on the upsell page to include the upsell product appropriately.
Helpful Resources:
Sending Automated Emails Using a Workflow
To ensure your customers receive important order information and post-purchase follow-ups, it's essential to send automated emails using a Workflow in ClickFunnels.
Common Email Types:
Order Confirmation Email: Sent immediately after the purchase is completed.
Upsell Follow-up Email: Encourages buyers to consider additional products they may have missed.
Shipping or Access Details: Provide digital product access or shipping confirmation for physical goods.
Abandoned Cart Email Sequence: Remind customers who started the checkout process but didn’t complete it to return and finish their purchase. These emails can include product highlights, limited-time discounts, or urgency messaging.
Post-Purchase Promotions: Offer discount codes, product care tips, or referral incentives.
Attaching Workflows to a Funnel Step
Once your email workflow is ready, you can connect it to your Cart Funnel so that contacts automatically enter the sequence based on their activity.
To attach a workflow:
Open your Cart Funnel and select the funnel step where the automation begins (e.g., Order Page).
Next to the funnel step, click the Lightning Bolt (
⚡ ) icon to add a new or existing workflow. This will open a dialog where you can select the appropriate workflow from the list. The workflow editor will open, and a new trigger will be automatically created in the workflow.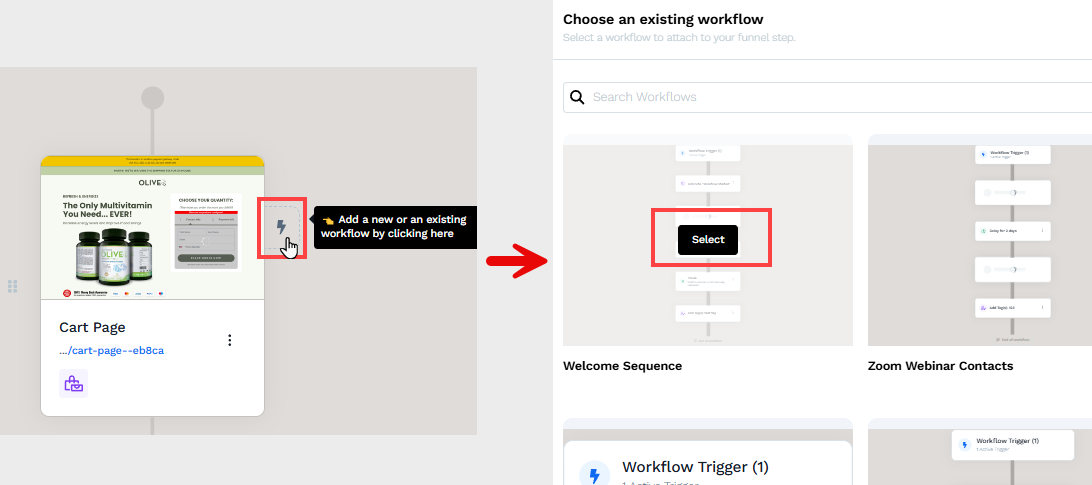
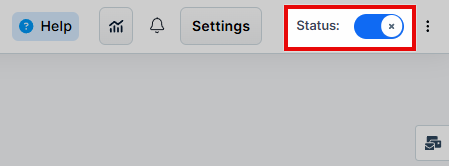
The final step is to activate the workflow to respond to contacts who meet the trigger criteria.
In the top right corner of the workflow navigation, find the Status option.
Toggle the status option. The workflow status will change from disabled to active.
Helpful Resources:
Fulfilling Customer Orders After Purchase
If you’re using a Cart Funnel to sell physical products, it’s important to define how those orders will be fulfilled after purchase. ClickFunnels supports multiple order fulfillment methods depending on your setup and product type.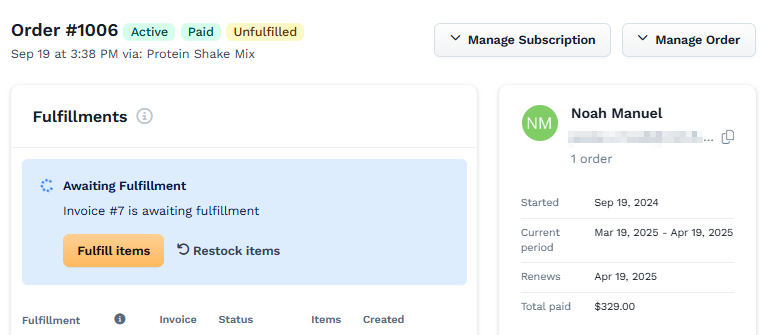
Order Fulfillment Methods in a Cart Funnel:
ShipStation Integration: If your business uses ShipStation for logistics and shipping, you can connect your account in ClickFunnels. When a customer completes a purchase, order data is automatically sent to ShipStation for processing, packaging, and shipping.
Shippo Integration: ClickFunnels also integrates with Shippo, which allows you to generate accurate shipping labels, compare live carrier rates, and access discounted shipping prices. When connected, Shippo can automatically display calculated shipping costs at checkout, helping you streamline fulfillment while offering cost-effective shipping options for your customers.
Zendrop Fulfillment: If your product was imported from Zendrop, ClickFunnels automatically sends the order data to Zendrop when the purchase is made. Zendrop then handles the packaging and delivery of the product on your behalf.
Manual Fulfillment: If you're fulfilling orders manually, you can manage and track customer purchases inside your Orders tab. You’ll need to mark orders as fulfilled manually or use internal processes to ship products and notify customers.
To give you a general overview of how order fulfillment works in a Cart Funnel, here are the most common scenarios depending on your business needs:
Automated Fulfillment with Shipping Services: If you want to fully automate shipping—including label generation, packaging, and delivery—you can use integrated services like ShipStation or Zendrop. These platforms handle logistics after the order is placed.
Manual Fulfillment with Live Shipping Rates: If you prefer to fulfill orders yourself (e.g., from your home or warehouse) but still want to charge accurate shipping fees, consider using Shippo. It allows you to display live carrier rates during checkout and print shipping labels manually.
Creating Shipping Profiles: You can set up domestic and international shipping profiles in ClickFunnels to display calculated shipping prices automatically when the customer enters their address during checkout.
Manual Order Management: You can also manually manage your entire fulfillment process by reviewing orders in the Orders tab, handling packaging and shipping yourself, and marking each order as fulfilled.
Helpful Resources:
Summary
To successfully set up and manage a Cart Funnel in ClickFunnels, here’s what you need to do:
Import a pre-built Cart Funnel template to get started with the essential funnel structure.
Create a product and attach it to the Order Page to enable payment processing and fulfillment.
Customize each funnel page to reflect your product's messaging, branding, and offer strategy.
Set up workflows to automate email communication, including order confirmations, upsell reminders, and abandoned cart sequences.
Define your fulfillment method—whether through ShipStation, Shippo, Zendrop, or manual order handling.
This setup helps you sell your products efficiently while creating a high-converting, customer-friendly checkout experience.
Funnel Builder Support Options
For additional support building your funnel, explore the Funnel Builder Coaching & Certification Program. The program offers step-by-step training and live coaching for members who want to build with guidance.
To hire a certified funnel builder, visit the Funnel Builder Directory to connect with a verified expert.