A challenge funnel is a step-by-step system that helps businesses attract leads, build engagement, and convert customers through a timed event. It creates an interactive experience where participants complete daily tasks while learning about a product or service. This article explains how challenge funnels work, how to create one, and key tips for making them successful.
Requirements
An active ClickFunnels account
How Challenge Funnels Work
A challenge funnel is a marketing system that delivers a structured, time-based experience to engage potential customers and guide them toward a paid offer. Instead of promoting a product directly, businesses use a challenge to provide value, build trust, and create a sense of achievement. Participants follow daily steps, complete tasks, and interact with the brand, making them more likely to take action at the end.
This type of funnel works well for businesses that teach skills, promote habits, or sell transformation-based products. For example, a nutrition coach could run a "5-Day Healthy Eating Challenge" where participants receive daily meal plans and grocery lists. At the end, they might be offered a full coaching program. A fitness trainer could host a "7-Day Home Workout Challenge" with guided exercises, leading into a membership program. A wellness brand might launch a "10-Day Mindfulness Challenge" to introduce their meditation app or coaching services.
Challenges create momentum by getting participants actively involved. They experience progress firsthand, making them more invested in the process. By the time they reach the final step, they’re more likely to see the value in upgrading to a paid offer.
Understanding the Challenge Funnel Structure
A challenge funnel consists of four main pages, each designed to guide participants through the experience while encouraging engagement and conversions.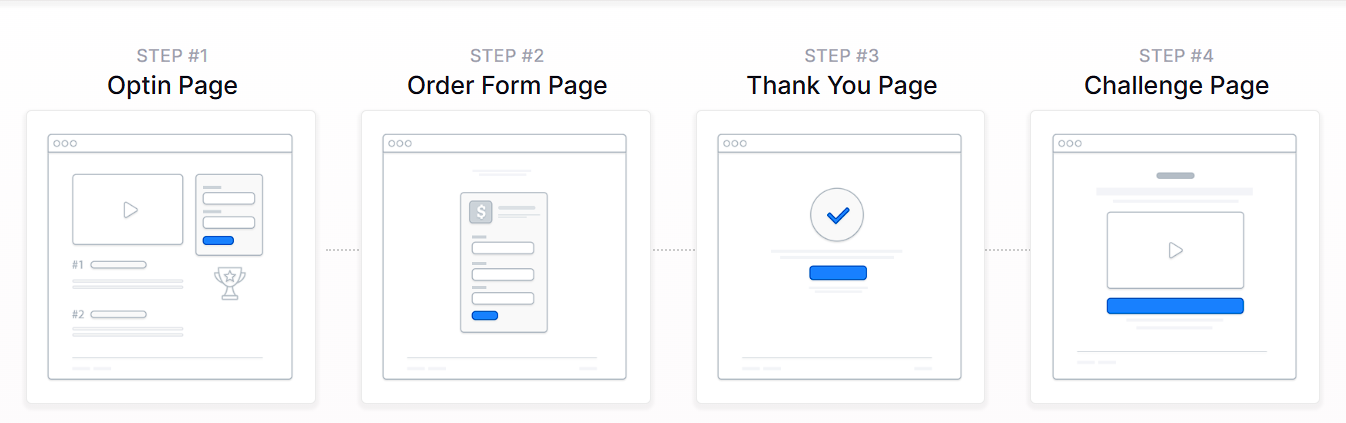
Opt-in Page: This is where visitors sign up for the challenge. The page highlights what they’ll learn, the duration of the challenge, and why they should join. It includes a simple form to collect names and emails, allowing businesses to follow up with participants.
Order Form Page (Optional VIP Upgrade): After signing up, participants are taken to an optional VIP upgrade page. This might offer bonuses such as live coaching, exclusive resources, or replays of the challenge sessions. If they choose to upgrade, they complete their purchase on this page.
Thank You Page: Once registered, participants land on the thank you page. This page confirms their spot in the challenge and provides next steps, such as joining a private community or marking the challenge dates on their calendar.
Challenge Page: The challenge page is where participants access daily lessons, videos, and resources. Depending on the setup, this could be a single page with sections unlocked each day or multiple pages for different challenge days.
Creating a Challenge Funnel
A challenge funnel can be built quickly using ClickFunnels' pre-designed templates. Instead of starting from scratch, you can choose a template that matches your needs, customize it with your content, and launch your funnel in just a few steps.
In ClickFunnels, go to the Funnels section from the left navigation menu.
Click the Create Funnel button.
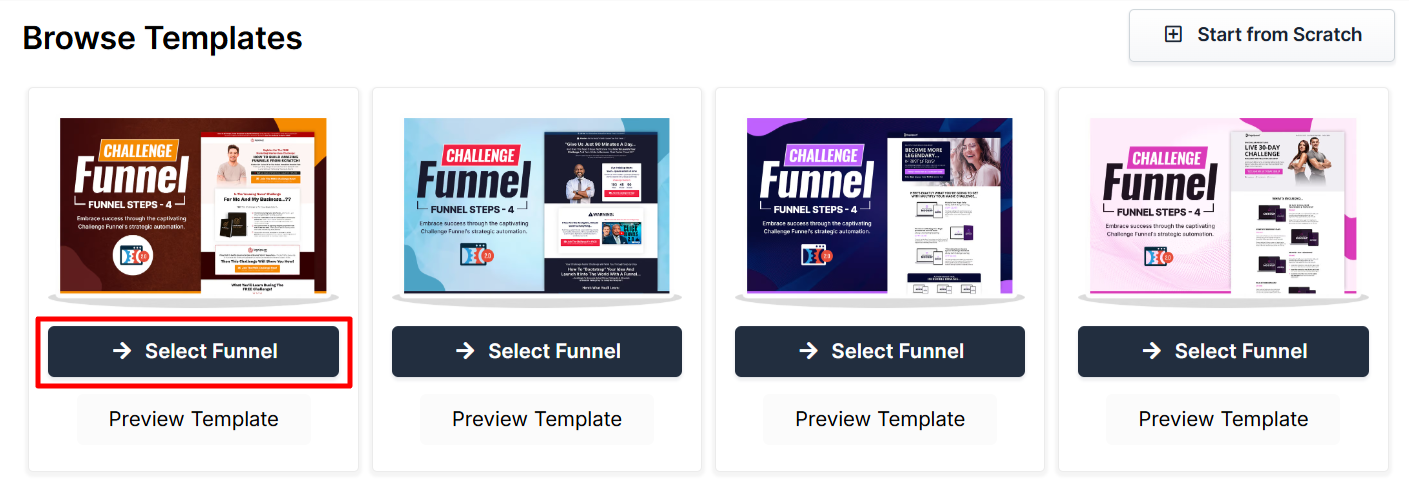
Browse the available funnel types and select a challenge funnel.
Each funnel type includes a training section with:
Overview: Understanding how a challenge funnel funnel works.
Strategy: Learning how to structure your funnel and offer for maximum impact.
Implementation: A step-by-step guide to customizing your funnel.
You can also watch the full training video at the top of this article. It covers all three parts in one walkthrough.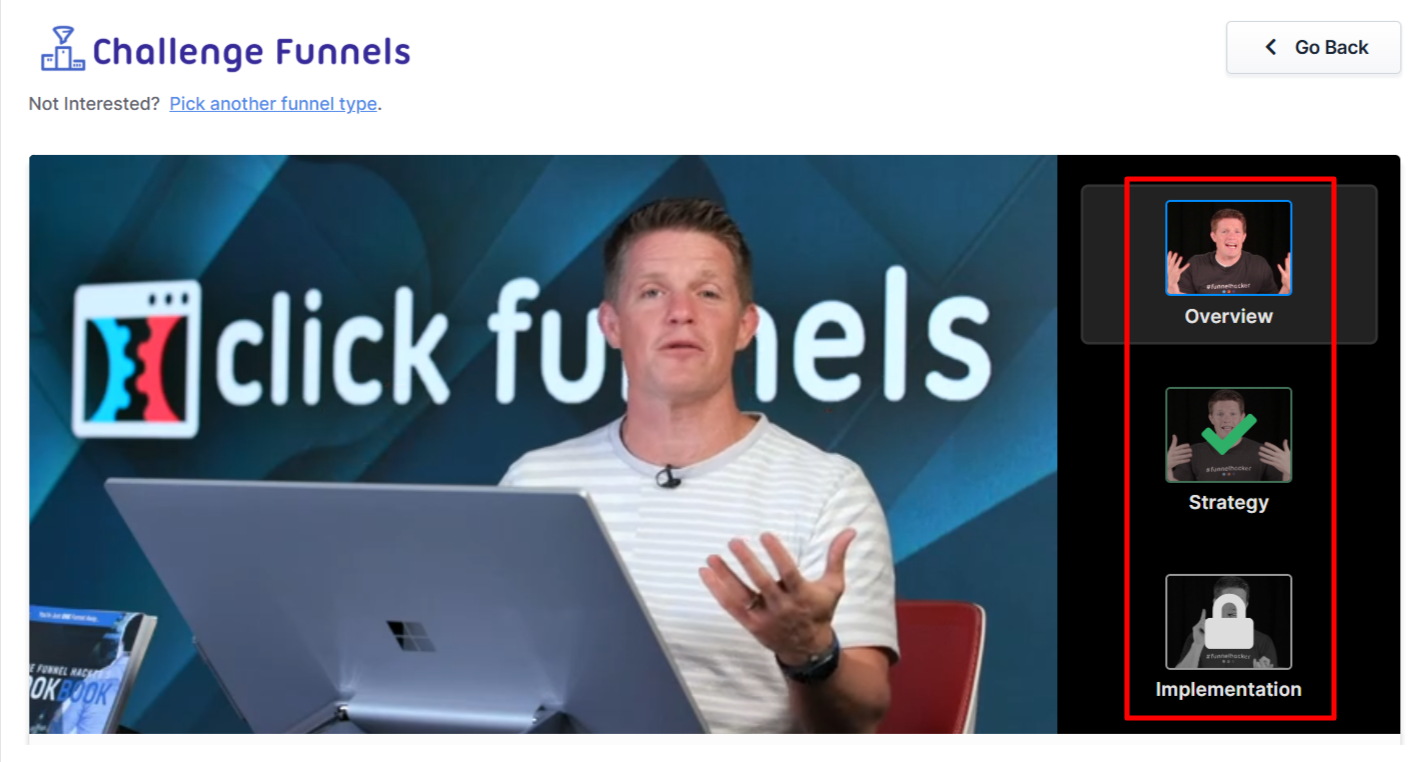
If you prefer a completely custom setup, click Start from Scratch to build your funnel manually. Refer to the How to Create a New Funnel article for instructions.
Scroll through the available templates and click Select Funnel under the one that best fits your business.
Wait for the funnel to install, then:
Click Close to exit the installation window.
Or click Customize Now to start editing your pages, build your workflows, and adjust your call-to-action.
Once the template is loaded into your workspace, you can begin customizing it to fit your product, audience, and sales message.
Editing Challenge Funnel Pages
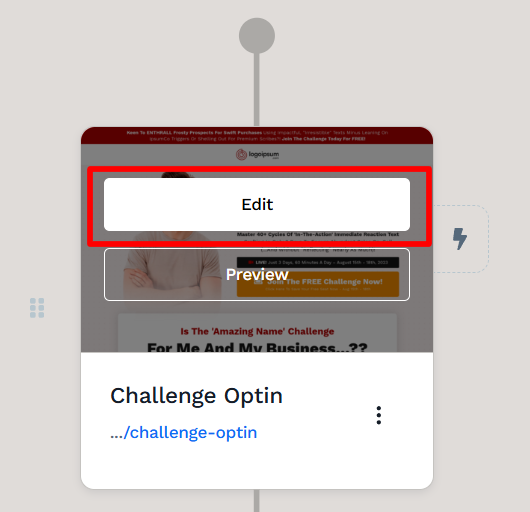
Once your challenge funnel is set up, you can start customizing each page to match your branding, messaging, and challenge content. This can be done using the Funnel Workflow Editor inside ClickFunnels.
Open the Funnel Workflow Editor by clicking on the funnel, find the page you want to update, hover over it, and click Edit.
Each page is built using sections, rows, and elements. Key areas to customize include:
Opt-in Form: Collect names and emails for challenge registration.
Headline & Description: Clearly state the challenge name, duration, and key benefits.
Video Element: Add an introduction video to explain what participants can expect.
Call-to-Action Button: Ensure buttons stand out and guide users to the next step.
Countdown Timer: Create urgency by showing when the challenge starts.
Testimonials or Social Proof: Build credibility with success stories from past participants.
Opt-Out Link: Usually included on the VIP acces page below call-to-action buttons for users who don’t want to upgrade. Link it to "?next_funnel_step=true" so they can continue without selecting the VIP offer.
To learn more about editing elements in ClickFunnels, refer to the Getting Started with the ClickFunnels Page Editor article.
Click Save in the top right corner to keep changes.
Use the Preview option to check how the page looks before publishing. Remember to view your funnel on mobile devices to ensure it looks great on all screens. For detailed instructions, check our article on Mobile Optimization Techniques.
NOTE
Most templates include a single challenge event page by default. If your challenge runs for multiple days, you can duplicate the page for each day:
In the Funnel Workflow Editor, click the ⋮ icon next to the page.
Select Clone Page and update the content for each day.
Adding Products to The Order Form Page
A challenge funnel usually gives participants a free experience, but adding a VIP upgrade allows you to offer extra value to those who want more. This could include live Q&A sessions, challenge replays, exclusive training, or other premium resources. Setting up the VIP option correctly ensures the right offer is available at checkout.
Scroll to the Order Form page in the Funnel Workflow Editor.
Click the three-dot (⋮) icon next to the page and select Add Products.
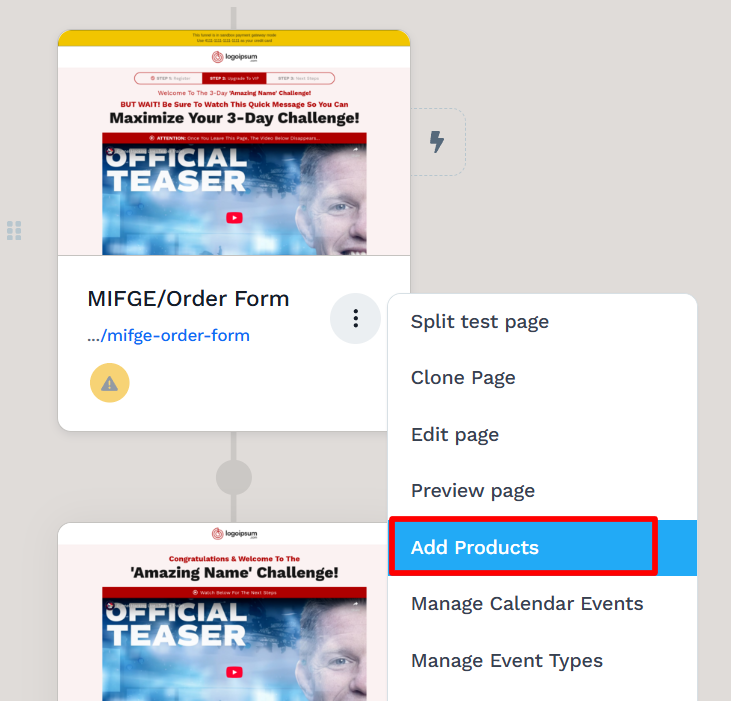
Click Add Product, then choose an existing product or create a new one.
Once added, click the Gear (⚙) icon to adjust product settings, such as the title or description.
Click Update to save changes.
Helpful Resources:
Automating Communication for Challenge Funnels
Workflows help keep participants engaged throughout the challenge without requiring manual follow-ups. They can send reminders, segment participants, and deliver important content at the right time.
With workflows, you can:
Send email reminders for daily challenge content.
Tag participants based on their engagement and actions.
Deliver exclusive VIP content automatically.
Register participants for third-party tools like Zoom for live sessions.
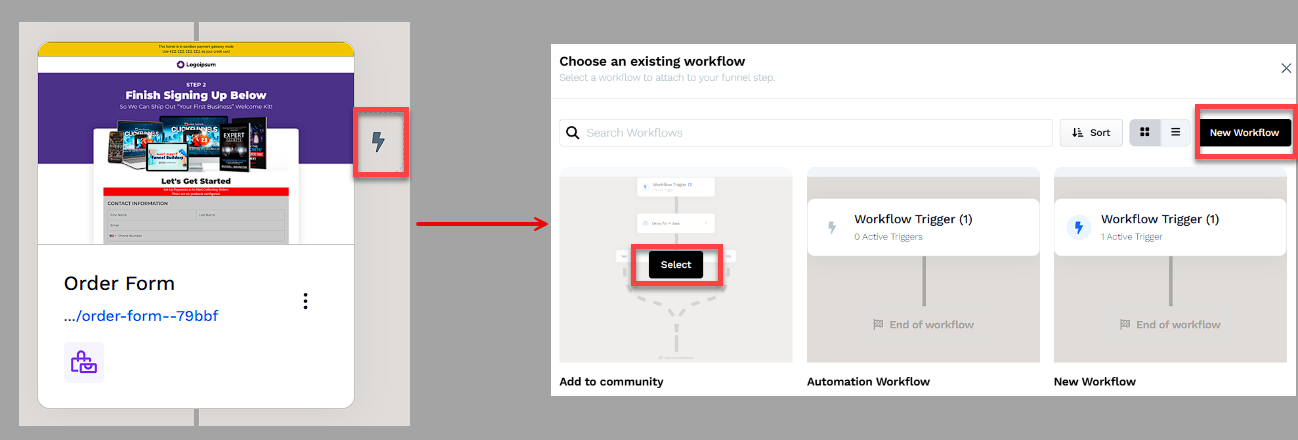
To create a workflow:
Locate the funnel step where you want to trigger the workflow.
Click the Lightning Bolt icon next to the step to add a new or existing workflow.
Select an existing workflow from the list or create a new one.
Click + (Plus) icon to add actions such as Send an Email, Send an Asset, or Tag Contact.
(Optional) Add a Delay to space out follow-up actions over time.
In the top right corner of the workflow navigation, find the Status option.
Toggle the status option. The workflow status will change from disabled to active.
Helpful Resources:
Testing and Publishing Your Funnel
Before making your funnel live, it’s important to test its functionality to ensure everything works as expected.
Test the Funnel
Verify that all pages are connected in the correct order.
Check buttons, forms, and links to confirm they function properly.
Test the funnel on different devices and browsers for a smooth experience.
To run a full checkout test, follow the steps in How to Test Funnel Checkout in Test / Sandbox Mode.
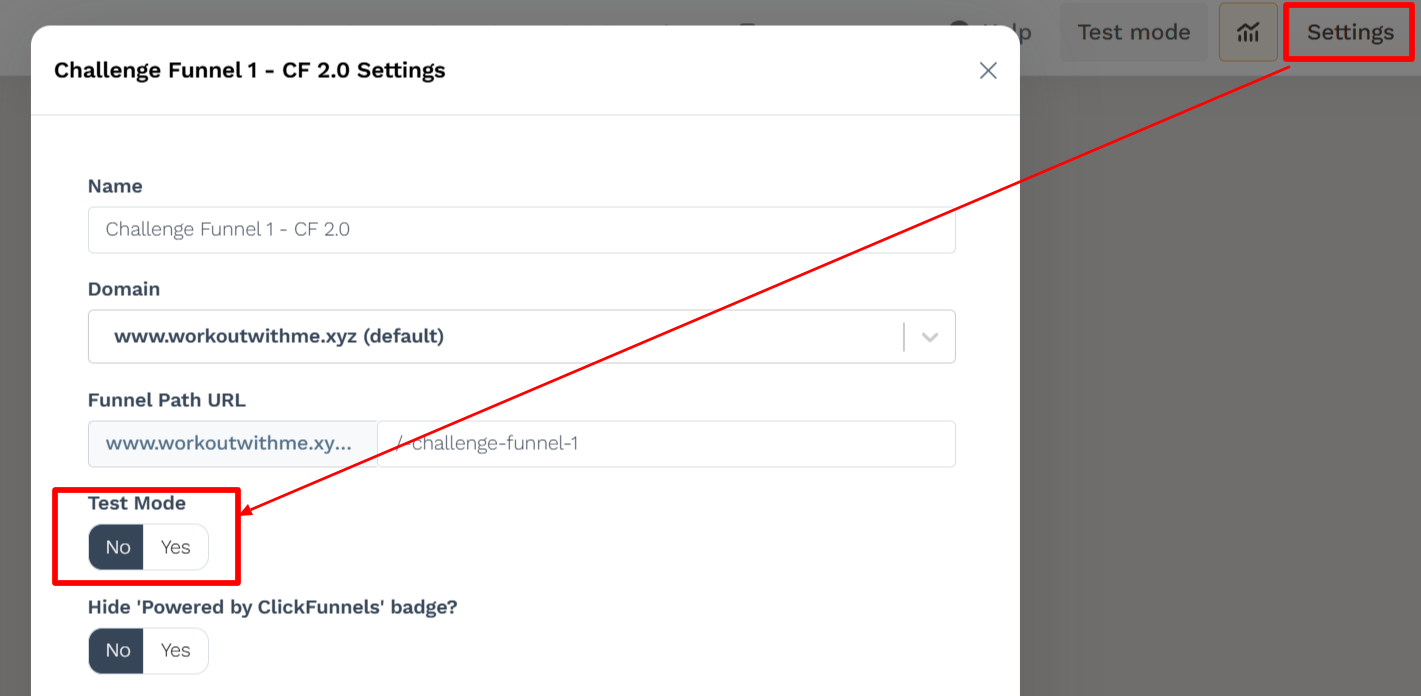
Enable Live Mode
Click the Settings button at the top-right corner of the funnel workflow editor to open the funnel’s settings.
Set the funnel to Live Mode to make it accessible to customers.
Copy and Share Your Funnel URL
Hover over the URL at the top of the funnel workflow page and click to copy.
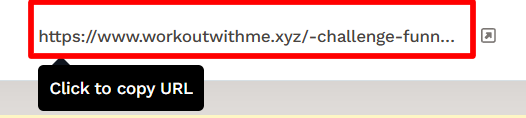
Share the link via your website, social media, or email campaigns.
Learn more about publishing and sharing your funnel in this article.
Funnel Builder Support Options
For additional support building your funnel, explore the Funnel Builder Coaching & Certification Program. The program offers step-by-step training and live coaching for members who want to build with guidance.
To hire a certified funnel builder, visit the Funnel Builder Directory to connect with a verified expert.