 Dashboard
 Site & Funnels
 Products
 Orders
 Contacts
 Analytics
 Marketing
 Sales
Sales Settings
 Apps
Apps Payments
 MessageHub
Customizing your store theme in ClickFunnels gives you full control over how your store looks and functions. With the right design, you can provide a smooth and engaging shopping experience that aligns with your brand and encourages customers to purchase. This article will walk you through the key areas of your store that you can customize, along with practical steps to make changes that matter.
Table of Contents
- Requirements
- Understanding the Importance of Store Design
- How to Access the Store
- Overview of the Store Theme
- How to Assign a Store Theme
- Understanding the Theme Structure
- How to Customize Store Front
- How to Customize Product Page
- How to Customize Collections Page
- How to Customize Order Confirmation Page
- Customizing the Upsell Page
- Additional Information
Requirements
- An active ClickFunnels account
- Store app
- Payments AI Configured Account
Understanding the Importance of Store Design
The design of your store isn’t just about making things look good—it directly impacts how customers interact with your business. A thoughtfully customized store makes it easier for customers to navigate, understand product details, and complete purchases. It can improve customer satisfaction and increase your sales by making the shopping experience smooth and intuitive.
Why Store Design is Critical:
-
Guiding Customer Behavior: A well-organized store helps customers find what they’re looking for without confusion. Strategic use of visuals, and clear product information makes the shopping process straightforward, reducing the chances of customers abandoning their journey.
-
Building Trust and Credibility: Customers expect a professional, trustworthy shopping environment. Your store’s design should reflect your brand’s identity, creating a cohesive look and feel that customers recognize and trust.
-
Boosting Sales and Conversions: A store that is easy to use encourages customers to stay longer, explore more products, and complete their purchases. Simple adjustments like optimizing the product layout or improving the checkout process can significantly impact your conversion rates.
By learning how to customize each section of your store, you’re not just improving aesthetics—you’re building a better experience for your customers that can drive long-term business growth.
How to Access the Store
Before you begin customizing, you need to access the store theme editor. Follow these steps:
- In your ClickFunnels dashboard, click the Store app in the left-hand navigation menu.
- Select Overview from the dropdown menu to open the Store Dashboard.
- From the Store Dashboard, click Customize Store to access the Theme Editor.

Once you’re in the Theme Editor, you’ll see different store pages that you can begin customizing.
Overview of the Store Theme
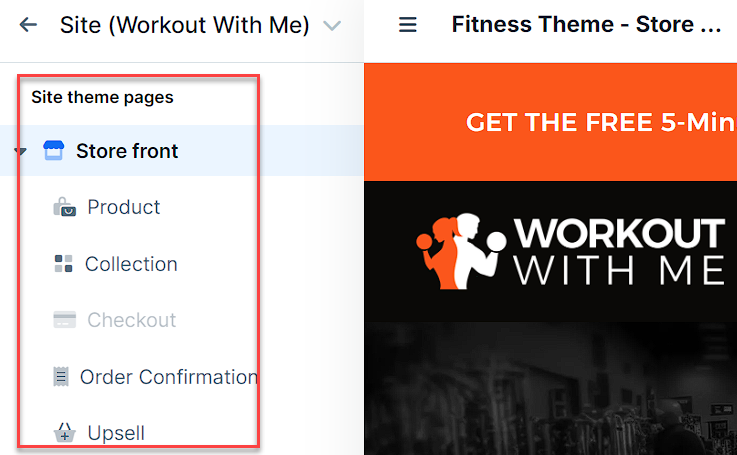
Your store theme is divided into multiple Site Theme Pages, each corresponding to a specific part of your store’s user journey. These pages include:
- Store Front: This is the main homepage of your store. It’s where you welcome customers and showcase key products or collections.
- Product Page: Displays individual product details like name, price, images, and descriptions.
- Collection Page: Groups similar products together, allowing customers to browse items by category or theme.
- Checkout Page: The final step in the purchase process where customers complete their order. (currently not available for customization but will be accessible in future updates).
- Order Confirmation Page: Confirms the details of a completed order, giving customers an overview of their purchase.
- Upsell Page: Offers additional products after the customer has completed their purchase, potentially increasing average order value.
Each of these pages is important to the overall user experience. Customizing them allows you to shape the look and feel of your store, creating a consistent brand presentation while ensuring an intuitive shopping process.
How to Assign a Store Theme
- Click the gear ⚙️ icon top-right corner of your store dashboard to open the settings.
- Scroll to the Store Theme section.
- Use the Theme dropdown to select a theme that fits your brand’s design.
- Preview your theme and make any desired adjustments in the Theme Editor.
- Click Update Store to apply the theme.
Understanding the Theme Structure
Each of these theme pages is built using a combination of Sections, Rows, and Elements, as displayed in the Theme Editor. Here’s what each part represents:
- Sections: Large containers that divide the page into different areas (like the header, product listings, or footer).
- Rows: Break down sections further, allowing you to organize your content within them.
- Elements: The individual components that sit within rows, such as images, text, buttons, and product displays.

How to Customize Store Front
Your store front is the first thing customers see, so it’s important to make a great first impression. This page introduces your brand, highlights your products, and invites visitors to explore.
Here’s how to customize the Store front:
- In the Theme Editor, ensure the Store front page is selected.
- Add a Section, then add a Row inside that section.
- Click the orange Add Element button to open the Elements menu.
- From the elements menu, you can add text, images, buttons, and other features to showcase your products and promotions.
- To display products, select the Products or Product Collections elements from the Collection category. This will automatically pulls in product details—such as images, names, and prices—from your existing product listings

- Adjust the layout and design by customizing the fonts, colors, and spacing to match your brand. Remember, your storefront should be visually engaging and easy to navigate.
- Click on Save from the top-right corner of the Page Editor.
To learn more about displaying product collections, follow the detailed steps in our guide on How to Display Product Collections on the Storefront. If you want to display individual products, refer to our guide on How to Display Products on the Storefront.
How to Customize Product Page
The product page is what customers see when they click on a product. It displays details like description, price, images, and buying options. By customizing this page, you can make it match your brand and highlight key product features. This helps customers clearly see what they’re buying and why it’s beneficial, improving their shopping experience.
To customize your Product Page:
- Select Product page from the left panel in the Theme Editor.
- Add elements like Name, Description, Price, and Image.
- Adjust the design and layout to match your brand.
- Click Save from the top-right corner of the Page Editor.
For a more detailed walkthrough, visit How to Customize the Store Product Page.
How to Customize Collections Page
The Collection Page displays groups of products organized by category or theme, allowing customers to browse and find items easily. Customizing this page ensures that collections are presented in a visually appealing and organized way.
To customize the Collection Page:
- Select Collection page from the left-hand menu in the Theme Editor.
- Add Sections and Rows, then click Add Element insert the Product collection type element.
- Customize product details like names, prices, and images. Adjust the layout to fit your branding.
For more guidance, refer to How to Display Store Collections Page.
How to Customize Order Confirmation Page
The checkout confirmation page is the final step in the buying process where customers review their order details. This page displays all the items they are about to purchase, the total cost, and any shipping information. It gives customers a chance to confirm everything is correct before they finalize their purchase. This ensures that there are no mistakes, such as incorrect items or quantities before the order is completed.
- Click the Order Confirmation page under Store front.
- Add elements to order confirmation to provide clear information about the purchase.
- To learn more about the Order Confirmation element, refer to the article Order Element: Confirmation
- Click on Save from the top-right corner of the Page Editor.
Customizing the Upsell Page
The upsell page provides a strategic opportunity to offer additional products or services to customers after they have made a purchase. This can increase your average order value.
To customize the Upsell Page:
- Select Upsell Page from the left-hand menu.
- Add Sections and Rows, then add the necessary elements, such as images, text, or product offers.
- Ensure the page contains a Checkout Element to allow customers to complete their purchases. If your selected template doesn’t include one, add a Checkout Element manually.
- Click Save from the top-right corner of the Page Editor.
For detailed instructions on customizing your upsell page, refer to How to Create a Store Upsell in the Store App.
Additional Information
Was this article helpful?
That’s Great!
Thank you for your feedback
Sorry! We couldn't be helpful
Thank you for your feedback
Feedback sent
We appreciate your effort and will try to fix the article