Apps in ClickFunnels are tools designed to enhance your workspace functionality. These apps can help streamline tasks, manage specific workflows, and provide additional capabilities, such as analytics, automation, and appointment scheduling. In this article, you'll learn how apps work in ClickFunnels and how to add new apps to your workspace.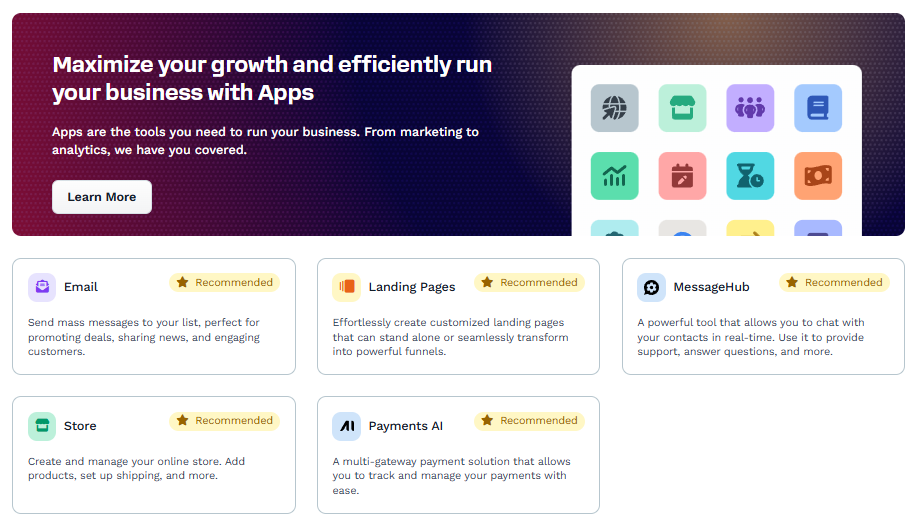
Requirements
An active ClickFunnels account
How Apps Work
Apps in ClickFunnels are extensions of the platform that integrate seamlessly with your existing workspace. Think of them like adding custom features to your smartphone - you install apps to extend its capabilities, such as a fitness tracker for workouts or a calendar app for better scheduling. They allow you to expand the platform’s functionality by enabling specific tools tailored to your business needs. Whether it’s managing affiliate programs, creating discounts, or automating workflows, apps can simplify complex processes and improve efficiency.
Each app can be installed or activated within your workspace and accessed directly from the "Apps" section of the main menu. Once added, they integrate into the platform, making the required features accessible without leaving ClickFunnels.
Example:
Let’s say you want to build a course to offer your audience. You can add the Courses app to your workspace, which provides all the necessary tools to create and manage courses. Inside the app, you can design course content, organize lessons, and even manage enrollments and analytics. This streamlines the entire course creation process, keeping everything centralized within ClickFunnels.
Adding a New App to Your Workspace
Your Workspace’s left-hand navigation menu shows the apps that are currently active. By default, you’ll see Site and Analytics apps are added to the workspace. If you need more tools, you can easily add additional apps. To add a new app to your Workspace, follow these steps:
From the main menu on the left, click on + Add Apps.
You will be redirected to the Apps page, which showcases a variety of available apps. Each app includes a description of its features and how it can help your business.
Click on the app you wish to add. For example, to add the Appointments app, click on its icon or card.
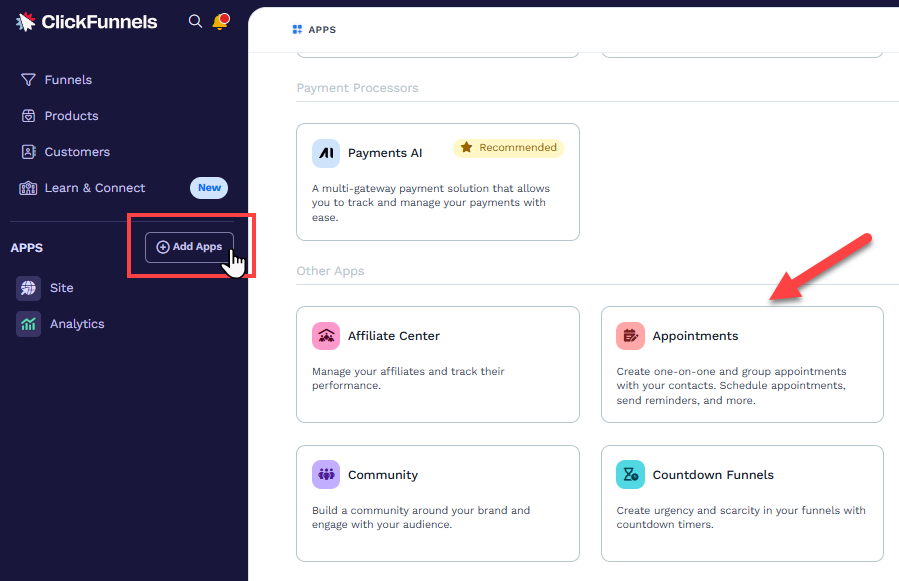
Click the Add App button on the app’s details page to activate it in your workspace. Some apps may require additional setup, such as connecting external services or configuring specific settings. Follow the on-screen instructions to complete the setup process.
Once configured, the app will appear in the left-hand sidebar and ready to use.
Apps You Can Add in ClickFunnels
Here is a list of apps you can add to your ClickFunnels workspace and how they can help your business:
Email: Use this app to send mass messages to your list. Example: Announce a new product launch to all your subscribers.
Landing Pages: Easily create landing pages that work standalone or within funnels. For example, Build a lead capture page to attract more signups. Design standalone landing pages or ones that fit seamlessly into your funnels. For example, Create a lead capture page to grow your email list.
MessageHub: Communicate in real time with your contacts. Example: Provide instant support to customers through chat.
Store: Set up and manage an online store. Example: Add products, configure shipping, and handle orders within ClickFunnels.
Payments AI: Manage your payment gateways. Example: Track all customer transactions and payments in one place.
Affiliate Center: Monitor your affiliate program and track its performance. For example, Reward affiliates based on their referrals.
Automations: Automate workflows like follow-up emails or task reminders. Example: Send a welcome email series to new leads.
Community: Build a private community around your brand. Example: Create a member area for exclusive content.
Countdown Funnels: Add urgency to your funnels with countdown timers. Example: Run a flash sale with a countdown.
Courses: Design and manage online courses. Example: Create a video course and track student progress.
Discounts: Offer and manage discounts for your products. Example: Create a special coupon code for a holiday sale.
Short Links: Generate short, trackable links for sharing. Example: Share a link to your webinar signup page and track clicks.
Survey Workflows: Gather customer feedback. Example: Create a survey to understand customer preferences.
Opportunities: Track sales opportunities. Example: Manage and close leads through a visual pipeline.
Zapier: Integrate ClickFunnels with thousands of apps. Example: Automatically sync leads to your CR