ClickFunnels allows you to create an online store that aligns perfectly with your brand and provides the tools for a smooth and engaging shopping experience for your customers. This article will guide you through setting up, customizing, and optimizing your store to maximize its potential and meet your business needs.
Requirements
An active ClickFunnels account
At least one product created in the workspace
The Payments AI or Stripe app connected to the workspace
Overview of the ClickFunnels Store Feature
Your ClickFunnels store isn’t just an online shop, it’s an opportunity to build trust and convert visitors into loyal customers. A well-designed store makes browsing and purchasing seamless, critical for maximizing sales and customer satisfaction. The ClickFunnels store feature allows you to showcase your products, run upsells, and ensure an optimized shopping journey.
Here’s how your ClickFunnels store can impact your business:
Customization: Control the look and feel of your store to align with your brand.
Sales Optimization: Upsell and cross-sell products to increase your average order value.
Streamlined Checkout: A smooth checkout process powered by Payments AI that reduces friction and encourages completed purchases.
Adding the Store App
From the main menu on the left, click on + Add an App to navigate to the Apps page.
Scroll down until you find the Store app, then click on it.
Confirm your selection by clicking the Add App button.
Check out our Adding Apps to Your ClickFunnels Workspace article for detailed information on how to add apps to your navigation menu.
Managing Product Visibility in Your Store
In the Products section, you control what items are available in your store and how they appear to your customers. Rather than manually placing each product on your store pages, you manage their visibility, allowing ClickFunnels to automatically pull product details, like images, names, and prices into your store design dynamically.
When products are made visible, they can be shown across different parts of your store such as the storefront, product pages, and collections, based on your design customizations. When managing your products in ClickFunnels, you have multiple options to get started with displaying items in your store: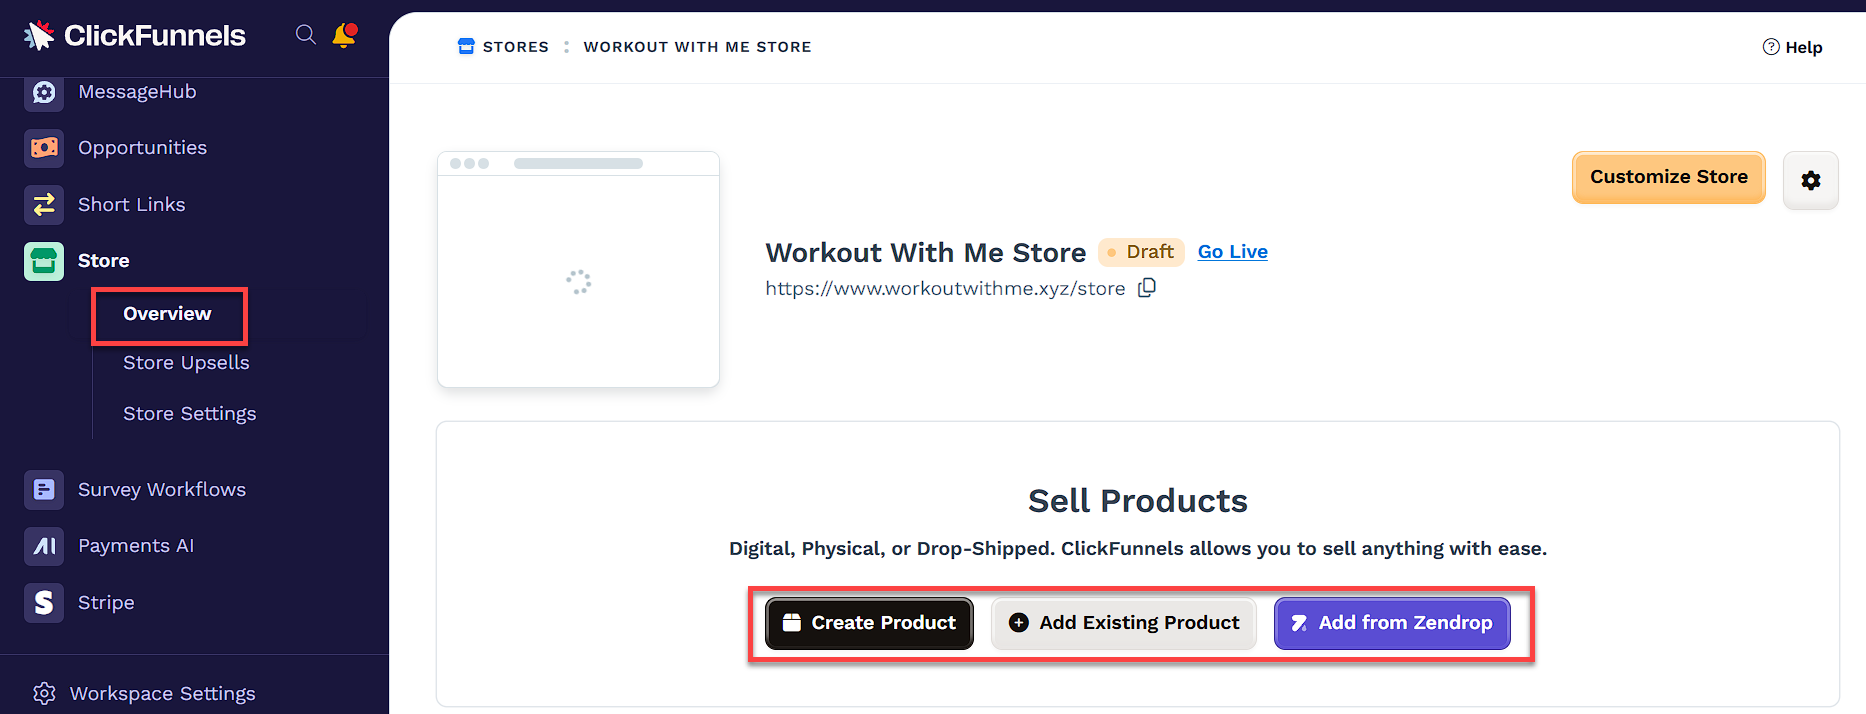
Create Product: Click this button to start the process of creating a new product from scratch. For detailed steps, refer to our guide on How to Create and Manage Products.
Add Existing Product: Clicking this button will direct you to the Products menu, where you can manage and adjust the visibility of your existing products. Here’s how you can set the visibility for your products:
Select a product, then click Actions.
From the dropdown, select Set Visibility of Selected.

In the visibility options window, select Visible in Store to ensure it appears in your storefront, then click Save.
Add from Zendrop: If you’re using the Zendrop integration for dropshipping, this button directs you to the Zendrop platform, where you can add products to your store. Learn more in our Zendrop Integration Guide.
Additionally, you can create Product Collections in the Products section to group items for easier organization. For detailed instructions, refer to the article on How to Create and Manage Product Collections.
You can also see which products are currently visible in your store by selecting View All Products from the overview page. This provides a quick way to review what's available to your customers at a glance.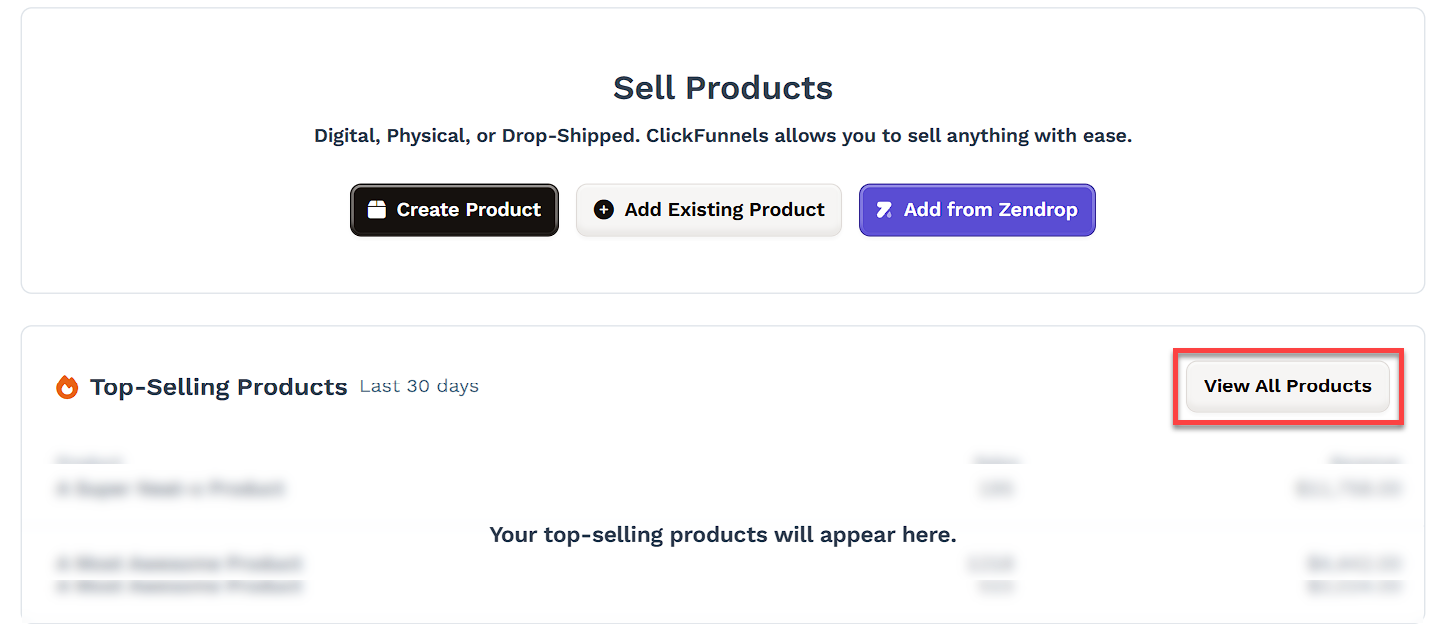
Customizing Your Store Design
Once you’ve set your product visibility, you can move on to customizing your store design. This is where the products you’ve made visible will be dynamically displayed based on the layout you choose.
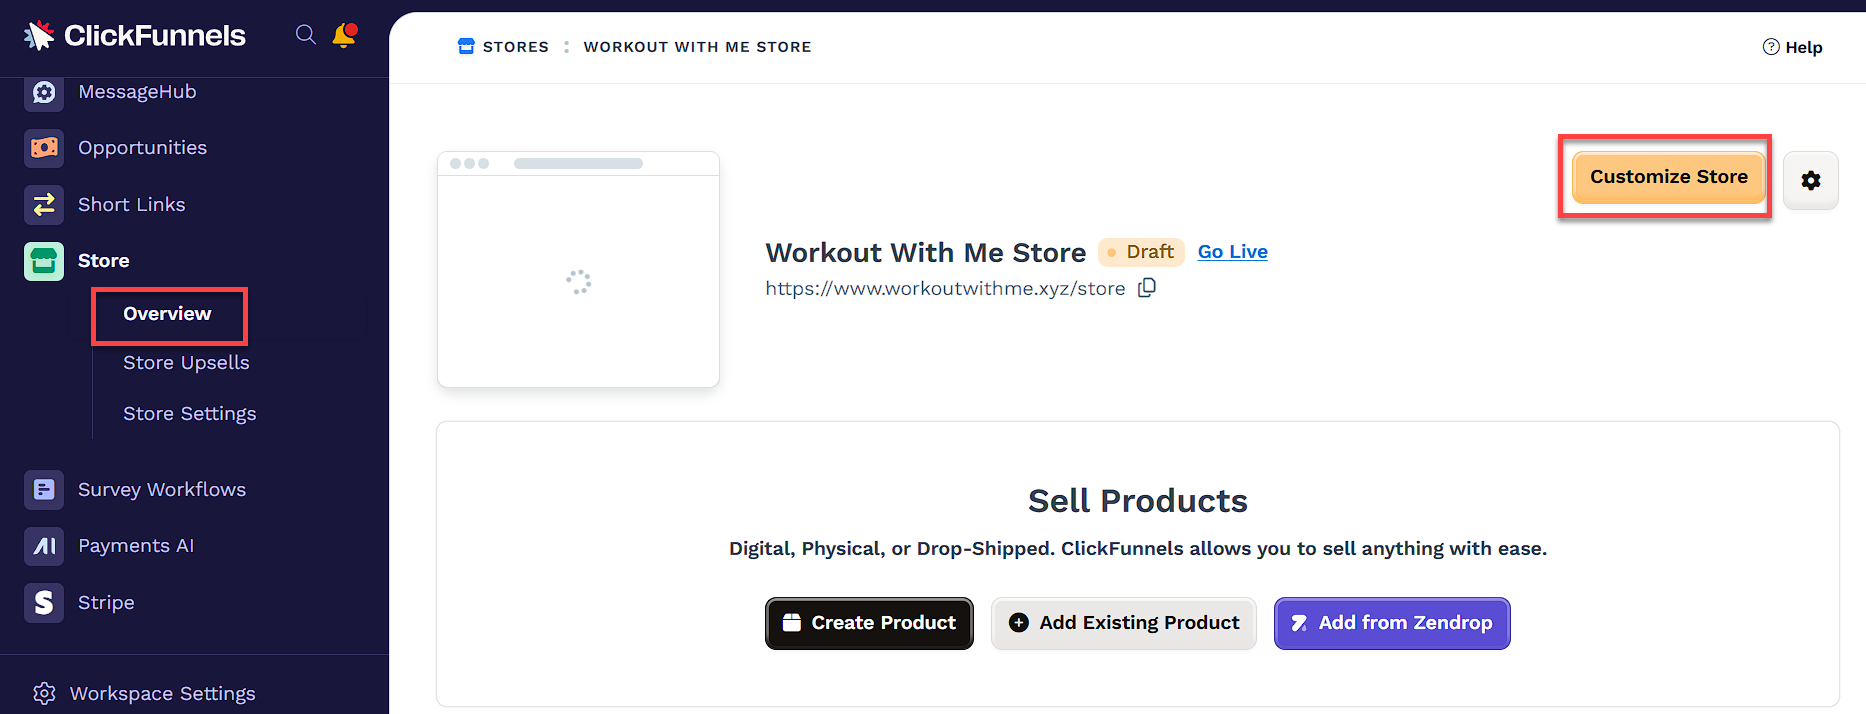
Navigate to the Store app > Overview and click Customize Store. You’ll see different pages you can customize.
Select the page you want to customize, such as the Storefront, Product Page, or Collection Page.
Use the editor to add sections, rows, and elements to your pages.
Adjust fonts, colors, and spacing to match your brand.
Save and preview your store to ensure it looks cohesive.
For a step-by-step guide on customizing individual pages, visit How to Customize Your Store Theme and Design.
Adding and Using the Add to Cart Functionality
The Add to Cart feature allows customers to add multiple products to their cart, review their selections, and adjust quantities before proceeding to checkout.
How to Set Up Add to Cart:
In the Store Theme Editor, select the Product Page.
Click the orange Add Element button, then select Add to Cart from the elements menu.
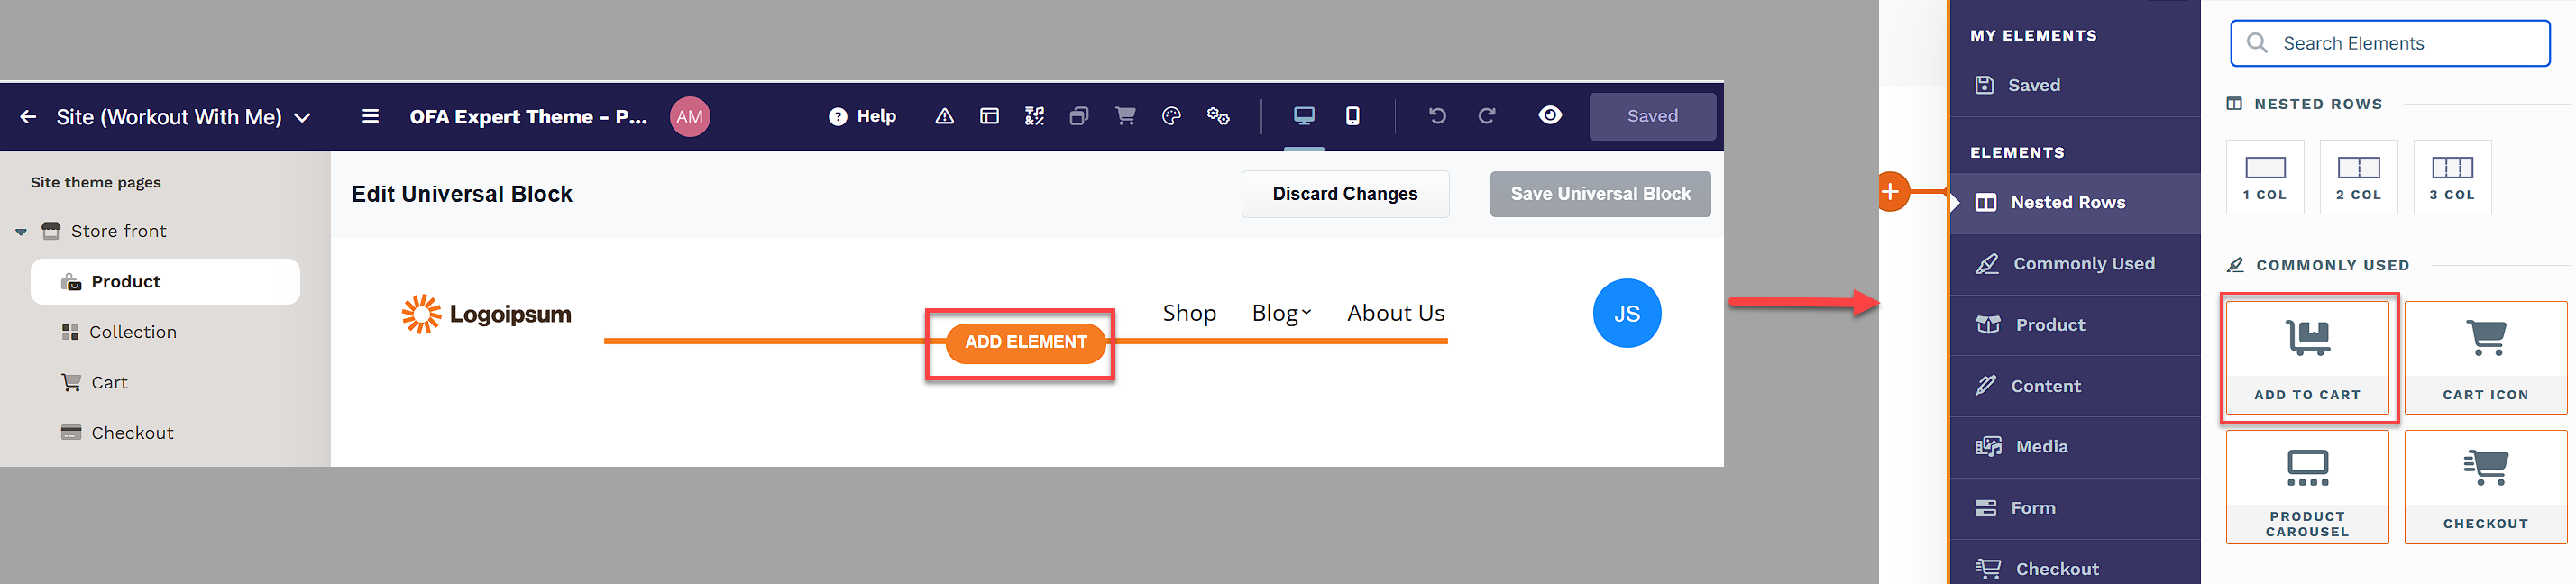
Place the Cart Icon element across all store pages (e.g., Store front, Product, Collection) to allow customers easy access to their cart.
Ensure the Checkout Page includes the Order Summary and Checkout elements for a smooth checkout process.
Customize the appearance of these elements, and save your changes.
For more details on setting up and customizing the Add to Cart and Checkout features, visit our How to Use Add to Cart Functionality in Your Store article.
Setting Up Store Upsells
Upsells are a powerful way to increase your average order value by offering additional products to customers during or after the checkout process. With ClickFunnels, you can easily set up upsell pages that will display related products or special offers to customers once they’ve added an item to their cart.
To create an upsell for your store:
Go to the Store app in the dashboard.
Select Store Upsells from the sidebar.
Click New Store Upsell to create a new upsell offer.
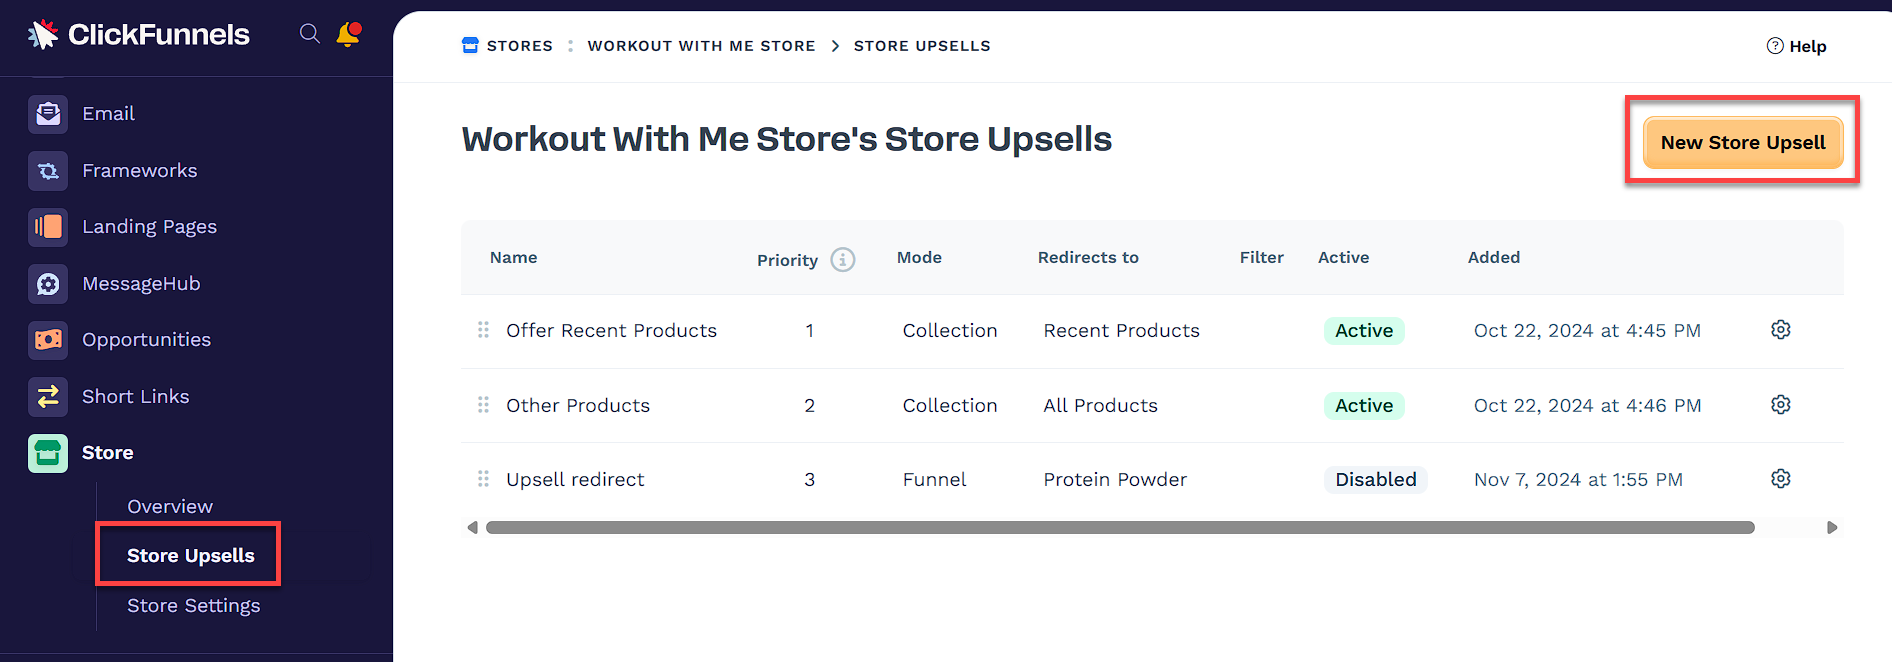
Choose your preferred mode:
Funnel Mode: Redirects customers to a sales funnel after they complete a purchase. You can create a funnel specifically for upselling products or related services.
Collection Mode: Redirects customers to a store upsell page where they are shown additional products from a specific product collection.
Once your upsell is created, you can configure the settings further by choosing the upsell’s priority, filters, and triggers. These triggers allow you to target specific customers based on the products they’ve purchased or other criteria, making your upsell more relevant and increasing the chance of a successful sale.
To explore more advanced upsell configurations, visit our detailed article on How to Create a Store Upsell in the Store App.
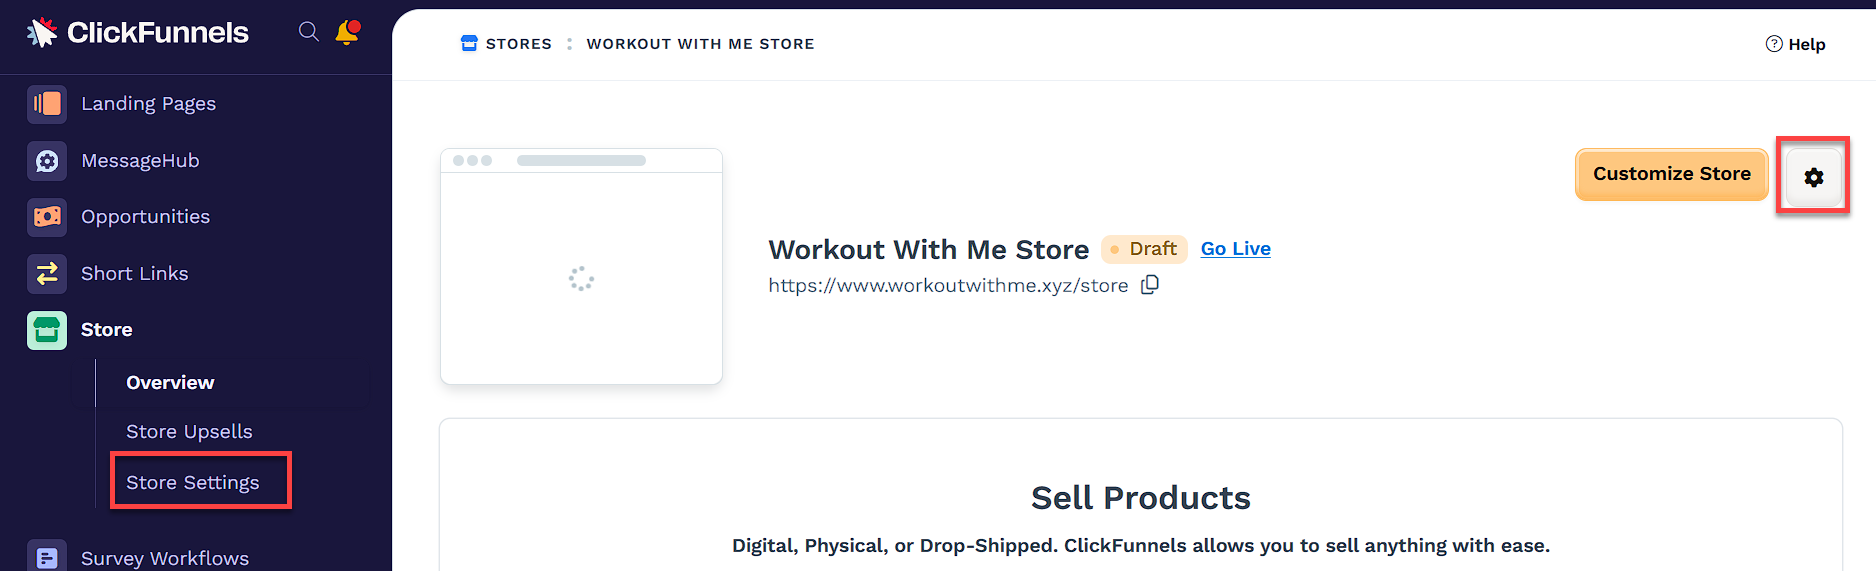
Managing Store Settings
To ensure your store is set up correctly and optimized, you can easily manage essential details like your store’s name, URL, and SEO settings.
Access Store Settings: You can access your store settings from either of the following locations:
In the Store app, go to Overview and click the gear icon in the top right corner.
Or, click Store Settings in the left-hand menu under the Store section.
Store Details:
Name: Update your Store Name to reflect your brand.
Current Path: Customize the URL path to make it easier for customers to find your store.
Visibility:
Select whether your store is Draft or Published.
Click Preview Store to view how your store will appear to visitors.
Store Theme:
Choose a theme for your store from the dropdown menu. If no theme is assigned, the store will use your site’s default theme.
SEO & Sharing:
Allow search engines to index this store: Toggle this on if you want your store to appear in search engine results.
SEO Title: Enter a clear title for search engines.
SEO Description: Write a brief summary of your store.
Social Image: Upload an image to represent your store when shared on social media.
Click Update Store to save your settings.
Delete Store
Scroll to the bottom of the Store Settings page and click the Delete button.
Click Proceed to confirm the action and permanently delete your store from ClickFunnels.
Testing Your Store
While ClickFunnels doesn’t offer a full store test mode, you can still test individual products to ensure the checkout process works properly. Each product must be tested separately to verify functionality without affecting live sales data.
IMPORTANT
The Add to Cart feature cannot be tested if your store is set up for individual product purchases only. If you’ve configured your store to allow Add to Cart, testing single-product checkouts directly won’t apply.
To test individual products:
Go to the Products section and select the product you want to test.
Disable the product’s visibility in your store by turning off Page live mode.
Copy the product URL and open it in a new browser window to access the test checkout page.
Use test payment details (e.g., 4111 1111 1111 1111 as the credit card number) to complete the checkout.
For more detailed steps and additional testing options, visit How to Test Store Checkout in TEST Mode.
To Test the Add to Cart Functionality:
Switch your store to Draft Mode in Store Overview.
Open your store in an incognito window and use
?preview=truein the URL to test as a customer..Add multiple products to the cart, review items in the Cart Icon, and proceed to checkout.
Complete the test transaction using Test Mode.
Publishing Your Store
Once you’ve set up your products and customized your store’s design, it’s time to make it live for your customers.
Go to the Store app in your ClickFunnels dashboard.
In the Overview section, click the Go Live link next to the store status indicator. This will take you directly to the Visibility section in Store Settings.
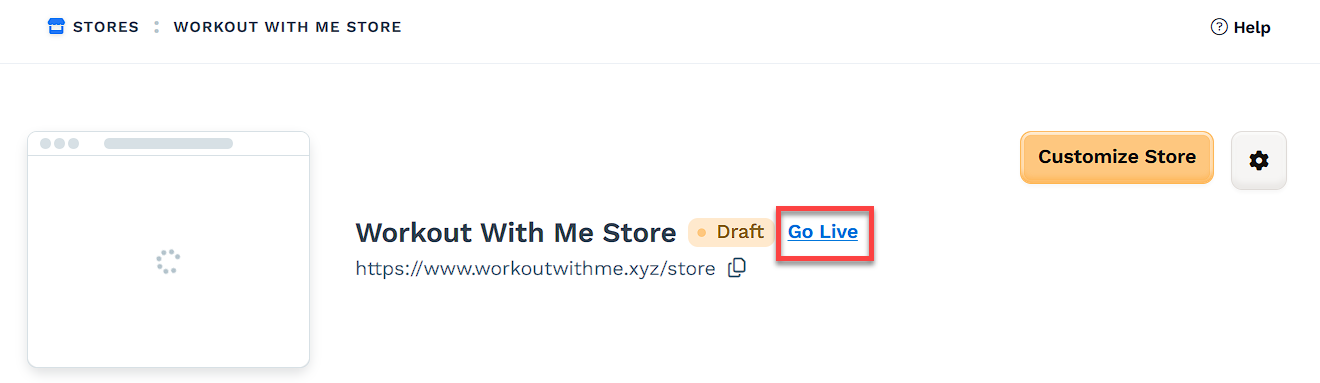
Click the Draft dropdown and select Publish Now.
Confirm your decision by clicking OK in the popup window.
Your store will now be visible and available to the public. Before publishing, double-check your products, store design, and settings to ensure everything is set up correctly.
Best Practices
Test individual products to ensure a smooth checkout experience.
Optimize your store for mobile devices to reach more customers.
Set up upsells to increase your average order value during checkout.
Use collections to group related products for easier browsing.
Ensure each product has clear descriptions, quality images, and accurate pricing.
Customize your store’s SEO settings for better search engine visibility.
Preview your store before publishing to ensure a cohesive design.
Store FAQs
Can I edit my store after it’s been published?
Yes, you can edit your store at any time after publishing. Simply go to the Store app, make the necessary changes, and click Update to save.
Can I set different shipping options for my products?
Yes, you can configure various shipping options for better control over delivery costs. To learn more, check out the Shipping Overview article.
Can I use my store to sell digital products?
Absolutely! ClickFunnels allows you to sell digital, physical, or drop-shipped products. Simply adjust the settings within the product details to indicate that it’s a digital product.
How do I manage product inventory in my store?
You can manage product inventory by tracking stock levels within the Product Settings section. This allows you to set up notifications for low stock and prevent overselling.
What happens if I delete a product after it’s been added to the store?
If you delete a product, it will no longer appear in your store or any collections where it was listed.
Can I test my entire store before going live?
Currently, it’s not possible to test your entire store in one go. However, you can test individual products by following the steps outlined in our article on How to Test Store Checkout.
How do I change my store URL?
You can customize the path for your store URL in the Store Settings under Store Details. For example, you can set it as /store or another path of your choice.
Can I unpublish my store after it’s live?
Yes, you can switch your store back to Draft by returning to the Store Overview section and selecting the Published option from the dropdown menu and click Convert to Draft. This will take your store offline, but your settings will remain intact.
What happens if I delete my store?
Deleting your store is a permanent action and cannot be undone. Ensure you’ve backed up any important information or settings before you proceed with deletion.
Can I share my store design with others?
Yes, you can share your store template with other ClickFunnels users through the Share Settings option in the Store Settings.