 Dashboard
 Site & Funnels
 Products
 Orders
 Contacts
 Analytics
 Marketing
 Sales
Sales Settings
 Apps
Apps Payments
 MessageHub
The “Webhook” step in ClickFunnels workflows enables you to pass data from ClickFunnels to external applications using a POST request. This is useful when you want to transfer contact details or other relevant information to another system in real-time. In this article, we’ll explore how to configure the “Webhook” step and provide an example of the data payload that gets sent.
Table of Contents
- Requirements
- Adding the “Webhook” Step to Your Workflow
- Configuring the “Webhook” Step
- Additional Information
Requirements
- An active ClickFunnels account
- A workflow is created
Adding the “Webhook” Step to Your Workflow
- Open Your Workflow:
- From your ClickFunnels dashboard, navigate to the Automations » Workflows menu.
- Open an existing workflow or create a new one.
- Add the “Webhook” Step:
- Click on the Plus Icon (+) in your workflow editor.
In the right-hand panel, select the “Webhook” option under the “Other” category.

Configuring the “Webhook” Step
Once you’ve added the “Webhook” step, follow these steps to configure it:
- Enter the Webhook URL:
You can either select an existing webhook URL from the dropdown or enter a new one directly. This is the endpoint where the webhook data will be sent.
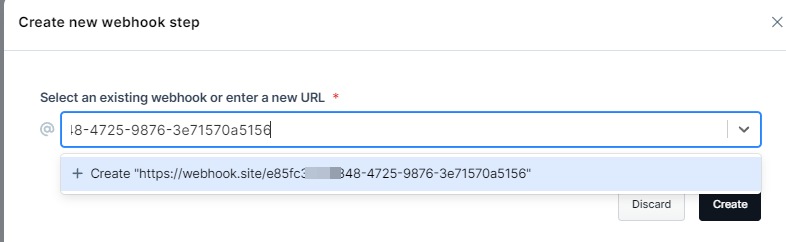
Ensure that the URL is a valid endpoint capable of receiving POST requests.
- Create the Payload:
- The “Webhook” step sends a POST request with a payload containing contact and other relevant information from ClickFunnels.
The payload sent to the external system is structured based on ClickFunnels data. You can refer to our API documentation for detailed information on the payload structure.
Example JSON Payload When a Contact is Created:
{
        "id": 45,
        "public_id": "hknIOD",
        "workspace_id": 42000,
        "email_address": "test-4d7dc24c0744f9e532de@example.com",
        "first_name": "Arielle",
        "last_name": "Fahey",
        "phone_number": "(346) 110-3099 x4556",
        "time_zone": "Pacific Time (US & Canada)",
        "tags": [
          {
            "id": 47,
            "public_id": "PMcSQF",
            "name": "Example Tag",
            "color": "#1c85b2"
          }
        ],
        "custom_attributes": {
          "CustomKey": "MyText"
        }
      }
Additional Information
Was this article helpful?
That’s Great!
Thank you for your feedback
Sorry! We couldn't be helpful
Thank you for your feedback
Feedback sent
We appreciate your effort and will try to fix the article