Workflows in ClickFunnels help automate tasks and communication, making it easier to manage leads, send emails, and trigger actions based on customer behavior. Instead of handling everything manually, you can set up a series of steps that run automatically, saving time and keeping things organized. In this article, we’ll go over how workflows function, what they can do, and how to set up your first one.
Requirements
An active ClickFunnels account
The Automations app added to the workspace
What is a Workflow in ClickFunnels?
A workflow in ClickFunnels is an automated sequence of actions triggered by specific user behaviors, such as opting in, making a purchase, or visiting a page. Workflows enable you to automate various tasks, such as sending emails, tagging contacts, enrolling in courses, or taking internal notes, without manual intervention. For instance, if a user opts into your funnel step, a workflow can automatically send them a welcome email, tag them for future marketing, and add them to a specific segment in the CRM.
Example:
Imagine you run an online course. When a user signs up for a free trial, you want to send them a welcome email, grant access to introductory course materials, and tag them as a “Trial User” in your system. After 30 days of their signup, you want to offer paid course modules and when they purchase, you want to unlock the modules automatically for the buyers. A workflow can automate all these steps, ensuring a seamless onboarding experience.
How ClickFunnels Workflows Work
Here’s a breakdown of the magic behind workflows:
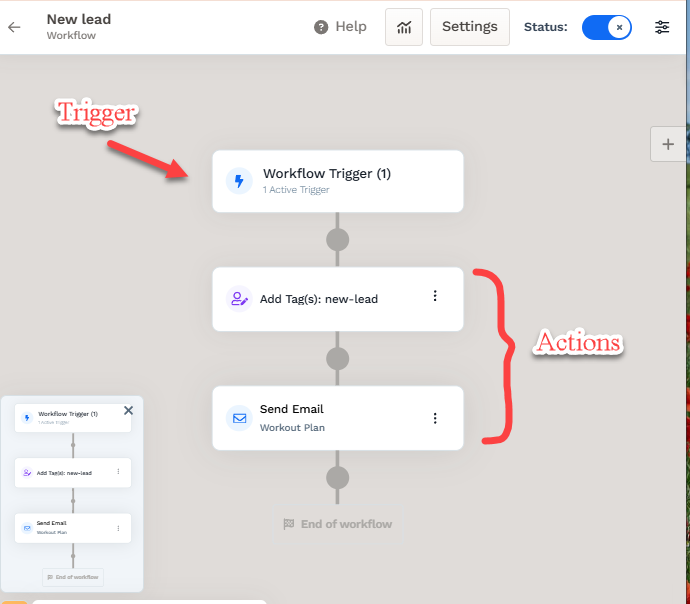
Triggers: These are specific events within your ClickFunnels that kickstart the workflow. Common triggers include opt-ins, successful purchases, page views, abandoned carts, and more.
Actions: These are the automated tasks that follow the trigger. You can send emails, MessageHub messages, add tags to categorize leads, grant access to courses, or even trigger webhooks to connect with third-party tools.
Workflow Builder: This visual interface allows you to drag and drop actions to create a customized sequence. Craft a personalized journey for your audience based on their interactions with your funnels.
What You Can Achieve with Workflows
The possibilities with ClickFunnels workflows are vast. Here are some powerful ways you can utilize them:
Welcome New Leads: Send automated email sequences that nurture new subscribers and introduce them to your brand.
Recover Abandoned Carts: Remind potential customers about forgotten purchases and nudge them towards completion.
Segment Your Audience: Automatically segment your audience based on their actions, ensuring you send the right message to the right people at the right time.
Post-Purchase Upsells: Offer complementary products or services after a purchase to increase customer lifetime value.
Automated Lead Qualification: Use tags based on user behavior to categorize leads and send targeted communication.
Trigger Drip Campaigns: Deliver personalized content based on page views, clicks, or other user actions.
Integrate with Third-Party Tools: Connect with your CRM, email marketing platforms, and other tools to streamline your marketing processes and keep all your data in sync.
By leveraging these automated sequences, you can save time, engage your audience more effectively, and convert more leads into customers.
Adding the Automations App in the Workspace
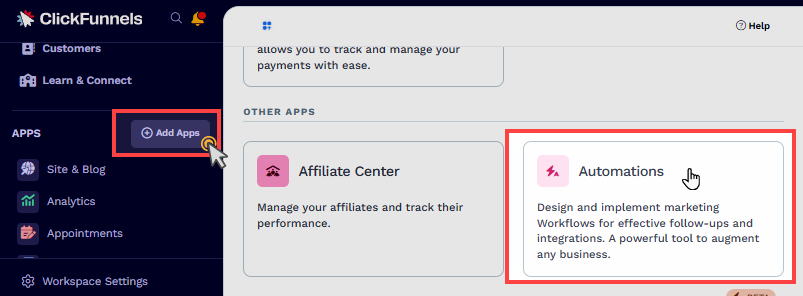
From the main menu on the left, click on + Add Apps to navigate to the Apps page.

Scroll down until you find the Automations app, then click on it.
Confirm your selection by clicking the Add App button.
Learn more about adding apps in the article: Adding Apps to Your ClickFunnels Workspace.
Setting Up Your First Workflow
ClickFunnels Workflows is a powerful feature that offers a user-friendly drag-and-drop interface to build an automated sequence. Imagine this: a potential customer abandons their cart after adding a product. With a simple workflow, you can automatically send a friendly reminder email showcasing the benefits of that product and nudge them back towards completion.
Here’s a quick glimpse of how easy it is to get started:
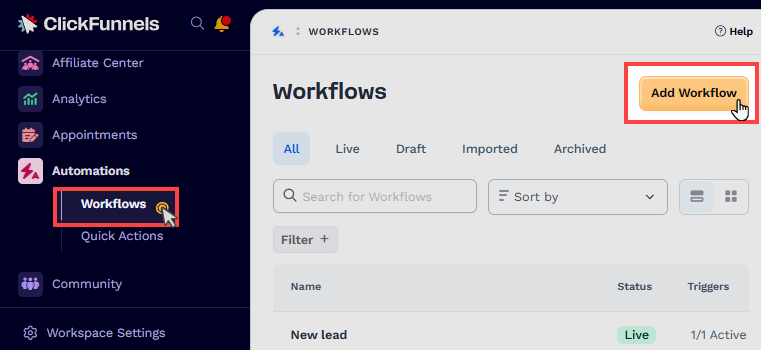
Navigate to the Automations app.
Click the Add Workflow button.

Enter your workflow name and select the run type. Then click the Create Workflow button to confirm the creation. You’ll be directed to the workflow builder interface.
Select a Trigger such as “Opt-In”, “Applied Tag”, “Order - Successful Purchase”, “Pageview”, etc. A trigger is the event that initiates your workflow.
Add Action(s) to the workflow. You can choose to send an email, add a tag for further segmentation, or even grant access to a course.

Learn more: How to Create a Workflow.
Triggering a Workflow from the Funnel Step
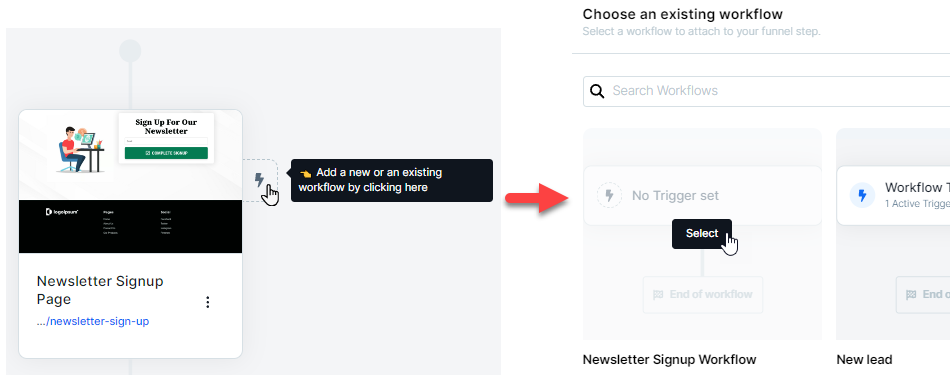
Navigate to the Funnels menu and access the funnel you wish to link to the workflow.
Choose the specific funnel step (e.g., an opt-in page) where you want the workflow to be triggered.
Next to the funnel step, click the Lightning Bolt icon to add a new or existing workflow. This will open a dialog where you can select the appropriate workflow from the list. The workflow editor will open, and a new trigger will be automatically created in the workflow.

Learn more: How to Create a New Funnel.
Workflows FAQs
How many workflows can I create? Is there a limit?
ClickFunnels offers a generous plan structure, and there’s currently no limit to the number of workflows you can create. This allows you to design and implement as many automated sequences as needed to support your marketing and sales efforts.
Can I connect a single workflow to multiple funnels?
Yes. You can leverage the power of a single workflow across multiple funnels within your ClickFunnels account. This eliminates the need to create duplicate workflows for similar actions. Simply create the desired workflow and link it to the specific funnel steps where you want it to be triggered.
Do I still need separate email autoresponder software if I use ClickFunnels workflows?
No. ClickFunnels workflows provide a robust and advanced alternative to traditional email autoresponder software. ClickFunnels workflows allow you to design comprehensive marketing and sales automation sequences that go beyond just sending emails. You can integrate various actions within your workflow, such as tagging contacts, enrolling them in courses, or triggering additional workflows based on specific criteria.
Can I have multiple triggers for a single workflow?
Yes. ClickFunnels workflows support the use of multiple triggers. This flexibility allows you to initiate the same workflow based on different user interactions or criteria. For example, a single workflow could be triggered by a user opting into a specific form, making a purchase, or abandoning their cart.
Can I edit an email in a workflow after the workflow has already been triggered?
Yes. You can edit an email in a workflow even after the workflow has been triggered, as long as the email has not yet been delivered to the contact. When a workflow is triggered, the system schedules the email for delivery based on the configured delay or conditions. If you update the email content before the email is actually sent, the updated version will be delivered to the contact.
Can I pause or stop a workflow after it’s started?
Yes. ClickFunnels empowers you to manage your workflows even after they’ve been activated. You can access the workflow settings at any time and choose to pause or completely stop the workflow if needed. This allows you to make adjustments or address any unforeseen issues.
Can I integrate workflows with external applications?
ClickFunnels offers a wide range of integrations with various third-party tools. This allows you to connect your workflows with your existing ecosystem for a more streamlined experience. Additionally, ClickFunnels workflows support Webhooks, enabling integration with any third-party application that supports Webhook technology.
How do I track the performance of my workflows?
ClickFunnels provides comprehensive workflow analytics to help you monitor the effectiveness of your automated sequences. You can access key metrics like average cart value, opt-ins, page views, and more. By analyzing this data, you can identify areas for improvement and optimize your workflows for better results.