The Site & Blog app in ClickFunnels empowers you to create a professional website with blog pages, customer centers, and much more within a single platform. With an intuitive interface and powerful tools, ClickFunnels provides everything you need to build, customize, and publish your website. This article will teach you the basics of setting up and managing your site using the Site & Blog app.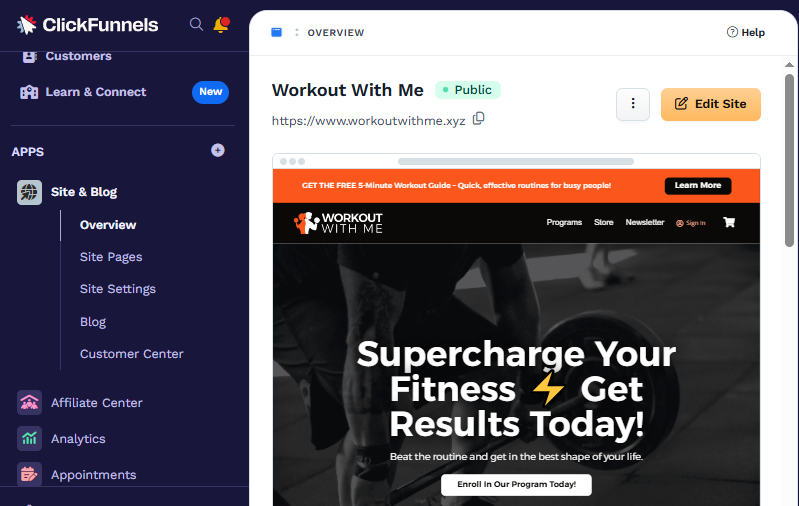
Requirements
An active ClickFunnels account
Adding the Site App to the Workspace
From the main menu on the left, click on + Add Apps to navigate to the Apps page.
Scroll down until you find the Site app, then click on it.
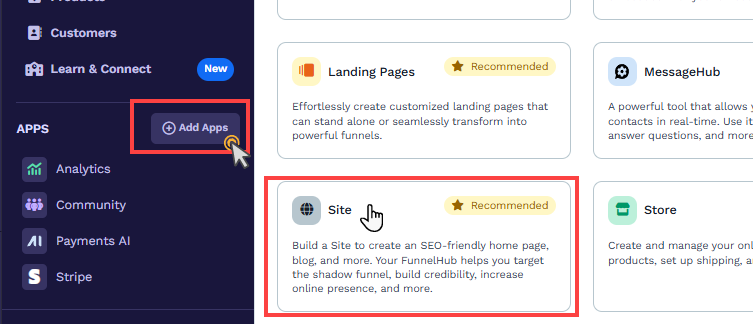
Confirm your selection by clicking the Add App button.
Learn more about Apps in the article Adding Apps to Your ClickFunnels Workspace.
Accessing Site Overview
The Site Overview page acts as the central hub for managing your website. From here, you can access site pages, blog posts, and your customer center and customize your site’s theme and settings. The Site & Blog app is added as the default app to your ClickFunnels workspace, so there's no need to install it manually.
Steps to Access the Site Overview
Log in to your ClickFunnels account.
Navigate to the Apps section on the left-hand menu.
Click on Site & Blog to open the Site Overview page.
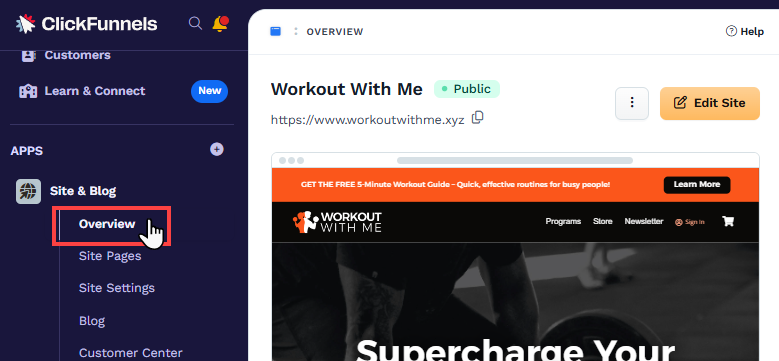
Features Available in Site Overview
Recent Posts: View and manage your latest blog posts.
Site Pages: Access and create pages for your website.
Theme Preview: See your current theme and make changes.
Quick Links: Shortcut options to create new pages, posts, or manage your customer center.
Selecting a Theme
A theme in ClickFunnels is a comprehensive collection of page templates that dictate the design and layout of various pages across your workspace. These templates include essential pages like the home page, 404 page, and coming soon page for your site, as well as store-specific pages such as the storefront, product page, checkout page, and cart page. Additionally, themes encompass templates for blogs, customer centers, and courses, ensuring a cohesive design throughout your workspace.
Choosing the right theme ensures your site’s branding and functionality align seamlessly across all areas. When you create a theme and select it as the default, a consistent design is applied across all the app template pages in your workspace. This is because a theme consists of page templates that maintain uniform branding, colors, and styles, ensuring your site and other app template pages present a cohesive and professional look.
Accessing the Themes
Navigate to Workspace Settings > Themes.
Browse the available themes in the list or create a new one.
Applying a Theme to the Site
From your workspace, click on the Site & Blog app in the left-hand menu.
Select Site Settings.
Scroll to the Default Theme option and select a theme from the list.
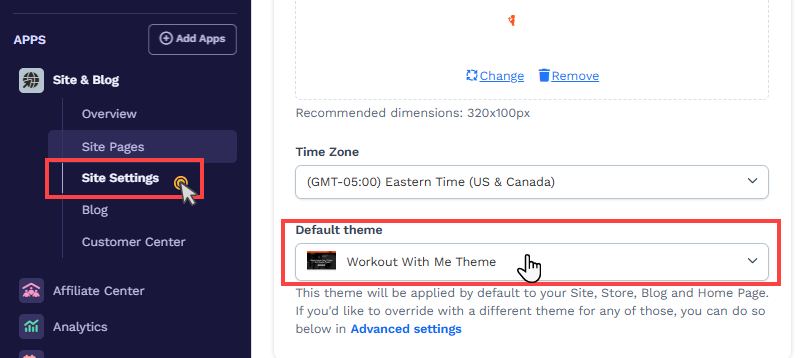
Click Update Site to apply the theme to the site.
Note:
When you create a new workspace, the default Hero Theme is automatically applied. This theme includes templates for all necessary pages and apps. You can replace it by creating a new theme and promoting as live.
Learn more about themes in the Creating and Managing a Theme in ClickFunnels article.
Selecting a Style Guide
A style guide is like a recipe book for your site’s design. It saves the "ingredients" and "instructions" for how your fonts, colors, buttons, and other design elements should look across your pages. Using a style guide, you ensure every page in your workspace has a consistent appearance without repeatedly setting the same styles.
For example, imagine you define paragraph font sizes such as Small (14px), Medium (16px), and Large (18px). If you insert a paragraph element inside a page editor and select the font size as "Large," the font size automatically adjusts to 18px based on your saved style guide. This saves time and ensures consistency throughout your site.
With a style guide, you can:
To maintain consistency, define font styles and sizes for headings, subheadings, and body text.
Establish a color palette for text, backgrounds, and accents, ensuring your brand colors are consistently applied.
Customize buttons with predefined styles, including shape, shadow, borders, and corner radius.
Configure borders and shadows for design elements to create a cohesive look.
Creating a Style Guide
Click on Workspace Settings at the bottom left of your ClickFunnels dashboard.
Scroll down the menu on the left and click on Styles.
Click the New Style button at the top right.
Enter the Name for your new style.
Click Create style to save it.
Note:
When you create a workspace, a default style guide is included with the Hero theme. This means that if you create a new theme, a corresponding style guide is also generated in your workspace and linked to the theme. Promoting a theme to your site automatically applies its associated style guide, ensuring that the theme’s template pages follow the predefined styles from the style guide.
For an in-depth guide on creating and managing style guides, refer to the article Getting Started with Styles.
Applying a Style Guide to the Site
From your workspace, click on the Site & Blog app in the left-hand menu.
Select Site Settings.
Scroll down to the Advanced Settings section in the Site Settings panel.
Locate the Style dropdown under Advanced Settings.
Click the dropdown and select the desired Style Guide (e.g., "Default Style Guide" or a custom Style Guide).
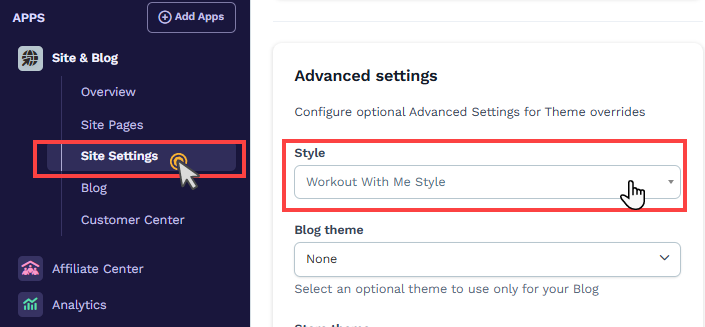
Click Update Site at the top or bottom of the page to save your changes.
Customizing the Site in the Editor
To design your Site home page:
Click the Edit Site button in the Site Overview.
.png)
Use the Page Editor to add sections, rows, and elements like headers, footers, and hero sections. Use the Page Editor to insert sections, rows, and elements to create the layout of your site pages. These containers allow you to design specific sections of your page, such as the header, footer, hero section, and more, ensuring a structured and visually appealing design.
Save your changes by clicking Save.
For an in-depth guide on the page editor, refer to the article Getting Started with the ClickFunnels Page Editor.
Setting Up Site Navigation
Navigation menus play a vital role in helping visitors navigate your site easily. By using ClickFunnels' Navigation element and Universal Sections, you can create and manage menus efficiently while ensuring consistency across your pages.
Adding a Navigation Element
The Navigation element allows you to create menus and link them to specific destinations within your site. To add a navigation element:
Insert the Navigation element into a section and row within your page.
.png)
Add menu items and set their links to pages or sections (e.g., Home, About, Contact).
Customize the appearance of the navigation menu to align with your site's design.
For detailed guidance, refer to the article Navigation: Add Navigation Menus to Pages.
Adding Universal Sections
Universal Sections are reusable containers that can be added to multiple pages on your site. For example, you can design a header or footer with navigation links and save it as a Universal Section. Any updates made to the Universal Section will automatically apply to all pages where it is used, ensuring consistency.
To create and insert a universal section:
Add a section in the page editor and add contents inside the section.
Hover over the section and click the Save icon.
Insert a section title and check the box “Make Section Universal.“
Click Save Section to save the section as a universal section.
.png)
Navigate to the page where you want to insert this saved section.
Click the green Plus icon and find the saved section from the Saved category.
Insert the section in the designated location on the page.
For an in-depth guide on site header and footer, refer to the article Adding a Universal Header and Footer to Your Site.
Adding Site Pages
Your site will require various pages to deliver a complete experience to your audience. Depending on your site's purpose, common types of pages include the home page, about page, contact page, and more. Each page serves a specific function and helps effectively structure your site’s navigation.
How to Add a New Page
Navigate to the Site & Blog app.
Click on Site Pages in the left-hand menu.
Click the New Site Page to create a new page.
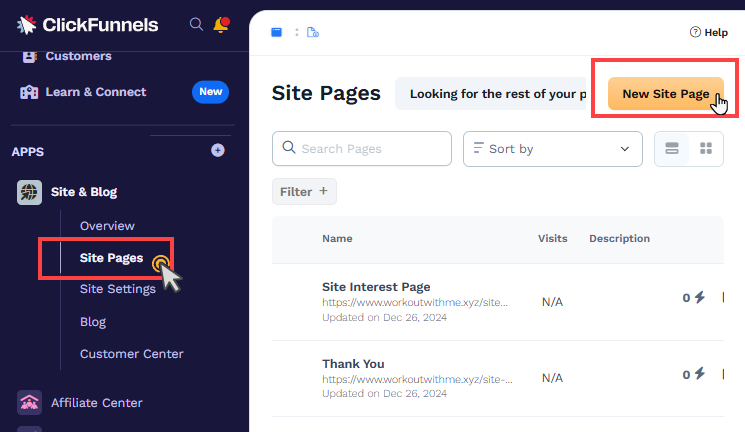
Choose a page template from the available templates.
Customize the page content and layout using the Page Editor.
Save your changes and link the page to your navigation menu for easy access.
For detailed instructions on adding site pages, visit the article How to Add and Manage Site Pages.
Connecting a Domain to the Site
By default, ClickFunnels provides a subdomain (e.g., workspace.myclickfunnels.com) so your site can function immediately. This subdomain is ideal for exploring and testing your site’s features. However, we highly recommend connecting your own domain to promote your site to a wider audience and enhance your brand’s professionalism.
Steps to Connect a Domain to the Site
From your workspace, click on the Site & Blog app in the left-hand menu.
Select Site Settings.
In the Domain field, choose the domain you wish to use for your site.
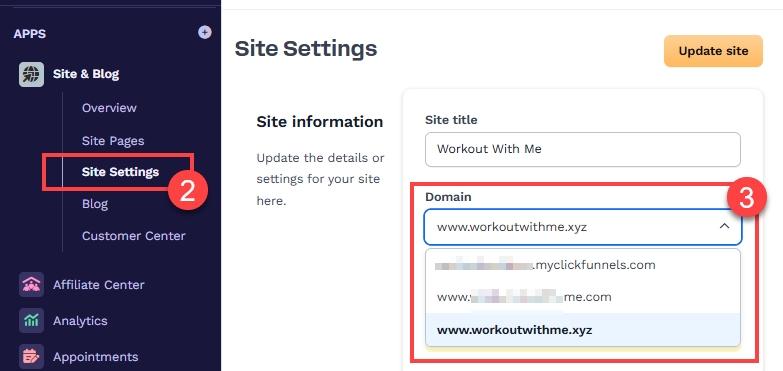
Click Update Site at the top or bottom of the page to save your changes.
Important:
The domain connected to the Site & Blog app is used for Courses, Store, Blog, Customer Center, Landing Pages, and Community. These features must share the same domain connected to the site settings.
Learn more about connecting a domain in the article Domains - How to Connect an Existing Domain (Automated Setup).
Publishing Your Site
Publishing your site means making it live and accessible to your audience. Once your site is published, visitors can access it using your configured domain. This is the final step in launching your website, ensuring all the pages, content, and navigation are ready for public view.
Steps to Publish Your Site
From your workspace, click on the Site & Blog app in the left-hand menu.
Select Site Settings.
Set the availability option to Public.
Click Update Site at the top or bottom of the page to save your changes.
Now, navigate to the Overview menu in the Site & Blog app.
Share your domain URL with your audience to drive traffic to your site.
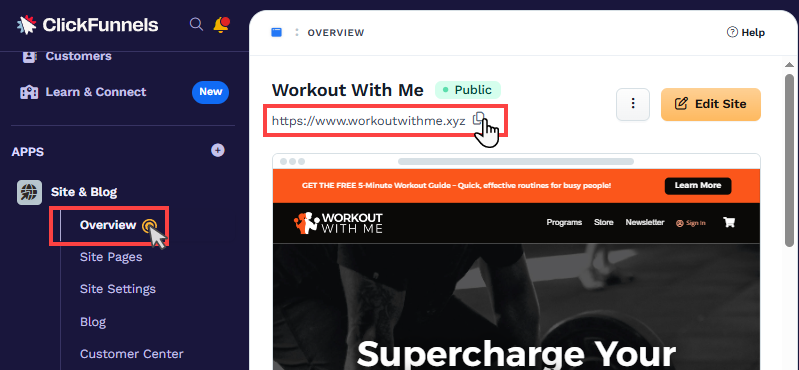
Publishing your site ensures it’s visible and ready for interaction, helping you connect with your target audience effectively.
Site FAQs
Do I need to buy hosting to host my site?
No, ClickFunnels includes hosting for all your site pages as part of your subscription plan. You don’t need to purchase separate hosting services.
Do I need to buy a domain?
ClickFunnels provides a default subdomain (e.g., yourbusiness.myclickfunnels.com) for every account, which is ideal for testing and exploring your site. However, for branding and professionalism, you can connect your own domain. Additionally, ClickFunnels offers one free domain per account. For more details, refer to the article How to Get a Free Domain in ClickFunnels.
What is the difference between a theme and a style guide?
A theme is a collection of pre-designed page templates that apply to various areas of your workspace, including site pages, store pages, blogs, customer centers, and more. On the other hand, a style guide is a set of predefined styling options—such as font sizes, colors, borders, and shadows—that you can apply to individual page content. While a theme defines the overall structure and layout of pages, a style guide ensures consistency in the visual appearance of elements across your workspace.
Can I add tracking codes to my site?
Yes. ClickFunnels allows you to add tracking codes in the Site Settings. You can insert tracking code or pixel code in the Header (<head>) and Footer (<body>) areas of your site.
Can I manage site SEO and social sharing information?
Yes. You can manage SEO and social sharing settings in the Site Settings section. This includes editing meta titles, descriptions, and social media sharing images to improve your site’s visibility and reach.
Can I add custom codes to the site?
Yes. You can use the HTML/JS element to add custom HTML and JavaScript code directly to a page. For tracking purposes, you can also insert custom code into the page’s header and footer areas within the Page Editor.
Can I reuse the same header and footer on multiple pages?
Yes. You can create reusable headers and footers by saving them as Universal Sections. These can be added to multiple pages, and any changes you make to the Universal Section will automatically update across all pages where it is used.
Can I add a form to my website?
Yes. You can add forms to your website using the Form Elements in the Page Editor, such as input, select box, text area, and button elements.
How do I optimize my site for mobile users?
In the ClickFunnels Page Editor, you can switch to Mobile Editing mode to optimize your content specifically for mobile devices. This ensures an optimal experience for users accessing your site on smaller screens. For detailed guidance, refer to the article Mobile Optimization Techniques.