Website Live Chats in ClickFunnels help you connect with visitors at the right moment. These timed messages appear on your pages after visitors have been browsing for a specific duration, allowing you to engage them when they’re most receptive. Using this feature can start more conversations and improve customer service. This article covers how to create and manage these chats effectively.

Requirements
An active ClickFunnels account
The MessageHub app
What are Website Live Chats
Website Live Chats are timed messages that appear on your ClickFunnels pages after visitors have been on the page for a set number of seconds. These messages show up as small windows on the bottom-right of the page, allowing you to communicate with your audience based on how long they’ve been viewing your content.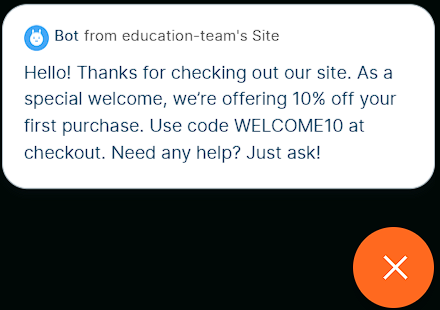
How Website Live Chats Enhance Your User Experience
Engage interested visitors: Reach out to people who spend time on your pages, indicating their interest.
Provide timely information: Offer help or details when visitors might need it most.
Guide users through your funnels: Encourage next steps at key moments in the user’s journey.
Increase conversions: Prompt action from engaged visitors, potentially boosting sales or sign-ups.
Examples of how to use Website Live Chats:
Welcome message: “Thanks for checking out our product! Need any help?”
Offer assistance: “Still considering? Our team is here to answer your questions.”
Promote a deal: “Exclusive offer: Get 10% off if you purchase in the next 15 minutes!”
Encourage progress: “Ready to take the next step? Click here to continue.”
Create Website Live Chats
Navigate to MessageHub in the side navigation menu. Click here to learn how to add apps to your workspace.
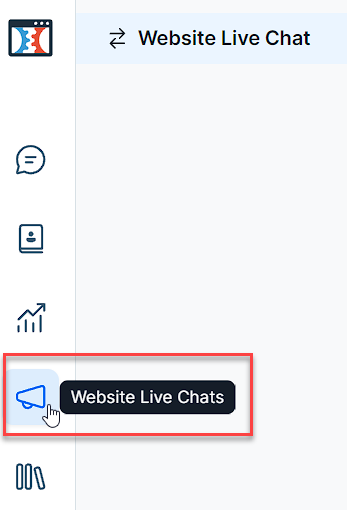
Click on the Megaphone icon to access Website Live Chats.
Click Create a Website Live Chat on the top right of the page.
Fill in the following information:
Title: Enter a title for your Website Live Chat.
Message: Type the message you want to display.
NOTE
Custom attributes are not yet available in Website Live Chat messages. This feature may be added in a future update.
Select Inbox: Choose the appropriate inbox. You can only select a Website Chat Inbox (Email and other inbox types won’t be on the list). To learn more, refer to the How to Create a New Inbox article.
Sent by: Select either a Bot or an agent. Click here to learn more about Chat Agents.
URL: Enter the webpage URL where the chat will appear.
Time on page (Seconds): Set how long to wait before showing the message (e.g., 10 seconds).
Enable: Check this box to activate the chat.
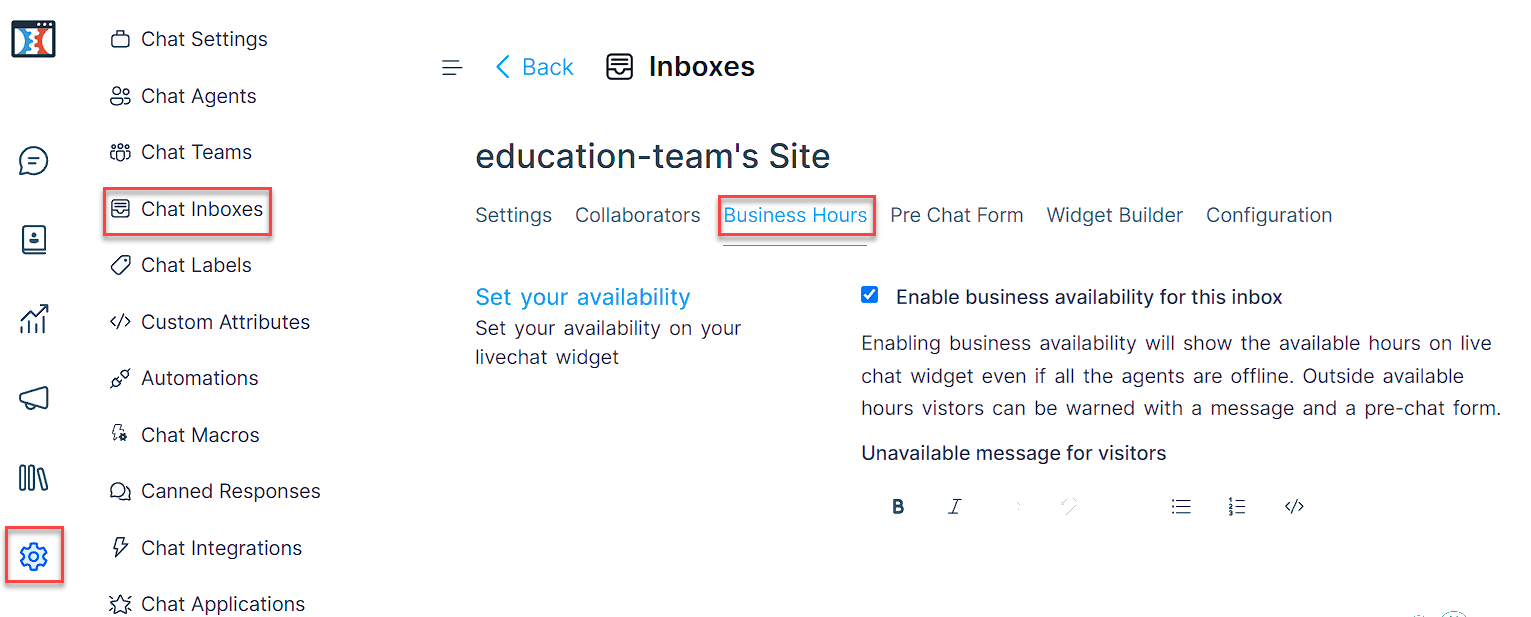
Trigger only during business hours: Check if you want the chat to appear only during set business hours. To set business hours for your chat, go to Chat Inboxes in the Chat Settings, select the inbox you want to modify, and look for the Business Hours option in the Inbox Settings.
Click Create to set up your Website Live Chat.
Test your Website Live Chat
Open a new browser window or incognito mode.
Visit the URL you specified in your chat settings.
Wait for the number of seconds you set in the Time on page field.
The chat message should appear after the specified time.
Manage Website Live Chats
Edit a Website Live Chat
On the Website Live Chats page, find the chat you want to change.
Click the Edit ? option on the right side of that chat.
Modify the chat details.
Click Update to save your changes.
Delete a Website Live Chat
On the Website Live Chats page, find the chat you want to remove.
Click the Delete Ⓧ option on the right side of that chat.
In the confirmation pop-up, click Yes, Delete to confirm.
IMPORTANT
Remember, deleting a chat is permanent. Make sure you really want to remove it before confirming.
Troubleshooting Website Live Chats
Why isn’t my chat appearing?
Double-check the URL settings: Make sure the URL matches exactly where visitors land. If you’re using redirects, enter the final destination URL, not the initial redirect URL.
Confirm that your Chat Inbox is configured and the code is added to the page where you want the chat to be displayed. For detailed instructions, refer to our article on Chat Inbox Configuration.
Ensure the chat is enabled.
Check the Inbox Settings: The Website Domain in your Inbox Settings must match the domain of the funnel or webpage where you’re adding the chat. Learn How to Connect a Domain to Your Site and Funnel.
Verify the Time on page setting.
Why is the wrong message showing?
Review and edit your message content.
Check if you have multiple chats set for the same page.
Why is my chat appearing at the wrong time?
Adjust the Time on page setting.
Check your timezone and business hours settings.
Can I use different messages for different pages?
Yes, create separate chats with unique URL settings.