A domain is a unique web address, like www.example.com, that helps people find your website or funnel online. It is essential for a professional online presence, making it easy for customers to find, remember, and trust your site.

ClickFunnels allows you to connect custom domains to personalize your website and funnels, ensuring they reflect your brand and build customer trust.
This article will cover how to connect an existing domain to your ClickFunnels account using the automated setup process. To use the automated method, your domain registrar must be supported. You can check if your Domain registrar is supported here.
WARNING
If you already have a website with your domain, connecting the root domain in ClickFunnels may cause it to stop working. Instead, try using a subdomain (like ‘funnels.example.com’) or connect another domain in ClickFunnels.
We currently do not support Internationalized Domain Names (IDNs). Special characters are letters that are not in the English alphabet. Some examples of special characters are æ, ø, å, ö, ä, ü and é.
Domain names with trademarked phrases cannot be added or used in ClickFunnels. Click here to view restricted phrase list.
IMPORTANT
ClickFunnels requires using ‘WWW’ in your domain, such as ‘www.example.com’. The automated setup process will configure your domain DNS to redirect ‘example.com’ to ‘www.example.com’.
To connect a subdomain, you don’t need ‘WWW’ — for example, ‘blog.example.com’.
Requirements
A ClickFunnels account
Adding a Domain
Navigate to Workspace Settings in the left-side navigation.
Select Domains.
Click Connect existing domain.
In the open prompt, enter your domain name with a subdomain such as ‘WWW’ and click Continue.

Once the domain registrar information populates, click Add Domain.
Set Up a Domain
After adding a domain, it will show a status of setup in progress. Now, you need to connect this domain with your domain registrar or DNS provider to complete the integration. Follow the steps below to connect the domain automatically:
Decide if you want to redirect your root domain (e.g.,
example.com) to your chosen subdomain (e.g.,www.example.com). Doing so means visitors can also type in your root domain (e.g.,example.com) to access your ClickFunnels site, Funnels, Courses, etc., without typing in the subdomain.WARNING
If you are using your root domain (e.g.,
example.com) somewhere else, you must disable the redirect by toggling it off. Otherwise, your root domain will be affected. For more information, read about using a domain with multiple websites.Redirect ON (default): Leave the toggle “ON” to redirect the root domain (e.g.,
example.com) to the chosen subdomain (e.g.,www.example.com). This will remove the root domain from any other site so it can be used with ClickFunnels instead.
Redirect OFF: Turn the toggle “OFF” to leave the root domain (e.g.,
example.com) alone and not redirect it to the chosen subdomain (e.g.,www.example.com). Turn the toggle OFF if you already use your root domain with a different site.
After you have decided whether or not to redirect your root domain, click the “Start domain setup” button.
A window will open, confirming that ClickFunnels will configure the domain. Click the “Continue” button to agree.

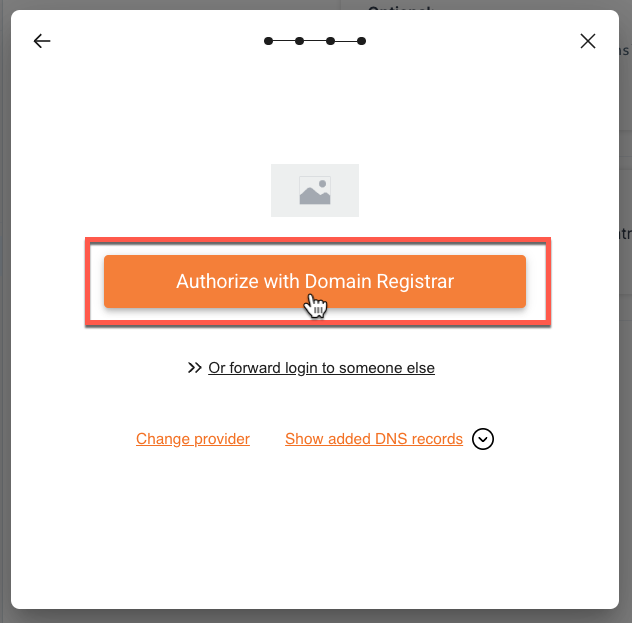
A window confirming the domain’s registrar will appear. Click the “authorize” button to continue.
The new DNS records to be added will be displayed. Click the “Okay, Continue” button to continue. In some cases, it may not show the new DNS records but will show existing records.

Click the “Done” button once the domain configuration has been confirmed.
The domain will now show as Connected to confirm a successful connection.

IMPORTANT
On some occasions, the domain status will show as “Securing…”. Please allow up to 48 hours for the securing process to finish.

Congratulations! You now know how to connect an existing domain in ClickFunnels.
How to Connect the Domain to the Workspace Site
After successfully integrating your domain with your workspace, follow these steps to connect it to your site:
From the left side navigation, select Site and click on the Overview menu.

Click the Three Dot ⋮ Icon and then click Site Settings.

In the Domain field, choose the domain you wish to use for your site.

Click the Update site button to save your changes.
Important:
The domain connected to the Site app is used for Courses, Store, Blog, Customer Center, Landing Pages, and Community. These features must share the same domain connected to the site settings.
How to Connect a Domain to a Funnel
Click on Funnels from the left navigation menu.

Identify a funnel you wish to associate with your domain and click the Settings ⚙ icon to access the funnel’s settings.

In the Domain field, select the desired domain from the dropdown menu.
Enter the desired path in the Funnel Path URL field, such as
/webinar,/blog, or/about. To set this funnel as the domain’s default page, enter a single/character.
Learn more in the Domains - How To Set a Funnel as the Domain Default Page article.
Alternatively, you can access these settings directly within your funnel. Open the funnel, click the Settings button in the top-right corner, and then follow steps 3 and 4.

Click Update Funnel to save changes.
Congratulations! Your domain is now connected to the funnel. When the domain is accessed, the first page of your funnel will be displayed.
Frequently Asked Questions (Domain FAQs)
I already have a website. Can I connect the same domain with ClickFunnels?
No, a domain or subdomain can only be used with one platform at a time. For example, if your domain is connected to Shopify, it cannot be used with ClickFunnels or vice versa.
Can I purchase a domain from ClickFunnels?
Yes, you can purchase a domain through ClickFunnels via IONOS. ClickFunnels has a partnership with IONOS that allows you to initiate the purchase process directly within ClickFunnels. Once the purchase is completed, ClickFunnels will automatically set up and secure the domain for you. To learn more about purchasing a domain in ClickFunnels, click here.
Do I have to purchase SSL?
No, ClickFunnels will generate and verify SSL during the domain setup process. You do not need to purchase SSL separately.
How many funnels can I connect with one Domain?
There is no limit to the number of funnels you can connect to a single domain.
Can I create custom emails associated with the domain in ClickFunnels?
Yes, during the domain setup process, ClickFunnels will prompt you to add email DNS records, allowing you to create custom emails within your workspace. Learn more here.
Can I assign different domains to individual courses in my ClickFunnels workspace?
No, all courses in your ClickFunnels workspace use the domain connected to the Site app. It is not possible to assign different domains to individual courses.