Managing workflows in ClickFunnels is crucial for automating your business processes and ensuring efficient communication with your contacts. Effective workflow management allows you to automate tasks, streamline operations, and maintain consistency across your marketing efforts. In this article, you’ll learn how to access and modify existing workflows, test their functionality, and implement best practices to optimize performance.
Requirements
An active ClickFunnels account
A workflow created in your workspace
Accessing the Workflows
ClickFunnels provides a dedicated page to view and manage all your workflows. Here’s a quick rundown of the options available:
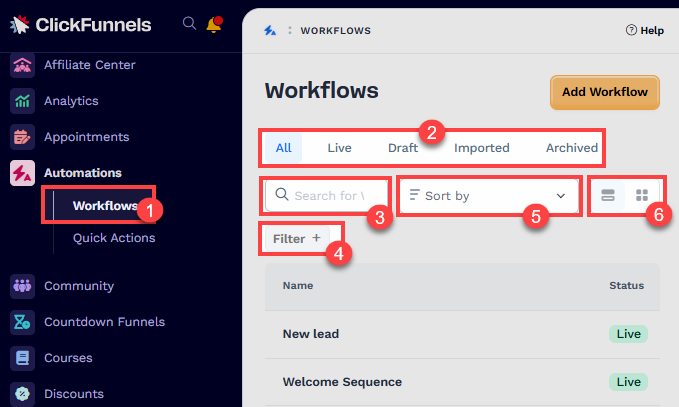
Accessing the Existing Workflows:
From your ClickFunnels dashboard, click on the Automations app in the left-hand menu.
Top Navigation:
The Workflows page will display various options at the top. You can choose to view all workflows or filter by their status, such as All, Live, Draft, Imported, or Archived.
Search Bar:
Use the Search Workflows bar to find specific workflows by typing in keywords. This is useful for quickly locating a particular workflow.
Filter Option:
Click on the + Filter button to filter workflows based on criteria such as workflow name, creation date, and update date. You can also save your filters for future use, making it easier to find workflows based on your preferred criteria.
Sort By:
The Sort by dropdown menu allows you to sort workflows alphabetically (A-Z or Z-A) or by date (oldest to newest or newest to oldest).
List View or Table View:
ClickFunnels offers a table view and a list view to display your workflows. Click on the corresponding icon to choose your preferred view.
Updating a Workflow
On the Workflows page, click on the workflow name you wish to update.
Once inside the workflow, make the necessary modifications according to your needs. This could include adding new steps, editing existing steps, or removing steps.
There is no saving required to save or update a workflow. Any changes made will be reflected live immediately. However, if you need time to update, you can disable the workflow by clicking on the Status toggle bar. This is useful when making extensive changes that might take time, such as setting up multiple steps or editing an email.
Removing a Workflow
On the Workflows page, click on the workflow name you wish to remove.
Click the Gear (⚙️) icon next to the workflow’s name to open the settings.
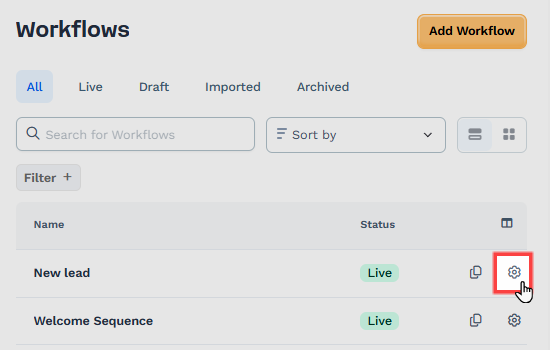
In the workflow settings, click on the Archive button.
Confirm the action by clicking on the Proceed button.
Restoring a Deleted Workflow
Navigate to the Automations app and select Workflows.
On the Workflows page, click the Archived tab to view all archived workflows.
Locate the workflow you want to restore and click the Undo icon.
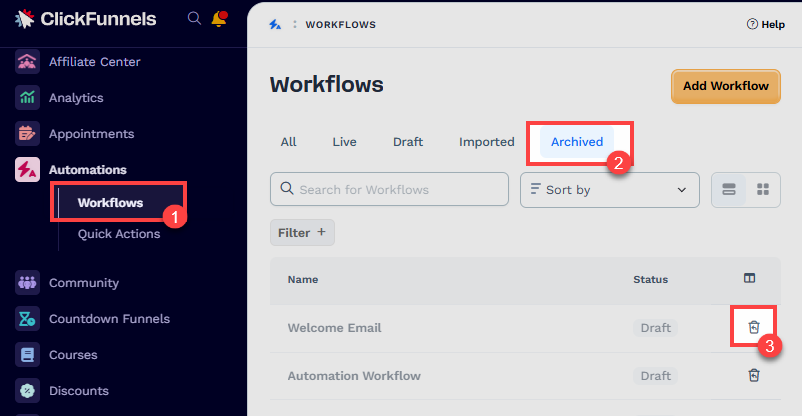
Confirm the action by clicking on the Proceed button. The workflow will be restored to use.
Duplicating a Workflow
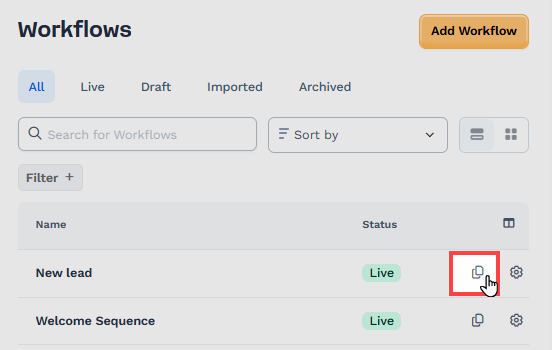
On the Workflows page, click on the workflow name you wish to duplicate.
Click on the Duplicate icon in the table. This will create a copy of the selected workflow.
Testing a Workflow
To ensure your workflow is functioning correctly before going live, you can use the “Test Workflow” feature. Follow these steps to test a workflow:
Access the Workflow:
On the Workflows page, click on the name of the workflow you wish to test to open the workflow editor.
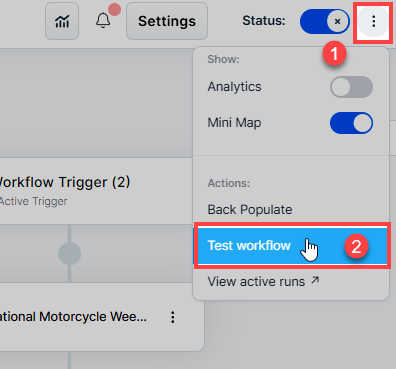
Find Test Workflow Option:
In the workflow editor, click on the three-dot icon at the top right corner of the page.
From the dropdown menu, select Test workflow.
Select a Contact for Testing:
In the Test workflow popup, choose a contact for the workflow to run the test on by entering an email address or searching name. You can also create a new contact instantly just by typing an email address.
Bypass Delay Steps (Optional):
If you want to skip any delay steps in the workflow, check the Skip delay steps box. This ensures that the system skips the delays and tests the action steps directly for the selected contact, providing a comprehensive check of the workflow’s functionality.
Run the Test:
Click on the Test button to initiate the test. The workflow will execute for the selected contact, allowing you to verify that all steps are working as expected.
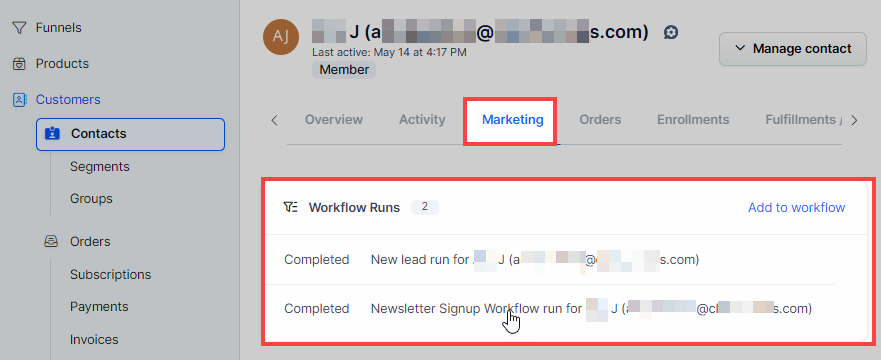
Review Test Results:
After the test is complete, review the results to ensure that all triggers and actions within the workflow are functioning correctly. To do this, open the contact profile used for testing and go to the Marketing tab. Under the Workflow Runs section, click on the workflow name to view the execution steps.
Activating / Deactivating a Workflow
On the Workflows page, click on the workflow name you wish to modify.
Open the workflow in the workflow editor.
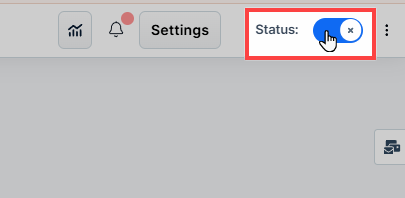
Locate the Status toggle switch at the top right corner of the workflow editor. Toggle the switch to activate or deactivate the workflow. A blue toggle indicates the workflow is active, while a gray toggle indicates it is inactive.
Sharing Workflows Between ClickFunnels Workspaces
Sharing a workflow in ClickFunnels means you can take a workflow you’ve created and share it with another ClickFunnels user or import it into another workspace within your ClickFunnels account. This feature is helpful for collaboration and leveraging successful automation strategies across different environments. Here’s how you can share a workflow:
Access the Workflow:
Navigate to Automations and select Workflows to access your existing workflows. Click on the gear icon (⚙️) next to the workflow you wish to share to open the workflow settings.
Initiate the Share Process:
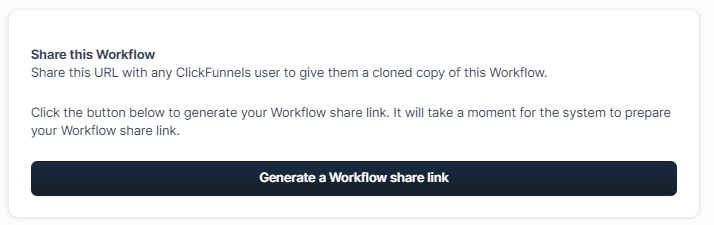
In the workflow settings, locate the Share this Workflow section and click on the Generate a Workflow share link button.
Configure Share Settings:
In the pop-up window, you can modify the workflow name and select or enter the affiliate code and affiliate name. If someone without a ClickFunnels account uses your shared link to create a new ClickFunnels account, you will receive an affiliate commission.
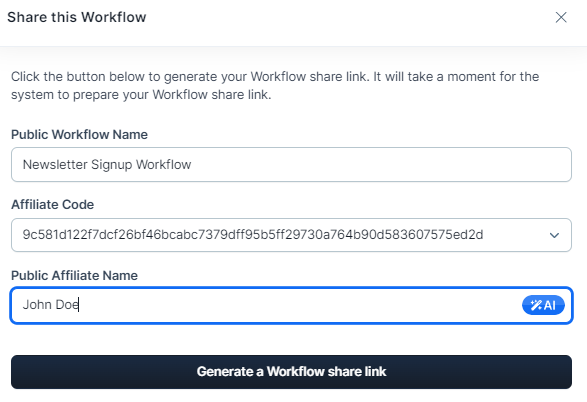
Generate the Share Link:
Click the Generate a Workflow share link button to create the shareable link. The system will take a moment to prepare your Workflow share link. Once generated, you can copy the link and share it with other ClickFunnels users to allow them to import the workflow into their workspace. To import the workflow into another workspace within your ClickFunnels account, simply paste the link into your browser. ClickFunnels will then prompt you to select the workspace where you want to import the workflow.
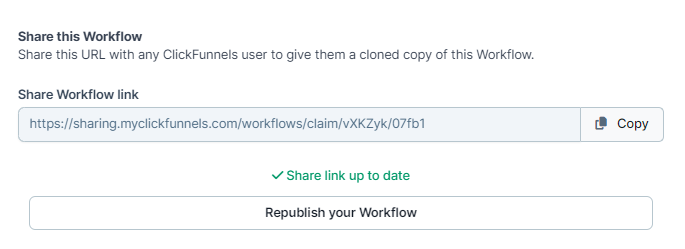
Note:
If you modify or update a workflow after creating a share link, ClickFunnels won’t automatically update the linked workflow for recipients. To ensure the shared link reflects your latest changes, you can republish the link after making edits. Click the Republish your Workflow button to update the shared link.