Running ads without reliable conversion tracking can lead to wasted budget and unclear results. ClickFunnels solves this by allowing you to integrate Meta Pixel (formerly Facebook Pixel) and the Conversions API (CAPI) directly from your site and funnels—no manual code pasting required. In this article, you will learn how integrating Meta Pixel and the Conversions API with ClickFunnels helps you track conversions more accurately through browser and server-side events.
Requirements
An active ClickFunnels account
The Site & Blog app added to your workspace
A Facebook Business account
Note:
For maximum tracking accuracy, especially on iOS devices affected by Apple’s App Tracking Transparency (ATT) policy, it’s strongly recommended to verify your domain in Facebook Business Manager. This ensures event attribution works correctly across browsers and devices.
How Meta Pixel and Conversions API (CAPI) Work
The Meta Pixel (formerly Facebook Pixel) is a browser-based tracking tool that records user interactions such as page views, form submissions, and clicks. This data is collected from the user's browser and sent to Meta to help with campaign performance measurement and retargeting. However, browser-based tracking has become less reliable due to privacy regulations and device-level restrictions, especially on platforms like iOS.
The Conversions API (CAPI) complements this by creating a direct and more secure connection between your website or server and Meta. Instead of relying on the browser, CAPI transmits conversion events directly from ClickFunnels’ server to Meta’s systems. This ensures events like purchases or opt-ins are still tracked accurately even when users block browser cookies or opt out of tracking.
For example, if a user completes a purchase on your funnel with browser tracking disabled, the Pixel event may fail, but Meta will still receive the same event sent through CAPI. When both Pixel and CAPI are used together, they create a dual-channel tracking system that increases data accuracy and minimizes signal loss.
Tips:
Understanding and using all the technical options in Facebook Business tools and Meta event tracking can be overwhelming at first. If you find it confusing, it's advisable to consult with an expert in Facebook Business tools and Meta integrations.
Step 1: Set Up Meta Pixel and Conversions API in Facebook Events Manager
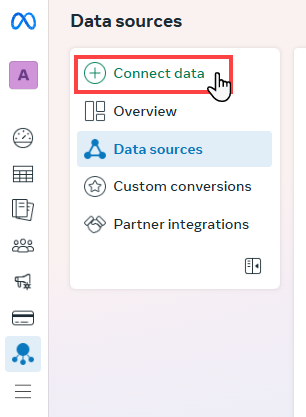
Connect Data Source in the Events Manager
Go to Meta Events Manager.
In the left sidebar, click Data Sources, then select + Connect Data.
In the open prompt, choose Web as a data source type.
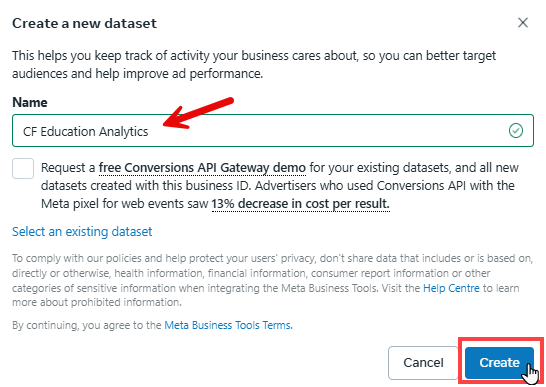
Click Create New Dataset to set up a new data stream. Alternatively, you can choose an existing dataset from the dropdown.
Enter a name for your dataset, then click Create.
When asked how you want to connect, click Set Up Manually.
Select Conversions API and Meta Pixel (Recommended) as the data sharing method.
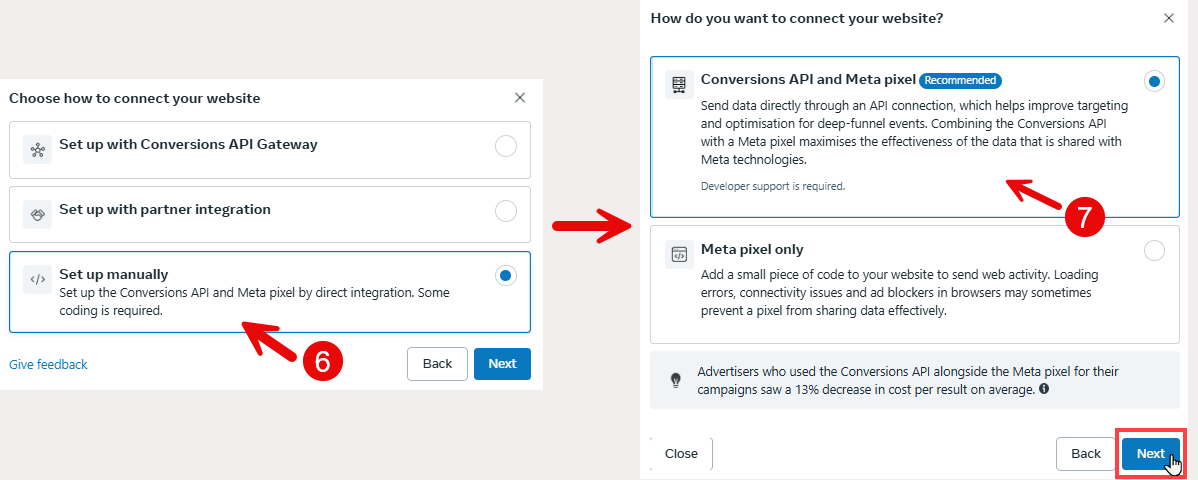
Click Start CAPI Setup, then click Finish to complete the initial configuration.
After this step, your dataset (which includes a Pixel ID) will appear under your Data Sources list. The Conversions API setup will be finalized in the next step when you generate your access token and connect it to ClickFunnels.
Setting Up Conversions API
Once you've created your dataset and selected manual setup, Meta walks you through five guided steps to implement the Conversions API. Here's what each part involves:
Overview – Meta introduces the steps and benefits of the Conversions API. Click Continue to begin.
Select Events – Choose which events to track on Facebook with the Conversions API. Examples include
View Content,Purchase,Start Trial, and others relevant to your business goals.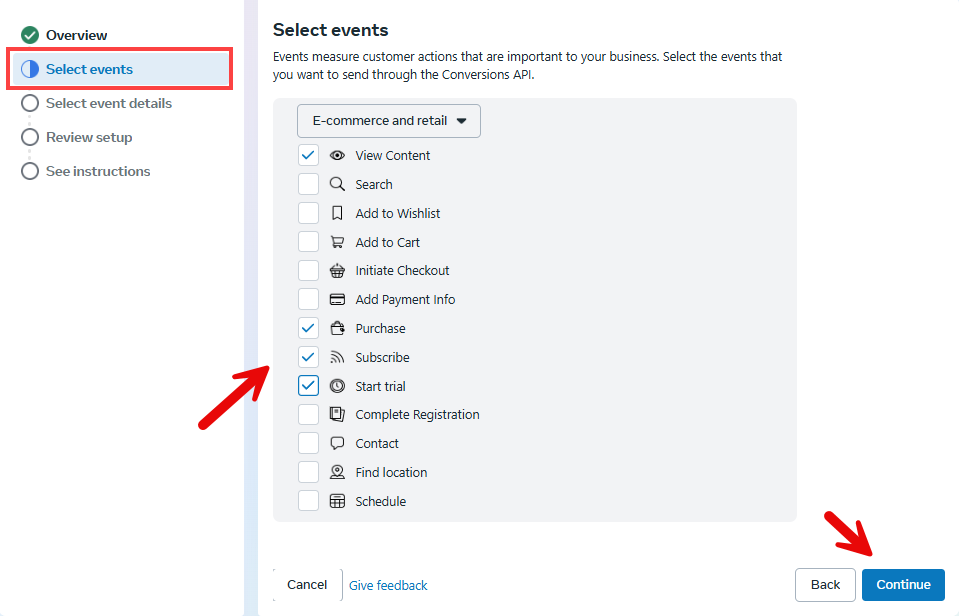
Select Event Details – This step specifies the details Meta will receive for each event you’ve chosen to track. These details are divided into two categories:

Event detail parameters describe what action was taken. For example, if a customer purchases a product in your funnel, the event is
Purchase, and the details might include the product's value, the currency used, and the page URL where the transaction occurred.Customer information parameters help Meta associate that action with a specific person. This includes identifying information such as their first name, email address, or phone number.
The more accurate and complete this information is, the higher your event match quality will be, which will improve reporting and ad optimization.
Note:
The Event Detail Parameters must be selected for each event individually. Please be sure you select each event and check the desired parameters before continuing.
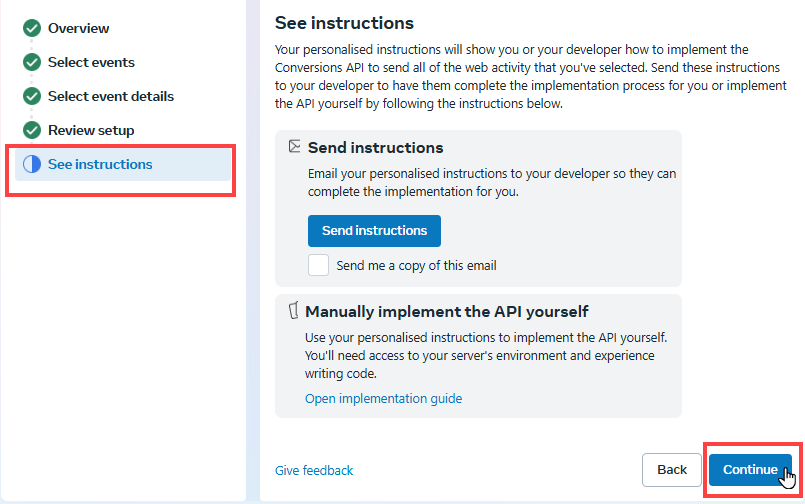
Review Setup – Meta displays a summary of the selected events and parameters so you can confirm that everything is correct before continuing.
See Instructions – This step provides an overview of how to implement the Conversions API based on the setup you've completed. At this stage, no additional configuration is needed. You can click Continue to proceed.
Helpful Resources:
Step 2: Fetching Access Token, Pixel ID, and Test Event Code
To connect Meta tracking to ClickFunnels, you’ll need three key items:
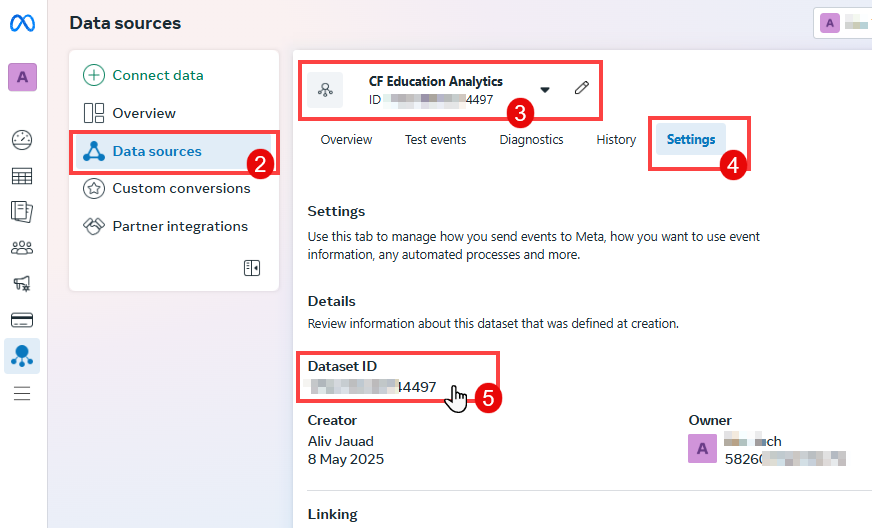
Pixel ID (also known as Dataset ID)
Go to Events Manager.
Click on Data Sources in the left sidebar.
Select your dataset (Pixel).
Click the Settings tab at the top.
Copy the Dataset ID listed in the details section — this is the Pixel ID you’ll use in ClickFunnels.
Access Token
Go to Events Manager.
Click on Data Sources and select your dataset (Pixel).
Click the Settings tab at the top.
Under Set up direct integration, click Generate access token.
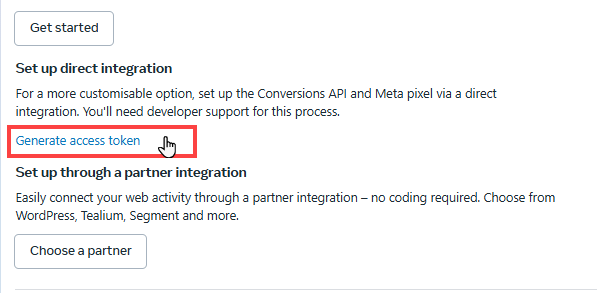
Copy the token to use in ClickFunnels.
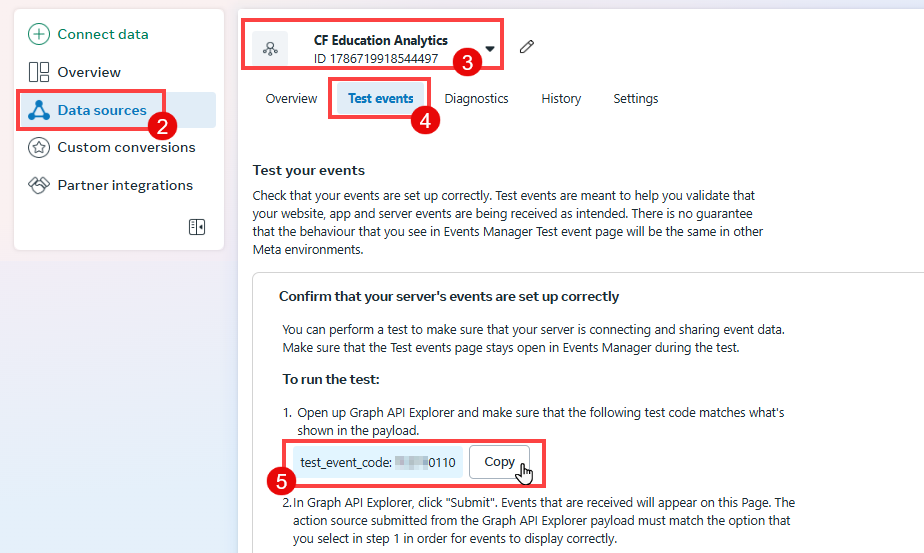
Test Event Code (optional)
Go to Events Manager.
Click on Data Sources in the left sidebar.
Select your dataset (Pixel).
Click the Test Events tab at the top.
Expand the section labeled Confirm that your server’s events are set up correctly and copy the Test Event Code.
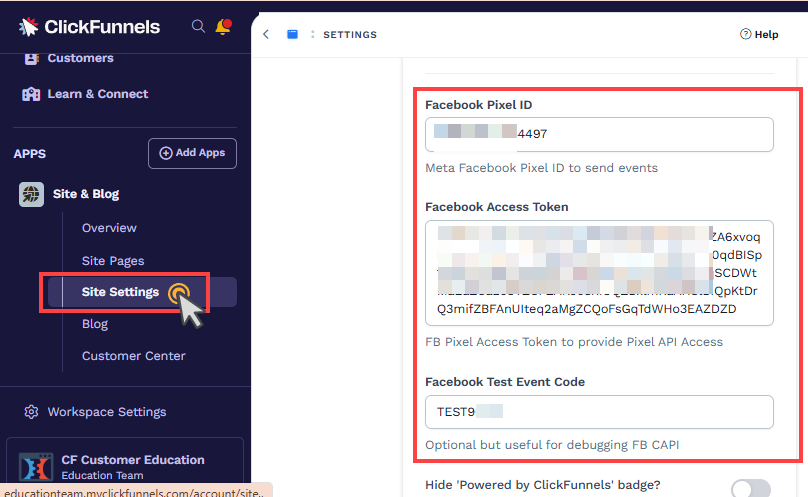
Step 3: Integrate Meta Pixel and CAPI with ClickFunnels
From your workspace, click on the Site & Blog app in the left-hand menu.
Select Site Settings.
Scroll to the Tracking Codes section.
Paste the Dataset ID into the Facebook Pixel ID field.
Paste the Access Token into the Facebook Access Token field.
(Optional) If you're testing events, paste the Test Event Code into the Facebook Test Event Code field.
Note:
If you're using a test event code to test the integration, be sure to remove it once testing is complete. Leaving the code in place may cause your live traffic data to appear as test events and not be used for campaign optimization.
Click Update Site to save settings.
Important:
Adding your Pixel ID and Access Token to the Site Settings implements the tracking universally across the workspace site pages, funnel pages, and landing pages.
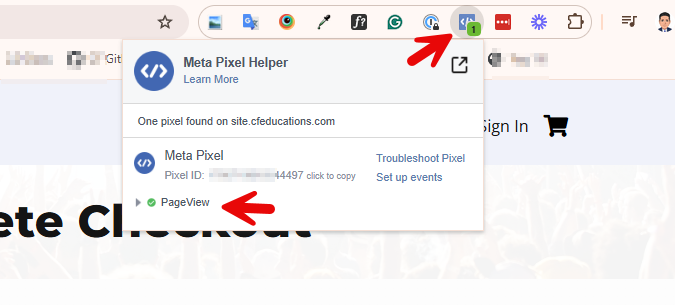
Verifying the Integration
After completing your setup, it's important to confirm that your Meta Pixel and Conversions API are working correctly. One of the most effective ways to do this is by using the Meta Pixel Helper Chrome Extension.
This tool helps you verify whether Meta events, such as PageView, Lead, or Purchase—are being triggered correctly when users interact with your ClickFunnels pages. It also displays additional event details like parameters and error diagnostics, making it ideal for testing and troubleshooting.
To use the extension:
Install the Meta Pixel Helper Chrome Extension.
Open your funnel or site page in your browser.
Click the extension icon in the toolbar to view real-time event activity.
Review the list of events fired and confirm they appear without warnings or errors.
Additionally, visit the Test Events tab in Facebook Events Manager to monitor server-side and browser events in real time.
Key Concepts and Tracking Terms
Pixel: A browser-based script that runs on your funnel pages and tracks user interactions. For example, when a user visits a page, the PageView event is triggered.
Conversions API (CAPI): A server-side solution that sends events directly from a server to Meta. For example, if a customer completes a purchase and their browser blocks tracking, CAPI can still record the Purchase event.
Events: Specific user actions that are tracked. Examples include:
PageViewwhen someone visits a funnel pageLeadwhen someone submits an opt-in formPurchasewhen someone buys a product
Parameters: Additional details included with events, such as purchase value, product ID, currency, or customer information. These help improve tracking accuracy and ad relevance.
Standard Events: Meta-defined events that are commonly used for tracking across all ad accounts. Examples: PageView, AddToCart, Purchase, Lead.
Custom Events: These are manually defined for unique interactions not covered by standard events. For example, a custom event like FormStepCompleted could be triggered when a user completes a specific step in a multi-step form, allowing you to track deeper engagement that standard events don’t cover.
Event Match Quality: A score showing how well your event data matches a user in Meta's system. Providing values like email, phone, and IP address improves this score and helps with more accurate attribution.