Payments AI enables the seamless management and acceptance of payments in ClickFunnels. By integrating Payments AI, you can enable multiple payment gateways, making it easier to collect customer payments through funnels and your online store. This guide provides step-by-step instructions on how to set up and use Payments AI within ClickFunnels.
Requirements
An active ClickFunnels account
Set Up Your Payments AI Account
Before you can start accepting payments, ensure that you have at least one payment gateway connected and verified within your Payments AI account, such as the Payments AI internal gateway, Stripe, PayPal, or NMI. This is necessary to process transactions in your ClickFunnels workspace.
Payments AI provides its own native gateway and several third-party gateways that offer flexibility in how you process payments. Below is a list of supported gateways by Payments AI and ClickFunnels:
Important:
You can also connect Stripe directly to ClickFunnels for seamless payment processing without relying on Payments AI. By adding the Stripe app to your ClickFunnels account and linking your business account, ClickFunnels can process payments directly through Stripe without requiring a Payments AI account or routing rules. For detailed instructions on setting up Stripe as a payment gateway in ClickFunnels, refer to the article Setting Up Stripe as a Payment Gateway in ClickFunnels.
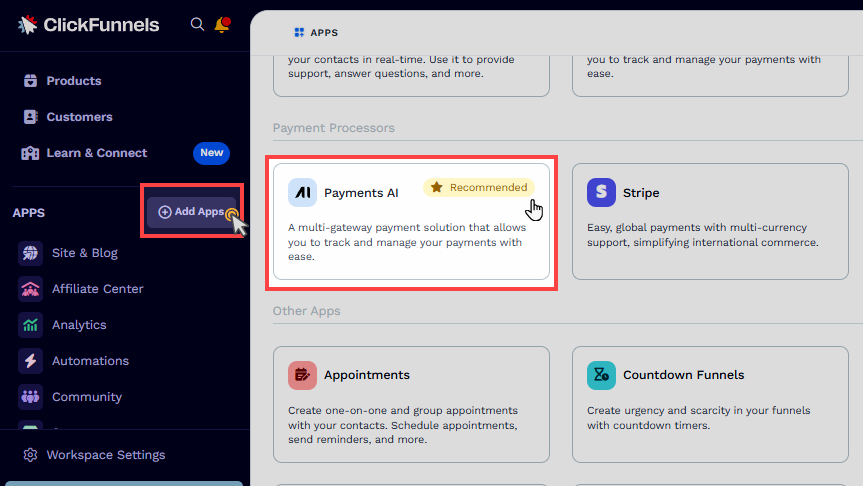
Add the Payments AI App in the Workspace
From the left sidebar menu, click on + Add Apps to navigate to the Apps page.
Scroll down until you find the Payments AI app, then click on it.
Confirm your selection by clicking the Add App button.
Prepare Your ClickFunnels Workspace to Accept Payments
To ensure you can collect payments across your ClickFunnels store and funnels, you need to complete the following steps:
Set the Default Payment Processor and Currency
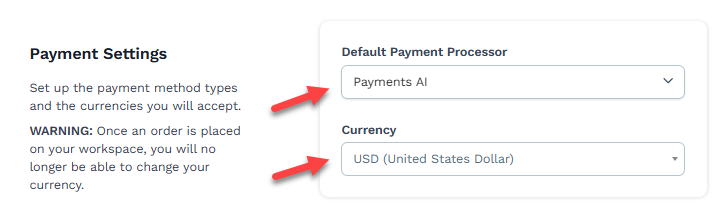
Navigate to Workspace Settings from the left-hand menu and select the General tab.
In the Payment Settings section, locate the Default Payment Processor dropdown.
Select the Payments AI account from the list to set it as the default processor for handling transactions.
Set the workspace currency under the Currency dropdown.
Note:
The "Default Payment Processor" selector will be displayed only if your workspace has multiple payment processor accounts connected, such as two Stripe accounts or a combination of one Stripe account and the Payments AI account.
Workspace Currency Consideration:
The currency options available in the dropdown are automatically populated based on your Payments AI gateway settings. You must first configure the currencies in your gateway settings within your Payments AI account.
Although you can select multiple currencies in the Payments AI gateway, each ClickFunnels workspace can only operate with a single currency.
Once an order is placed within your ClickFunnels workspace, the selected currency will be locked for that workspace, and it will no longer be possible to change it.
Enable Billing Method Types in the Payments AI Settings
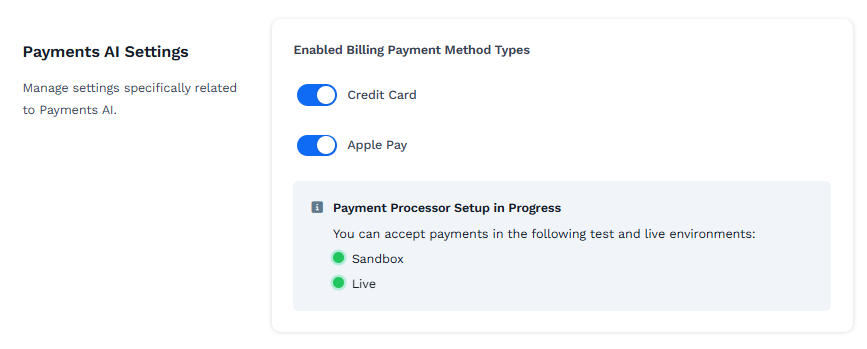
From the left sidebar menu, click on Workspace Settings and select General.
Under Payment AI Settings, enable the desired billing methods (e.g.,
Credit Card,Apple Pay,Paypal). This will allow payments to be collected across the entire workspace.Once enabled, you can add products to your store, and customers will be able to complete the checkout process.
Enabling billing methods at the workspace level ensures that payment processing is activated for all relevant areas within your workspace.
Create a Product
Before you can accept payments, you need to create the products that customers will be purchasing:
Navigate to the Products menu and select All Products.
Click Create Product to create a new product, or choose Add from Zendrop to import a product from your Zendrop account.
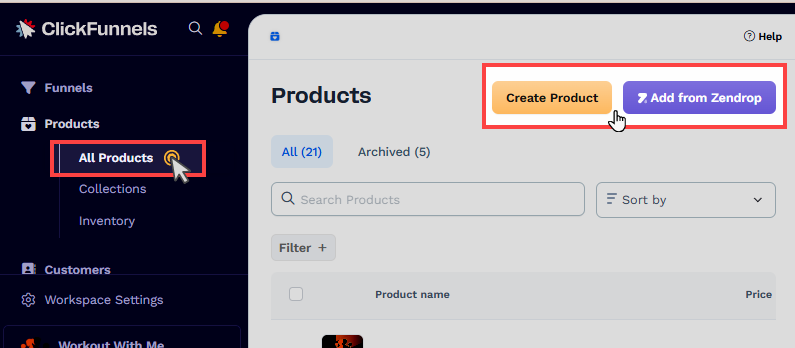
Complete the necessary fields, such as product name, pricing, variations, etc, and save the product.
Configuring products accurately is crucial for a seamless checkout process. For more detailed guidance, refer to our existing article on Products - How to Create and Manage Products for more comprehensive guidance.
Accepting Payments in the Store
Once your product is created, you can make it available in your ClickFunnels store:
Enable ‘Sales Channel Visibility’: In the product settings, enable the Online Store option to make the product available in your store.

In the Store app, access the store editor by clicking the Customize Store option.
In the left-side navigation, expand the Store Front menu and select the Product page. When customers click on a product in the storefront, they will be redirected to the product page.
Ensure the product page contains a Checkout element to enable payment collection.

Once these steps are complete, customers can visit the store and purchase your product using the payment methods configured through Payments AI.
Note:
The Store app in ClickFunnels uses the default payment processor configured within the workspace settings.
Accepting Payments in a Funnel
Payments can also be collected through funnels:
Access to a Funnel:
Navigate to the Funnels menu in the ClickFunnels dashboard.
Create a new funnel or access to an existing one.
Select the Payment Processor and Billing Payment Method Types:
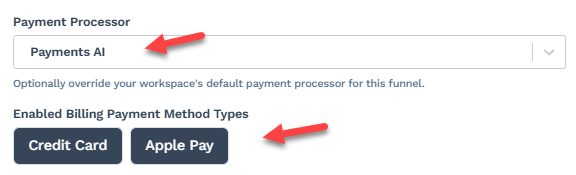
In the Funnel Settings, select Payments AI as a payment processor. If Paments AI is already designated as the default processor in the workspace settings, you do not need to select it again here manually.
Note:
The "Payment Processor" selector will be displayed only if your workspace has multiple payment processor accounts connected, such as two Stripe accounts or a combination of one Stripe account and the Payments AI account.
Under the Enabled Billing Payment Method Types section, enable billing methods (e.g.,
Credit Card,Apple Pay,Paypal).
Add a Page to the Funnel:
You can use a pre-built Order Page Template with a Checkout element.
Alternatively, you can add a Checkout element manually using the page editor. Do not use the Legacy Checkout element.
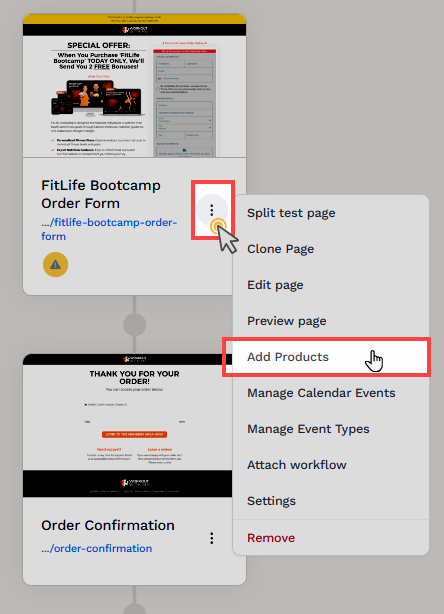
Attach a Product to the Funnel Page:
Click the three-dot icon on the funnel page, select Add Products, and link an existing product from your workspace.
Set Funnel to Live Mode:
In the funnel settings, switch Test Mode to “No” to make the funnel live.
Once these steps are complete, you can share your funnel, and users can make purchases using the configured payment methods, such as credit card, debit card, Apple Pay, or PayPal.