Customizing the Store Product Page in ClickFunnels Store allows you to control how your products are displayed, improving the shopping experience for customers. By personalizing this page, you can highlight key product information, align the design with your brand, and make it easier for customers to make a purchase. This article will show you how to customize the page using dynamic product elements that pull details from the products you’ve already created.
.png "8WqE6p_IgGHC2Sn0SHahVD2sXaWiK6avRg(1).png")
Requirements
An active ClickFunnels account
The Store app added to your workspace
At least one product created and set to Online Store visibility
Overview of the Store Product Page
The Store Product Page is a template page used to display individual products in your store. Each product automatically uses this page, which pulls in details such as the name, price, description, and image. When you preview the page in the editor, you’re looking at the template design itself, not a specific product. This is why you may not see product names or descriptions in preview mode. Once a customer clicks on a product in your store, the template displays that product’s details dynamically.
By customizing this page, you can ensure your products are displayed in a way that’s both attractive and easy to understand, which can lead to increased sales.
Customizing the page allows you to highlight product details such as the name, image, price, and description, using dynamic elements that automatically pull data from the products you’ve already created. This not only saves you time but also keeps your store looking consistent and professional.
A well-customized product page can:
Improve user experience by organizing product information clearly.
Boost conversions by creating a clean, easy-to-navigate layout.
Strengthen your brand identity by aligning the page design with your overall store theme.
IMPORTANT
The Product Page you customize is a reusable template. Customers will only see product-specific details (like name, description, and price) when they click on an actual product in your store. In preview mode, you’ll only see the template layout.
Setting Product Visibility for the Online Store
To make sure your products display correctly on the Product Page, confirm that they are visible in the Online Store. If a product is hidden, it will not appear on the page even if you’ve customized the layout. Follow these steps to check visibility:
From your workspace dashboard, click Products in the left-hand menu.
Select All Products.
To update visibility, click on the product you want to edit. In the product settings, go to Sales Channel Visibility and toggle Online Store on.
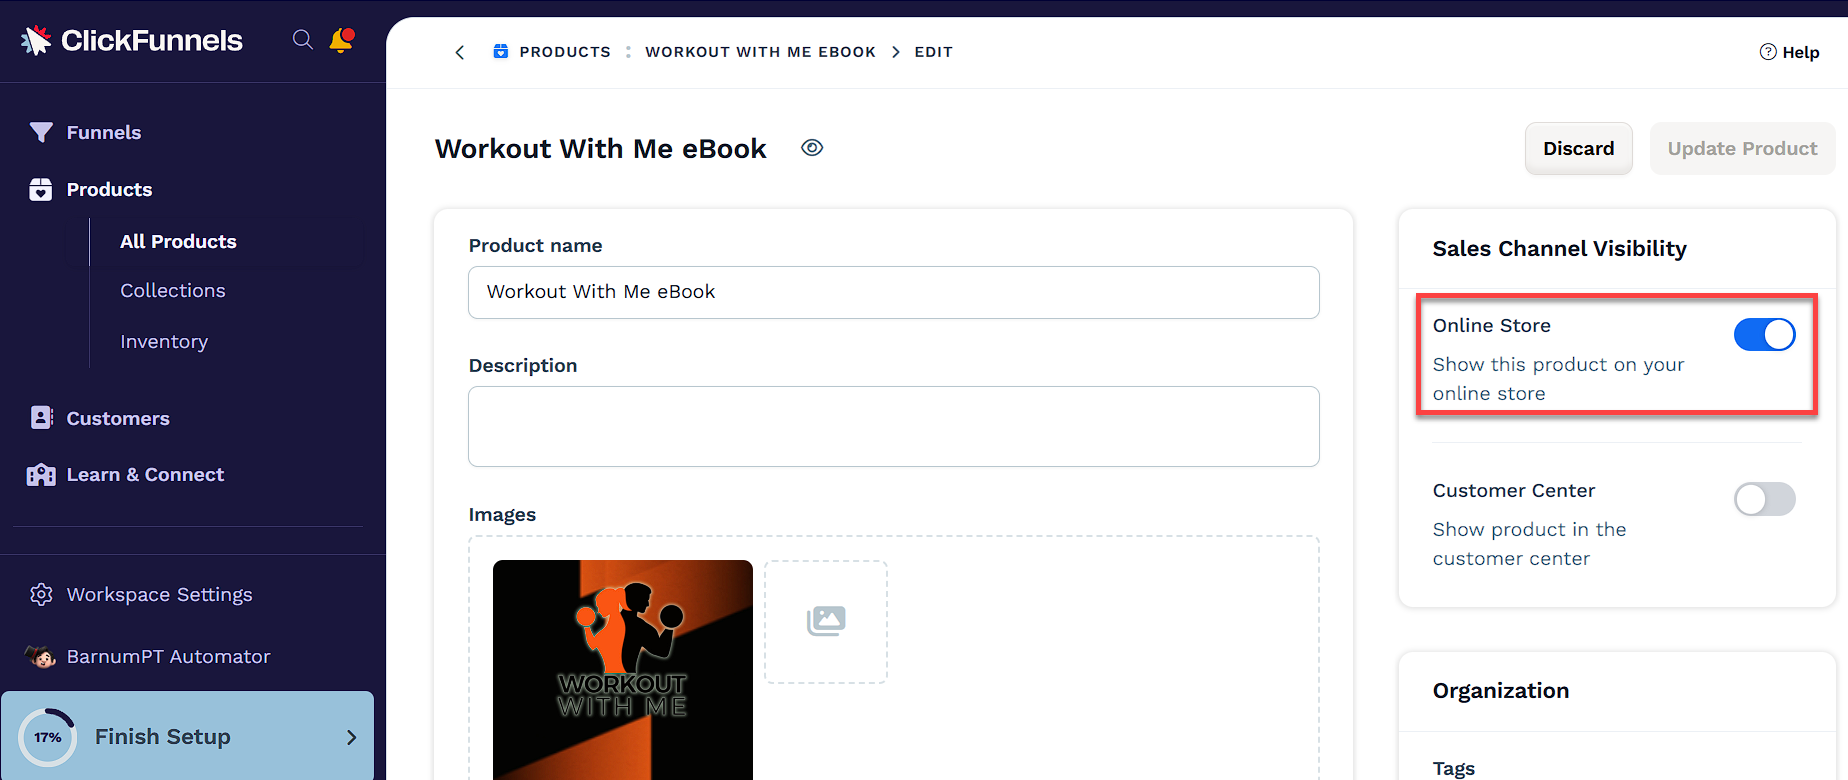
Once a product is marked as visible, it will display on your Online Store and use the Product Page design you’ve customized.
Customizing the Store Product Page
Customizing the Store Product Page lets you control how product details are displayed and how customers complete their purchases. You can add or remove elements, adjust the layout, and choose between two checkout options for your store.
When setting up your Store Product Page, you’ll need to decide how customers will complete their purchases: using Individual Product Checkout or an Add to Cart experience. This choice determines how your checkout process works across your store and should align with your overall sales strategy.
Individual Product Checkout: This option allows customers to purchase a single product directly from the product page, taking them immediately to checkout.
Add to Cart: This option enables customers to add multiple products to a cart, review their selections, and then proceed to checkout.
IMPORTANT
Checkout choice applies to your entire store. You can’t mix Add to Cart and Individual Checkout.
To customize the Store Product page:
In the left-hand menu, click Store, then select Overview.
Click Customize Store to access the theme editor.
Make sure the Product page is selected from the left-hand panel.
.png "AVmPmKduerTOpI_YsP2SuD8e4qoyHTOuWg(1).png")
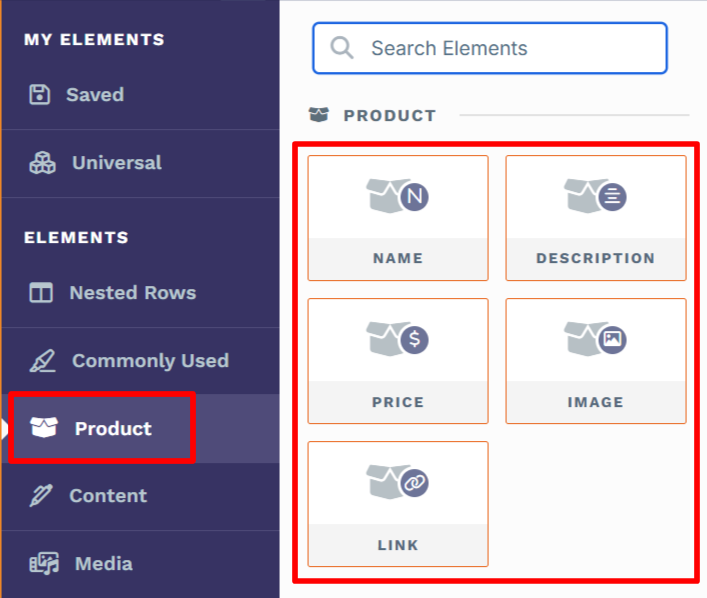
Inside the editor, add a Section, then add a Row within that section. Click the orange Add Element button inside the row to insert a new element.
From the Elements menu on the right, scroll to the Product section and add the elements you want, such as:
Name: Automatically displays the product name.
Description: Adds the product description.
Price: Shows the product price.
Image: Displays the product image.
Choose how you want customers to complete their purchase:
Option 1: Individual Product Checkout
Add a Checkout element to the product page. When clicked, it will take customers directly to the checkout page to complete their purchase. To learn more about the checkout element, refer to the Checkout: Enable Users to Complete their Purchase article.
Option 2: Add to Cart Functionality
Replace any existing Checkout element on the product page with the Add to Cart element.
For detailed steps on setting up and customizing Add to Cart, visit our How to Use Add to Cart Functionality in Your Store article.
Click on each element to access its settings. Adjust the fonts, colors, spacing, and layout to match your store’s theme, ensuring a cohesive and professional look.
NOTE
You can add other elements, such as custom text or images, as needed to further personalize the page. Feel free to adjust the layout or add additional sections to suit your design preferences.
After completing your setup, Save your changes.
Helpful Resources: