Understanding how visitors interact with your site is key to making informed business decisions, and that’s where Google Analytics helps. However, installing it manually can involve a complex setup. ClickFunnels simplifies this with a no-code solution to connect Google Analytics directly from your site settings. In this article, you’ll learn how to connect Google Analytics (GA4) in ClickFunnels.
Requirements
An active ClickFunnels account
The Site & Blog app added to your workspace
A Google Analytics account
A GA4 property is available in your Google Analytics account
What is Google Analytics 4 (GA4)
Google Analytics 4 (GA4) is Google's latest analytics platform, built to provide deeper insights into how users interact with your website. It replaces Universal Analytics and introduces event-based tracking, which captures more meaningful actions, like button clicks, form submissions, and purchases, rather than just pageviews.
Key benefits:
Track how visitors move through your site and funnels in real time
Measure events like button clicks, form submissions, and purchases
Use data insights to optimize site and funnel performance and conversions
Example:
Suppose you have a funnel with a lead capture form followed by an order form. With GA4, you can track the number of people who viewed each step, submitted the form, and completed the purchase. This lets you identify drop-off points and improve your funnel's effectiveness.
💡 Helpful Resources:
Step 1: Get Your Measurement ID (GA4 Data Stream)
Note (first-time setup):
If this is your first time using Google Analytics, create a GA4 property first, then create a Web data stream inside that property.
💡 For details, see Google’s guide: Set up Analytics for a website and/or app.
Sign in to Google Analytics.
Go to
⚙️ Admin (bottom-left).Under Data Collection and Modification, choose Data Streams.
Click Add stream » Web.

Enter your website URL and stream name.
(Optional) Enhanced Measurement can remain on by default. It sends common events such as
page_viewandscroll.Click Create & Continue.
In the stream details, copy the Measurement ID (format:
G-XXXXXXXXXX). You’ll paste this into ClickFunnels.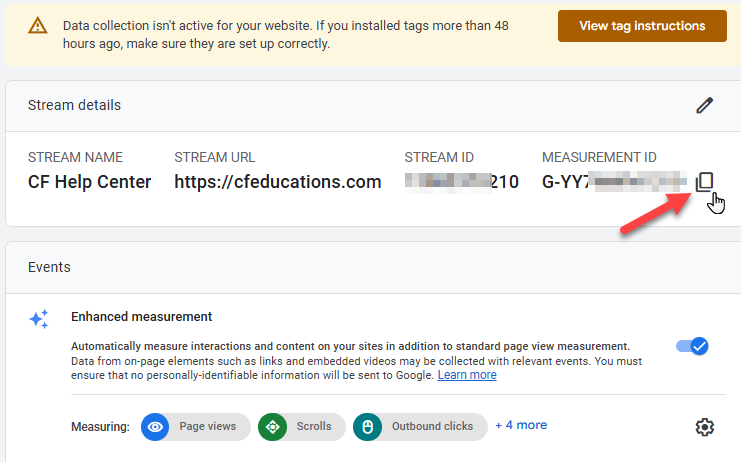
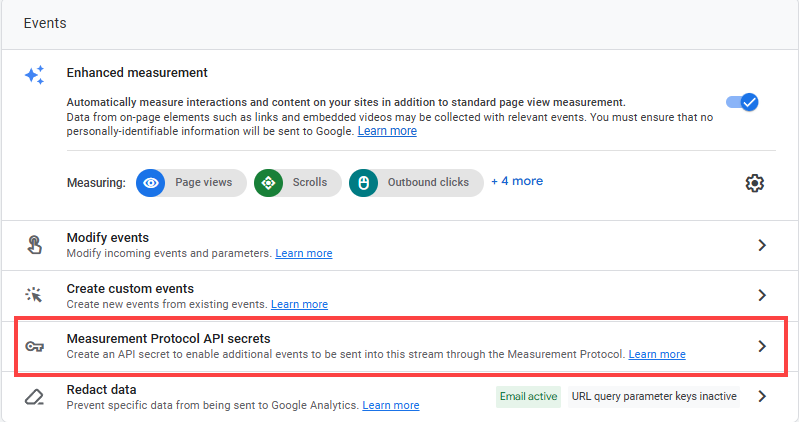
Step 2: Create an API Secret
From the same Web Data Stream, scroll to Measurement Protocol API secrets.
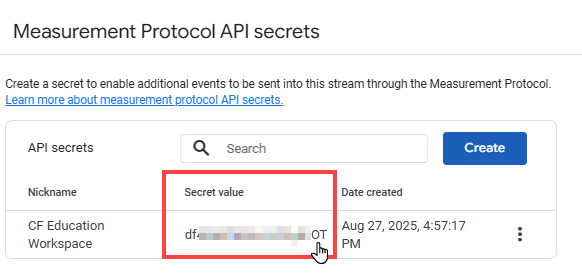
Click Create.
Type a nickname (e.g., ClickFunnels Site).
Click Create.
Copy the Secret value. Store it securely. It may not be fully visible again.
Step 3: Connect to ClickFunnels
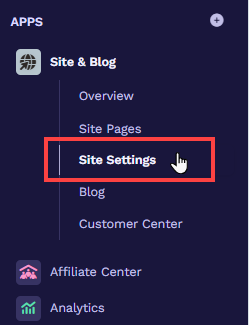
In your ClickFunnels workspace, go to the Site & Blog app.
Select Site Settings.
Scroll to Tracking Code.
Paste your Measurement ID into GA4/GTM Measurement ID.
Paste your Secret value into GA4/GTM Api Secret.
Review Add GTagJS Script and choose one option:
On (recommended) – Turn this on if you are not already loading Google Analytics/gtag or Google Tag Manager anywhere else. ClickFunnels will inject
gtag.json every page for you.Off – Turn this off if you already load gtag/GA or GTM via another method (e.g., GTM container, custom code). This prevents duplicate pageviews and events.
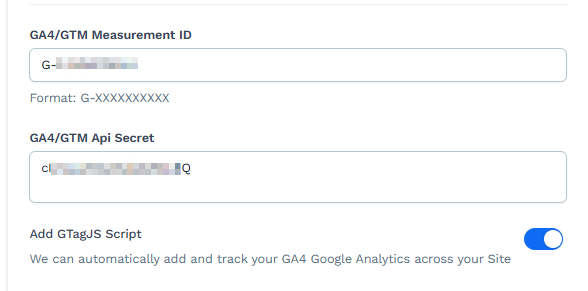
Click Update Site.
Note:
If you enter only the Measurement ID, ClickFunnels will record browser-side events via
gtag.js. Adding the API Secret enables additional server-side event delivery from ClickFunnels. At this time, ClickFunnels sends one additional server-side event:generate_lead. Support for more GA4 Recommended Events may be added in the future. Your API Secret is stored server-side. Never include it in front-end code.
Step 4: Verify in GA4
Realtime (immediate validation)
In GA4, go to Reports » Realtime Overview.
Open your site or funnel pages in a new tab (or Incognito) and browse a few pages.
Within minutes, confirm you see an Active user and events such as
page_view,session_start, plus any other events you triggered.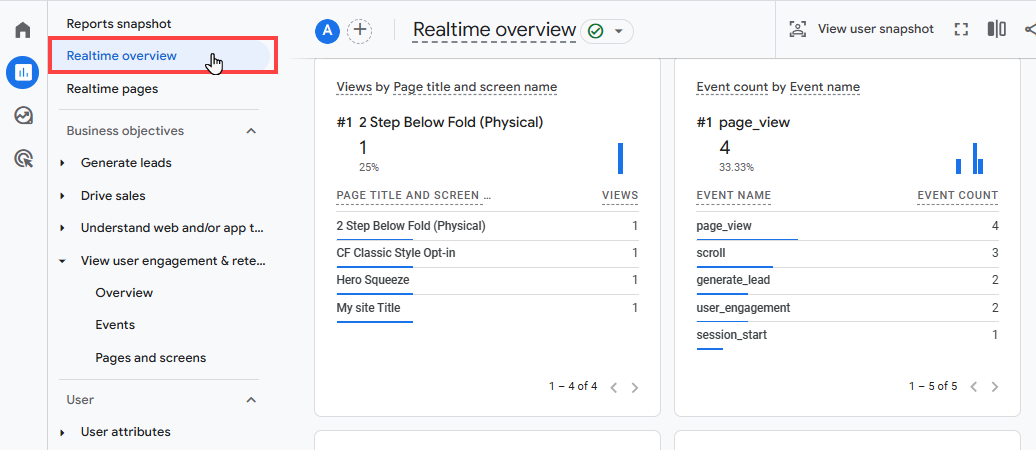
Optional: add a comparison for Host Name to verify which domain sent the hits (useful if you track multiple domains).
Standard Reports (totals)
Events Report
In GA4, go to Reports (bar‑chart icon on the left).
Under Business objectives, expand View user engagement & retention.
Click Events.
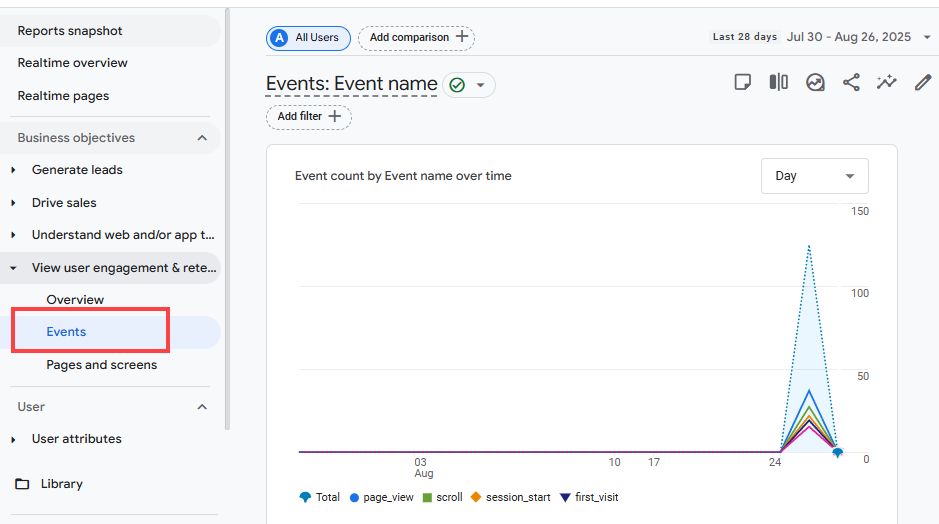
Use the Search box to find your custom event, or scan the table.
(Optional) Click Add comparison to break down by device, country, or add Host name as a secondary dimension to separate domains.
What You’ll See
A timeline chart of event activity.
A table with Event name, Event count, Total users, Event count per active user, and Total revenue.
Pages & Screens Report
In GA4, go to Reports.
Under View user engagement & retention, click Pages and Screens.
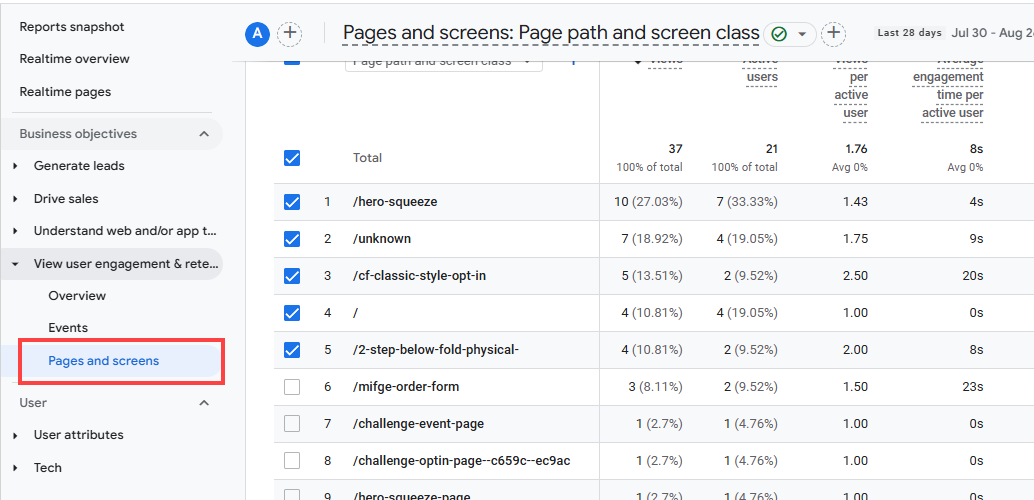
Review page‑level totals.
(Optional) Click Add comparison to break down by device, country, or add Host name as a secondary dimension to separate domains.
Important:
For events to appear in the main Events tab (under Reports > View User Engagement & Retention), there's a processing delay. This is because GA4 needs time to process, organize, and model the data. You should expect to see your events appear in these reports within 24 to 48 hours ⏳ . However, Events will show up in the Real-time report almost instantly, typically within a few seconds to a few minutes.
💡 Reference: [GA4] Data freshness.
Tracking Custom Events
Record a specific action (e.g., a CTA click or a step view) as its own GA4 event.
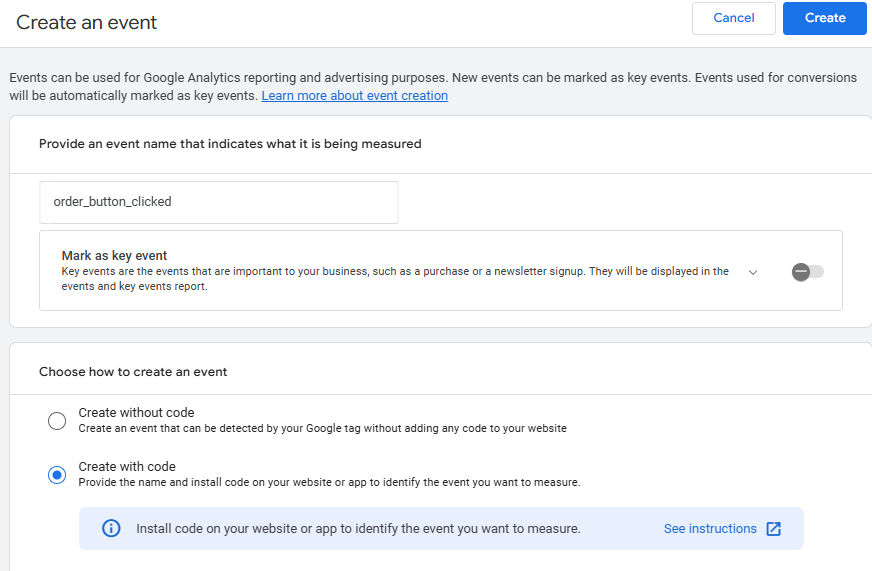
Create the Custom Event in GA4
Go to
⚙️ Admin (bottom-left).Under Data Display, select Events.
Click + Create Event.
Enter an event name (use
lowercase_with_underscores, e.g.,cta_click).Optionally mark the event as a key event.
Choose Create with Code.
Click Create to create the event.
Trigger the Event From Your ClickFunnels Page
Make sure GA4 loads once (either turn Add GTagJS Script = ON in ClickFunnels or load GA via GTM, not both).
Add the event to your custom script to the ClickFunnels Page » Settings » Show Code » Footer: Here is a sample script:
<script>
document.addEventListener('DOMContentLoaded', function () {
const btn = document.querySelector('[data-element-id="order-button"]');
if (!btn) return;
btn.addEventListener('click', function () {
if (typeof gtag === 'function') {
gtag('event', 'order_button_click', { label: 'Order Button Clicked' });
}
});
});
</script>
Note:
The above code is an illustration of JavaScript that selects a button with a custom attribute
[data-element-id="order-button"]. You can select any container (section, row, element, and their children) using theirIDorcustom attribute. If you need help with custom coding, we advise reaching out to a qualified developer for assistance.💡 Learn more: Adding JavaScript and Tracking Code for Advanced Features.Click Save to apply changes to the page editor.
Open the page in a new tab (or Incognito) and trigger the event (e.g., click, scroll, etc).
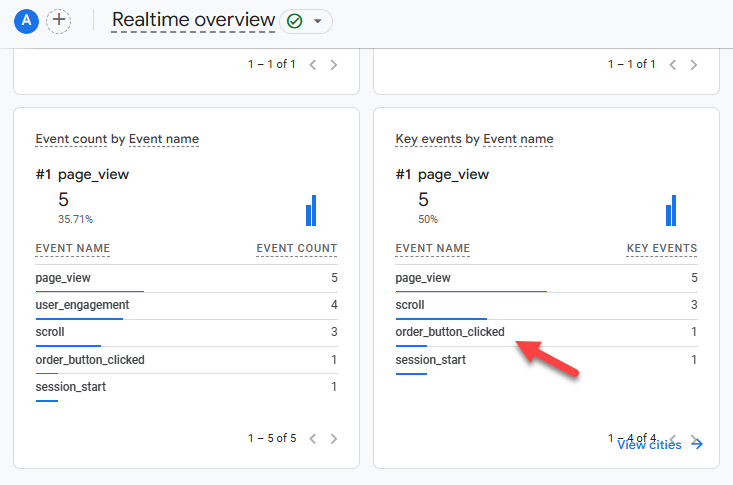
Verify It Fired
In GA4, go to Reports (bar‑chart icon on the left).
Select Realtime Overview.
Trigger the action by visiting the page. You should see your event name appear within minutes.
Standard Report
In GA4, go to Reports (bar‑chart icon on the left).
Under Business objectives, expand View user engagement & retention.
Click Events.
Your custom event will list automatically after the first hit. However, remember that standard reports (Events, Pages & screens, Conversions) may take up to 24 - 48 hours to show totals.
Troubleshooting
No data in Realtime: Verify the Measurement ID and API Secret, save settings, and retry. Ensure Add GTagJS Script is on unless you purposely load GA via GTM/custom code.
Double pageviews or inflated sessions: Likely caused by loading GA twice (e.g., GTM + the toggle). Turn off the toggle “Add GTagJS Script” if GTM or another gtag is already present.
Ad blockers / privacy features: Test using a different browser or Incognito; some extensions block analytics requests.
Use DebugView (live device debugging): In GA4, open Admin » DebugView. DebugView shows a real‑time, device‑specific timeline of events and parameters. Use it when Realtime shows activity but a specific event is missing, or when you need to confirm the order and payload of events. Enable via GTM Preview or the Google Analytics Debugger Chrome extension (or send a test event with
debug_mode: true). Learn more: Use DebugView in GA4.
GA4 FAQs
Do I need Google Tag Manager (GTM)?
No. ClickFunnels can inject gtag.js when Add GTagJS Script is on. Use GTM only if you want to manage multiple tags/pixels or advanced logic; if you switch to GTM for GA4, turn the toggle off to avoid duplicates.
Realtime shows data, but standard reports are empty. Why?
Standard reports can take up to 24 - 48 hours to process. Use Reports → Realtime for immediate checks.
Do I need to create a GA4 property before a Data Stream?
Yes. A Web Data Stream lives inside a GA4 property. Create/select the property first, then add the stream to get your Measurement ID.
Is the Measurement ID alone enough, or should I also add the API Secret?
You can connect with just the Measurement ID to track browser-side events via gtag.js. Adding the API Secret enables additional server-side delivery from ClickFunnels for improved reliability (less impact from blockers or early page exits). If you skip the secret, server-side events are not sent.
Should I turn ON or OFF “Add GTagJS Script”?
Turn ON if you’re not loading GA elsewhere—ClickFunnels will inject gtag.js. Turn OFF if GA/gtag or GTM has already been deployed to prevent duplicate hits.
Will my API Secret be exposed in the browser?
No. ClickFunnels stores and uses it server-side. Never paste the API Secret into front-end code
I’m seeing double pageviews—what’s wrong?
You’re likely loading GA twice (toggle ON and GTM or custom code). Disable one.
Can I track custom events without GTM?
Yes. With the toggle ON, add a small gtag('event', ...) script to your page footer. See the Tracking Custom Events section for examples.