Event types in ClickFunnels help streamline the scheduling of various appointments and meetings with clients. By integrating your calendar, you can automate the booking process and ensure seamless synchronization with your schedule. This article will guide you through the process of creating and managing event types in ClickFunnels.
Requirements
An active ClickFunnels account
The Appointments app added to your workspace
A calendar (Google, Outlook, iCloud, Office365, etc) connected to the Appointments app
What is an Event Type
An event type in ClickFunnels is a customizable appointment category designed to meet different scheduling needs. To organize and manage client interactions efficiently, you can create various types of events, such as one-on-one meetings, round-robin sessions, collective events, and group sessions.
This feature is needed when you want to automate and simplify the appointment scheduling process. Whether you’re a consultant, a coach, or a business owner, event types help you manage your time effectively, reduce manual scheduling tasks, and enhance client experience by providing a streamlined booking process.
Example:
Imagine you are a business consultant offering individual coaching sessions and group workshops. By using ClickFunnels’ event types, you can create a one-on-one meeting type for personalized coaching and a group session type for your workshops. Clients can book these appointments directly through your scheduling link, which syncs with your calendar to avoid double-booking and ensures that your availability is always up-to-date.
ClickFunnels offers a comprehensive solution for managing your appointments:
Customizable Event Types: Create and tailor different types of events to meet specific needs.
Calendar Integration: Sync appointments with your Google, Outlook, iCloud, or Office365 calendar to ensure real-time availability.
Automated Scheduling: Allow clients to book appointments based on your predefined availability, reducing back-and-forth communication.
Flexible Booking Options: Set rules for booking intervals, buffer times, and guest allowances to fit your scheduling preferences.
Step 1 - Creating a New Event Type
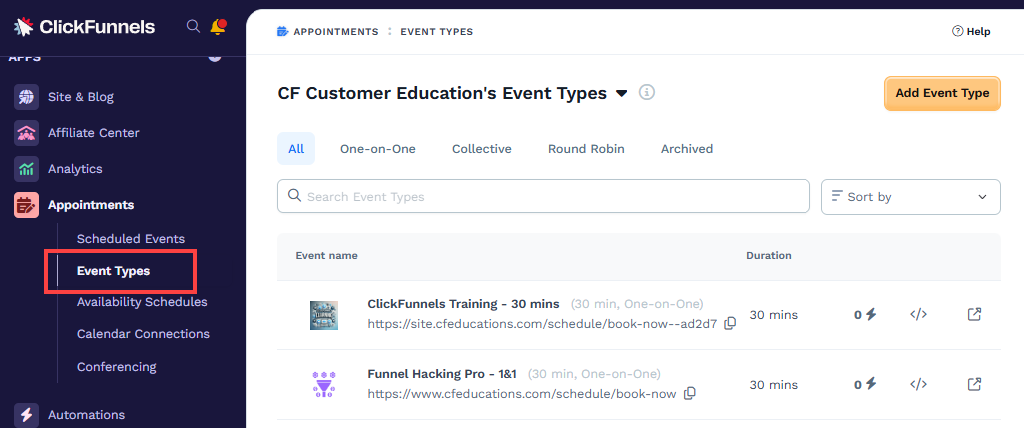
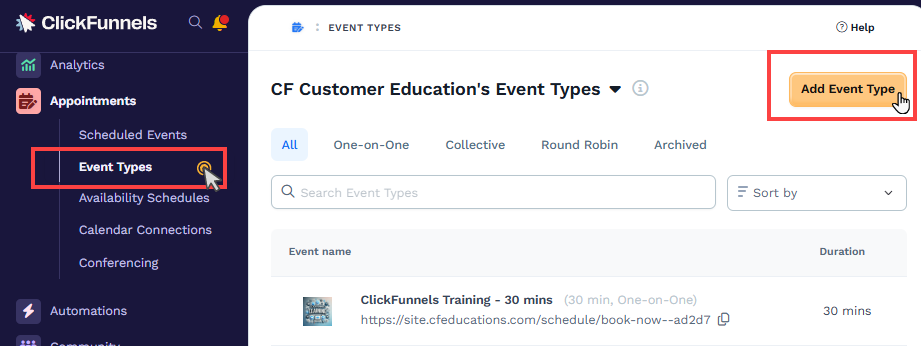
From the left-hand main menu, click the Appointments app.
Select Event Types.
Click the Add Event Type button to create a new event.
Choose the Event Type you wish to create. The available options are:
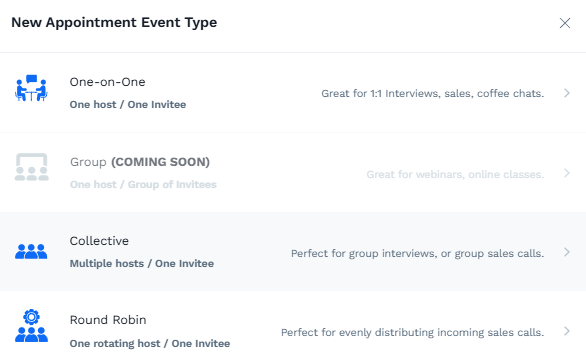
One-on-One: This event type is ideal for 1:1 interviews, sales meetings, or casual coffee chats. It involves one host and one invitee.
Group (COMING SOON): Suitable for webinars or online classes, this event type will involve one host and a group of invitees.
Collective: Perfect for group interviews or group sales calls, this event type involves multiple hosts meeting with one invitee.
Round Robin: Ideal for evenly distributing incoming sales calls, this event type features one rotating host meeting with one invitee.
Step 2 - Setting Up the Event
Event Detail:
Event Name: Enter the name of the event.
Domain: Select the domain for the event.
Scheduling Link URL: Enter the path name of the scheduling link URL. For example, if you choose the path name
book-now, the scheduling link URL will becomehttps://yourdomain.com/schedule/book-now.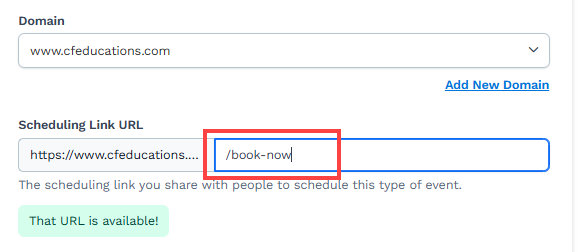
After Booking: Choose what happens after booking. The available options are:

Display Confirmation Page: After booking, present the invitee with the integrated confirmation page. Choosing this option will lead them to a confirmation page created by ClickFunnels, which will convey the confirmation message.
Redirect to a Funnel: After booking, redirect the invitee to a specific funnel. In the “Redirect Location” field, select a funnel. The visitor will land on the first step of the funnel.
Redirect to a Page: After booking, redirect the invitee to a specific page. You will have to select a page (Landing page) available in your workspace in the “Redirect Location” field.
Redirect to a Custom URL: After booking, redirect the invitee to a custom URL. Copy and paste your desired URL in the “Redirect Location” field.
Description: Add a brief description of the event. The description will appear on the event scheduling page.
Scheduling Page Primary Color: Choose a theme color for the scheduling page.
Scheduling Page Image/Logo: Upload an image or logo for the scheduling page.
Hide ‘Scheduling by ClickFunnels’ Badge: Toggle this option if you prefer to hide the ClickFunnels affiliate badge. The badge appears at the bottom right corner of the scheduling page.
Invite Settings
The Invite Settings section allows you to customize the event invite that displays on the calendar when a customer schedules an event. By tailoring the event title and description, you can provide clear and detailed information to your invitees, ensuring they know what to expect.

Calendar Event Title: Enter the desired title for the event as it will appear on the calendar invite. If left blank, the event name will be used by default.
Calendar Event Description: Provide a description of the event that will appear in the calendar invite. This can include details about the event to help invitees prepare. If left blank, the event description will be used by default.
Merge Tags: Use merge tags to personalize the title and description with dynamic information, such as the invitee’s name or custom attributes.
Booking Questions
ClickFunnels allows you to customize the appointment scheduling form with various fields to gather information from your invitees. You can include essential details like name, email address, and phone number, along with custom fields to capture specific requirements. These custom fields can be existing contact attributes or new ones created directly within the event type settings.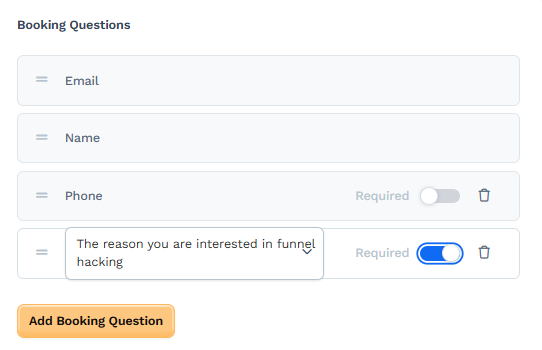
Add Booking Question: Click the Add Booking Question button to add a new question to the booking form.
Add a Contact Attribute: Click the Add Contact Attribute button to create a new custom field or select an existing contact attribute.
Field Details:
Label: Enter the field value to add to the booking form (e.g., “reason for booking”, “enter your message”, etc)
Field Types: Choose between text fields and select fields for your custom questions.
Text Field: Use this type when you need detailed, free-form responses from the user. For example, you might ask, “What specific goals do you hope to achieve with this training?” This allows the invitee to provide a comprehensive answer.
Select Field: Use this type when you want to provide a predefined list of options for the user to choose from. For example, you might ask, “How did you hear about us?” with options like “Social Media,” “Referral,” “Search Engine,” and “Other.” This helps standardize responses for easier analysis.
Set Required Fields: Toggle the required switch to make fields mandatory.
Reorder Fields: Drag and drop fields to change their order.
Important:
The Name and Email fields are mandatory and cannot be deleted. You can only arrange them in your preferred order (e.g., name first, email second, or vice versa).
Booking Availability
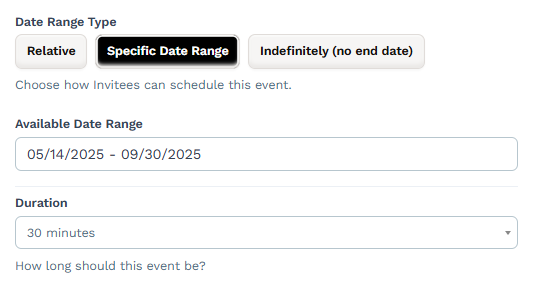
Date Range Type: Choose how invitees can schedule this event. The options are:
Relative: This option allows invitees to schedule the event within a relative date range from the current date (e.g., the next 30 days).
Specific Date Range: This option lets you specify the exact start and end dates during which the event can be scheduled (e.g., June 1st - June 30th).
Indefinitely (no end date): This option allows invitees to schedule the event without any end date restriction, meaning the event can be booked at any time in the future.
Duration: Specify how long the event will last. For example, you can set the duration to 30 minutes to ensure that each appointment is scheduled for a specific length of time, providing clarity for both the host and the invitee.
Event Host(s) and Location
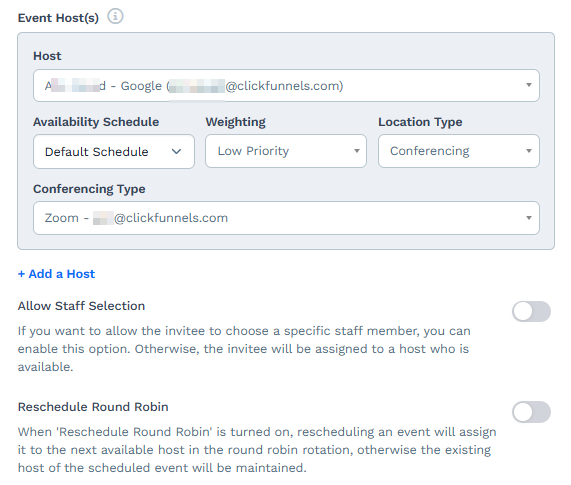
Host: Select who will host the event from the available options. The host’s name will appear in the dropdown from calendar connections. If your event type is “Collective” or “Round Robin”, you can add multiple hosts to the event. Click the + Add a host and select the host in the dropdown.
Important:
You can add more than one host only when multiple calendars are linked in the Appointments app. Furthermore, team members have the ability to connect their individual calendars within the workspace, which can then be selected as a host for the event type. However, each team member gets one default calendar where their appointments will be scheduled. Team members can still connect multiple calendars (the extras are used for conflict checking only).
Learn more: Appointments - How to Connect and Manage a CalendarAvailability Schedule: Choose the availability schedule for the selected host. You can create a new schedule from Appointments > Availability Schedules > Add New Schedules.
Weighting (Round Robin events only): This option appears when the event type is set to "Round Robin" and influences how appointments are distributed among multiple hosts. Assigning a weighting priority helps balance appointments according to your business needs:
High Priority: When multiple hosts are available, the host with this weighting will be prioritized and selected more frequently.
Medium Priority: The host will be selected moderately.
Low Priority: The host will receive fewer appointments than hosts with higher weighting.
Setting appropriate weighting ensures efficient distribution of workload among your team members.
Location Type: Specify the type of location for the event (e.g., Conferencing, In-person, and Custom). If you select an in-person or custom location, add a location description.
Important:
Collective events support only one location. You cannot assign different locations to multiple hosts in this event type.
Conferencing Type/Connection: When the location type is set to Conferencing, select the platform (e.g., Zoom, Google Meet) you intend to use for your virtual appointments. Learn more about the conferencing connection in the article Appointments - How to Add a Conferencing Connection.
Allow Staff Selection: This option allows invitees to choose a specific staff member for the appointment. If disabled, the system assigns the appointment to an available host automatically.
Reschedule Round Robin: When enabled, rescheduling an event will assign it to the next available host in the round robin rotation. If disabled, the original scheduled host remains assigned to the event.
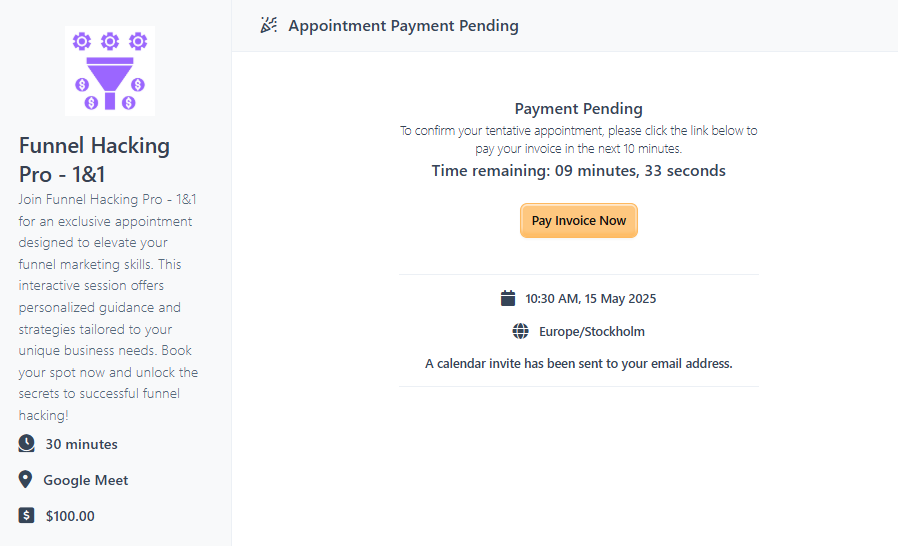
Payments (Optional)
Enabling the Require Payment option ensures that invitees pay before booking the event. Follow these steps to set up the payment requirement:
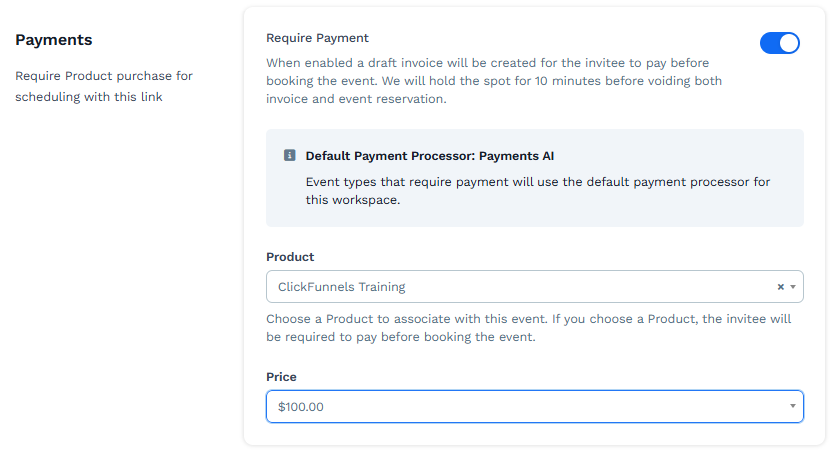
Turn on the Require Payment option to mandate payment before confirming the appointment.
Select a product and specify the product price required for payment.
How Payment Processing Works During Appointment Scheduling:
During the appointment scheduling process, a Pay Invoice Now button will appear, prompting the invitee to a checkout page for payment.
The system will generate an invoice and reserve the appointment slot for 10 minutes to allow for payment.
If the invoice remains unpaid after 10 minutes, the system will void the invoice and release the reserved slot.
Warning:
The Calendar element is not compatible for handling payments for paid events. Alternatively, you may follow one of the following methods for publishing a paid event:
Embed the booking form directly on your webpage.
Share the direct event link with your audience for seamless access.
💡 Learn more: Appointments - How to Publish Your ClickFunnels Appointments.
Additional Rules
Allow Guests: Decide if attendees can bring guests. Enabling this option allows invitees to add additional guests to the event, which is useful for group meetings or consultations.
Buffer Before and After: Specify the buffer time before and after the event to ensure you have enough time for preparation and follow-up activities.
Buffer Before: This is the time blocked off before the event starts. For example, if you set a 15-minute buffer before, and you have an event scheduled at 10:00 AM, your calendar will show you as unavailable from 9:45 AM to 10:00 AM. This gives you time to prepare for the meeting.
Buffer After: This is the time blocked off after the event ends. For example, if you set a 15-minute buffer after, and your event ends at 11:00 AM, your calendar will show you as unavailable from 11:00 AM to 11:15 AM. This allows time for any follow-up tasks or to transition to your next appointment.
Show Available Start Times in Increments of..: Set the interval at which start times are shown to invitees. For example, setting this to 30 minutes will show available start times at 30-minute intervals (e.g., 9:00 AM, 9:30 AM, 10:00 AM).
Minimum Appointment Schedule Buffer: Set the minimum amount of time required between now (when you are setting up the event) and when an appointment can be scheduled. For example, if you set this to 4 hours and it is currently 10:00 AM, invitees cannot schedule an appointment that starts before 2:00 PM on the same day. This ensures you have sufficient notice before any new appointments.
Maximum Per Day Per Contact: Limit the number of times a contact can book this event per day. This helps prevent any single contact from booking multiple appointments on the same day, which can be useful for managing your schedule.
Automatic Timezone: Set this to “Automatically” to ensure everyone meets at the correct time regardless of their local time zones. If the conferencing type is set to “In Person,” you can select a specific time zone that the users should be aware of. For example, if your event is scheduled in New York, the schedule page will display the time zone as New York by default.
Event Notifications
Adding event notifications allows you to send your invitees timely reminders or follow-up messages. This helps ensure that they are well-informed about the event details and any necessary preparations.
Note:
The Event Notifications section will only appear once you finish creating the Event Type and save it.
The MessageHub app must be added in the workspace and a Chat Inbox must to created in the settings.
The Marketing Contact Address and Company Email Address must be added in the Email Settings.
Click the Add Event Notification button. A pop-up will appear where you can configure the notification's details.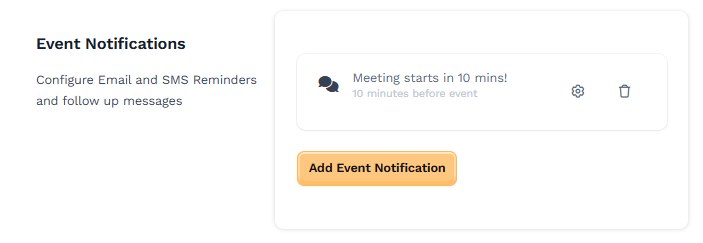
Transition Type: Choose when the notification should be sent in relation to the event. The options include:
Before Event: Send the notification before the event starts.
After Event: Send the notification after the event ends.
Time Offset: Enter the amount of time before or after the event when the notification should be sent. For example, setting this to 10 with “Minutes” will send the notification 10 minutes before or after the event.
Offset Type: Select the unit of time for the offset (e.g., minutes, hours).
Sending Chat Inbox: Choose the chat inbox from which the message should be sent. Learn more about creating a chat inbox in the article MessageHub: How to Create a New Inbox.
Subject: Enter the subject line of the message. You can personalize the subject line by including the merge tags. Click on the blue “Merge tags” link to view the available merge tags and select the appropriate merge tags for the subject line, such as the contact’s first name, last name, etc.
Message: Enter the body of the email message that will be sent to the invitees. This could include reminders, additional information about the event, or follow-up details. You can also personalize the contents by including the merge tags. Click on the blue “Merge tags” link to view the available merge tags and select the appropriate merge tags for the email body, such as the contact’s name, event date and time, custom questions they answered during the application, etc.
Once you have set up the Event Type, click the Create Event Type button to create the event.
Step 3 - Publishing the Event Type
There are now three ways to publish an event type:
Option 1: Use the “Calendar” Element in a Funnel Page
Navigate to the funnel step where you want to display the booking form.
Click the three-dot icon on the funnel step and select Manage Event Types.

Attach the event type you want to use, then enter the Page Editor.
Click the orange + Plus or Add New Element icon to insert a new element.
From the Misc (Miscellaneous) category, select the Calendar widget. Once added, the form will automatically display the selected event type.
Once the booking is completed, the next funnel step will automatically be displayed.
Important:
If your Appointment Event Type requires payment, the Calendar widget can not process payments during the booking. For paid events, consider using Option 2 (embedding the form) or Option 3 (sharing the direct event link).
Option 2: Embed the Booking Form Using the Embed Code
Navigate to the event type you wish to embed.
Click the Embed Code (</>) icon to copy the code.
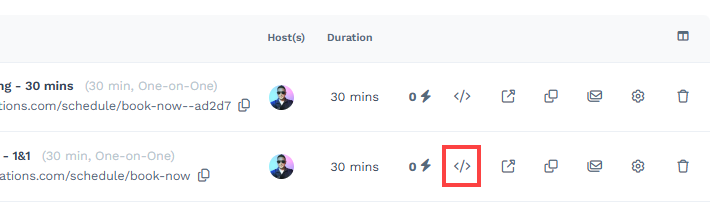
In the page editor, add a new element and select HTML / JS.
Paste the embed code into the HTML / JS element within the page editor to display the booking form.
Option 3: Share the Event Type URL
Navigate to the event type you want to share.
Copy the unique scheduling URL provided by ClickFunnels.
Share the link with your audience via email, social media, or other communication channels, allowing them to book directly.
Learn detailed steps about the event type publishing process in the Appointments - How to Publish Your ClickFunnels Appointments article.
Adding Quick Actions to an Event Type
ClickFunnels now allows you to add quick actions directly to your event types, enhancing the automation and functionality of your appointment scheduling process. Quick actions can be triggered when a specific event occurs, such as scheduling an appointment.
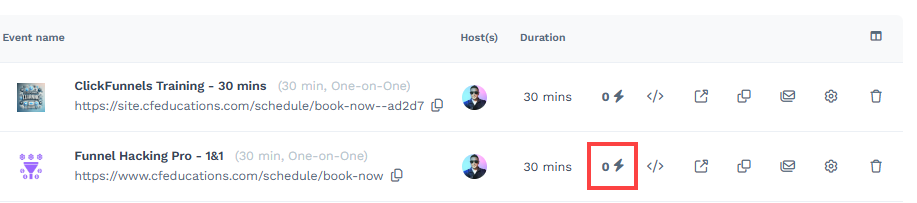
Steps to Add a Quick Action:
From the left-hand main menu, click Appointments and select Event Types.
Locate the event type to which you want to add a quick action and click the lightning bolt icon (⚡) next to the event name.
A new pop-up labeled Quick Actions will appear. Click the Add Quick Action button.

Click the Add Trigger to add a trigger that will initiate the quick action. For scheduling appointments, select Schedules appointment as the trigger.
Then, click Add Effect to choose an effect. Options include sending a MessageHub message, sending an asset, triggering a workflow, and more. Select the effect that best suits your event’s needs.
After selecting the desired trigger and effect, click the toggle bar to activate and deactivate the automation. Blue means it’s active, and gray means it’s inactive.
Your quick action is now added to the event type and will automatically execute when the specified trigger condition is met.
Learn more about Quick Action in the article Automations: How to Manage Quick Actions.
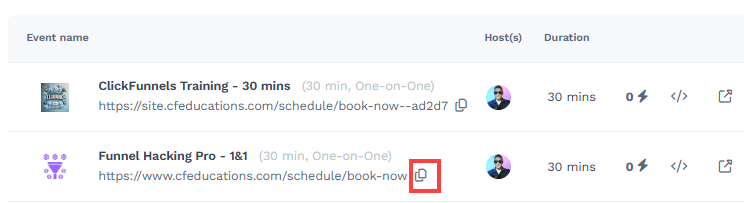
Cloning an Event Type
Cloning an event type allows you to create an exact copy of an existing event along with all its settings. This feature is useful for quickly setting up similar events without the need to reconfigure every detail.
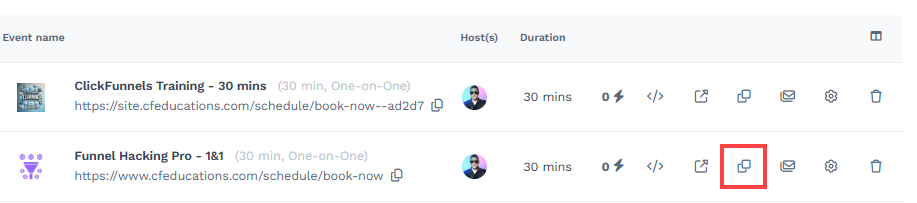
From the left-hand main menu, click Appointments and select Event Types.
Find the event type you wish to clone.
Click the Clone icon next to that event type.
Click Proceed to confirm and create the duplicate event type.
The duplicate event type will now appear in your event list, retaining all the original settings and configurations. This makes it easier to manage multiple events with similar setups.
Editing an Event Type
Editing an event type lets you update the event details and configurations as needed. Follow these steps to edit an event type:

From the left-hand main menu, click Appointments and select Event Types.
Find the event type you wish to edit. You can click either the Event Title or the Gear
⚙️ icon next to it.Modify the event details as needed.
After updating the information, click the Update Event Type button to save your changes.
Deleting an Event Type
Deleting an event type allows you to remove an existing event from your list. Follow these steps to delete an event type:
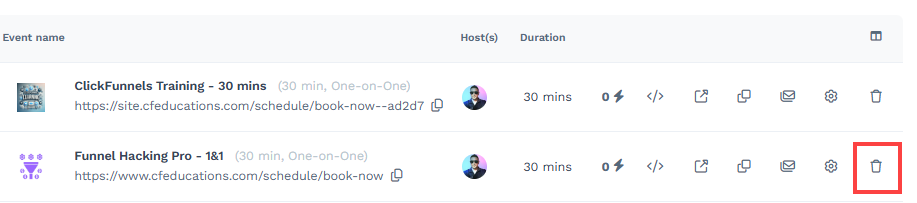
From the left-hand main menu, click Appointments and select Event Types.
Find the event type you wish to delete. Click the Trash Can icon next to that event type.
Alternatively, you can access the event type by clicking on the event title or the Gear
⚙️ icon and then clicking the Delete button at the bottom left corner of the page.Click Proceed to confirm and complete the deletion.
By following these steps, you can easily delete an event type, keeping your event list organized and up-to-date.