Apple Pay is a secure payment method that allows customers to make purchases quickly using their Apple devices. By integrating Apple Pay, your customers will experience a seamless checkout option that increases conversions by reducing friction during payment. This article will guide you through enabling Apple Pay in your ClickFunnels workspace, setting it up for funnels and stores, and managing or disabling it on specific checkout pages.
Requirements
An active ClickFunnels account
The Payments AI or Stripe app connected to the workspace
A domain or subdomain connected to the workspace
Note:
Apple Pay is only compatible with the new Checkout element and will not function with the legacy checkout element.
With the Payments AI app connected as the payment gateway, the Apple Pay option will not be visible in test mode during the checkout process. Apple Pay can only be tested in test mode with the Stripe payment gateway.
To enable Apple Pay when Stripe is selected as the payment gateway, you must connect and verify your domain in your Stripe account.
What is Apple Pay
Apple Pay is a secure and convenient payment method that allows customers to make purchases using their Apple devices, such as iPhones, iPads, Apple Watches, and Macs. It works by tokenizing customer payment information, meaning that sensitive card details are never shared with merchants. Instead, a unique, encrypted transaction code is generated for each purchase, ensuring high security and privacy.
For example, when a customer uses Apple Pay in your ClickFunnels store or funnel checkout, they can simply tap their Apple device or pay using their Mac. By verifying their identity with Face ID, Touch ID, or their device passcode, the payment is processed instantly, creating a seamless checkout experience on mobile or desktop.
How to Enable Apple Pay
Step 1 - Authorize Apple Pay with Your Connected Domain
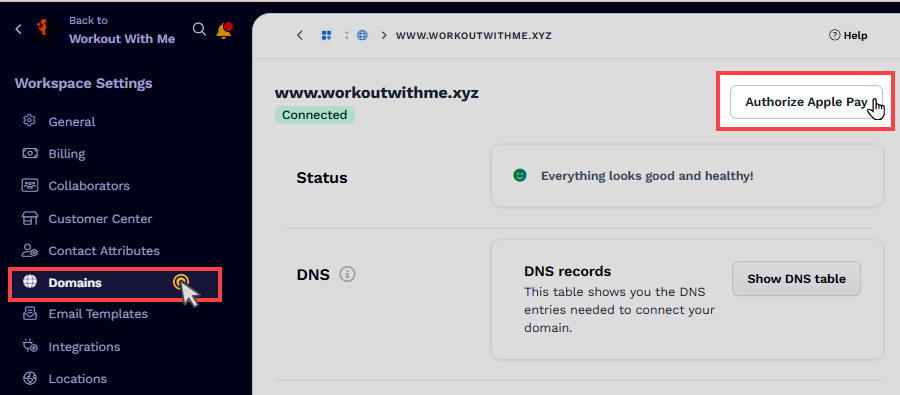
From your ClickFunnels dashboard, navigate to the Workspace Settings » Domains menu.
Ensure the domain you plan to use is successfully connected, and its status is marked as Connected.
Click on the domain or the adjacent Gear (⚙️) icon to access domain settings.
Click on the Authorize Apple Pay button.
For internal domains (those provided by ClickFunnels with
myclickfunnels.com), the Authorize Apple Pay button will appear directly adjacent to the domain name on the Domains page rather than within the domain settings.Once your domain is successfully set up, you will see an Apple Pay Authorized status next to it.
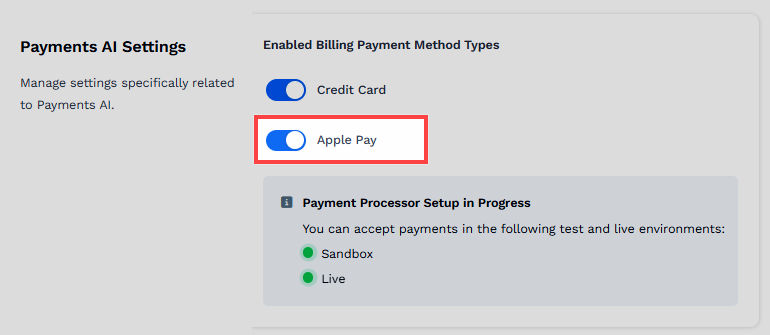
Step 2 - Enable Apple Pay in Payments AI Settings (Payments AI Only)
When you are using the Payments AI as a payment processor, follow the steps below:
Navigate to the Workspace Settings and select the General tab.
Scroll down to the Payments AI Settings section.
To enable Apple Pay, toggle the switch next to Apple Pay under the Enabled Billing Payment Method Types. This enables Apple Pay globally for your entire workspace.
Step 3 - Add the Domain to Your Stripe Account (Stripe App Only)
If you have connected the Stripe app in your ClickFunnels workspace and want to use Apple Pay with the Stripe payment gateway, you must verify your domain or subdomain in your Stripe account. Follow the steps below to complete this process:
Note:
If you are using Stripe through Payments AI, you do not need to perform these steps in your Stripe account. You can skip Step 3.
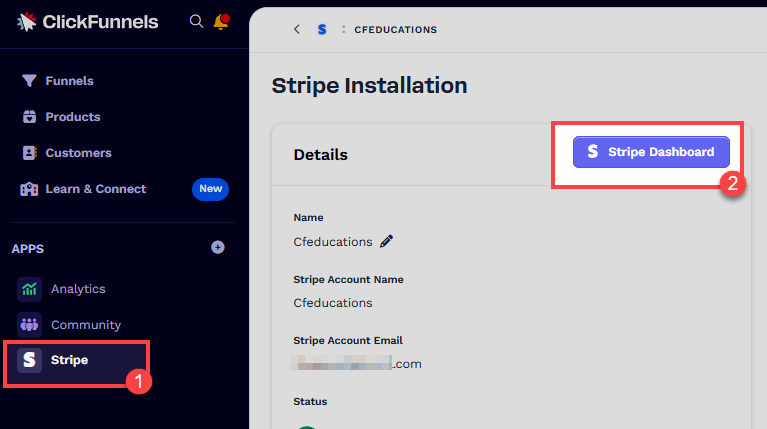
From the left-hand navigation in your ClickFunnels workspace, click the Stripe app.
Click the Stripe Dashboard button. Your connected Stripe account will open in a new browser tab.
In the Stripe Dashboard, click the gear icon (⚙️) in the top-right corner to open Settings.
Under the Product Settings section, select the Payments menu.
Navigate to the Payment Method Domains tab.
Click + Add a New Domain.
.png)
Enter your domain or subdomain name (e.g.,
www.yourdomain.com,blog.yourdomain.com) In the field provided, click Save.
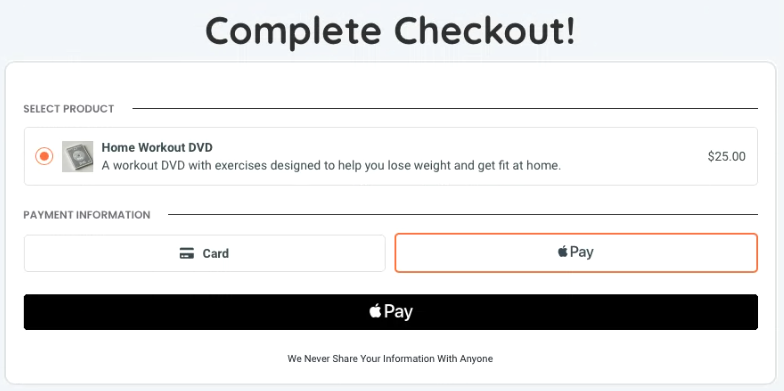
Using Apple Pay with ClickFunnels Store Checkout
Once Apple Pay is enabled, it will automatically be available as a payment option in your store’s checkout. Customers using Apple devices will see the Apple Pay option when selecting a product and proceeding to the checkout page.
To ensure that Apple Pay is properly configured in your store checkout:
From the ClickFunnels dashboard, navigate to the Store app and select the Overview menu.
Click on the Customize Store button.

In the left-hand navigation panel, expand the Store Front menu and select the Product page.
In the page editor, ensure that the Checkout element is added to the product page. Additionally, verify that Apple Pay is enabled in the payment method settings. For details on enabling or disabling Apple Pay on a checkout page, refer to this section: Enable / Disable Apple Pay in the Checkout Page.
Important:
Your workspace site domain must be authorized for Apple Pay. If the site domain is not authorized, the Apple Pay widget will not appear on the store checkout page.
Using Apple Pay with a Funnel
From the ClickFunnels dashboard, navigate to the Funnels menu.
Select the funnel you wish to edit from the list of available funnels.
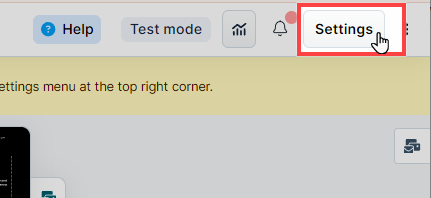
Click on the Settings option to access the Funnel Settings.
Scroll to the Enabled Billing Payment Method Types section and toggle on Apple Pay. Once selected, the background color will turn dark, indicating it’s active.
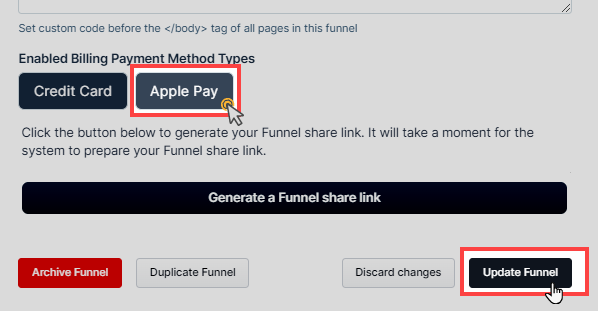
Click Update Funnel to save your changes.
After enabling Apple Pay in the funnel settings, ensure that Apple Pay is also activated for each checkout page in the funnel. To do this, open each checkout page where the checkout element is located and enable Apple Pay in the payment method settings. For instructions on enabling or disabling Apple Pay on individual checkout pages, refer to this section: Enable / Disable Apple Pay in the Checkout Page.
Important:
The funnel must be connected to a domain that has been authorized for Apple Pay. If the domain is not authorized, the Apple Pay widget will not appear on the checkout page.
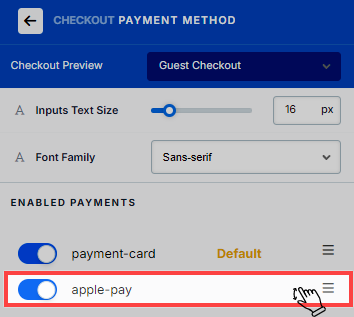
Enable / Disable Apple Pay in the Checkout Page
Once Apple Pay is authorized, navigate to the Page Editor for the specific checkout page.
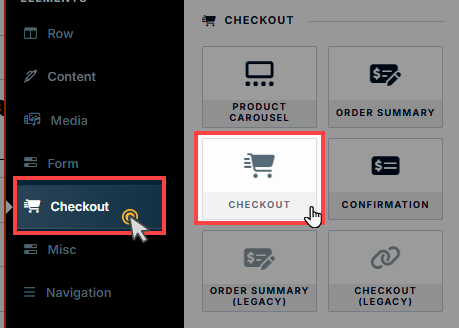
Ensure that the checkout page contains the new Checkout element.
Navigate to the Checkout Element Settings and select the Payment Method.
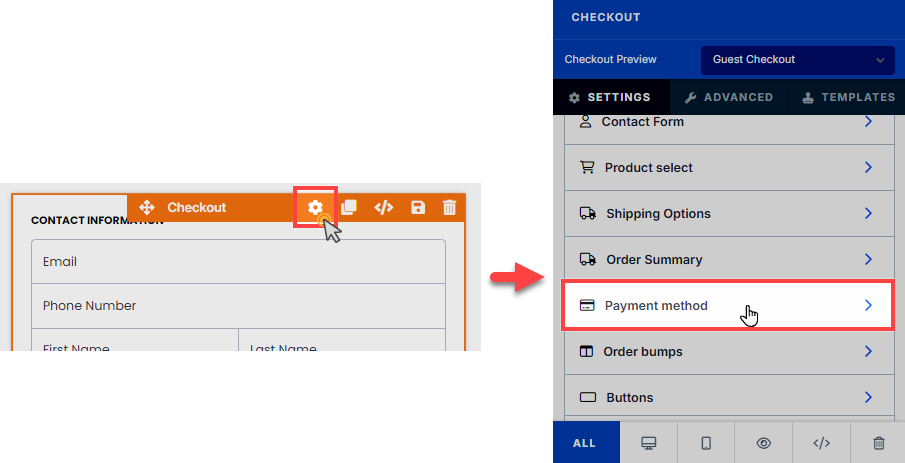
Ensure that Apple Pay is toggled on as one of the available payment options.
You can set Apple Pay as the default payment method by using the drag-and-drop feature to move Apple Pay to the top of the list in the payment method settings.
Important:
Even if you set Apple Pay as the default payment method, if the customer is using a different browser or device that is not compatible with Apple Pay (e.g., non-Apple devices or browsers), the credit card widget will automatically load as a fallback option. Apple Pay will only appear as an option when the customer is using an Apple device and the Safari browser. When Apple Pay is selected during the checkout process, the customer’s contact information (such as name, email, and billing address) will be automatically retrieved from their Apple Pay account, streamlining the process and reducing manual input.
Apple Pay FAQs
I have upsells and downsells in the funnel. Will Apple Pay automatically sync on the upsell pages after the initial checkout?
Yes. Apple Pay will automatically sync on the upsell and downsell pages after the initial checkout is processed using Apple Pay.
Do I need the Payments AI app to use Apple Pay?
Apple Pay functions effortlessly with both Payments AI and Stripe set up as a payment gateway in the workspace. If you exclusively use Stripe as your payment gateway, installing the Payments AI application in the workspace is not required.
Will Apple Pay work with any domain and sub-domain?
Absolutely! Apple Pay works with any domain and sub-domain that has been properly connected and verified in ClickFunnels. However, the domain or sub-domain must be added to the Stripe account settings for Apple Pay to function effectively.
Can I enable Apple Pay for some products but not others?
Apple Pay is enabled on a per-funnel or store basis. You can disable it on specific checkout pages but not on a per-product basis.