Payments AI is a powerful tool integrated into the ClickFunnels ecosystem, designed to simplify and streamline the process of accepting payments for your business. It serves as a multi-gateway solution that provides flexibility, automation, and seamless payment processing. In this article, we will introduce Payments AI.
What is Payments AI
Payments AI is a multi-gateway payment solution that allows users to manage payments from multiple payment processors in one central location. Whether you’re using Payments AI as a standalone gateway or in conjunction with other services like Stripe or PayPal, it offers a robust platform for managing transactions, automating processes, and applying complex rules for different customer segments.
Payments AI is especially useful for handling advanced scenarios, such as subscriptions, failed payments, or currency-based routing. It centralizes all your payment activities, providing a seamless experience for both you and your customers.
What are Some Advantages of Using Payments AI
Multiple Gateways Routing:
Payments AI allows for advanced gateway routing, where you can decide which gateway processes specific transactions based on rules you define. These rules can be based on customer location, currency, product, or transaction amount, ensuring flexibility in managing payments.
Learn more about gateway routing rules in the Payments AI help center article Setting Up Payment Gateway Routing Rules.
Advanced Automation:
With Payments AI, businesses can set up automation rules for handling different payment scenarios. For example, routing payments through different gateways or charging partial amounts based on transaction rules. This level of automation enables businesses to scale efficiently without manual intervention.
Advanced Subscription Dunning:
Payments AI provides advanced tools for managing failed payments, known as subscription dunning. If a customer’s payment fails, you can create multiple automated rules to handle the scenario.
Add the Payments AI App in the Workspace
From the left sidebar menu, click on + Add Apps to navigate to the Apps page.
Scroll down until you find the Payments AI app, then click on it.
Confirm your selection by clicking the Add App button.
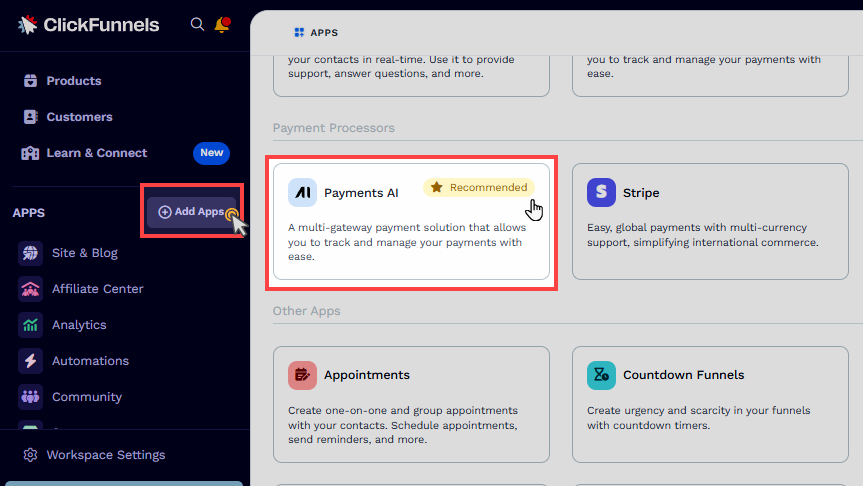
Learn more about adding apps in ClickFunnels in the Adding Apps to Your ClickFunnels Workspace article.
Register for a Payments AI Account
When you click on the Payments AI app in your ClickFunnels workspace, you will be redirected to the Payments AI platform, where you can either log in with your existing credentials or create a new account. Here’s how to proceed:
If you have an existing Payments AI account:
Simply log in and authorize your ClickFunnels workspace to connect with your Payments AI account.
If you don’t have an account:
You must register for a new account on their website, www.payments.ai. During registration, you will be prompted to enter essential details about your business to complete the setup. Once this step is finished, you’ll be taken to the Payments AI dashboard.
Authorize Your ClickFunnels Workspace:
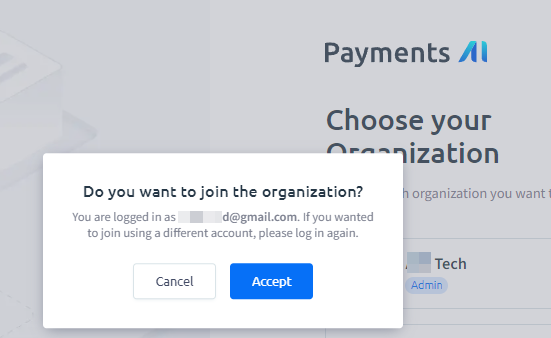
After logging in or completing registration, you must authorize your ClickFunnels workspace to connect with Payments AI. This allows the workspace to access your account to process payments. Confirm your authorization by accepting the prompt as shown in the image.
Note:
In Payments AI, you can manage multiple organizations. Each organization is linked to a specific ClickFunnels workspace, and a workspace can only be associated with one Payments AI organization.
Learn more about registering a Payments AI account in their help center article Getting Started with Payments AI.
Connect a Gateway
After setting up your Payments AI account, the next step is connecting to a payment gateway. A payment gateway processes the actual transactions, such as customer credit card payments, ensuring your customers’ payments are handled securely.
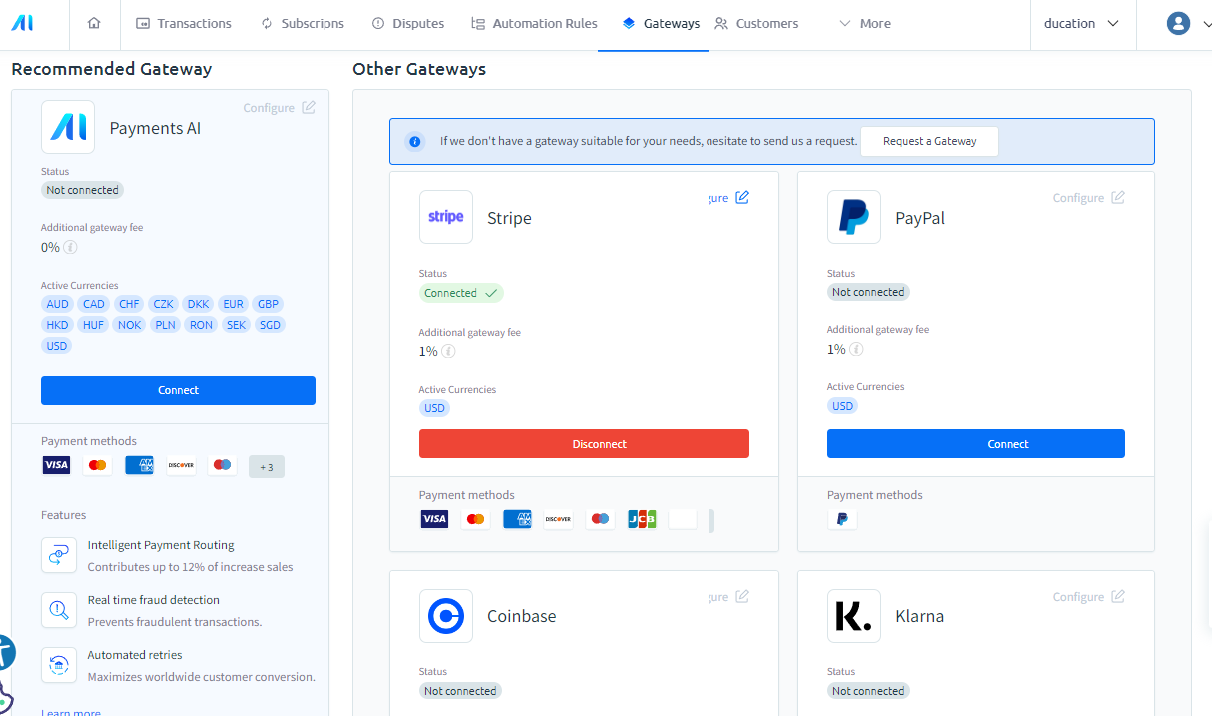
Supported Gateways by Payments AI:
Payments AI provides its own native gateway and several third-party gateways that offer flexibility in how you process payments. Below is a list of supported gateways:
Coinbase
Klarna
Note:
We understand how important Coinbase and Klarna are for your business. While Payments AI supports connecting both gateways, they are currently not compatible with the ClickFunnels Checkout element. Please know that our development team is actively working on integrating these features, and we truly appreciate your patience as we aim to deliver this functionality as soon as possible.
Once you connect a gateway, Payments AI can process payments either directly or route them through the connected third-party services based on your business preferences.
Prepare Your ClickFunnels Workspace to Accept Payments
To ensure you can collect payments across your ClickFunnels store and funnels, you need to complete the following steps:
Set the Default Payment Processor and Currency

Navigate to Workspace Settings from the left-hand menu and select the General tab.
In the Payment Settings section, locate the Default Payment Processor dropdown.
Select the Payments AI account from the list to set it as the default processor for handling transactions.
Set the workspace currency under the Currency dropdown.
Note:
The "Default Payment Processor" selector will be displayed only if your workspace has multiple payment processor accounts connected, such as two Stripe accounts or a combination of one Stripe account and the Payments AI account.
Workspace Currency Consideration:
The currency options available in the dropdown are automatically populated based on your Payments AI gateway settings. You must first configure the currencies in your gateway settings within your Payments AI account.
Although you can select multiple currencies in the Payments AI gateway, each ClickFunnels workspace can only operate with a single currency.
Once an order is placed within your ClickFunnels workspace, the selected currency will be locked for that workspace, and it will no longer be possible to change it.
Enable Billing Method Types in the Payments AI Settings
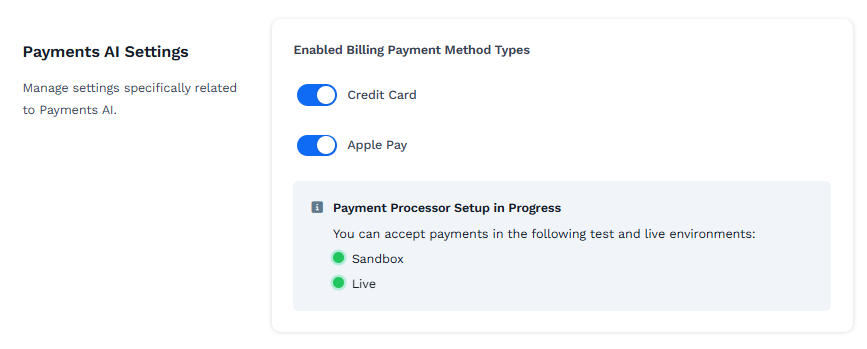
From the left sidebar menu, click on Workspace Settings and select General.
Under Payment AI Settings, enable the desired billing methods (e.g.,
Credit Card,Apple Pay,Paypal). This will allow payments to be collected across the entire workspace.Once enabled, you can add products to your store, and customers will be able to complete the checkout process.
Enabling billing methods at the workspace level ensures that payment processing is activated for all relevant areas within your workspace.
Enable Billing Method in Funnels

Navigate to the Funnels menu in the ClickFunnels dashboard.
Open the specific funnel for which you want to activate payments.
In the Funnel Settings, select Payments AI as a payment processor. If Payments AI is already designated as the default processor in the workspace settings, you do not need to select it again here manually.
Note:
The "Payment Processor" selector will be displayed only if your workspace has multiple payment processor accounts connected, such as two Stripe accounts or a combination of one Stripe account and the Payments AI account.
Under the Enabled Billing Payment Method Types section, enable billing methods (e.g.,
Credit Card,Apple Pay,Paypal).
Enabling these settings within the funnel allows you to accept payments on that particular funnel’s checkout pages.
Completing the Setup
Once you’ve enabled billing methods both in the workspace settings and the funnel settings:
Create your Products and add them to the store or funnel.
Ensure that your checkout page includes the Checkout element.
Add the products to the checkout page to accept user payments.
Payments AI FAQs
What payment gateways are supported by Payments AI?
Payments AI supports various gateways, including its own gateway, Stripe, PayPal, NMI, Coinbase, and Klarna. However, Coinbase and Klarna cannot currently be used with the ClickFunnels Checkout element.
What countries are supported by Payments AI?
ClickFunnels does not control or manage which countries are supported for collecting payments. You need to check the supported countries directly in Payments AI. The availability of supported countries will vary depending on the payment gateway connected to your Payments AI account. You can find more information in the Payments AI help center article Merchant Account Supported Countries.
What are the costs associated with using Payments AI?
Signing up for Payments AI is free. However, transaction and gateway fees apply when processing payments. For detailed information, please refer to the Payments AI pricing policy.
Can I connect Stripe or PayPal directly within ClickFunnels?
ClickFunnels can only process payments using Payments AI. You can connect Stripe and PayPal as gateways within your Payments AI account.
Can I manage orders in ClickFunnels, such as invoicing, refunds, or subscriptions?
Yes. You can view and manage orders from the Customers menu within your ClickFunnels workspace.
Does ClickFunnels collect credit card information?
No, ClickFunnels does not collect or store users’ credit card information. Payment processing is handled directly by the payment gateway connected through Payments AI. When a customer purchases, their payment details are securely transmitted to the respective payment gateway (such as Stripe, PayPal, or Payments AI) for processing. ClickFunnels ensures that no sensitive payment data is stored on its servers, which helps maintain the highest data security standards.
What happens if a payment fails with Payments AI?
Payments AI provides subscription dunning tools to handle failed payments. You can set up automated rules to retry payments, charge different amounts, or apply discounts to process the payment successfully.
Do I need to link a payment gateway to each product in ClickFunnels?
No, ClickFunnels supports global products. This means you only need to create products once within your workspace, making them available across the entire workspace ( the store and funnels). When products are ready for use in the store and funnels, the checkout element will automatically use the payment gateways configured in Payments AI.
How does Payments AI handle multiple payment gateways?
Payments AI allows you to connect multiple gateways and route transactions through different gateways based on custom rules, such as the customer’s location, currency, or product purchased.
I am located in Europe. Is 3D Secure Payment supported?
Yes, 3D Secure Payments are supported. To enable this feature, you must activate the 3D Secure option within your Payments AI Gateway settings. Once enabled, the 3D Secure verification modal will automatically be displayed during the checkout process when required, particularly for transactions originating from EU countries, ensuring compliance with European payment regulations.