Opportunities in ClickFunnels are potential deals or sales that you are working on. They help you keep track of every step in the sales process, from the initial contact to closing the deal. Managing opportunities is incredibly useful for staying organized, prioritizing your tasks, and ensuring you don’t miss any potential sales. This article will show you how to make the most of opportunities in ClickFunnels!
Table of Contents
- Requirements
- How to Manually Add a New Opportunity
- Creating Opportunities Using Workflows
- How to Manage Opportunities
- How to Edit Opportunities
- How to Delete Opportunities
- Related Articles
Requirements
- An active ClickFunnels 2.0 account
- The Opportunities App (Adding Apps to Your ClickFunnels Workspace)
How to Manually Add a New Opportunity
-
Click Opportunities from the left-side navigation menu.
Please visit our article Adding Apps to Your ClickFunnels Workspace for detailed information on how to add apps to your navigation menu.
- Click the Add Opportunity button located at the top left.
- Enter the Name of your new opportunity.
- Choose the Pipeline where this opportunity belongs.
- Select the appropriate Pipeline Stage for this opportunity.
- Choose the Primary Contact to select or create the Contact associated with this opportunity.
-
Assign the opportunity to a specific team member by selecting the Assignee.
Manually selecting an assignee will override the round-robin assignment, if applicable, for this specific opportunity.However, it will not affect the round-robin assignment for future opportunities.
- Enter the Value of the opportunity, indicating its worth.
- Set the Close Date for when you expect to finalize this opportunity.
- Finally, click Create Opportunity to add it to your pipeline.
Creating Opportunities Using Workflows
- Navigate to the Automations app from the left side menu.
- Click the Add Workflow button at the top right of the page. You can also choose to edit an existing workflow.
- Enter a Name for your new workflow.
- Choose the Type of Run for the workflow.
- Click Create Workflow.
- Add a Trigger for the workflow, such as an opt-in, form submission, or page visit.
- In the Workflow editor, click the + Sign under your trigger To add a step.

- Scroll down and select Create/Move Opportunity from the sidebar.
- Pick the Pipeline where you want this opportunity to go.
- Decide which Stage the opportunity should be in.
- Choose an Assignment Strategy:
- Do Not Assign: The opportunity won’t be assigned to anyone.
- Assign to Team Member: Assign it to a specific team member. When you choose this, an input field will appear for you to add the team member’s name.
- Use Pipeline Round Robin: This option uses the round robin settings of the selected pipeline to automatically assign opportunities to team members, ensuring an even distribution.
- Configure Round Robin: Spread opportunities evenly among team members. Selecting this will open a field where you can add the team members involved.
- Enter the opportunity Name. The default is
contact.email_address, and you can use Contact merge tags. - Add the Value of the opportunity to indicate how much it’s worth.
- Toggle on Move existing opportunities if you want to move current opportunities to this workflow. If this is off, a new opportunity will be created for each contact instead.
- Click the Create step button.
- To finish your workflow, click the + Sign again and select End.
How to Manage Opportunities

- Switching Dashboard View
- Click on the view option in the Opportunities dashboard.
- Select between Kanban Board and Table View.
- Viewing Opportunities Within Pipelines
Every time you create a new pipeline, it will become available on the Opportunities dashboard. To view opportunities within a certain pipeline:- Click on the Pipeline Name option.
- Select the pipeline from the drop-down menu.
- Filtering by Assignee
- Click on the Assignee option to filter opportunities based on the assigned team member.
- You can choose between All assignees or a specific assignee.
- Using the Search Feature
- Use the Search Opportunities bar to quickly find specific opportunities.
- Type keywords or relevant details, and the list will update to display matching results.
How to Edit Opportunities
- Click next to the opportunity Name.
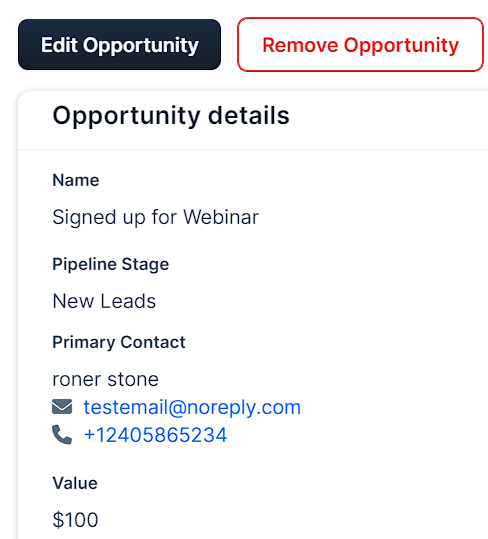
- A sidebar will appear showing the Opportunity details:
- You can view additional contact information such as phone number, email, and contact tags within the sidebar.
- Phone numbers and emails are clickable, allowing you to instantly call or email the contact directly.

- Click on Edit Opportunity.
- Edit the Opportunity details and click on Update Opportunity when finished.
How to Delete Opportunities
Deleting an opportunity is final and cannot be undone.
- Click the opportunity Name.
- Click the Delete button at the bottom-left corner of the sidebar.
- Click the Proceed button to remove the opportunity.
Related Articles
Was this article helpful?
That’s Great!
Thank you for your feedback
Sorry! We couldn't be helpful
Thank you for your feedback
Feedback sent
We appreciate your effort and will try to fix the article
 Dashboard
 Site & Funnels
 Products
 Orders
 Contacts
 Analytics
 Marketing
 Sales
Sales Settings
 Apps
Apps Payments
 MessageHub