MessageHub is a ClickFunnels CRM solution for managing customer interactions across various platforms. By integrating messages from different channels into a single interface, it simplifies your communication workflow and helps you respond more effectively. This article will show you how to set up MessageHub and use its key features to improve your customer interactions, save time, and boost your business relationships.
Requirements
An active ClickFunnels account
What is MessageHub
MessageHub is a tool that brings together all your customer conversations in one place. It combines messages from text, email, and social media, making it easier for you to manage and respond to customers quickly. MessageHub helps your team streamline communication processes, improve customer engagement, and ultimately increase customer lifetime value.
MessageHub Key Features: MessageHub offers a range of powerful features to streamline your customer communication including:
Multi-channel inbox management (email, chat, social media)
Team collaboration tools
Automated responses and workflows
Custom labels for organization
Detailed analytics and reporting
Integration with Webhooks and other tools
Benefits of Using MessageHub:
Using MessageHub can make your work easier by:
Helping you answer customers faster.
Keeping all customer conversations in one spot.
Automating routine responses to save time.
Improving customer satisfaction with quick replies.
Examples of MessageHub in Action:
Customer Support: Quickly address inquiries across multiple platforms without switching between apps.
Sales Follow-ups: Check in with potential customers at the right time.
Team Collaboration: Assign conversations to team members and track resolution progress.
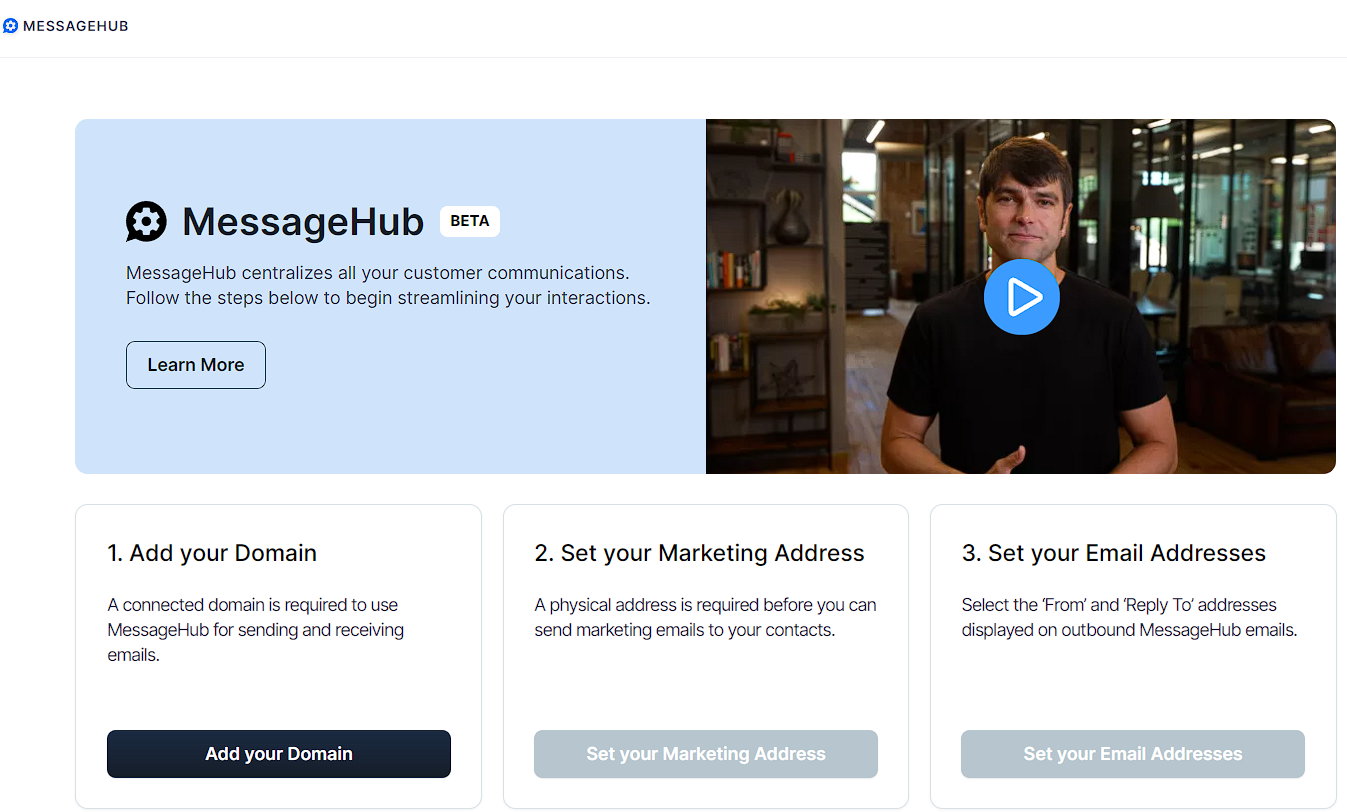
Adding MessageHub App
From the main menu on the left, click on + Add an App to navigate to the Apps page.
Scroll down until you find the MessageHub app, then click on it.
Confirm your selection by clicking the Add App button.
To continue, you’ll need to complete these required actions:
Add your Domain:
Click on Add your Domain
Enter your domain (with subdomain) in the provided field.
Click Continue to proceed.
This will take you to the Domain tab in Workspace Settings.
Click the Start domain setup button to connect your domain. For more details, see our article on How to Connect an Existing Domain.
Set your Marketing Address:
Click on Set your Marketing Address.
Fill in your company name and address details.
Add Location details.
Click Save when done.
Set your Email Addresses
Click on Set your Email Addresses.
Choose your From address from the dropdown.
Select your Reply to address.
To add a new email, click Add new Email Address.
Click Save to confirm your choices.
For more information, check our How to Add a Custom Email Address in ClickFunnels article.
Once all steps are complete, click Go to MessageHub to start using the app.
Adding Your First MessageHub Inbox
Inboxes are communication channels linked to your MessageHub account. Each inbox represents a specific platform (e.g., website chat, Facebook, WhatsApp). You can view conversations from a particular channel by selecting its inbox. Here is a list of supported channels that you can add to your MessageHub:
Website live-chat widgets
Facebook Messenger
WhatsApp
Emails
SMS
API
Telegram
Line
You can add a new inbox in two ways:
Through the Settings ⚙ icon > Chat Inboxes > Add Inbox.
Using the New inbox option on your Conversations tab.
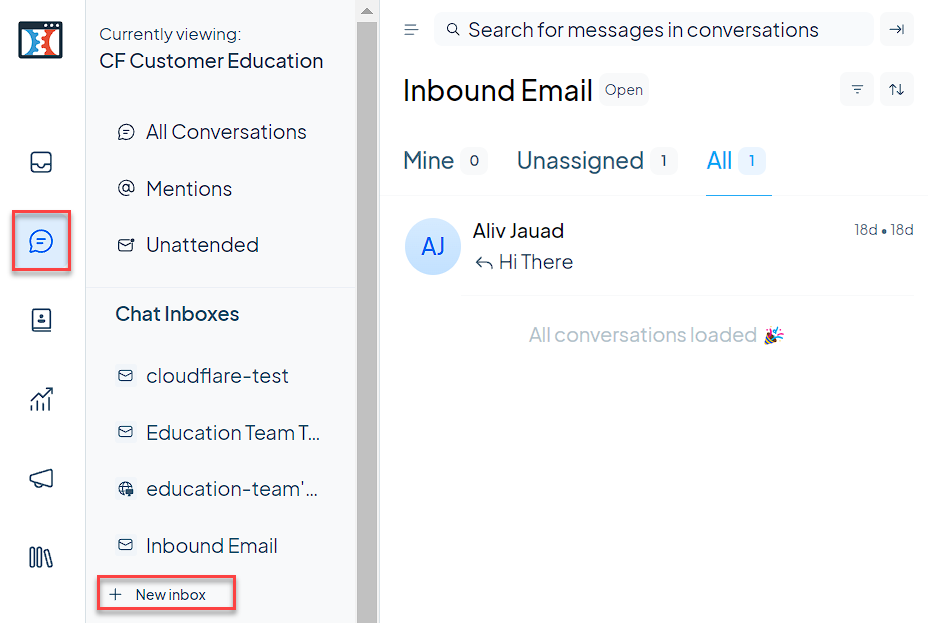
Steps to Add an Inbox:
Navigate to the inbox creation screen using either method above.
Choose the channel type you want to add.
Follow the configuration steps for your chosen channel.
Each channel has its own specific setup process. For detailed instructions on setting up a new inbox, please refer to our How to Create a New Inbox article.
Adding Agents to MessageHub
Agents are members of your customer support team who can view and respond to messages from your users in MessageHub. To add new agents to your MessageHub:
Navigate to Settings ⚙ > Chat Agents in your MessageHub dashboard.
You’ll be redirected to the Team members page.
Click the Invite a new team member button in the top right corner of the screen.
Fill out the new team member’s details.
Click Create invitation to send an email invite to the new agent.
The invited agent will receive an email with a confirmation link to activate their account. Once activated, they can access MessageHub and start responding to messages.
For detailed instructions on agent roles and permissions, refer to our Chat Agents and Administrators article.
Assigning Agents to Conversations
Assigned agents can then view and respond to their assigned conversations, to assign an agent to a conversation:
Open the desired conversation from your Conversations list.
Look for the Conversation Actions section on the right side of the screen.
Expand the Assigned Agent dropdown menu and choose an agent.
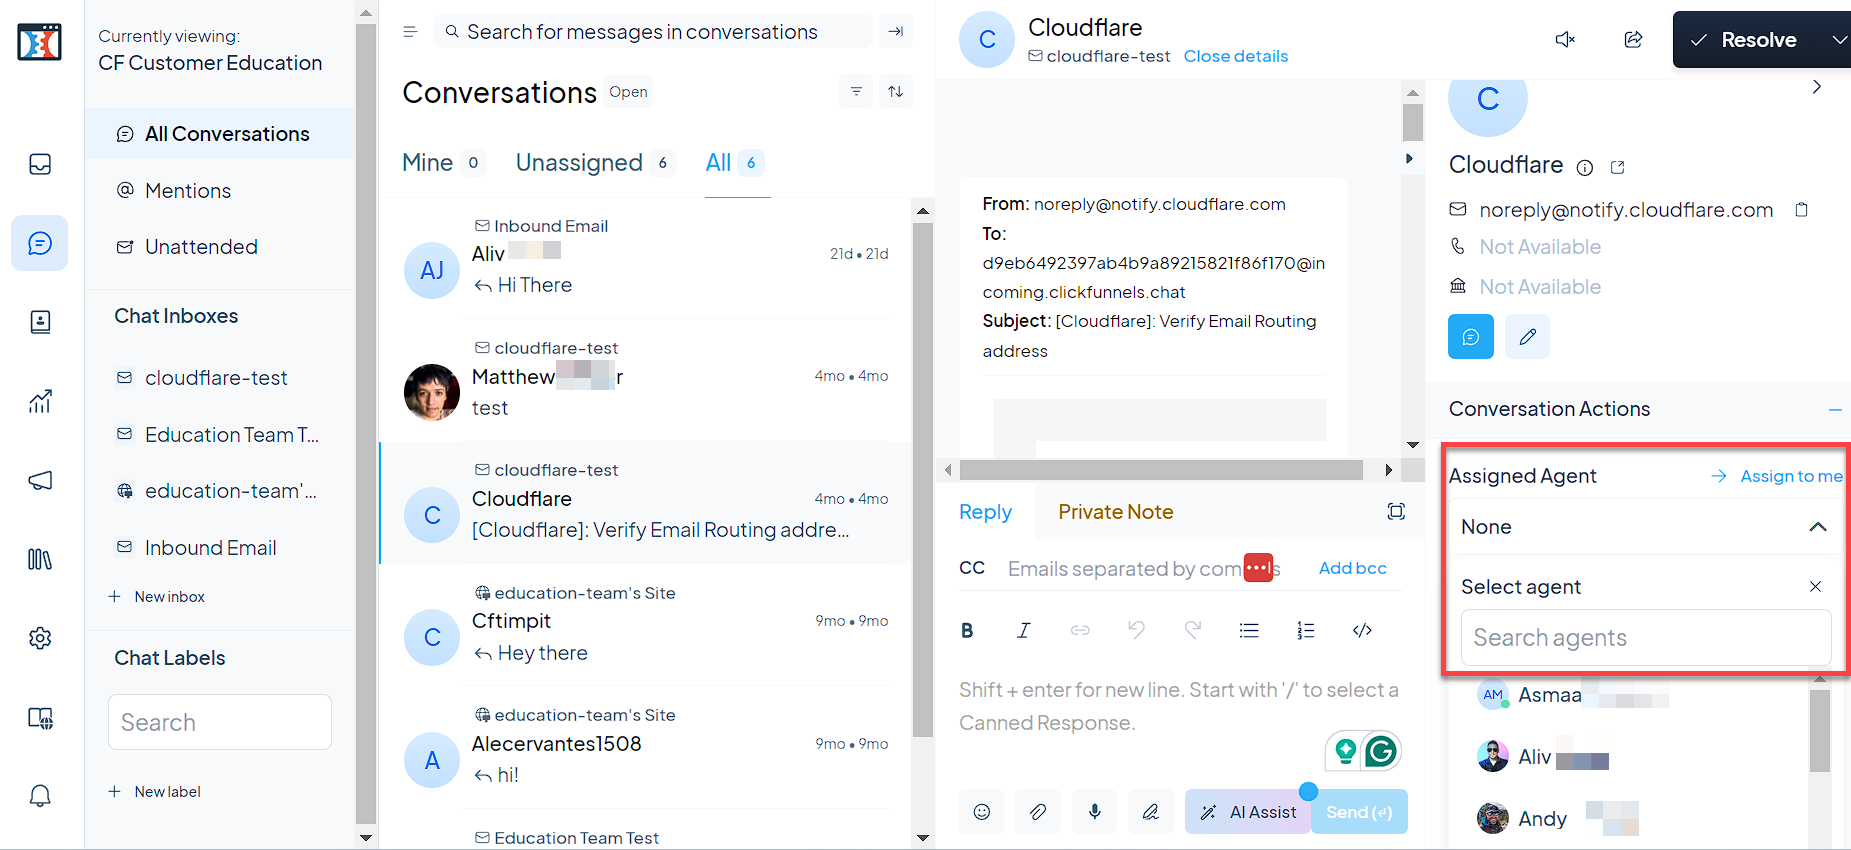
The conversation will be immediately assigned to the selected agent.
Adding Labels in MessageHub
Labels in MessageHub help you categorize and organize conversations, making it easier to manage and analyze customer interactions over time. Labels allow you to:
Quickly identify conversation types (e.g., bug reports, feature requests)
Easily sort and filter conversations
Analyze trends in customer inquiries
Assign conversations to relevant teams more efficiently
To create a new label:
Go to Settings ⚙ > Chat Labels.
Click on Add Label.
Design your label.
Click Create to add the label to your MessageHub.
Assign a label to a conversation
Open the conversation you want to label.
Find the Conversation Actions section in the sidebar.
Scroll down to Conversation Labels, and click +Add Labels.
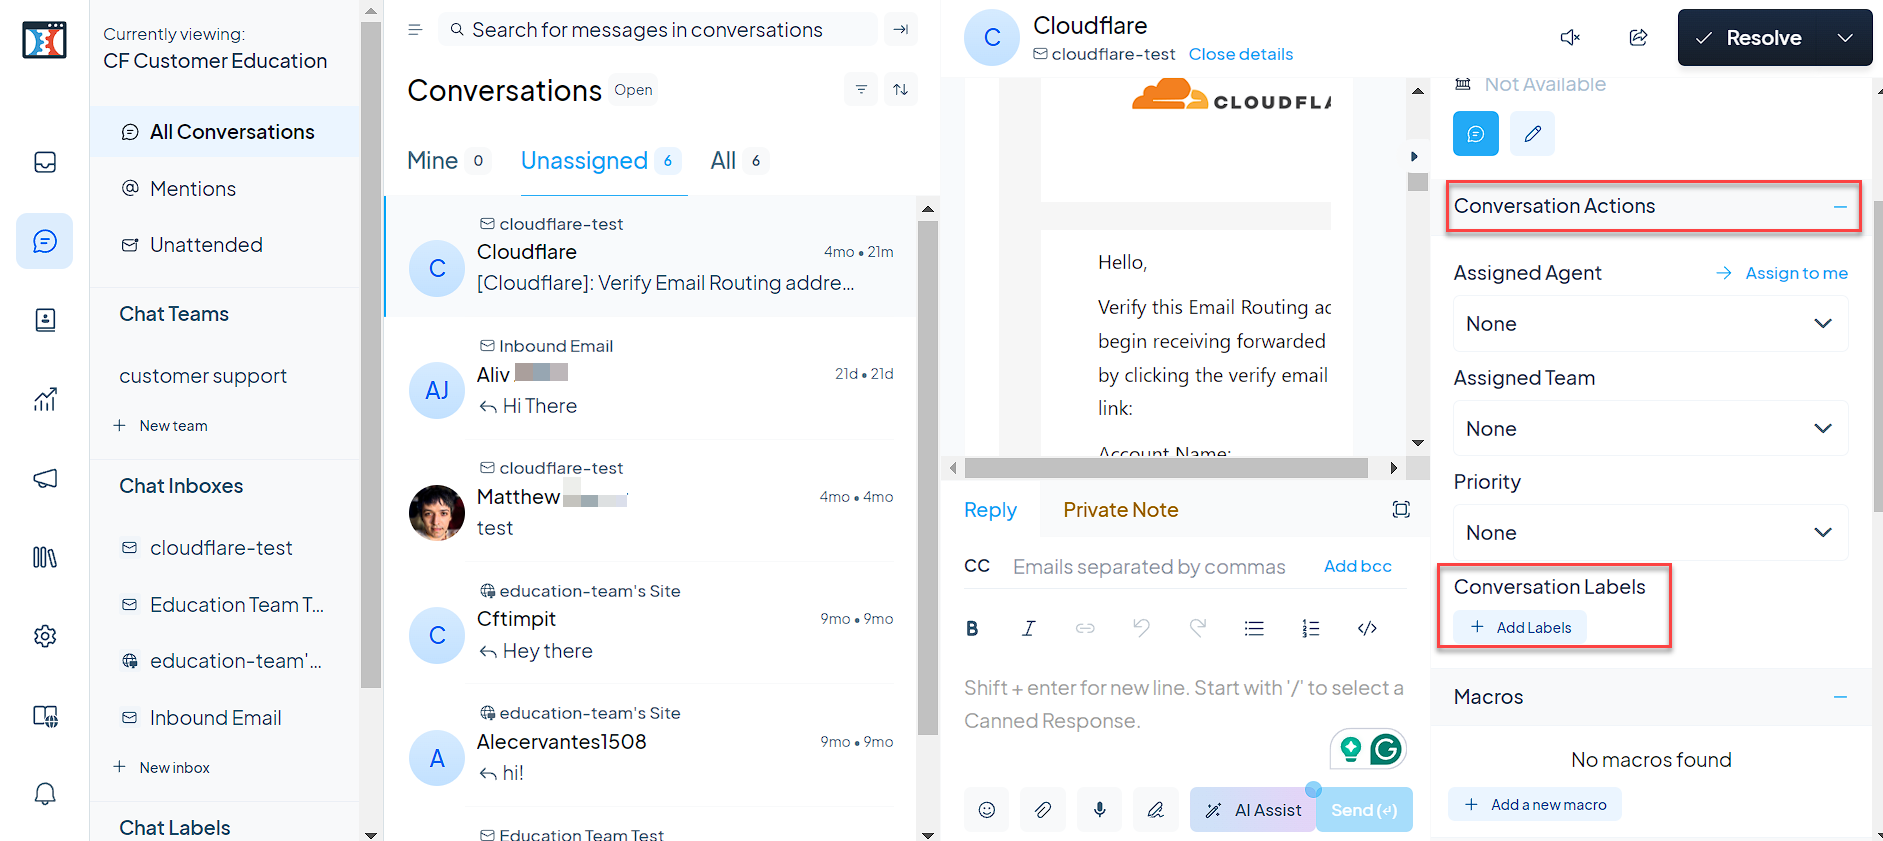
Select the appropriate label(s) from the list.
To learn more about creating and assigning labels, refer to this article.
Using Canned Responses in MessageHub
Canned responses are pre-written message templates that allow your support team to quickly respond to common inquiries. This feature significantly improves response times and ensures consistency in your communication with customers.
Create a New Canned Response
Navigate to Settings ⚙ > Canned Responses.
Click on Add canned response.
In the modal that appears, fill in the following:
Short Code: A unique, memorable code.
Content: The message template you want to save
Click Submit to save your canned response.
Use Canned Responses in Conversations
In the message compose box, type
/followed by your shortcode.Select the appropriate canned response from the list that appears.
The pre-written message will be inserted into your reply.
Adding Website Live Chats
Website Live Chats are timed messages that appear on your ClickFunnels pages after visitors have been on the page for a set number of seconds. Website Live Chats can be used to welcome new visitors, offer assistance to hesitant customers, and promote time-sensitive deals.
To create a Website Live Chat:
Click the Megaphone icon to open Website Live Chats.
Select Create a Website Live Chat in the top right corner.
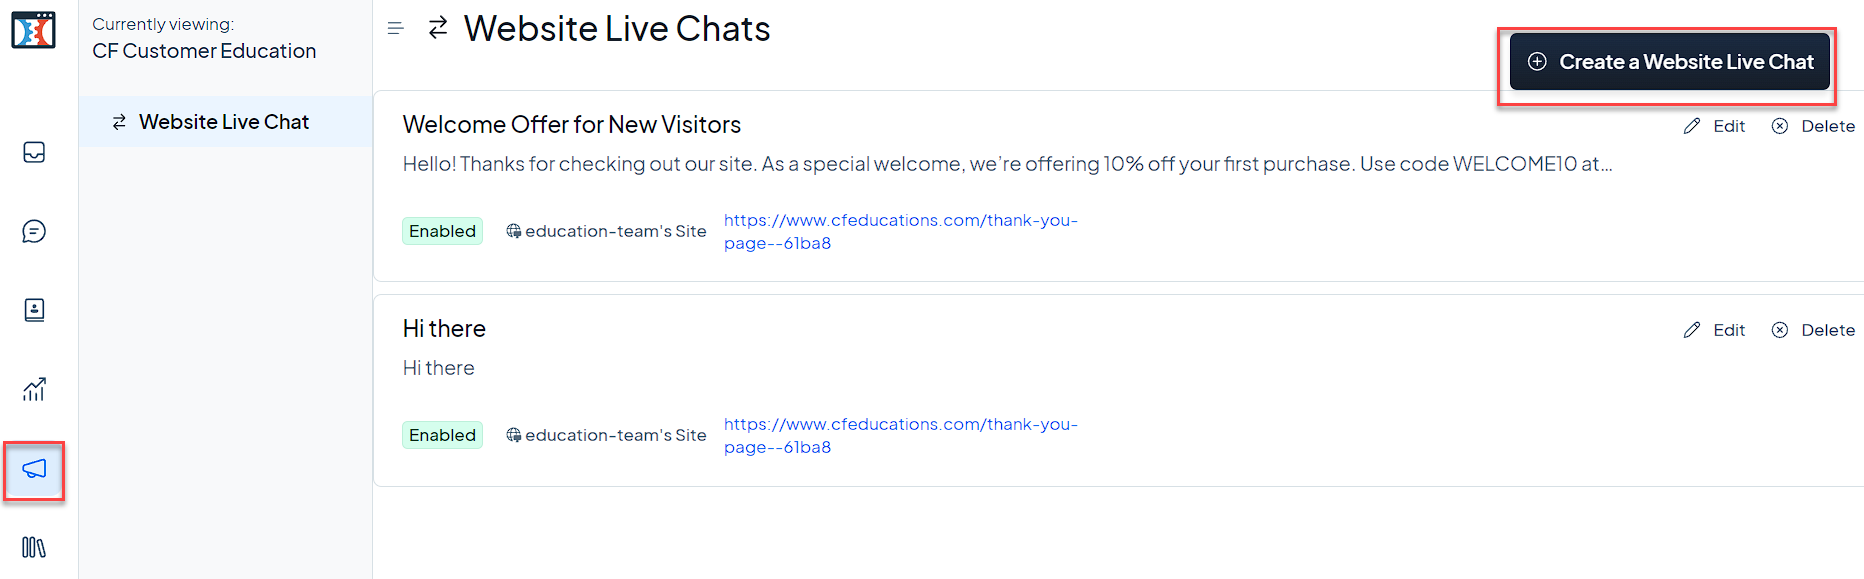
Fill in the required information:
Message content
Chat Inbox
Timing for the message to appear
Target pages
Click Create to activate your Website Live Chat.
For detailed instructions on creating and managing Website Live Chats, please refer to our comprehensive How to Create and Manage Website Live Chats in MessageHub article.
Adding Automations in MessageHub
Automations in MessageHub allow you to set up rules that automatically perform tasks based on specific triggers and conditions. This feature helps streamline your customer support workflow and ensures consistent handling of conversations.
An automation rule consists of three components:
Event: The trigger that initiates the automation.
Conditions: Criteria that must be met for the action to occur.
Actions: Tasks that MessageHub performs when conditions are met.
To create an automation rule:
Go to Settings ⚙ > Automations.
Click Add Automation Rule.
Define the Event that will trigger the automation.
Set any necessary Conditions for the rule to apply.
Specify the Actions to be taken when the Event occurs and Conditions are met.
Finalize by clicking the Create button.
To find more detailed information, check out our MessageHub Automations article.
Analyzing Performance with Chat Reports
MessageHub’s Chat Reports feature provides valuable insights into your customer support operations. These reports help you track key performance indicators (KPIs), analyze trends, and make data-driven decisions to improve your support quality.
MessageHub offers seven types of reports:
Chat Overview
Conversations
CSAT
Chat Agents
Char Labels
Chat Inbox
Team
Each report type focuses on specific aspects of your support operations, from real-time metrics to long-term performance trends.
To access and use the Reports feature:
Click the bar graph icon in the left sidebar to view the list of available reports.
Select the desired report type.
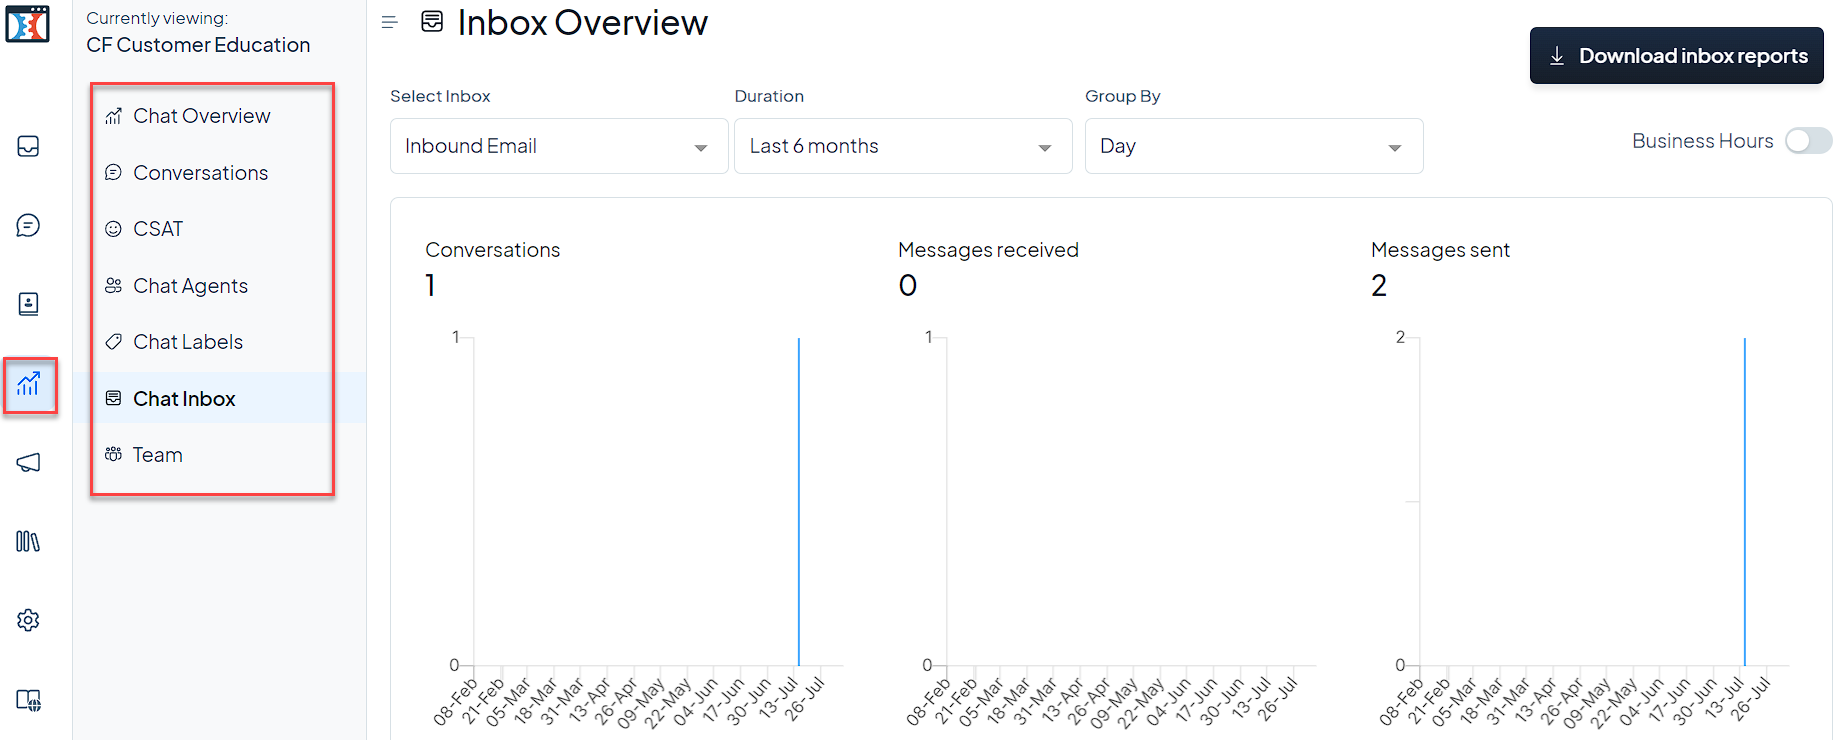
Choose the relevant parameters (e.g., agent name, inbox, or team).
Set the time period for your analysis.
Click on specific metrics to view detailed graphs.
You can download any report by using the button in the top right corner of the report view. To learn more about Chat Reports, refer to this article article.
Frequently Asked Questions
Is it possible for an agent to join more than one team?
Yes, agents can be members of multiple teams simultaneously.
Do agents have the ability to create and modify canned responses?
Yes, all agents can create and edit canned responses.
Are canned responses shared among all agents?
Yes, canned responses are accessible to all agents in the account.
Who has permission to create automation rules?
Only administrators can create automation rules.
How do I choose the most effective channels for customer engagement?
Select channels based on your target audience preferences, business type, and resource availability. It’s often beneficial to start with a few key channels and expand as needed.
Can I integrate MessageHub with other tools we use?
Yes, please refer to our MessageHub Integrations article.
How do I enable or disable MessageHub for my site?
Navigate to Site > Overview from the left side menu.
In the top-right corner of the main content area, click the three dots ⋮ menu.
Click on Site Settings from the drop down list.
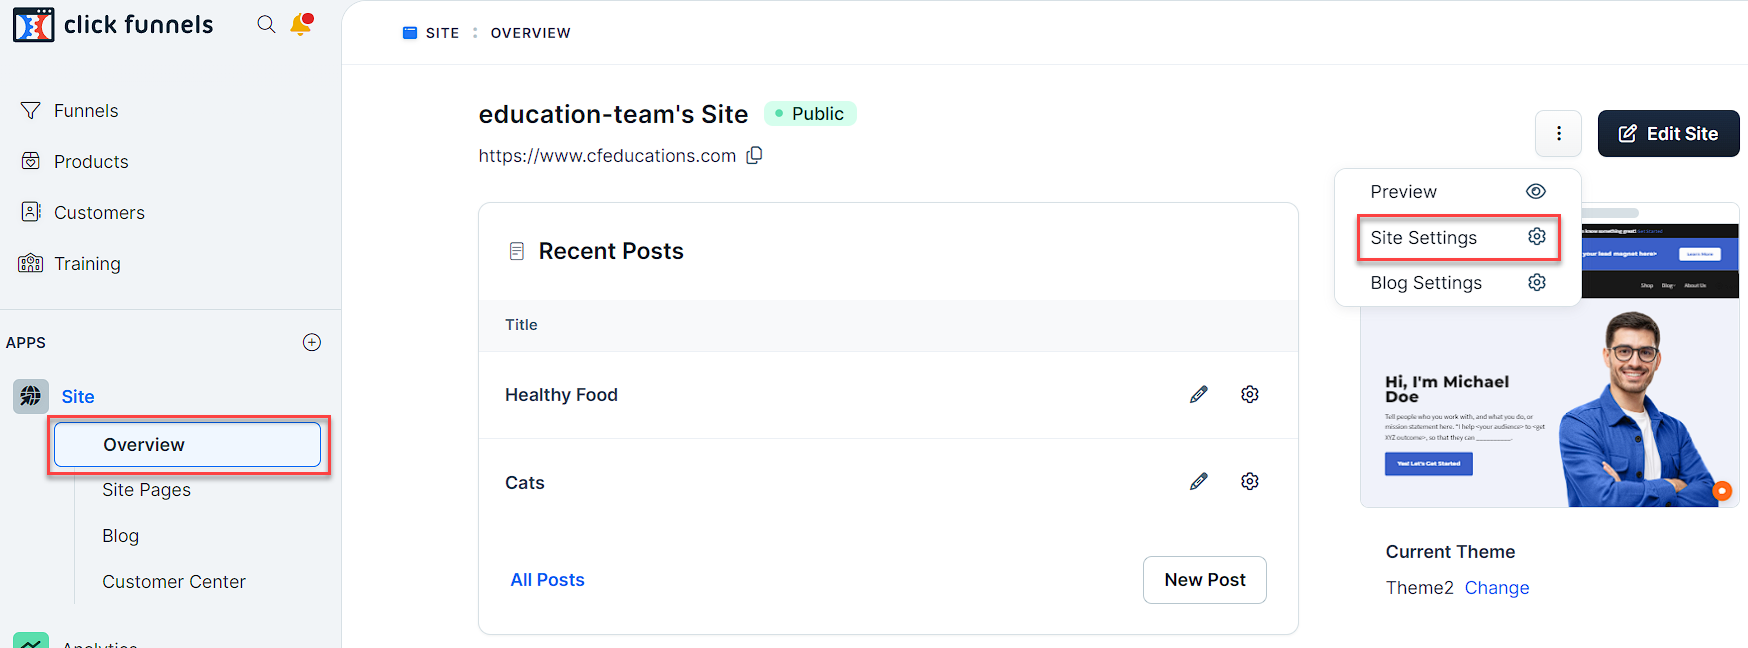
Scroll down to the Tracking codes section and locate the MessageHub Status option.
Select Enabled to turn on MessageHub, or Disabled to turn it off.
Click Update site at the bottom right of the page to save your changes.
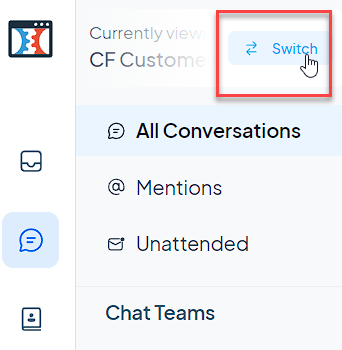
Can I switch between different workspaces MessageHubs?
Yes, you can switch between different workspaces MessageHubs. At the top of the MessageHub interface, you’ll see the name of the currently active workspace. If you have multiple workspaces linked to your email, you can click the Switch button next to the workspace name to change to a different one.