Cancellations are a reality of any subscribtion business, but they don’t have to mean a lost customer. The Cancellation Funnel is a feature designed to help you turn cancellations into opportunities. By guiding subscribers through a custom flow, you can offer solutions like alternative plans, discounts, or even gather valuable feedback to improve your product.
With a well-designed Cancellation Funnel, you can reduce churn, improve retention, and create a smoother experience for your customers—even if they ultimately decide to cancel. This article explains how to set up and use the Cancellation Funnel feature to manage subscription cancellations.
Important
The Cancellation Funnel feature will only be available for Subscription Products.
Requirements
An active ClickFunnels account
A redirect page URL
What Is a Cancellation Funnel?
The Cancellation Funnel is a feature designed to manage how subscription cancellations are handled in your business. Instead of letting customers cancel their subscription immediately, you can direct them to a dedicated page or funnel step where you can provide additional options, address their concerns, or even present exclusive offers.
With this tool, you’re in control of the cancellation process, creating an opportunity to engage with your customers one last time before they make their final decision.
Why Use a Cancellation Funnel?
The Cancellation Funnel doesn’t just help you process cancellations—it’s a strategic tool that can bring measurable value to your business:
Save More Subscriptions:
Provide alternatives like pausing subscriptions, offering discounts, or adjusting plans to match customer needs.Learn Why Customers Are Leaving:
Add a survey to your funnel to understand why subscribers are canceling, giving you insights to improve your product or service.Upsell or Cross-Sell:
Use the funnel to present upgrades or complementary products that might suit the customer better.Protect Your Brand:
A thoughtful cancellation experience shows customers you care, leaving a positive impression even if they choose to leave.Reduce Churn and Boost Revenue:
Every cancellation request is an opportunity to keep a subscriber or turn a loss into a new sale.
How to Access Cancellation Funnel
Click on Products on the left-hand side of your workspace.
Select All Products to view your product list.
.png)
Locate your desired product, then click on the product name, image, or settings (⚙️) icon to access its settings.
Scroll down to the Cancellation Funnel section.
How to Add a Cancellation Funnel
Important
You need to create a funnel step or a landing page to generate a Cancellation Funnel URL.
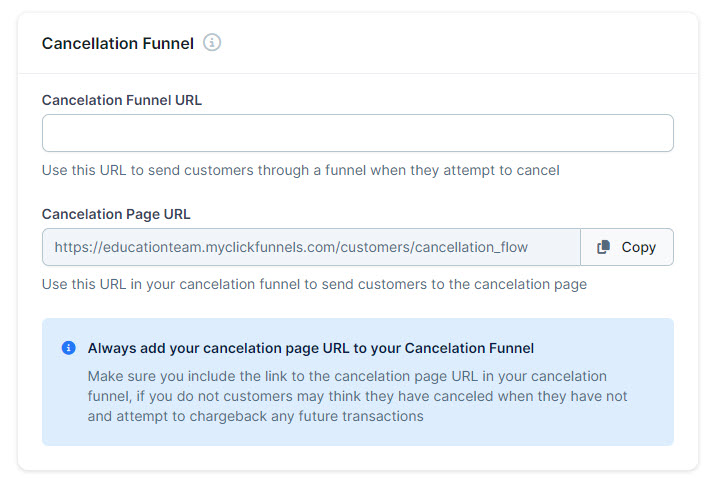
Step 1: Copy the Cancellation Page URL
Scroll down to the Cancellation Funnel section in your product settings.
Locate the Cancellation Page URL field and click Copy.
.png "image(593).png")
Step 2: Set Up Your Funnel or Landing Page
Open your designated funnel step or landing page in the editor.
Add a button to the page or select an existing button that you want to assign the cancellation action to.
In the button settings, choose Go to URL as the action.
.png "image(594).png")
Paste the copied Cancellation Page URL into the URL field.
Step 3: Link the Funnel to the Product
Save your changes to the funnel step or landing page.
Copy the funnel URL from the top of the Funnel Workflow Editor.
.png "image(595).png")
Step 4: Add the Funnel URL to Your Product
Return to your product’s Edit (Settings) page.
Paste the funnel URL into the Cancellation Funnel URL field.
Click Update Product to save your changes.
NOTE
Always test your Cancellation Funnel after setup to ensure it works as intended.
How to Remove a Cancellation Funnel
Go to your Product’s settings page.
Scroll to the Cancellation Funnel section.
Remove the URL from the Cancellation Funnel URL input field.
Scroll to the bottom of the page and click on Update Product.
IMPORTANT
While removing the cancellation funnel, the cancellation funnel URL input field should be left empty to avoid unexpected errors.