An Application Funnel, also known as a Phone Funnel or Coaching High Ticket Funnel, is designed to pre-qualify leads before they speak with you or your team. It helps filter serious prospects through an application form, often followed by a scheduled call so that you can focus on high-value conversations. Application funnels work well for high ticket coaching programs, services, or offers that require a more personalized sales approach. In this article, you’ll learn how to build and customize your Application Funnel using ClickFunnels.
Requirements
An active ClickFunnels account
How Application Funnels Work
Application Funnels are designed to guide visitors through a simple, focused process that helps you gather key details before connecting with them directly. This funnel type works especially well for businesses that rely on qualifying leads before offering a consultation, strategy call, or high-ticket service. By collecting information upfront, you can identify who’s a good fit for your offer and prioritize your time around the most promising leads.
Unlike a traditional sales funnel that focuses on pitching an offer directly, an Application Funnel is ideal for high-ticket programs or services where a conversation is needed before the sale. This allows you to learn more about each prospect’s needs, goals, and level of interest. Businesses use Application Funnels in different ways. For example, coaches might ask about current challenges and desired outcomes, while an agency may request budget and project timelines. Some users include a calendar booking step after the application, while others prefer to follow up manually.
This setup helps reduce unqualified calls, shorten the sales cycle, and create a more focused conversation when you do connect with a lead. It also adds a layer of professionalism and positions your offer as more exclusive, which can increase perceived value.
Understanding the Application Funnel Structure
An application funnel is built to move potential clients through a short series of steps that help you learn more about them before getting on a call. Each page in the funnel has a clear purpose: collect details, qualify the lead, and guide them toward the next step in your process. An Application funnel typically includes the following pages: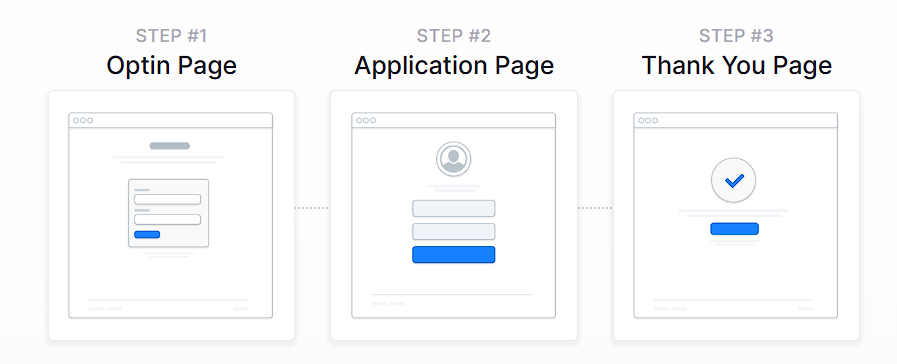
Optin Page: This is where visitors first enter the funnel. The goal of this page is to capture basic informatio, usually a name and email address before leading them to the application. You can also use this page to introduce your offer and explain what the next step involves.
Application Page: After opting in, visitors are taken to the application page. This is the most important part of the funnel. It’s where you collect detailed information using questions that help you qualify leads. You can ask about their goals, challenges, budget, or anything else that helps you decide if they’re a fit for your offer.
Thank You Page: Once the form is submitted, visitors land on a thank you page. This can simply confirm that the application was received, or include next steps such as booking a call or watching a video. You can also use this page to share additional content or let them know when they’ll hear from you.
Success Story Page (optional): This page is used to share testimonials, client results, or case studies. It’s often linked from ads, emails, or the optin page to build trust before someone applies.
Creating an Application Funnel
A high ticket application funnel can be built quickly using ClickFunnels' pre-designed templates. Instead of starting from scratch, you can choose a template that matches your needs, customize it with your content, and launch your funnel in just a few steps.
In ClickFunnels, go to the Funnels section from the left navigation menu.
Click the Create Funnel button.
Browse the available funnel types and select Application Funnel.
Each funnel type includes a training section with:
Overview: Understanding how a phone funnel works.
Strategy: Learning how to structure your funnel and offer for maximum impact.
Implementation: A step-by-step guide to customizing your funnel.
You can also watch the full training video at the top of this article. It covers all three parts in one walkthrough.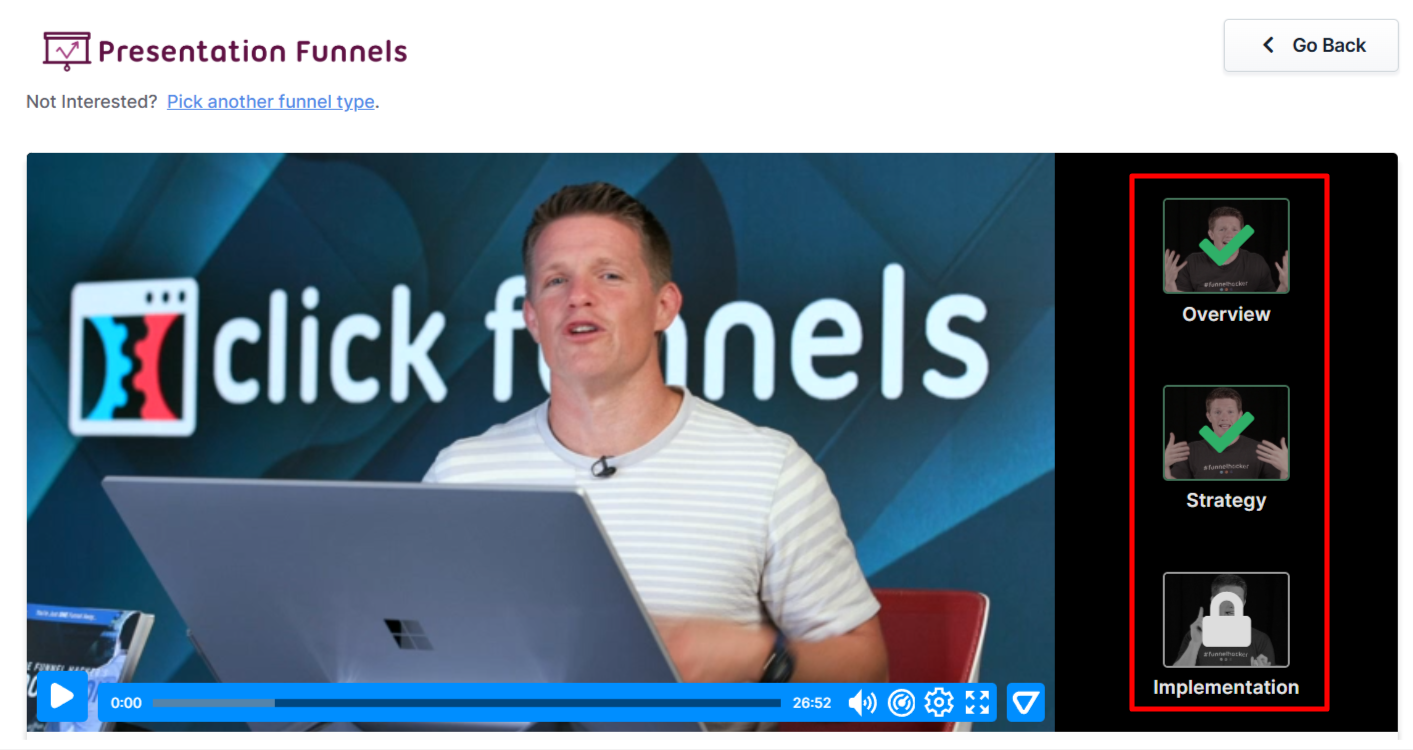
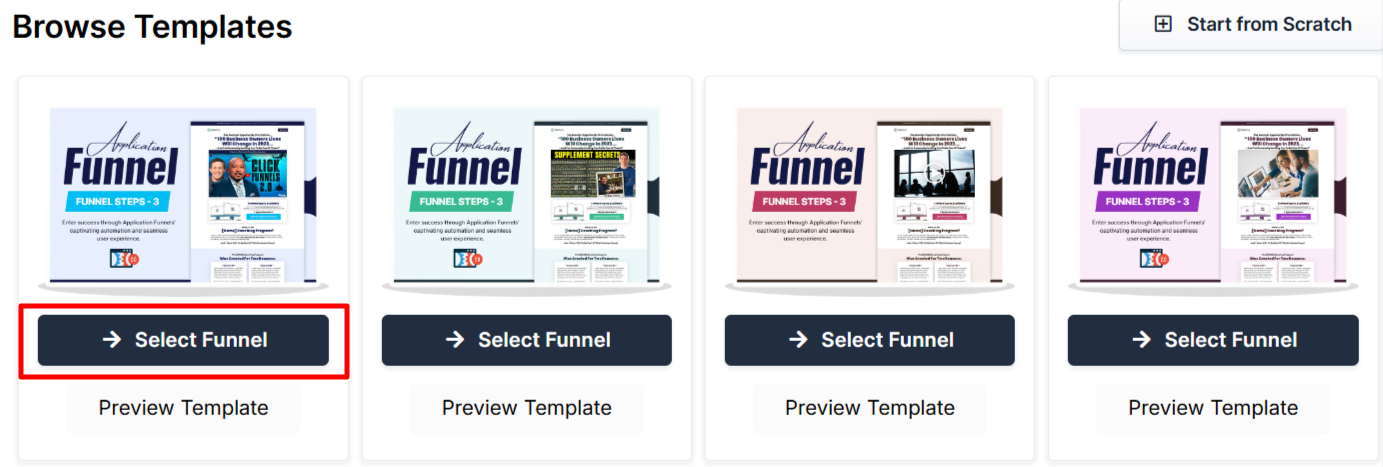
If you prefer a completely custom setup, click Start from Scratch to build your application funnel manually. Refer to the How to Create a New Funnel article for instructions.
Scroll through the available templates and click Select Funnel under the one that best fits your business.
Wait for the funnel to install, then:
Click Close to exit the installation window.
Or click Customize Now to start editing your pages, upload your video, and adjust your call-to-action.
Once the template is loaded into your workspace, you can begin customizing it to fit your product, audience, and sales message.
Editing Application Funnel Pages
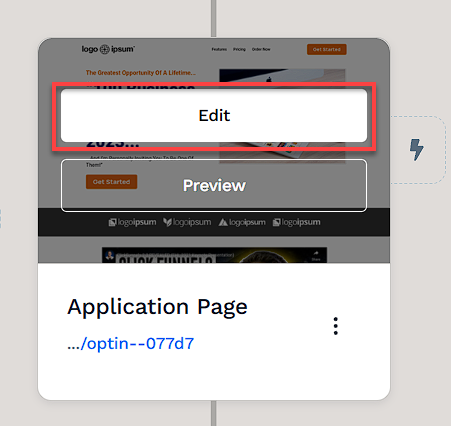
Once your funnel is installed, you can start customizing it by clicking Customize Now on the installation screen or by navigating to the Funnels section in your dashboard. From there, select your funnel to access the funnel workflow editor.
Open the Funnel Workflow Editor by clicking on the funnel. Find the page you want to edit, hover over it, and click Edit.
Each page is built using sections, columns, rows, and elements. Key areas to customize include:
Headline & Supporting Copy: Use clear, direct messaging to explain who the funnel is for and what the visitor should expect after applying.
Opt-in Form: Collect the visitor’s name and email before showing the application. This helps you follow up even if they don’t complete the full form.
Application Questions: These form input fields are the heart of the funnel. Ask qualifying questions that help you decide if someone is a good fit for your offer such as their goals, budget, current challenges, or timeline.
Call-to-Action Button: Make sure your button is clear and easy to spot. It should guide users to the application form or submit their answers.
Social Proof or Testimonials: If available, include short success stories or client quotes to build trust before the user fills out the application.
Video Element: You can add a short video to introduce yourself or explain why you're asking for an application. This can help make the process feel more personal.
To learn more about editing elements in ClickFunnels, refer to the Getting Started with the ClickFunnels Page Editor article.
Click Save at the top right to keep your changes.
Use the Preview option to check how your funnel looks before publishing. Remember to view your funnel on mobile devices to ensure it looks great on all screens. For detailed instructions, check our article on Mobile Optimization Techniques.
Adding Call Booking Options to Your Funnel
Once a lead submits their application, you may want to give them the option to book a call with you. There are a few different ways to do this inside ClickFunnels, depending on how you prefer to manage your appointments:
Add a Booking Form Directly in the Funnel:
Use the Event Type Scheduler element to display your calendar on the page. This is useful if you want leads to book immediately after applying, without leaving the funnel.Embed a Booking Form Using Custom Code:
You can also embed your booking form using the Custom HTML element in the page editor. To do this, copy the embed code from your appointment and paste it into the desired section of your funnel page.Share a Direct Booking Link:
You can also link to your appointment from a button or email. This opens the booking page in a new tab, which some users prefer if they want to keep the funnel page simpler.
Helpful Resources:
Automating Communication with Workflows
Workflows help keep potential customers engaged throughout the application without the need for manual messaging. They can send reminders, segment contacts, and deliver content at the right time.
With workflows, you can:
Send email reminders when someone starts but doesn’t complete an application.
Tag applicants based on their stage in the funnel, such as "Application Started" or "Interview Scheduled."
Automatically deliver confirmation emails, next-step instructions, or resource guides after each funnel milestone.
To create a workflow:
Locate the funnel step where you want to trigger the workflow.
Click the Lightning Bolt icon next to the step to add a new or existing workflow.
Select an existing workflow from the list or create a new one.
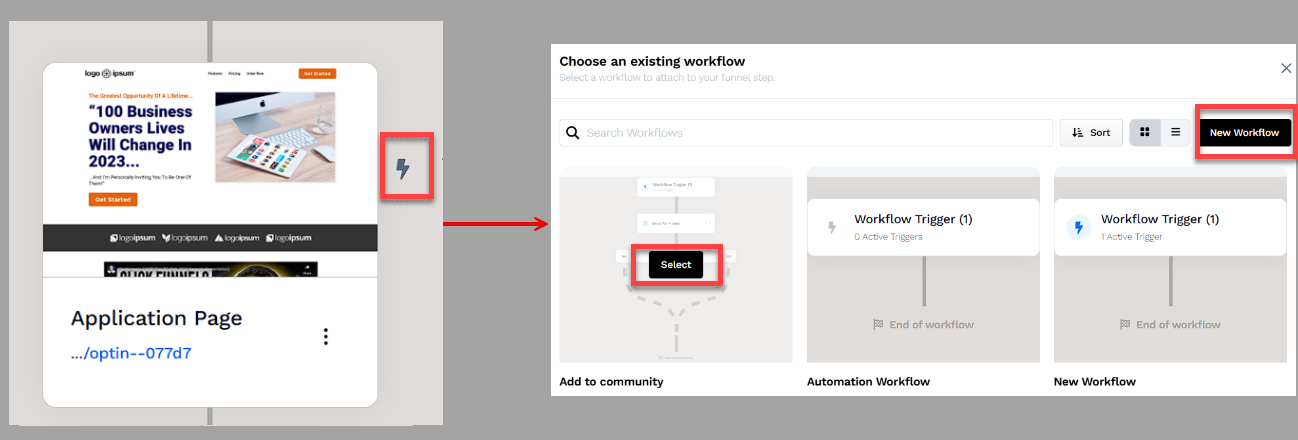
Click + (Plus) icon to add actions such as Send an Email, Add a note, or Tag contact.
(Optional) Add a Delay to space out follow-up actions over time.
In the top right corner of the workflow navigation, find the Status option.
Toggle the status option. The workflow status will change from disabled to active.
Helpful Resources:
Testing and Publishing Your Funnel
Before making your funnel live, it’s important to test its functionality to ensure everything works as expected.
Test the Funnel
Verify that all pages are connected in the correct order.
Check buttons, forms, and links to confirm they function properly.
Test the funnel on different devices and browsers for a smooth experience.
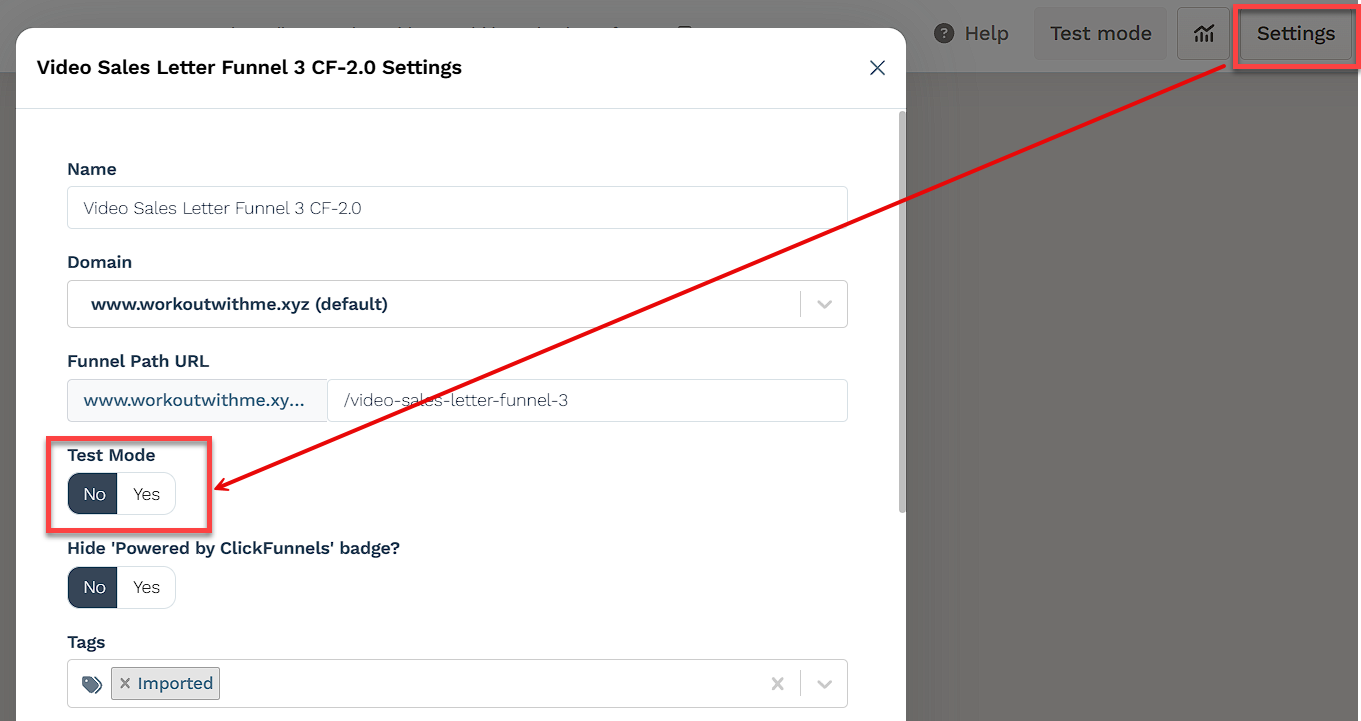
Enable Live Mode
Click the Settings button at the top-right corner of the funnel workflow editor to open the funnel settings.
Set the funnel to Live Mode to make it accessible to customers.
Copy and Share Your Funnel URL
Hover over the URL at the top of the funnel workflow page and click to copy.
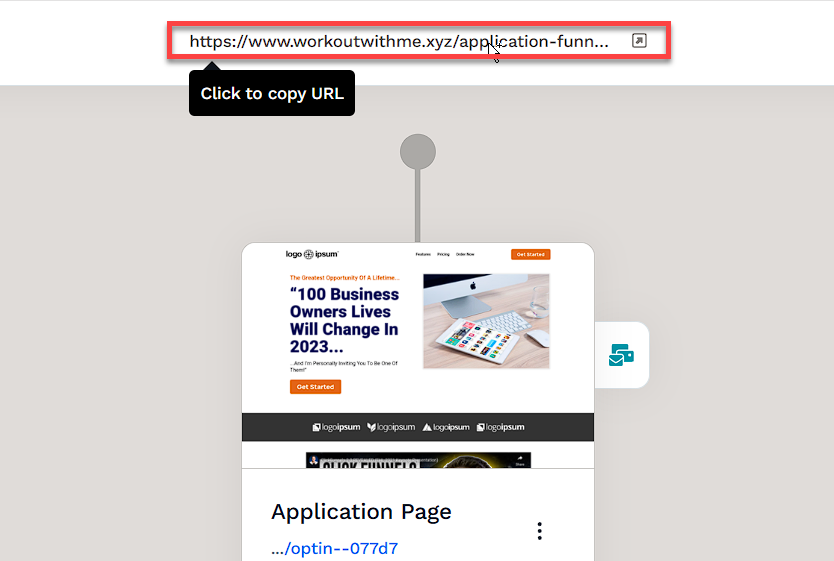
Share the link via your website, social media, or email campaigns.
Learn more about publishing and sharing your funnel in this article.
Funnel Builder Support Options
For additional support building your funnel, explore the Funnel Builder Coaching & Certification Program. The program offers step-by-step training and live coaching for members who want to build with guidance.
To hire a certified funnel builder, visit the Funnel Builder Directory to connect with a verified expert.