To send emails through ClickFunnels using an external email service provider like SendGrid or Mailgun, you need to connect an SMTP (Simple Mail Transfer Protocol) service. Once connected, marketing emails from the associated email domain will be routed through the SMTP server instead of ClickFunnels’ email server. This article walks you through the steps to set up an SMTP connection in ClickFunnels.

Requirements
An active ClickFunnels account
A domain connected to the workspace
Access to Email Settings (available only to users with the Funnel Builder, Marketing, or Administrator roles)
The email DNS records verified in the domain
Access to your SMTP service credentials (e.g., username, password, or API key)
What is an SMTP
SMTP stands for Simple Mail Transfer Protocol. It’s the standard way servers send emails across the internet. When you connect an SMTP to ClickFunnels, you're linking an external service like SendGrid, Mailgun, or another email provider to handle sending your marketing and transactional emails.
Consider SMTP as selecting your own delivery truck. Typically, when you send emails through ClickFunnels, we manage the delivery process on your behalf using a reliable and professional system. However, if you prefer, you can connect your own delivery service (SMTP), which gives you greater control over your emails' routing, tracking, and reputations.
The main difference is control over the sending system:
Sending with ClickFunnels' default setup: You can customize your sender domain, authenticate your domain (with DNS records like SPF, DKIM), and manage your sender identity, while ClickFunnels manages the sending service behind the scenes.
Sending with your own SMTP connection: You can choose and manage your email sending service (like SendGrid, Mailgun), giving you complete control over server settings, deliverability preferences, and service-specific configurations.
When to Use an SMTP with ClickFunnels:
While ClickFunnels provides a built-in email sending system that works for many users, connecting your own SMTP service can be a better choice in some situations.
You should consider using your SMTP if:
You already have an email service provider like SendGrid, Mailgun, or Amazon SES that you prefer to use.
You want complete control over your email deliverability settings, server configurations, and email tracking.
You are sending a high volume of emails and want a dedicated email service to manage the volume and reputation.
You need advanced customization for email authentication (such as managing your own SPF, DKIM, and DMARC policies directly with your provider).
You require specific compliance with company policies, industry regulations, or regional privacy laws that mandate using specific email servers.
Tips:
In most cases, the default ClickFunnels email system is typically an excellent option for sending marketing and transactional emails. However, as your business grows or your email needs become more specialized, connecting your own SMTP can give you more flexibility, scalability, and control over your email communications.
Steps to Connect an SMTP in ClickFunnels
Step 1 - Add a New SMTP
Navigate to the Workspace Settings and select Email Settings from the left-side navigation.
Click on SMTP Settings.
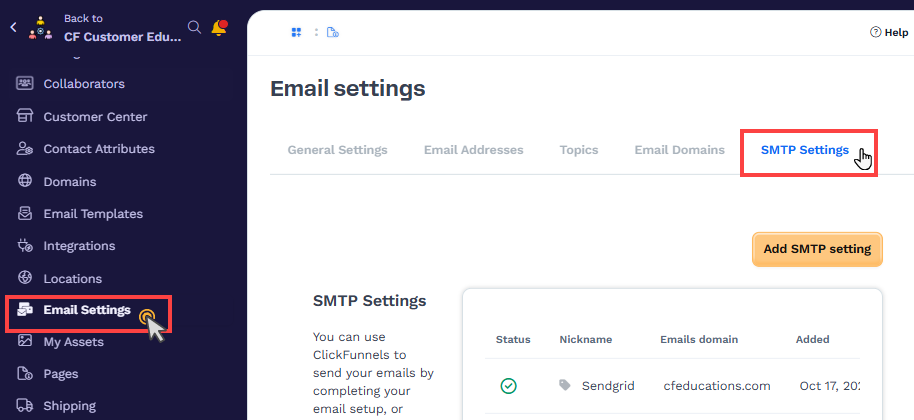
Click the Add SMTP Setting button to begin configuring a new SMTP connection.
Step 2 - Enter SMTP Details
In the new SMTP settings pop-up, fill in the following fields:

Nickname: Enter a name for this SMTP configuration (for internal use).
Email Domain: Select the domain associated with this SMTP configuration.
Server: Choose your SMTP provider (SendGrid, Mailgun, or Other). If you select “Other” as the SMTP provider, you must provide the Custom SMTP Server Address. This is the server address your SMTP provider uses for sending emails (e.g.,
smtp.yourprovider.com). You can obtain this information from your SMTP provider’s documentation or support team.Note:
You can connect any other SMTP provider, but tracking capabilities (e.g., delivery and bounce statistics) will be limited.
Port: Enter
587or input the SMTP port number given by your SMTP provider.Username: Enter the username provided by your SMTP service. For some providers, this may be your email address. If you’re using SendGrid, enter text
apikeyin this field.Password: Enter the Password or API key provided by your SMTP service. For SendGrid, this will be your API key.
Step 3 - Add Webhook URL for Tracking Events
After entering your SMTP details, you will be prompted to add a Webhook URL. This webhook is necessary for tracking the performance of your emails, such as delivery, opens, clicks, and bounces. The provided webhook URL needs to be added to your SMTP provider.
Copy the Webhook URL provided by ClickFunnels.
Go to your SMTP provider’s settings and create a new webhook.
Paste the copied webhook URL into your SMTP provider’s webhook field.
Once you’ve added the webhook, check the box that says Webhook URL added in ClickFunnels to confirm the integration.

After adding the webhook and completing the SMTP details, click Update SMTP Setting. ClickFunnels will verify the connection and update the SMTP status.
Helpful Resources:
How ClickFunnels Utilizes an SMTP for Email Sending
Once your SMTP is successfully connected to your ClickFunnels workspace, the system will display the verified status for your associated email domain.
Any email address created within your workspace, linked to this domain, will automatically use the SMTP for email delivery when sending broadcasts or emails within workflows. ClickFunnels dynamically makes this decision based on the connected SMTP and the selected email address.
Example:
For instance, you want to use SendGrid as SMTP. You have verified the domain www.yourdomain.com in your ClickFunnels workspace and set up an email address like support@yourdomain.com. After verifying the domain and DNS records both in ClickFunnels and SendGrid, when you’re ready to send a broadcast or trigger an email step in a workflow, you will choose the email address you wish to send from. If you select support@yourdomain.com, ClickFunnels will automatically route the email through SendGrid’s SMTP, as the email address is associated with the verified domain connected to SendGrid. If SendGrid were disconnected, ClickFunnels would use the default internal mail server.
When your email domain is associated with an SMTP server, the system emails will not use the custom email address set as “From Email” in the workspace settings under Email Settings. System emails can only utilize a custom email address as “From Email” when the email domain is not linked to an SMTP server. If you don't have one, ClickFunnels will use the default system email address (e.g., no-reply+XXXX@clickfunnelsmail.com) to send system emails. An SMTP can only be used to send marketing emails in the workspace.
Troubleshooting
If you’re having trouble setting up an SMTP, check the following:
Incorrect SMTP Credentials: Double-check your SMTP username and password.
Firewall Issues: Ensure your SMTP provider is not blocking access to ClickFunnels’ servers.
Propagation Time: The SMTP connection may take some time to propagate fully