WhatsApp is one of the most widely used messaging platforms, making it an essential channel for businesses to communicate with their customers. By integrating WhatsApp with MessageHub, you can manage all customer messages in one place. In this article, you will learn how to set up your WhatsApp inbox using either the WhatsApp Cloud or Twilio, along with the requirements for each method.
Requirements
An active ClickFunnels account
The MessageHub App added to your workspace
A verified phone number to connect with WhatsApp.
NOTE
Additional tools or credentials may be required depending on the connection method you choose: WhatsApp Cloud or Twilio. These will be explained in detail in their respective sections.
Understanding WhatsApp Integration Options
MessageHub supports two integration methods for connecting a WhatsApp inbox, allowing you to choose the option that best fits your business needs and existing tools.
WhatsApp Cloud API (Meta)
This option connects directly through Meta’s official WhatsApp Cloud API. It’s best suited for businesses that already manage their WhatsApp presence through Meta’s developer platform or prefer a more hands-on, direct integration with Facebook’s tools.
WhatsApp via Twilio
This method uses Twilio’s programmable messaging platform to deliver WhatsApp messages. It’s ideal if you’re already using Twilio for SMS or want to manage both SMS and WhatsApp conversations in one place.
Each option involves a different setup process. The steps you’ll follow depend on the integration path you choose.
In the sections below, you’ll find instructions for both options—starting with the common setup inside MessageHub, then branching into platform-specific guidance.
Adding a WhatsApp Inbox in MessageHub
Follow these steps to add a WhatsApp inbox in MessageHub. Once the basic setup is complete, proceed with the configuration specific to your chosen integration method: WhatsApp Cloud or Twilio.
Open the MessageHub app from the left-side menu in your ClickFunnels Workspace.
Navigate to Settings ⚙ > Chat Inboxes and click the Add Inbox button in the top-right corner.
From the list of available inbox types, select WhatsApp.
Choose an API provider from the dropdown menu: WhatsApp Cloud or Twilio.
.png)
After selecting your API provider, MessageHub will display the relevant fields for that integration. Follow the next section below for setup instructions specific to your selected provider.
Setting Up WhatsApp Inbox with WhatsApp Cloud
The WhatsApp Cloud API is Meta’s official solution for integrating WhatsApp, offering direct access to the platform without third-party providers. It’s ideal for businesses that want full control over the connection and data handling.
This section walks you through the complete setup, from preparing your Facebook Developer and Business accounts to configuring the webhook and completing the inbox setup inside MessageHub.
Step 1: Set Up Your Facebook Developer App
Create a Facebook Developer App with the WhatsApp Product enabled. For additional guidance, refer to the Facebook Developer documentation.
Once you finish this step, navigate to the Getting Started section under WhatsApp in your developer dashboard.
Add your phone number(s) and configure the required settings.
Take note of the following values that will be required later:
Phone Number ID
WhatsApp Business Account ID
.png)
Step 2: Create a System User in Facebook Business Manager
Open your Business Manager and create a new system user.
Go to the WhatsApp Accounts tab under Accounts in the left-hand menu. Select the WhatsApp Business account you want to connect, then click Add People. Choose the system user you just created and grant the following permissions:
whatsapp_business_managementwhatsapp_business_messaging
Return to the System Users tab and select the newly created system user. Under Assigned Assets, click Add Assets, then assign the WhatsApp Business account to this user.
Generate the access token and select the required permissions.
Copy the generated access token. This will be used later when configuring the WhatsApp inbox in MessageHub.
Step 3: Set Up WhatsApp Inbox in MessageHub
Fill in the Inbox Details:
.png)
Inbox Name: Enter a name for your inbox (e.g., Your Business Name).
Phone Number: Use the phone number you configured in the Facebook Developer App.
Phone Number ID: Enter the Phone Number ID retrieved from the Facebook Developer App prerequisites.
Business Account ID: Provide the Business Account ID retrieved earlier.
API Key: Enter the access token for your Business Account User.
Complete the Setup and Copy the Callback URL:
Once you’ve entered all the required details, click Create WhatsApp Channel. This will generate a Callback URL specific to your setup. Copy this URL for the next steps.Configure the Webhook in the Facebook Developer App:
Open your Facebook Developer App.
Navigate to the WhatsApp section and open the Configuration subsection.
Paste the Callback URL you copied into the Callback URL field.
Enter the Webhook Verify Token you set up during the inbox creation in MessageHub.
Select message field events under Webhooks Fields.
.png)
Step 4: Adding Agents
After completing the setup, you’ll be automatically directed to the Agents tab:
Use the dropdown menu to select the agents you want to assign to this inbox.
Click Add Agents to confirm.
Your WhatsApp inbox is now ready! You can manage customer interactions, assign conversations, and ensure a smooth support experience directly within MessageHub.
Setting Up WhatsApp Inbox with Twilio
Twilio offers a reliable method for integrating WhatsApp with MessageHub. This setup is ideal if you're already using Twilio for SMS or want a centralized platform for managing both SMS and WhatsApp messaging.
Follow the steps below to configure your Twilio account and connect it to MessageHub.
Step 1: Set Up Your Twilio account
Log in to your Twilio Console at twilio.com/console.
On your Twilio Dashboard, find and copy your Account SID and Auth Token. You'll need these later in MessageHub.
If you don’t already have a number, you’ll need to purchase one that supports SMS before continuing. In the sidebar, go to Phone Numbers → Manage → Buy a Number and purchase a number that supports SMS.
Go to Messaging → Regulatory Compliance and start the registration process:
Under A2P 10DLC Overview, click Register for A2P Standard package to begin the process of unlocking U.S. message delivery.
Register your Brand.
Create a Campaign. Provide sample messages, complete all required fields, and wait for Twilio to approve your campaign.
Once approved, go to Messaging → Services and create a new Messaging Service. After creating it:
Copy the Messaging Service SID.
Scroll to the Integration section.
Paste this webhook URL: https://app.messagehub.com/twilio/callback.
Set the method to HTTP POST, then save your changes.
(Optional) Go to Account Settings → Messaging → Geo Permissions and enable other countries.
Step 2: Set Up WhatsApp Inbox in MessageHub
Fill in the Inbox Details:
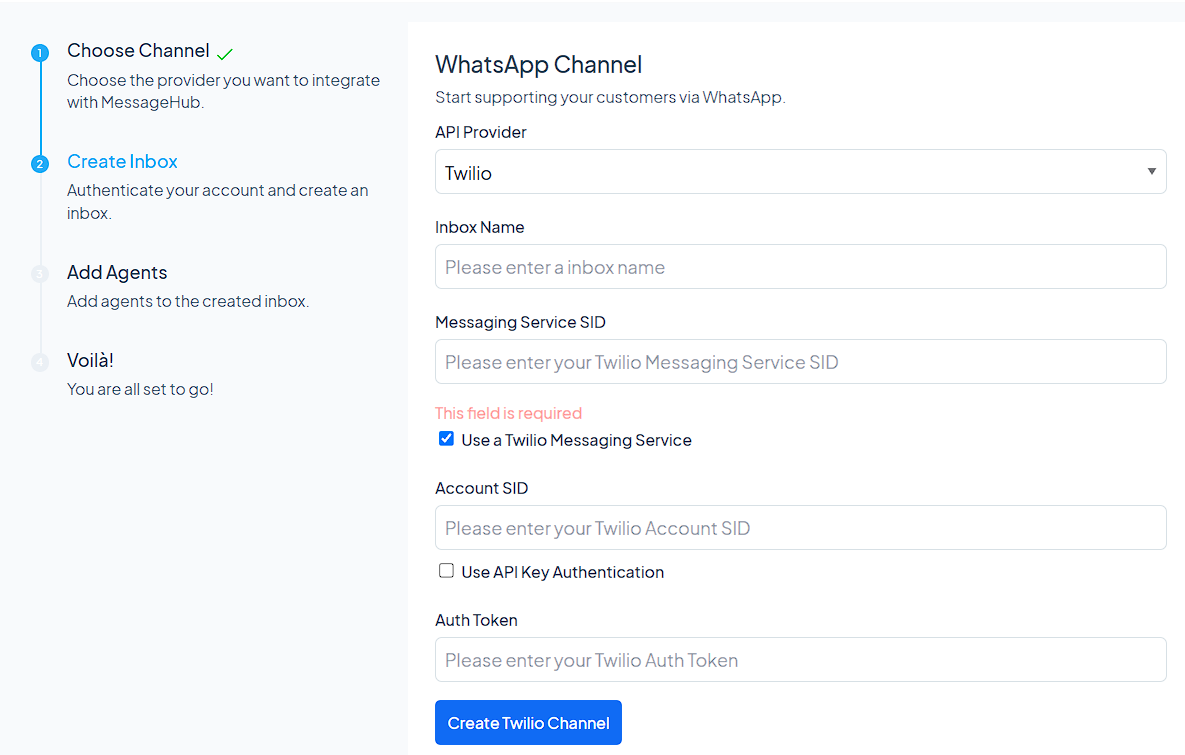
Inbox Name: Enter a name for the inbox (e.g., “Customer Support”).
Phone Number: Select Use a Twilio Messaging Service checkbox. this will change the field label to Messaging Service SID, where you must enter your Twilio Messaging Service SID.
Account SID: Copy the Account SID from your Twilio Console.
Auth Token: Copy the Auth Token from your Twilio Console.
Click the Create Twilio Channel button.
Step 3: Adding Agents
After completing the setup, you’ll be automatically directed to the Agents tab:
Use the dropdown menu to select the agents you want to assign to this inbox.
Click Add Agents to confirm.
Your WhatsApp inbox is now ready! You can manage customer interactions, assign conversations, and ensure a smooth support experience directly within MessageHub.
Configuring the WhatsApp Inbox
After adding your WhatsApp Inbox in MessageHub, you can configure its settings to manage communication efficiently and align with your team’s workflow. Follow these steps to access and customize the settings:
In MessageHub, go to Settings > Chat Inboxes.
Click the Settings ⚙️ icon next to your WhatsApp Inbox.
In the inbox settings, use the tabs at the top of the page to configure different aspects of the inbox:
Settings
Customize the basic information and functionality of your WhatsApp Inbox:.png)
Channel Avatar: Upload an image or logo to represent your inbox. This avatar will appear in conversations, adding a professional and branded look.
Inbox Name: Enter or update the name for the inbox to help you identify it within MessageHub.
Enable Channel Greeting: Use the dropdown menu to enable or disable automatic greeting messages that are sent to customers when a new conversation begins.
Enable CSAT: Toggle this option to enable or disable Customer Satisfaction (CSAT) surveys after conversations are marked as resolved.
Click Update to save any changes you make in this tab.
Collaborators
The Collaborators tab allows you to manage agents and configure conversation assignment for this inbox..png)
Use the dropdown menu to add agents who will have access to the inbox. Once an agent is added, their name will appear in the list.
To remove an agent, click the "x" icon next to their name and select Update to save your changes.
Toggle Enable Auto Assignment to allow conversations to be automatically assigned to the added agents.
Set an Auto Assignment Limit to define the maximum number of conversations that can be assigned to an agent at one time.
Click Update after making any changes to apply the settings.
Business Hours
The Business Hours tab allows you to set the team availability of your WhatsApp inbox..png)
Enable or disable business availability for the inbox by checking the Enable business availability for this inbox box.
Add an Unavailable Message for Visitors to display outside of business hours. Use the text editor to customize the message as needed.
Select the appropriate Timezone for your business from the dropdown menu.
Configure Weekly Hours by checking the days you are available and setting the specific hours. For all-day availability, check the All-Day box next to the relevant day.
Leave any unavailable days unchecked to mark them as Unavailable.
Click Update business hours settings after making any changes.
Supported Media Types
Your WhatsApp inbox in MessageHub supports a variety of media types to ensure smooth communication between agents and end-users. Below is a breakdown of the supported file types:
Audio
Supported extensions: aac, mp4, mpeg, amr, ogg
Supported for: Both end-users and agents in MessageHub.
Documents
Supported extensions:
text/plain
application/pdf
application/vnd.ms-powerpoint
application/msword
application/vnd.ms-excel
application/vnd.openxmlformats-officedocument (Word, Excel, and PowerPoint formats)
Supported for: Both end-users and agents in MessageHub.
Images
Supported extensions: jpeg, png
Supported for: Both end-users and agents in MessageHub.
Videos
Supported extensions: mp4, 3gp
Supported for:
mp4: Both end-users and agents in MessageHub
3gp: Only end-users
Stickers
Supported extensions: image/webp
Supported for: Only end-users
Frequently Asked Questions (FAQ)
How to configure multiple numbers under a single Facebook App?
If you're managing multiple WhatsApp numbers under a single Facebook App, note that Facebook only supports one webhook endpoint per app. To configure multiple inboxes in MessageHub:
Create inboxes in MessageHub for each number.
Use the webhook URL provided in MessageHub for just one inbox and replicate this configuration across all other inboxes.
What types of WhatsApp templates are supported?
MessageHub supports only text-based WhatsApp templates. Media headers and custom components (e.g., buttons or forms) are currently not supported and will not appear in the template selector.