An Instant Affiliate Link is a ClickFunnels feature that instantly provides newly registered affiliates with a unique referral link, allowing them to start promoting immediately. ClickFunnels simplifies this process with a Default Affiliate Registration Framework, which automates link generation on the Thank You page. In this article, you’ll learn how to import the Default Affiliate Registration framework and enable Instant Affiliate Links in ClickFunnels.
Requirements
An active ClickFunnels account
The Affiliate Center app added to the workspace
Available on the Optimize and Dominate plan
An Affiliate Campaign created in the Affiliate Center app
A Commission Plan assigned to the Affiliate Campaign
What is an Instant Affiliate Link
Instant Affiliate Links ensure that new affiliates get their unique tracking link as soon as they register. This improves onboarding efficiency and enables them to promote your affiliate campaign immediately without waiting for manual approvals or additional setup steps.
Example:
A new affiliate signs up on the registration page and is immediately redirected to the Thank You page, where they see their unique link, such as https://www.yourdomain.com/?aff=12345.
Step 1 - Import the Default Affiliate Registration Framework
ClickFunnels offers a Default Affiliate Registration Framework, including the necessary pages and an attached workflow to register affiliates automatically.
📥 Download:Click here to import the Default Affiliate Registration Framework to your workspace.
Open a web browser (such as Chrome, Firefox, Safari, etc.) and click on the shared link.
If you are not already logged in, you will be prompted to log into your ClickFunnels account. If you do not have an account, you must create one.
Once logged in, you can choose which workspace you want to import the components into. Alternatively, you can create a new workspace for the imported Framework.
When the importing is completed, a success window will appear. Click View to access the signup funnel.
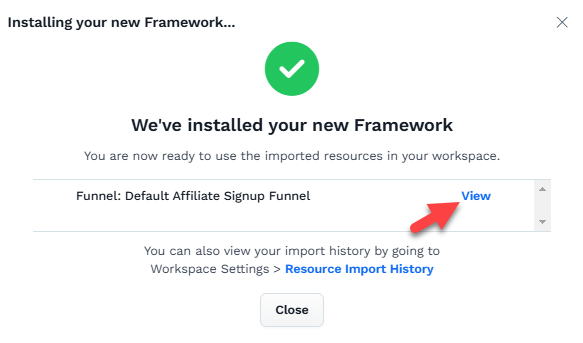
This funnel consists of:
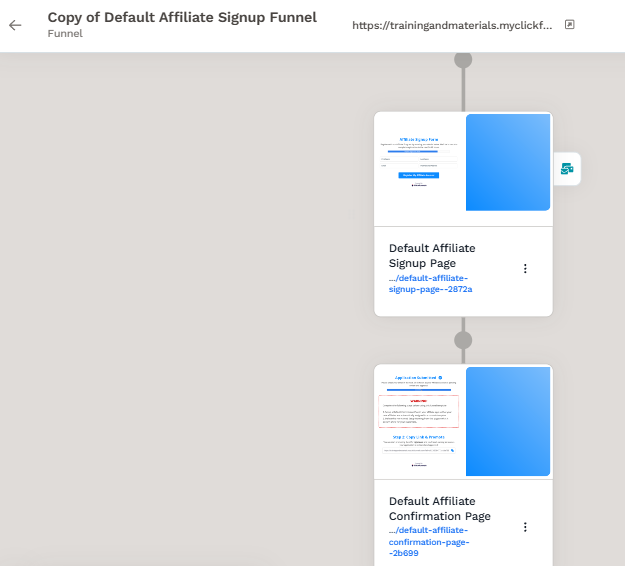
Affiliate Registration Page – Where new affiliates sign up.
Affiliate Confirmation Page – Automatically displays the affiliate’s unique referral link after registration.
Automated Workflow – Manages the automation of affiliate contact registration.
You can customize the design and content of the framework components according to your brand’s needs.
Step 2: Customize the Thank You Page for Instant Link Generation
The Thank You page in the default funnel includes three key sections: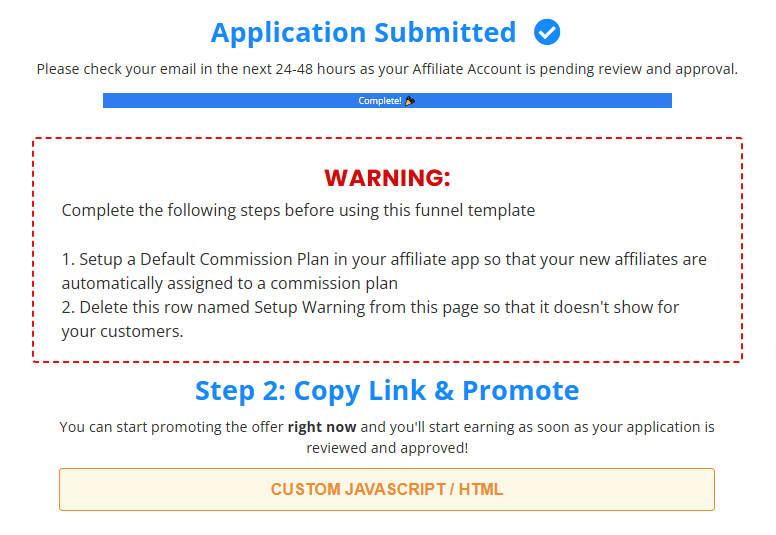
Thank You Message – Confirms the registration submission.
Warning Row – Provides prerequisites before publishing the funnel.
Tips:
The Warning Row is intended for your reference only. Please ensure that this row is removed prior to publishing and sharing this funnel with your affiliates.
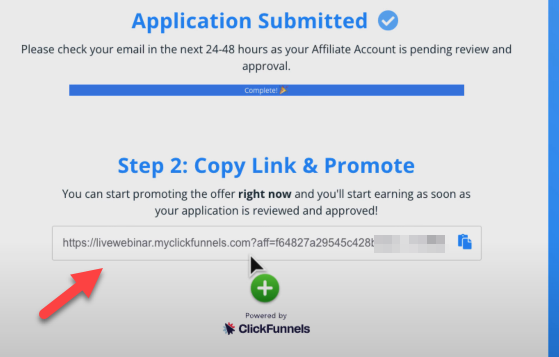
Promotion Section – Contains a Custom Javascript/HTML element with pre-configured code to generate and display the affiliate’s link.
How the Promotion Section Generates the Affiliate Link
The custom code in the template includes an HTML container for the affiliate URL and JavaScript code for automatic affiliate link generation. By default, this code generates the URL based on the domain connected to your affiliate registration funnel.
https://www.yourdomain.com/?aff=12345
Important:
The code will generate the affiliate link (e.g.,
https://www.yourdomain.com/?aff=12345) with the domain linked to the Default Affiliate Registration Funnel. After importing the funnel into your workspace, you can link the same domain that is connected to the sales funnel you want your affiliates to promote.
For example, ifwww.example.comis assigned to a cart funnel as the default domain, you can configure the Default Affiliate Registration Funnel to usewww.example.comin its settings. This ensures that affiliates will automatically promote the cart funnel after registration.
Modifying the Custom Code for Specific Funnel URL (Advanced)
If you want to display a specific funnel URL associated with your affiliate campaigns, you must modify the custom code and insert the correct domain URL.
The custom code in the template includes an HTML code for the affiliate URL and JavaScript for automatic affiliate link generation. By default, the origin variable retrieves the domain of the current funnel, which affiliates will use in their referral links.
If you need to link to a specific funnel URL for your affiliate campaigns, update the origin variable in the JavaScript section of the code:
Example Modification: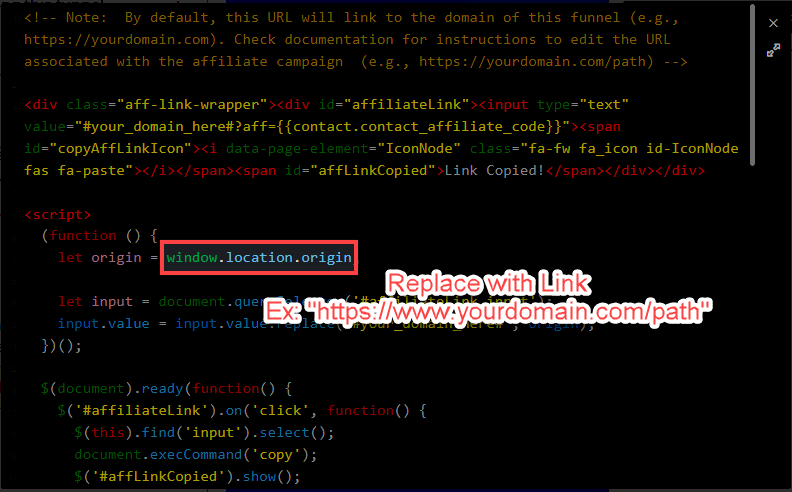
Before:
let origin = window.location.origin;After:
let origin = "https://www.yourdomain.com/path";Warning:
Always use the full URL format, including
https://, when modifying theoriginvariable (e.g.,https://www.yourdomain.com/path).Be cautious when editing the code to avoid unintended errors. Modifying or removing other parts of the script may cause the affiliate link functionality to break.
ClickFunnels team does not provide support for custom code modifications due to their complexity. If you require assistance, consider consulting a qualified developer.
Step 3 - Customize the Signup Workflow
The Default Affiliate Registration Funnel comes with an Affiliate Signup Workflow attached to the Affiliate Signup Page. This means that when someone registers as an affiliate, the automated workflow is triggered. To customize the workflow, follow these steps:
Access the Workflow from the Affiliate Registration Funnel
Click the Workflow icon next to the Affiliate Signup Page in your funnel view.
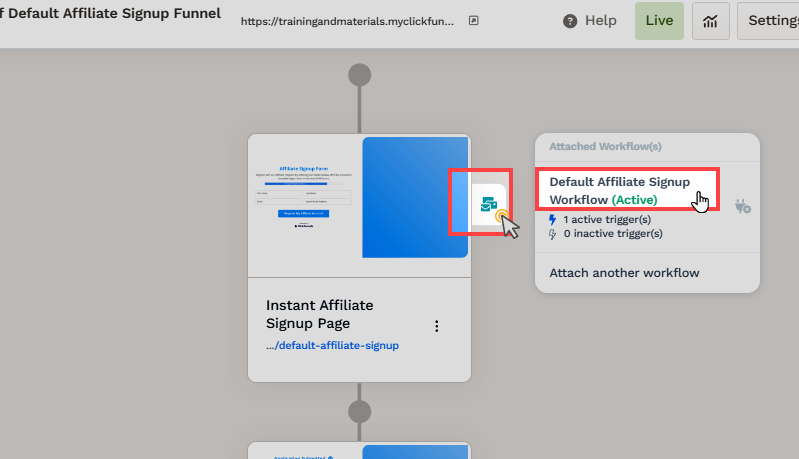
This will open the Default Affiliate Signup Workflow, which consists of two steps:
Workflow Trigger Step – This activates when an affiliate submits the signup form.
Create Affiliate Step – This automatically creates the affiliate inside your Affiliate Center app.
Assign a Commission Plan
Click on the Create Affiliate step in the workflow.
Assign one or more commission plans to the new affiliate in the Create Affiliate step. Based on the commission plans selected, relevant campaigns linked to those plans will appear in the affiliate’s dashboard.
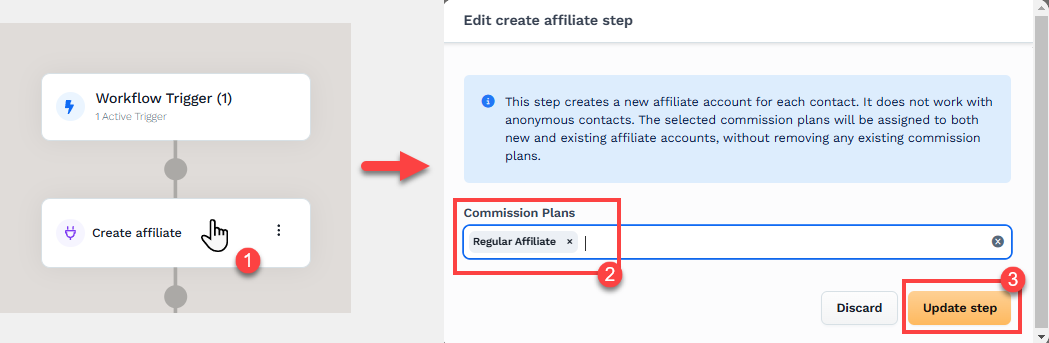
Click the Update Step to save the changes.
Note:
Even if you assign specific commission plans in the Create Affiliate step, the default commission plan set in the Affiliate Center will still apply. Additionally, if an existing affiliate signs up again, they will retain their current commission plans, with any new plans specified in this step being added to their profile.
Learn more about creating and managing commission plans in the Affiliate Center app in the article Affiliate Center - Creating and Managing Commission Plans.
Step 4 - Ensure Affiliate System Emails Are Enabled
System emails play a vital role in communicating with your affiliates during the registration and approval process.

Navigate to System Emails: From the ClickFunnels dashboard, go to your Workspace Settings and select System Emails.
Enable System Emails for Affiliates: Ensure the New Affiliate Welcome Email and Affiliate Approved Email are enabled. These emails notify affiliates about their registration and approvals.
Learn more about affiliate center system emails in the Affiliate Center - Customizing System Emails article.
Viewing Newly Registered Affiliates
Once affiliates register, you can manage and view them in the Affiliate Center:

Access Newly Registered Affiliates: Go to the Affiliate Center app, click on Affiliates, and view the list of registered affiliates.
Payout Status and Approval Process: New affiliates will initially have a Pending payout status, indicating their registration is under review. While their status is pending, affiliates can still log in to their affiliate area and promote campaigns, but payouts will only be processed after their registration is approved.