The “Conditional Goal” step in ClickFunnels workflows is a powerful feature designed to redirect contacts to a specific point in the workflow once they meet predefined conditions. Unlike other steps that require contacts to move sequentially through a series of actions, the Conditional Goal step allows you to pull contacts forward, bypassing any preceding steps that are no longer relevant once the goal is met. In this article, we will guide you through setting up the “Conditional Goal” step, configuring the conditions, and understanding its unique behavior within the workflow.
Requirements
An active ClickFunnels account
A workflow created in your workspace
Adding the “Conditional Goal” Step to Your Workflow
Navigate to the Automations app and select Workflows.
Open an existing workflow or create a new one.
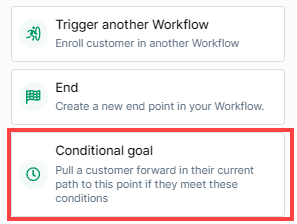
Click on the Plus Icon (+) in your workflow editor.
Select the Conditional Goal step under the Workflow category.

Configuring the “Conditional Goal” Step
Once you’ve added the “Conditional Goal” step to your workflow, follow these steps to configure it:
Set Up the Conditions:
In the configuration window, define the criteria that must be met for the contact to achieve the goal and be pulled forward in the workflow. You can set conditions based on various factors, such as whether a contact has purchased a specific product, been assigned a particular tag, or completed a certain action.
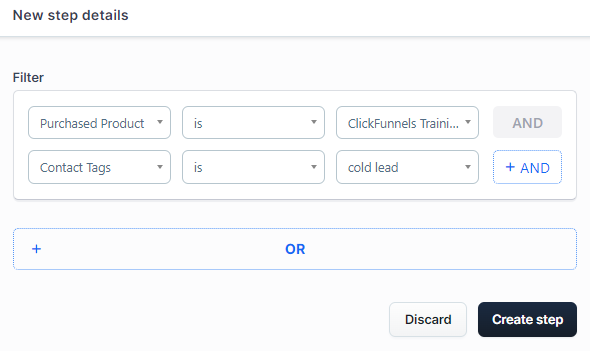
Use the +AND button to add multiple conditions that all need to be true for the goal to be achieved. If you want to include alternative sets of conditions, use the OR operator to allow the contact to achieve the goal if they meet any one of these condition groups. This setup enables you to create flexible and dynamic criteria that adapt to different contact behaviors and attributes.
Save Your Settings:
Once you’ve carefully set up the conditions, click the Create Step button to save your configurations and return to the workflow editor.
What Happens When a Goal is Achieved in the Workflow?
When you add the “Conditional Goal” step to your workflow, it acts as a powerful checkpoint that continuously monitors the defined conditions. If a contact meets the specified criteria at any point in the workflow, they are immediately pulled forward to the “Conditional Goal” step, skipping any steps in between that have not yet been completed. This ensures the contact does not continue through unnecessary or irrelevant steps once the goal is met.
Note:
If the “Conditional Goal” step is on one side of a conditional split path and a contact meets the goal criteria at any point in the workflow, they will be pulled forward to this step, regardless of where they are in the workflow. This means that the step isn’t limited to just the “yes” or “no” side of the split, it evaluates the entire workflow.
Example:
Imagine you have a workflow designed to send a series of reminder emails to contacts who have abandoned their shopping carts. You add a “Conditional Goal” step towards the end of the workflow with the condition that the contact must have completed the purchase.
If a contact completes the purchase after receiving the first reminder email, the workflow will immediately pull them forward to the “Conditional Goal” step, bypassing the remaining reminder emails.
Once the contact reaches the “Conditional Goal” step, they will continue on the path defined after the goal, which might include a thank-you email or an offer for a related product.
What Happens When a Goal is Not Achieved in the Workflow?
If a contact progresses through all the preceding steps in the workflow and reaches the “Conditional Goal” step without meeting the specified goal conditions, the workflow will continue to move forward. In this case, the contact will bypass the goal’s intended action and proceed to the next steps that follow the “Conditional Goal” step.
This means that the “Conditional Goal” step does not act as a barrier or a pause point if the goal conditions are not met. Instead, it allows the workflow to carry on, ensuring that contacts who do not meet the goal criteria can still complete the workflow journey without getting stuck at the goal step.
Practical Use Cases
The “Conditional Goal” step is highly effective in various scenarios:
Abandoned Cart Recovery: If a contact purchases a product midway through an abandoned cart sequence, the “Conditional Goal” step can skip the remaining reminder emails and move them directly to a post-purchase sequence.
Lead Nurturing: In a multi-step lead nurturing campaign, you can pull contacts forward to a final conversion step once they’ve met the desired engagement criteria, such as attending a webinar or downloading a resource.
Cross-Sell Campaigns: If a contact purchases a related product while going through a cross-sell sequence, the “Conditional Goal” step can accelerate them to the final thank-you step, skipping any unnecessary promotional steps.
Difference Between “Until Triggered” Step and “Conditional Goal” Step
Understanding the distinction between the “Until Triggered” step and the “Conditional Goal” step is crucial for effectively managing your ClickFunnels workflows. While both steps are designed to manage workflow progression based on specific conditions, they serve different purposes and behave differently within the workflow.
.png)
“Until Triggered” Step
The “Until Triggered” step is used to temporarily pause the workflow at a specific point, waiting for a predefined event or condition to occur before allowing the workflow to continue. This step ensures that the contact does not proceed to the next step until the specified condition is fulfilled or the maximum wait time has passed. The “Until Triggered” step is particularly useful when you want to ensure that a contact completes all preceding steps before moving forward.
Example Use Case: The “Until Triggered” step is ideal for scenarios where you need to deliver specific content or grant access based on a user’s actions. For instance, in an educational workflow, you might want to wait until a student completes a particular module or lesson before granting access to the next module. After the student finishes the initial lessons, the workflow pauses at the “Until Triggered” step until the completion is detected, at which point the workflow continues and grants access to the subsequent content.
“Conditional Goal” Step
The “Conditional Goal” step, on the other hand, acts as a dynamic checkpoint within your workflow. Unlike the “Until Triggered” step, the “Conditional Goal” step does not pause the workflow. Instead, it continuously monitors the contact’s actions to determine if the defined conditions have been met.
If a contact meets the goal criteria at any point in the workflow, they are immediately pulled forward to the “Conditional Goal” step, skipping any preceding steps that have not yet been completed. This feature is particularly useful for streamlining workflows and avoiding unnecessary steps once the goal has been achieved. However, if a contact completes all steps leading up to the “Conditional Goal” step without meeting the goal conditions, they will still move forward to the next steps in the workflow, even if the goal criteria were not fulfilled.
Example Use Case: The “Conditional Goal” step is especially effective in scenarios like abandoned cart recovery. For instance, if a contact starts a purchase but doesn’t complete it, you might set up a workflow with reminder emails. If the contact completes the purchase after the first reminder, the “Conditional Goal” step will recognize this and pull the contact forward, skipping the remaining reminder emails and moving directly to the next relevant step or end the abandoned cart sequence.