The Survey element in ClickFunnels lets you add interactive questionnaires to your funnels. By integrating surveys into your pages, you can gather important information from your visitors, tailor their experience, and make smarter marketing decisions. This article will show you how to add and configure the Survey element in your funnels.

Requirements
An active ClickFunnels account
Adding the Survey Element to Your Funnel
Click on Funnels in the left navigation menu of your ClickFunnels dashboard.
Select the funnel you want to edit or create a new one.
In the funnel workflow, click Edit page on the page where you want to add the survey.
In the funnel editor, click the orange ADD ELEMENT button where you want to place the survey.
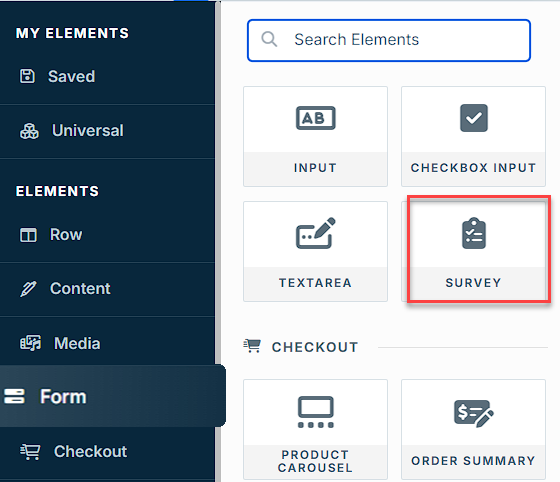
Click on Form in the elements panel.
Click on the SURVEY element to add it to your page. Alternatively, use the search bar at the top of the elements panel to quickly find the Survey element.
NOTE
Survey Workflows can be added to any ClickFunnels page type, not just Funnel Pages (this could be a Landing Page, Site Page, Funnel Page, etc…). The process for adding a survey element remains the same regardless of the page type.
Configuring The Survey Element
After adding the Survey element to your funnel, you can customize it using several important settings. follow these steps to access and customize its settings:
Click on the Survey element in your funnel page editor.
The Survey Settings panel will appear on the right side of the screen.
Now you can customize the Survey element using several important settings. Let’s dive into the most crucial ones:
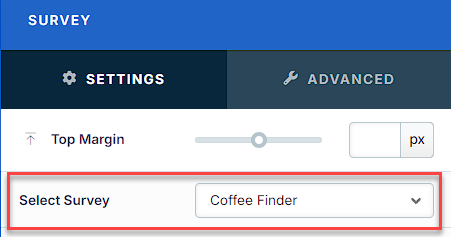
Select Survey
This dropdown menu allows you to choose which specific survey you want to display in your funnel. The options here are surveys you’ve previously created in the Survey Workflows app. By selecting a survey here, you’re linking that pre-built questionnaire to this specific element in your funnel.
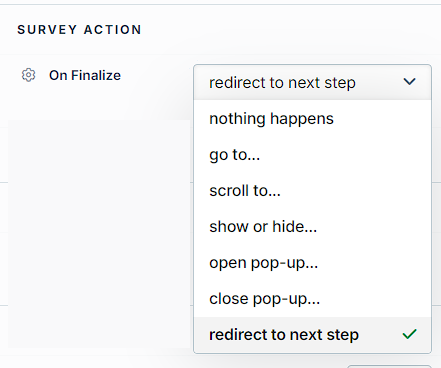
On Finalize
This setting determines what happens when a user completes the survey. You have several options:
Redirect to next step: Automatically moves the user to the next step in your funnel.
Nothing happens: The survey completes without any additional action.
Go to…: Allows you to specify a particular URL to send the user to after completion.
Scroll to…: Moves the page view to a specific section of the current page.
Show or hide…: Reveals or conceals other elements on the page based on survey completion.
Open pop-up…: Triggers a pop-up window after the survey is finished.
Close pop-up: Closes any open pop-up windows upon survey completion.
IMPORTANT
If you’ve set up Split rules in your Survey Workflow, respondents may be redirected to another funnel based on specific answers, bypassing the “On Finalize” action set here.
For more information on setting up survey workflows and Split rules, refer to our How to Create and Manage Survey Workflows article.
Survey End Text
This field allows you to customize the message displayed to respondents when they complete the survey. You can use this to thank participants, provide further instructions, or offer additional information.
Appearance
These settings control the visual aspects of your survey:
Choose the Font Family for all text in your survey.
Adjust the Size and Color of your question text.
Set the Size and Color of the answer options.
Customize Answer Active Color to specify the color that appears when an answer is selected.
Define the Hover Text Color when a user hovers over text.
Set the Hover Background that appears when hovering over answer options.
IMPORTANT
After adjusting any settings in your Survey element, remember to click the Save button at the top right corner of the page editor. It’s a good practice to save your changes regularly, especially after making significant modifications to your survey configuration.
Testing Your Survey
Before publishing your funnel with the new survey element, it’s crucial to test it thoroughly. Here’s how:
Click the Preview button at the top right of the page editor to see how your survey looks and functions.
Go through the survey as if you were a respondent, trying different answer combinations.
Check that:
All questions display correctly.
Answer options work as intended.
The progress bar (if enabled) updates accurately.
Any rules and redirects work properly.
The survey end text appears as expected.
The final action (redirect, etc.) occurs as set.
Test on different devices and browsers to ensure compatibility.
If you encounter any issues, return to the element settings or your Survey Workflow to make necessary adjustments. Always retest after making changes to ensure everything functions correctly.