Survey Workflows lets you build dynamic surveys and add them to your funnel pages. This feature helps you collect important information about your leads and create personalized experiences. You can use these surveys to learn what your customers want and improve your marketing. This article will show you how to start using the Survey Workflows feature.
Requirements
An active ClickFunnels account
The Survey Workflow app added to your workspace
What are Survey Workflows
Survey Workflows is a feature that lets you create custom surveys and add them to your funnel pages. With this feature, you can collect valuable information from your leads and customers directly within your marketing funnels.
Benefits of Using Survey Workflows:
Gather customer insights: Learn about your audience’s preferences, pain points, and needs.
Qualify leads: Use surveys to identify which leads are most likely to convert.
Personalize your marketing: Tailor your offers based on survey responses.
Improve product development: Get feedback on your products or services.
Increase engagement: Interactive surveys can boost user involvement on your pages.
Examples of how you can use Survey Workflows:
Pre-purchase questionnaire: Ask potential customers about their specific needs to guide them to the right product.
Customer satisfaction survey: Collect feedback after a purchase to improve your service.
Market research: Gather data about your target audience’s preferences and behaviors.
Event registration: Use surveys to collect attendee information and preferences for upcoming events.
Adding Survey Workflows App
From the main menu on the left, click on + Add an App to navigate to the Apps page.
Scroll down until you find the Survey Workflows app, then click on it.

Confirm your selection by clicking the Add App button.
Check out our Adding Apps to Your ClickFunnels Workspace article for detailed information on how to add apps to your navigation menu.
Creating Your First Survey Workflow
Adding Survey Workflow Questions
Access the Survey Workflows app from your navigation menu.
Click Add new survey workflow and give it a Name.
In the survey builder, add questions by clicking the + icon.
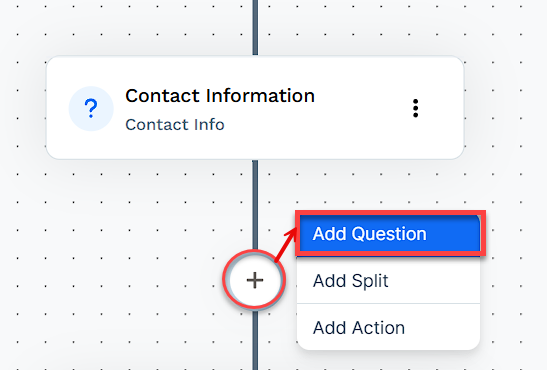
Choose from different question types: Choice, Input, Image Choice, Contact Info, Email, or Phone Number.
Enter your question headline in the provided field.
For Choice questions:
To enable scoring, toggle Enable scoring and assign scores to each answer.
Optionally, toggle Allow Multiple Answers.
Optionally, toggle Enable 'Other' Choice to add an "Other" option at the end of the list, allowing respondents to type in their own answer.
Optionally, toggle Dynamically Generate Options to automatically add typed "Other" responses to the list of options for future respondents.
Optionally, set Contact Attributes to map responses to contact profiles.
Click Add Answer to include response options.
For Image Choice questions:
Optionally, toggle Show Labels to display text labels below each image.
Select the Image Size (Small, Medium, or Large).
Optionally, toggle Enable scoring and assign scores to each image.
Click Add Answer to add images as response options.
Optionally, set Contact Attributes to save responses to contact profiles, if applicable.
Save your changes after adding each question.
For more detailed instructions on creating and managing Survey Workflows, please refer to our comprehensive article: How to Create and Manage Survey Workflows
Creating Custom Paths with Splits
Splits allow you to create custom paths through your survey based on respondents’ answers or scores, leading to more relevant data collection and improved user engagement. By using splits, you can tailor the survey experience to each respondent, asking only the most relevant questions based on their previous answers. Here’s how to use Splits in your survey workflow:
Click the + sign and select Add Split from the options.
Click the yellow ⚠ icon to access split options:
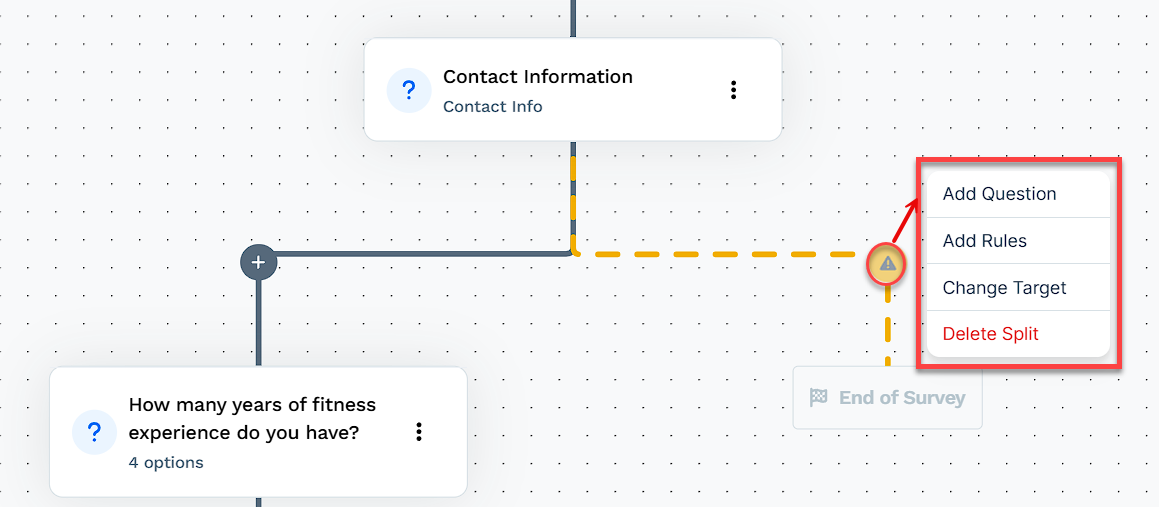
Add Question: Add a new question to the split branch.
Edit Rules: Set conditions for when this split should occur.
Change Target: Specify where to direct respondents (e.g., to different questions or to end the survey).
Delete Split: Remove the split if needed.
To set up split logic, click Edit Rules.
Choose to create rules based on specific answers, cumulative scores, or contact attributes.
Set your conditions and save the rule.
Adding Actions to Survey Workflows
Survey Workflows also allow you to automate tasks based on the responses. You can add actions to apply tags, send emails, trigger workflows, and more when a respondent answers a question in a certain way.
After adding a question, click the + icon next to it.
Select Add Action from the dropdown menu.
Choose an action, such as applying a tag, sending an email, or triggering another workflow.
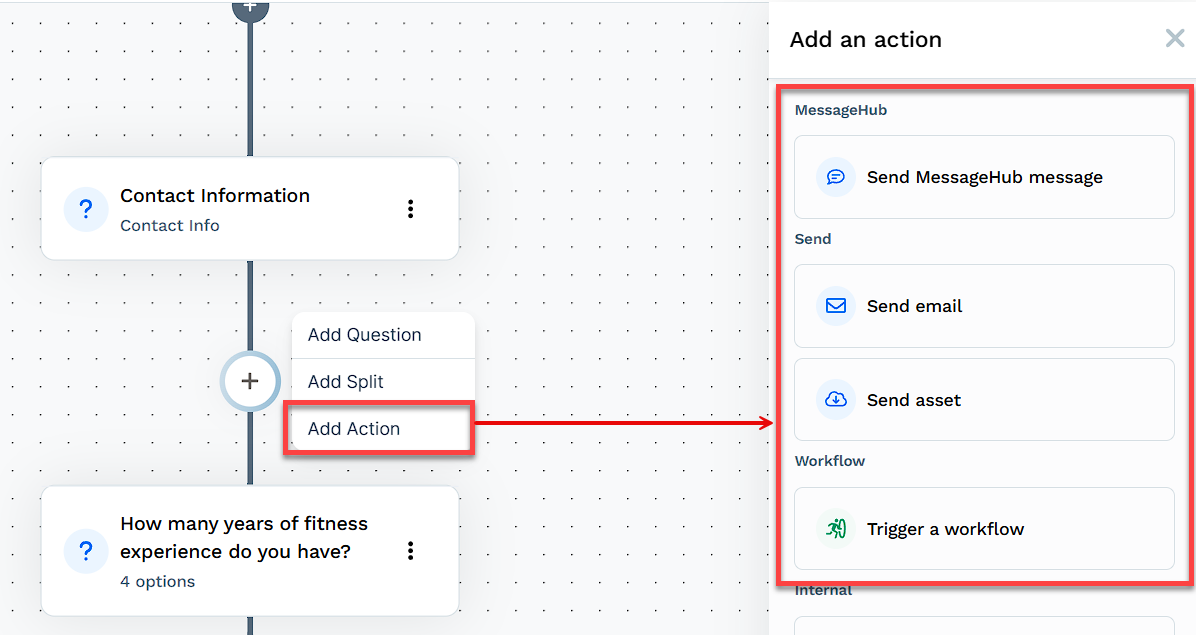
Configure the action details, then click Create action.
Set the rules for when the action should be triggered by clicking the branch icon and specifying the conditions (based on specific answers or scores).
NOTE
If you want an action to apply to all survey respondents, you don't need to set a rule.
Save the action.
These options allow you to create sophisticated survey flows that adapt to each respondent’s answers. For more detailed instructions on creating and managing Survey Workflows, please refer to the How to Create and Manage Survey Workflows article.
Adding Survey Workflows to Your Funnel
Click on Funnels in the left navigation menu of your ClickFunnels dashboard.
Select the funnel you want to edit or create a new one.
Edit the funnel page where you want to add the survey.
Click the Add Element button where you want to place the survey.
Select the Survey element from the Form section.
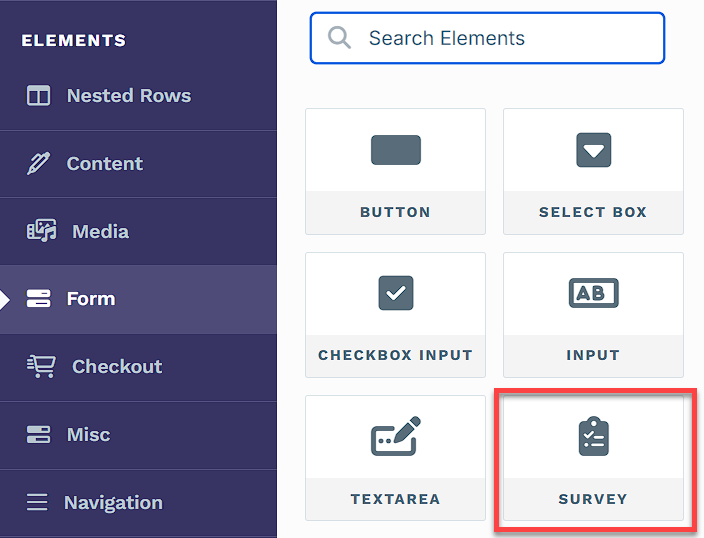
In the element Settings, choose the survey you created from the Select Survey dropdown.
Set the On Finalize action to determine what happens when the survey is completed.
Adjust appearance settings to match your funnel’s design.
Save your changes.
NOTE
Survey Workflows can be added to any ClickFunnels page type, not just Funnel Pages (this could be a Landing Page, Site Page, Funnel Page, etc…). The process for adding a survey element remains the same regardless of the page type.
To learn more about adding the survey element to your funnel, please refer to our article: How to Add and Configure Survey Element in Funnels
Testing Your Survey
Click the Preview icon at the top of the funnel editor.
Go through your survey, trying different answer combinations.
Verify that all questions display correctly and any custom paths work as intended.
Check that the final action (redirect, etc.) occurs as set.
Test on different devices to ensure compatibility.
If needed, return to the survey settings or funnel editor to make adjustments.
Remember to always test your survey thoroughly before publishing your funnel.
Exporting Survey Submissions
From the Survey Workflows page, locate your desired survey.
Click either:
The submission count under the “Submissions” column, or
The bar chart icon on the far right.
This will open the submissions list for that survey.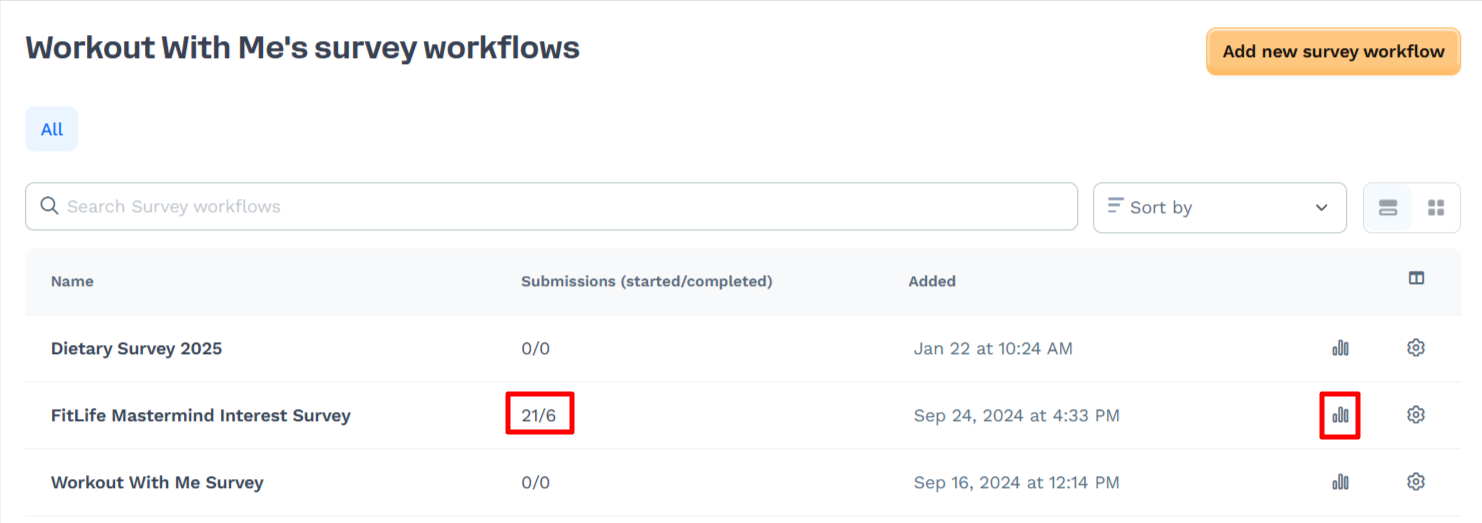
On the submissions page, click the Export button in the top-right corner.
Wait for the export to process. You'll be taken to the Export Details page once it's ready.
Click Download Export at the bottom of the page to save the file to your device.
To view previous exports:
On the submissions page, click View Export Actions (next to the Export button).
A list of all past exports will appear.
Click View next to any completed export to see details.

From the export details page, click Download Export to retrieve the file.
Analyzing Survey Results
Regular analysis of these results will help you make data-driven decisions for your business based on audience insights. Here’s how to access and interpret the data collected:
In the Survey Workflows app, find your survey in the list.
You have two options to view submissions:
Click on the number in the Submissions (started/completed) column.
Click on the graph icon to the right of the survey name.

On the submissions page, review respondents’ answers, scores, and survey completion details.
Click on a specific contact submission to see detailed responses for each question.
Look for patterns in responses to identify audience trends and preferences.
Compare the Started and Completed times to assess how long respondents spend on your survey.
Best Practices for Creating Effective Survey Workflows
Aim for surveys that take 5 minutes or less to complete. Shorter surveys typically have higher completion rates.
Begin with simple, engaging questions to encourage participants to continue.
Use clear, specific language. Avoid jargon or ambiguous terms that might confuse respondents.
Ask one thing at a time. Each question should focus on a single idea to avoid confusion and ensure accurate responses.
For Choice and Image Choice questions, offer a range of options that cover all possible responses.
Group related questions together and follow a natural progression from general to specific topics.
For multiple-choice questions, consider adding an “Other” field to capture unexpected responses.
Use splits strategically to create personalized survey experiences, showing respondents only the most relevant questions based on their previous answers.
Always test your survey before publishing to catch any errors or unclear questions.
Respect privacy by only asking for personal information that’s necessary for your survey’s goals.