ClickFunnels’ team members (also known as sub-users) feature enables you to collaborate efficiently on various projects within a workspace. As a team member, you play a vital role in enhancing productivity and ensuring seamless workflow integration. Whether you’re assisting in building sales funnels, managing websites, designing workflows, or developing courses, your contribution is essential to the project’s success.
 For example, consider a scenario where a workspace owner has created a detailed sales funnel with multiple landing pages, email sequences, and integrations. As a team member, you might be invited to bring your specialized skills to the table. You could be a freelance designer tasked with creating visually appealing landing pages, a copywriter responsible for crafting persuasive email sequences, or a marketing specialist setting up automated triggers. Your role helps distribute the workload, allowing the project to be completed more efficiently.
In this article, you will learn how to accept an invitation to join a ClickFunnels workspace and start collaborating on projects. We will guide you through the steps to accept an invitation and start collaborating effectively.
NOTE
If you already have a ClickFunnels account, you can use your existing login credentials to access and collaborate on projects within the workspace after accepting the invitation.
If you don’t have a ClickFunnels account! You can still accept the invitation and contribute to the workspace projects. No separate account creation is required.
Requirements
An active ClickFunnels account
An invitation from the account owner
Accepting The Team Member’s Invitation from the Workspace Owner
If You Have an Existing ClickFunnels Account
Follow these steps to accept the invitation and start collaborating if you already have a ClickFunnels account:
Log in to ClickFunnels: Go to the ClickFunnels login page and enter your credentials to access your account.
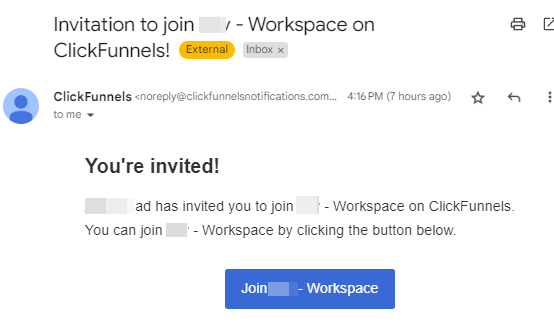
Check Your Email: In another browser tab, open your email inbox and locate the invitation email from the workspace owner.
Click the Invitation Button: Click the ‘Join.. Workspace’ button within the email to accept the invitation.
Access the Workspace: Upon acceptance, you’ll find the new workspace listed in your ClickFunnels account. To view available workspaces, click on the Workspace Navigation at the bottom left corner and switch among them for collaboration.
You are now ready to begin collaborating on projects within the new workspace.
If You Don’t Have a ClickFunnels Account
Follow these steps to accept the invitation and start collaborating if you do not have a ClickFunnels account:
Open Your Email: Open your email inbox and find the invitation email from the workspace owner.
Accept the Invitation: Click the “Join.. Workspace” button within the email to accept the invitation.
Create an Account and Set User Profile: You’ll be prompted to create a ClickFunnels account. Enter your desired username and password, and complete the User Profile information to finalize your account setup. No credit or debit card is required.
Access the Workspace: Once your account creation process is finalized, you will be automatically redirected to the ClickFunnels workspace to which you were invited.
You are now prepared to collaborate on projects within the workspace.
Exiting a Workspace After Joining
ClickFunnels allows team members to easily leave a workspace once their contributions are complete or their involvement is no longer required. This section will guide you through the simple steps to exit a workspace and maintain control over your collaborators list.
Navigate to Your Workspace: In the bottom left corner of the menu, click on your Workspace Navigation.
Access Team Settings: Hover over the desired workspace and click on Team Settings.
.png)
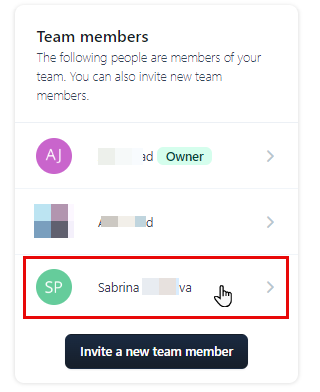
Locate Existing Team Members: Within the Team Dashboard, navigate to the Team Members section and click on your profile.

Leave as a Team Member: In the “Membership details” section, click the Leave this Team button.
Confirm the Action: A prompt will appear seeking confirmation. To proceed with the removal, click on the Proceed button.
Upon leaving the workspace, you will lose access to its contents. Should you wish to rejoin, kindly request the workspace owner to resend an invitation.
Team Member FAQs
My client wants to collaborate with me on ClickFunnels projects, but they’d prefer not to share their account login credentials. Is this possible?
Absolutely! ClickFunnels offers a “Team Member” feature that allows workspace owners to grant access to collaborators without sharing account credentials. Your client can invite you to their workspace as a Team Member or sub-user, specifying your permission level based on your role in the project.
For detailed instructions on inviting Team Members, please refer to our guide:
What should I do if I don’t receive the invitation email?
Check your spam or junk folder in case the email was filtered out. If you still can’t find it, ask the workspace owner to resend the invitation.
Do I need a paid ClickFunnels account to accept an invitation?
No. You do not need a paid ClickFunnels account to accept an invitation. You can join as a team member with a free account and start collaborating immediately.
Can I use the same ClickFunnels account to manage multiple workspaces?
Yes, you can use the same ClickFunnels account to manage multiple workspaces. Each workspace will be listed separately in your account.
What permissions will I have as a team member?
Your permissions will depend on what the workspace owner has assigned you. These can include roles such as Reader, Builder, Marketing, Support, and more.
Can I leave a workspace after joining?
Yes, you can leave a workspace at any time. To do so, go to the Team Settings in the workspace from where you want to leave and remove yourself from the workspace from the Team Members section.