The “Exit Dunning” step in ClickFunnels workflows helps businesses manage failed subscription payments and the recovery process. This step ensures that customers either update their payment details or the system marks them as exiting the dunning process after all attempts to recover the payment are exhausted. In this article, we will explain how to use the “Exit Dunning” step in a workflow.
Requirements
An active ClickFunnels account
A workflow created in your workspace
A product created with subscription pricing
What Does “Exit Dunning” Mean?
“Exit Dunning” is when a customer’s failed payment is either fixed or can’t be fixed anymore. It’s part of a process called “dunning” where the system tries to collect the payment again and contacts the customer for help.
Here’s what happens in “Exit Dunning”:
Payment Fixed: If the customer updates their payment information (e.g., expired card) and successfully pays the outstanding balance, the dunning process ends. They can resume enjoying the benefits of their subscription, like accessing an online course they were enrolled in.
Payment Can’t Be Fixed: If the system attempts to collect the payment multiple times without success, and the customer doesn’t update their payment details, the dunning process reaches its exit. This could happen due to invalid card information, insufficient funds, or the customer deliberately choosing not to pay.
Example, Imagine you have a subscription service for a music streaming platform. A customer’s credit card used for the monthly subscription payment expires. The dunning process would kick in, automatically attempting to charge the updated card.
Exit Dunning - Payment Fixed: If the customer receives a notification about the expired card and updates their payment information, the dunning process stops, and they can continue listening to their favorite tunes.
Exit Dunning - Payment Unrecoverable: If the system exhausts its retry attempts and the customer doesn’t take action, the dunning process concludes. The customer’s access to the music platform would be suspended until they resolve the payment issue.
Adding the “Exit Dunning” Step to Your Workflow
To use the “Exit Dunning” step, you must configure a workflow trigger that listens for when a recurring subscription payment is declined.
Open Your Workflow:
From your ClickFunnels dashboard, navigate to the Automations » Workflows menu.
Open an existing workflow or create a new one.
Set the Workflow Trigger:
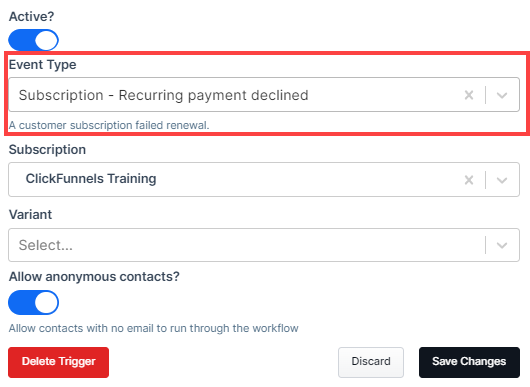
Click on Add Trigger and select Subscription Recurring Payment Declined as the event type.
Choose a specific Subscription and Variant to monitor a particular subscription plan. Leaving these fields blank will apply the trigger to all subscription products in your workspace.
Toggle Allow anonymous contacts? to decide if contacts without email addresses can run through the workflow.
This trigger starts the workflow whenever a customer’s subscription payment fails.
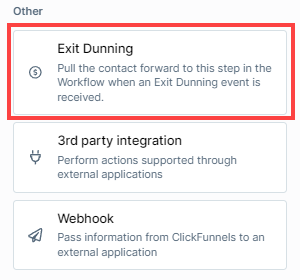
Add the “Exit Dunning” Step:
Click on the Plus Icon (+) in your workflow editor.
From the side panel, select Exit Dunning under the Other category.
Configure the “Exit Dunning” Step
After inserting the “Exit Dunning” step, you must click the “Create step” button to add it to the workflow. No specific settings are required for this step.

It automatically listens for signals from the payment processor and triggers based on two possible outcomes:
The customer successfully updates their payment details and pays the declined invoice.
The automated retry attempts are exhausted, and no payment is made.
Managing Subscription Dunning with Payments AI
The Subscription Dunning process is designed to help manage failed subscription payments effectively. During this stage, the system will attempt to communicate with the customer to ensure the payment is resolved, either through default retry attempts or customized automation rules in Payments AI.
IMPORTANT
Understanding the Importance of Subscription Dunning:
Automatic payment retries depend on rules set in Payments AI. If no rules exist, retries won’t happen. We strongly recommend configuring at least default subscription dunning rules in Payments AI to ensure automatic retry attempts for failed payments. This helps minimize subscription churn and maintain revenue. To learn more about setting up dunning rules, please visit the Payments AI official documentation: Customized Subscription Dunning
If you do not set up any dunning rule (default or custom), no retries will take place. Failed payments will simply be marked as failed and past due, but the subscription remains active, and the customer will retain access to the product. In such cases, you will need to manually monitor failed payments and either collect the overdue payments or cancel the subscription manually.
Default Subscription Dunning Rules
If you have enabled the default subscription dunning rule in Payments AI, it will make 3 retry attempts on failed payments:
The first retry occurs 3 days after the initial failed attempt, using the full amount.
The second retry is scheduled for 7 days after the first failed attempt.
The final retry happens 15 days later at 06:30:00 using the full amount.
If all retry attempts are unsuccessful, the system will proceed according to the actions defined in your Subscription Dunning Configuration for “what happens after the last failed attempt.” These actions could include canceling the subscription, marking invoices as abandoned, or other options. Ensure these actions are set up appropriately in the dunning rules within Payments AI to align with your business needs.
Customizing Subscription Dunning Rules
Payments AI allows you to customize the dunning process. If the default rules don’t meet your business needs, you can log into your Payments AI account and set up customized automation rules. For example, you can adjust the retry schedule, try partial payments, or enable backup payment methods for the retries.
Understanding the Dunning Process
The dunning process in Payments AI is designed to automatically manage failed payments through a series of retry attempts, based on the configured dunning rules (either default or custom). When a dunning rule is in place, Payments AI will notify the customer of the failed payment and initiate retries according to the specified schedule:
Successful Payment: If the payment is successful during one of the retry attempts, the customer’s subscription will continue without interruption.
Unsuccessful Payment: If all retry attempts fail, the system will take actions as defined in your dunning configuration. This may include canceling the subscription, marking invoices as abandoned, or any other actions you have configured.
Example Workflow with the “Exit Dunning” Step
In this example, we’ll show how the Exit Dunning step works in managing failed subscription payments. Please note that dunning workflows can vary, and this is just one way of handling subscription payment failures.
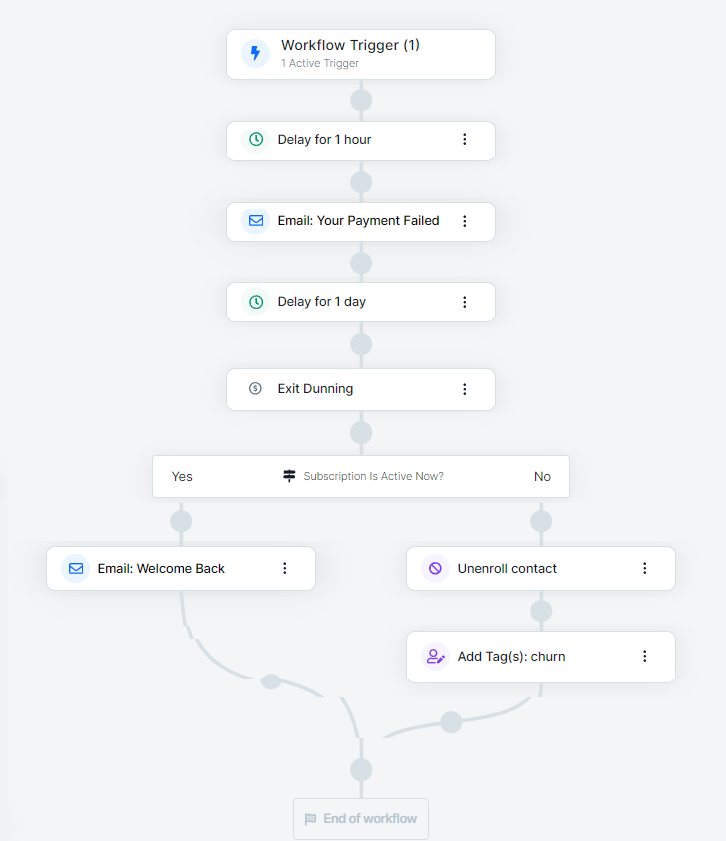
Trigger the Workflow:
Start with a trigger for Subscription - Recurring Payment Declined. This ensures that the workflow is activated when a customer’s recurring payment fails.
Communication Steps:
You may add communication steps, such as notifying the customer about the failed payment. Adding a delay (e.g., 1 hour or 1 day) before sending these messages can give the customer time to resolve the issue.
IMPORTANT
Automatic payment retries depend on rules set in Payments AI. If no rules exist, retries won’t happen. We strongly recommend configuring at least default subscription dunning rules in Payments AI to ensure automatic retry attempts for failed payments. This helps minimize subscription churn and maintain revenue. To learn more about setting up dunning rules, please visit the Payments AI official documentation: Customized Subscription Dunning
Exit Dunning Step:
The Exit Dunning step listens for either successful payment updates from the customer or the completion of the retry attempts set in Payments AI.
Conditional Logic:
Optionally, include a Conditional Split Path to check if the subscription is still active after the dunning process. Depending on the result, you can decide to re-engage customers with active subscriptions (e.g., sending a “Welcome Back” email) or take further steps like unenrolling them from your service if the subscription has been canceled.
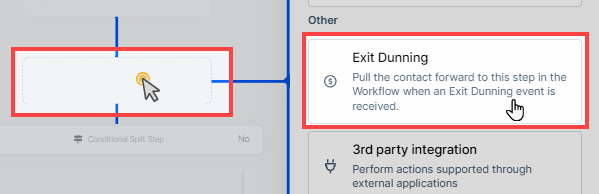
Adding “Conditional Split Path” Step After “Exit Dunning”
Adding a Conditional Split Path step after the Exit Dunning step can help you manage two different scenarios based on the customer’s payment outcome:
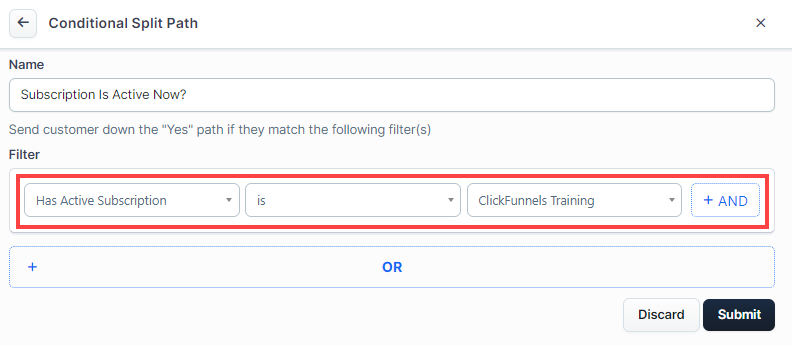
If the customer successfully pays: You can trigger additional steps, such as sending a confirmation email or providing access to the product.
If the payment retries fail: You can take alternative actions, such as tagging the customer for churn or following up with an unsubscribe step.