Workspaces in ClickFunnels help you organize projects and collaborate with team members. This article explains what workspaces are, how to use them, and how to add a new workspace to your account.
.png)
Requirements
An active ClickFunnels account
Important:
The number of workspaces you can have depends on your ClickFunnels subscription plan:
Startup Plan: Up to 3 workspaces.
Pro Plan: Up to 10 workspaces.
Understanding Your Team Workspace
Your Team Workspace is where collaboration happens. Here’s what you need to know:
What is a Team?
A team in ClickFunnels is your main account, where you and other members collaborate to manage your business. Think of it as the "headquarters" for your entire business. When you create a ClickFunnels account, you automatically create a team. Depending on your plan, you can invite more people to join your team and work together.
What is a Workspace?
A workspace is an environment dedicated to managing specific aspects of a business, such as websites, funnels, courses, or products. You can create multiple workspaces within a team account to keep everything organized and separate.
Imagine you own a business center. Inside this center, there are three distinct shops, each with its own purpose and management:
The first shop offers meals and beverages. This workspace manages everything related to its operations, including menus, pricing, and marketing strategies.
The second shop sells shoes. This workspace focuses on inventory management, customer promotions, and branding specific to its product offerings.
The third shop sells clothing. Its workspace handles a unique website, payment systems, and advertising campaigns tailored to its audience.
Each shop operates independently, with its own tools and data. However, the business center (your team account) oversees all the shops, providing a unified way to manage employees, monitor performance, and ensure smooth operations.
You can replicate this setup for your business by using workspaces in ClickFunnels. Each workspace is like a specialized shop, managing its own data, branding, and processes while remaining under the same team umbrella. This structure ensures you can focus on individual business areas without overlapping data or workflows.
Adding a New Workspace
Click on the Workspace Name in the bottom left corner of your dashboard.
If you are added to multiple teams, hover over to the Team you want to switch.
Click Team Settings.
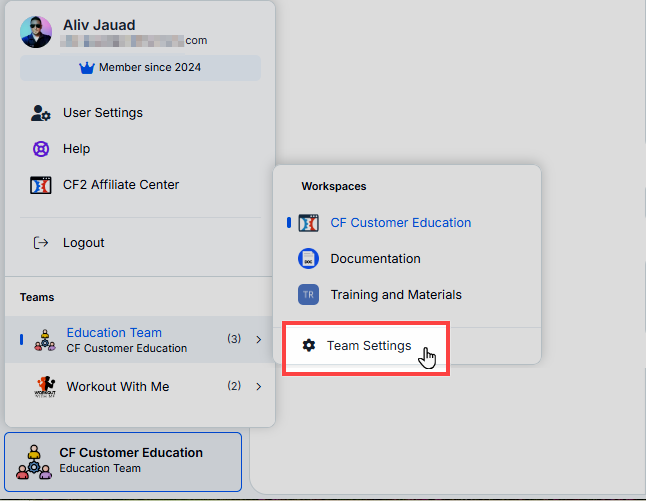
Navigate to the Team Workspaces tab in the left navigation menu.
Click Add New Workspace at the bottom right of the page.
Enter a Workspace Name.
Click Create Workspace to finalize the process.
Setting Up Your New Workspace
After creating a new workspace, you’ll need to set it up. Follow these steps:
Click on your newly created workspace on the Team Workspaces page.
Enter your business name in the My Business Name field.
Specify your subdomain in the My Subdomain field. This will create your workspace URL (https://yoursubdomain.myclickfunnels.com).
Note:
You can enter a name for your workspace subdomain linked to the domain myclickfunnels.com (for example: myblog.myclickfunnels.com). However, if the term “myblog” is already in use by another ClickFunnels user, you will need to select a different term for the default account subdomain.
You can also connect your own domain to your ClickFunnels workspace from workspace settings » Domains menu. Learn more about how to connect a domain in ClickFunnels in the article Domains - How to Connect an Existing Domain (Automated Setup).
You can optionally upload a new logo for your workspace. Click Add Logo and select an image to upload.
Click Next to proceed with the setup.
After completing these steps, you’ll be directed to your new workspace dashboard, where you can manage your projects.