ClickFunnels “Workflow” is a powerful tool for automating your marketing and communication processes, and the “Send Email” step is a crucial feature within a Workflow. This step enables you to automate the sending of emails based on specific triggers within your workspace, ensuring timely and relevant communication with your audience.
In this article, we’ll guide you through the process of adding the “Send Email” step to your workflow, customizing the email content, and ensuring your automated email sequences function smoothly.
Requirements
An active ClickFunnels account
A workflow created in the Automations app
IMPORTANT
The “Send Email” step within workflows is designed for automated email sequences. If your goal is to send a single email immediately or at a specific date and time, ClickFunnels offers a powerful Broadcast feature. Broadcasts are ideal for one-time announcements, promotions, or targeted communication. For more information on creating and sending broadcasts, refer to this helpful guide: How to Create and Send a New Broadcast.
Adding and Configuring the “Send Email” Step
Open Your Workflow:
From your ClickFunnels dashboard, click on the Automations app in the left-hand menu.
Create a new workflow or navigate to the workflow you wish to edit and open the workflow editor.
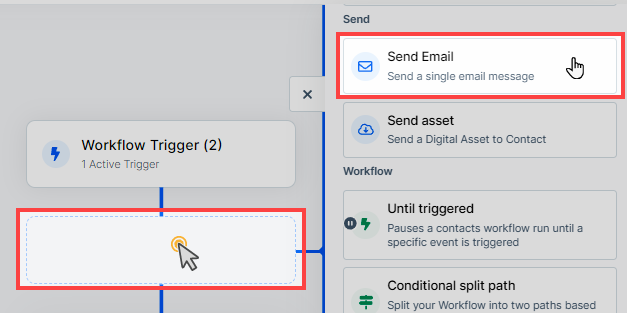
Add the “Send Email” Step:
Click on the Plus Icon (+) below the trigger to add an action.
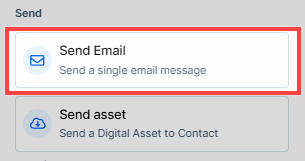
In the panel that appears on the right, select the “Send Email” option under the Send category.
Select an Email Template:
A prompt will appear asking you to choose an email template. ClickFunnels provides a variety of templates to choose from. You can select an existing template provided by ClickFunnels, choose a previously saved template, or create one from scratch. Click Choose on the template you wish to use.
NOTE
Selecting an email template within the “Send Email” step assigns it permanently to that email. Unfortunately, you cannot change the template after selection. However, you can still modify the content and design using the ClickFunnels editor. To ensure you select the most suitable template, we recommend previewing its content and design before making your choice.
Configure Email Settings:
After selecting the template, you will need to configure the email settings. Here are the details you need to fill in:
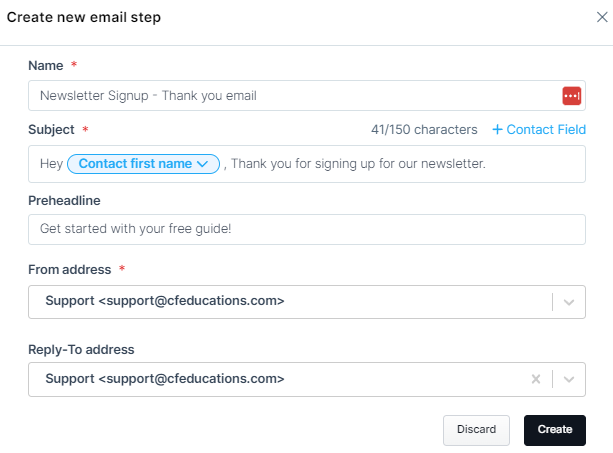
Name: Enter a name for the email step. This name will help you identify the email within the workflow. The email step name will not be visible to the recipients.
Subject: Enter the subject line of the email. This is what recipients will see as the subject of the email. You can also insert merge tags in the subject line by clicking the ”+ Contact Field” option to personalize the subject line with contact-specific information.
For example, if you use the merge tag for the contact’s first name, the recipient’s first name will be automatically inserted when the email is delivered. If the contact profile in ClickFunnels includes a first name, the system will populate it. For instance, if the contact’s name is John Doe, the subject line “Hey [Contact First Name], thanks for signing up” will be replaced with “Hey John, thanks for signing up.” If the merge tag field is missing in the contact’s profile, the system will simply ignore the merge tag space and proceed without it.
Preheadline (optional): This is an optional field where you can add a preheader text that appears after the subject line in the email inbox preview.

From address: Specify the email address from which the email will be sent.
Reply-To address: Enter the email address where the recipient’s replies will be sent.
Once all fields are completed, click “Create” to proceed.
“Send Email” Step Settings
When you click on the three-dot icon next to the email step, you will see several options. Here’s what each option does:
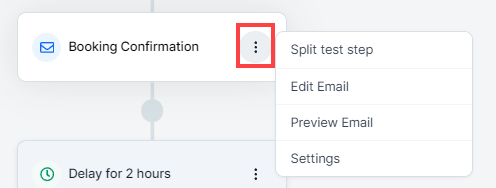
Split Test Step: This option allows you to create a split test for the email step. You can test different versions of the email to determine which performs better. When selected, the existing email will be cloned and added to the workflow. You can then adjust the split rule to determine the percentage of contacts that will receive each version of the email.
Edit Email: Opens the email editor so you can make changes to the email content.
Preview Email: Let you preview the email to see how it will appear to recipients.
Settings: Provides settings for the email step, such as step name, email subject, preheader, sender email address, and reply to address options.
Analyzing Email Step Performance
ClickFunnels provides detailed analytics for each “Send Email” step within your workflow, allowing you to track the performance of your automated email campaigns. These metrics help you evaluate the effectiveness of your email communication and optimize future campaigns. Clicking on these metrics will open a widget on the right side of the screen, displaying the list of contacts associated with each metric.

Are Here / Were Here / Was Here: These metrics show the number of contacts currently at this step (“Are Here”) or those who have completed it (“Was Here” for a single contact and “Were Here” for multiple contacts).
Sends: Shows the total number of emails sent from this step. Clicking on this metric opens a list of contacts to whom the email was sent.
Opens: Displays the number of contacts who opened the email. The percentage next to it shows the open rate.
Unique Opens: Shows contacts who opened the email for the first time, providing insights into unique interactions.
Clicks: Indicates how many contacts clicked on any link within the email, highlighting engagement and the effectiveness of your call-to-action.
Revenue: Displays the total revenue generated by contacts who clicked through the email and completed a purchase.
IMPORTANT
Please note that the email step analytics count may not always match the number of contacts listed in the open widget. This discrepancy occurs because a workflow can run multiple times for the same contact, and if the “Send Email” step is triggered more than once for that contact, it will increase the Sends/Opens/Clicks count without creating a new contact entry in the system. The analytics capture every instance an email is sent, even if it’s sent to the same contact more than once.
Searching for Specific Contacts: To quickly find whether a specific contact received the email from this step, you can use the Search bar at the top of the open widget. Enter the contact’s name or email address to see if they were included in any of the metrics, such as Sends, Opens, Unique Opens, or Clicks.
Design Your Email
The ClickFunnels Email Editor allows you to create visually appealing and effective emails using a simple drag-and-drop interface. Here’s the overview of what you can do with the email editor:
Editor Layout
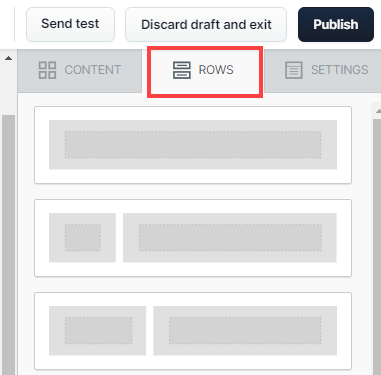
The layout of your email is built using “Rows”. Rows can contain multiple columns, and you can adjust the alignment and number of columns to suit your design needs. This flexibility allows you to create a variety of layouts for your emails.
Adding Elements
Within each row, you can add different elements to build your email content. The available elements include:

Title: Add and format titles to make your email stand out.
Paragraph: Insert paragraphs to add detailed text content.
List: Use lists to organize information in bullet points or numbered lists.
Image: Insert images to enhance your email visually.
Button: Add call-to-action buttons to encourage engagement.
Divider: Insert dividers to separate sections of your email.
Spacer: Add space between elements for better readability.
Video: Embed videos to provide dynamic content.
Icons: Use icons to add visual cues.
Menu: Insert navigational menus for more complex emails.
Text: Add and format text to convey your message.
Stickers: Add stickers to make your email more engaging.
GIF: Insert GIFs to add animated content.
Countdown Timer: Add a countdown timer to create a sense of urgency.
Note
The Countdown Timer element in the Email Editor becomes accessible when the workflow trigger is set to 'Calendar Event - Contact Registered'.
Social: Add social media icons to encourage sharing.
HTML: Insert custom HTML code for advanced customization.
Each element can be customized using its own settings. For example, you can change the font, size, and color of text elements or adjust the width and alignment of images.
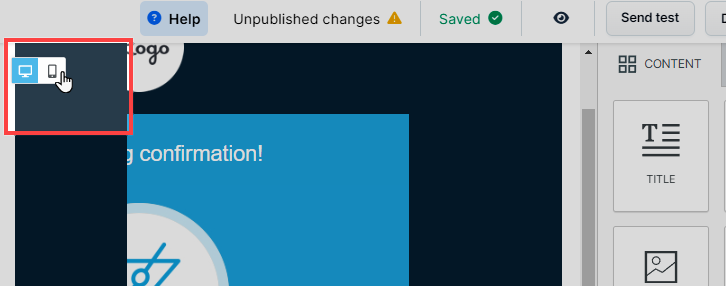
Mobile Optimization
You can view and edit your email design specifically for mobile devices within the editor. This feature allows you to ensure that your email content is optimized and looks great on mobile screens. Simply switch to the mobile view in the editor to make adjustments accordingly.
Saving and Publishing the Email

Saving as Draft: ClickFunnels automatically saves any changes made in the email editor, so you don’t need to save manually.
Discard Draft and Exit: This option allows you to discard any unsaved changes and exit the editor without saving.
Publish: Clicking the publish button will apply and save all your edits, making them the current content in the email.
Previewing Your Email
Before finalizing your email, it’s important to preview your edits to ensure everything appears as expected. The preview feature in ClickFunnels allows you to view both the draft and published versions of your email directly within the email editor. Here’s how to do it:
Preview Email: Click on the eye icon within the email editor to preview the email. This option lets you view the current draft or the published version of your email.
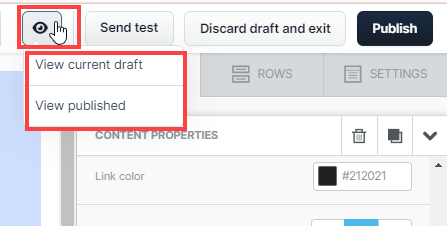
When clicked, you can review your edits for both desktop and mobile views, ensuring your email looks great on all devices. Additionally, you can see how the email will appear in both dark and light modes. Use this feature to check the layout, design, and overall appearance of your email before publishing.
Send a Test Email
Before finalizing your email, it’s crucial to send a test email to ensure everything appears as expected. Here’s how to do it:
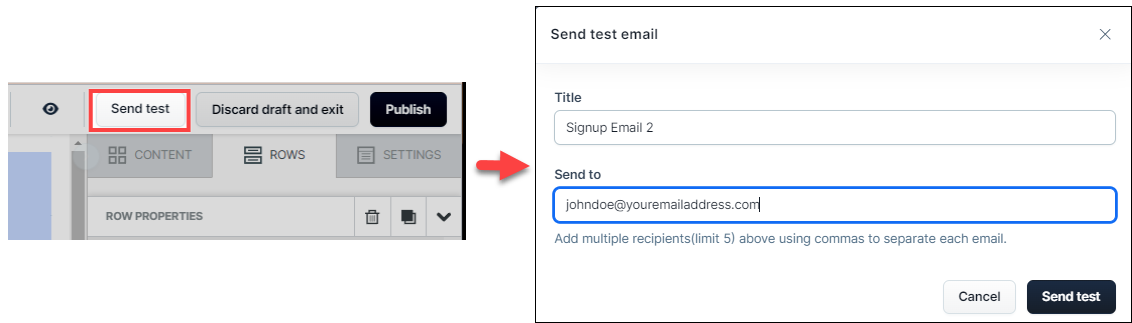
Send Test Email: Click on the “Send test” button within the email editor.
Title: In the open prompt, enter a title for the test email. This will be used as the preheader, appearing after the subject line in the recipient’s email inbox.
Send to: Enter the email addresses where you want to send the test email. You can add multiple recipients (up to 5) by separating each email address with a comma.
Once you have entered the necessary information, click “Send test”. This allows you to preview the email and make any necessary adjustments before the email goes live in your workflow.