Organizing your community effectively is key to keeping members engaged and ensuring smooth communication. In this article, we’ll cover how to create and manage Groups and Topics within the ClickFunnels Community app. By using Groups and Topics to organize your community, you can create targeted discussions that keep members engaged and make content easier to find, leading to a more vibrant and active community.

Requirements
An active ClickFunnels account
Understanding Groups and Topics
Groups: These are the main categories in your community, used to organize members around broad themes or interests. Groups help you segment discussions and content based on shared goals or topics relevant to specific segments of your audience.
Topics: Topics exist within Groups and focus on more specific discussions. They serve as conversation threads where members can interact on detailed subjects, keeping the conversation focused and organized within the group.
Examples of How to Use Groups and Topics:
A fitness business could structure its community using Groups and Topics like this:
Groups:
Beginner Workouts: A space for new members to access basic exercises and guidance.
Nutrition Tips: A Group dedicated to sharing meal plans, dietary advice, and healthy recipes.
Topics within the Beginner Workouts Group:
Daily Exercise Routines: Share workout plans and allow members to discuss their progress.
Stretching Tips: Offer tips on injury prevention and improving flexibility.
Ask a Trainer: Host Q&A sessions where members can ask fitness experts for advice.
Accessing Groups and Topics
Navigate to the Community app from the left menu.
From the Community dashboard, you’ll see a list of existing Groups and the option to create new ones.
To manage Topics within a Group, select the Group to access the Topics page.
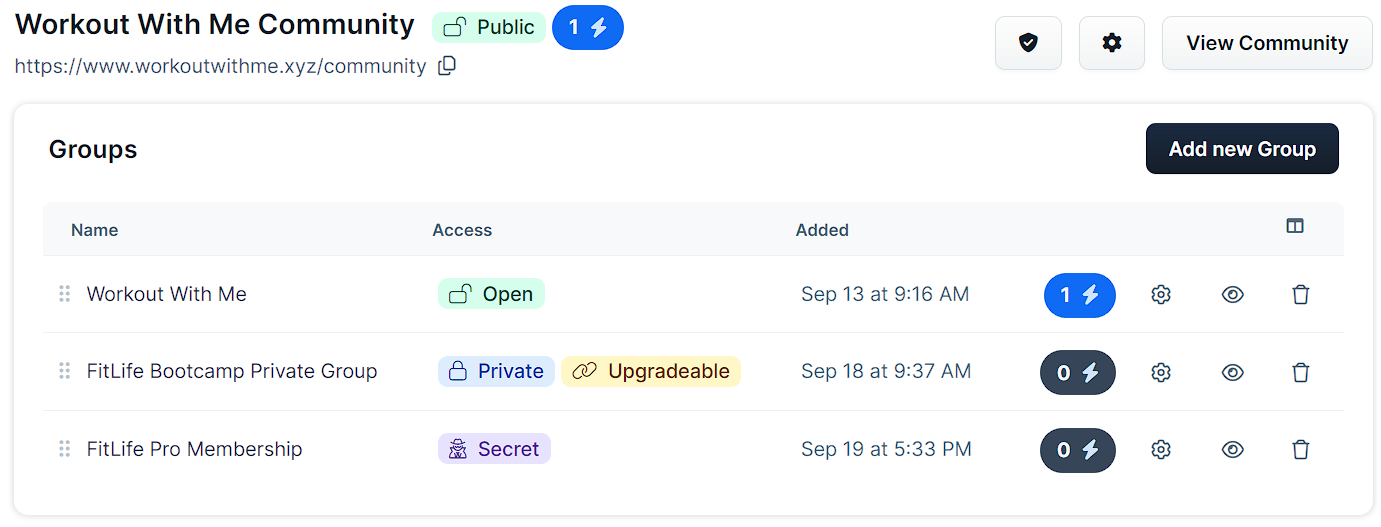
Creating a New Group
Navigate to the Community app from your ClickFunnels dashboard then select Groups.
Click Add new Group at the top right of the page.
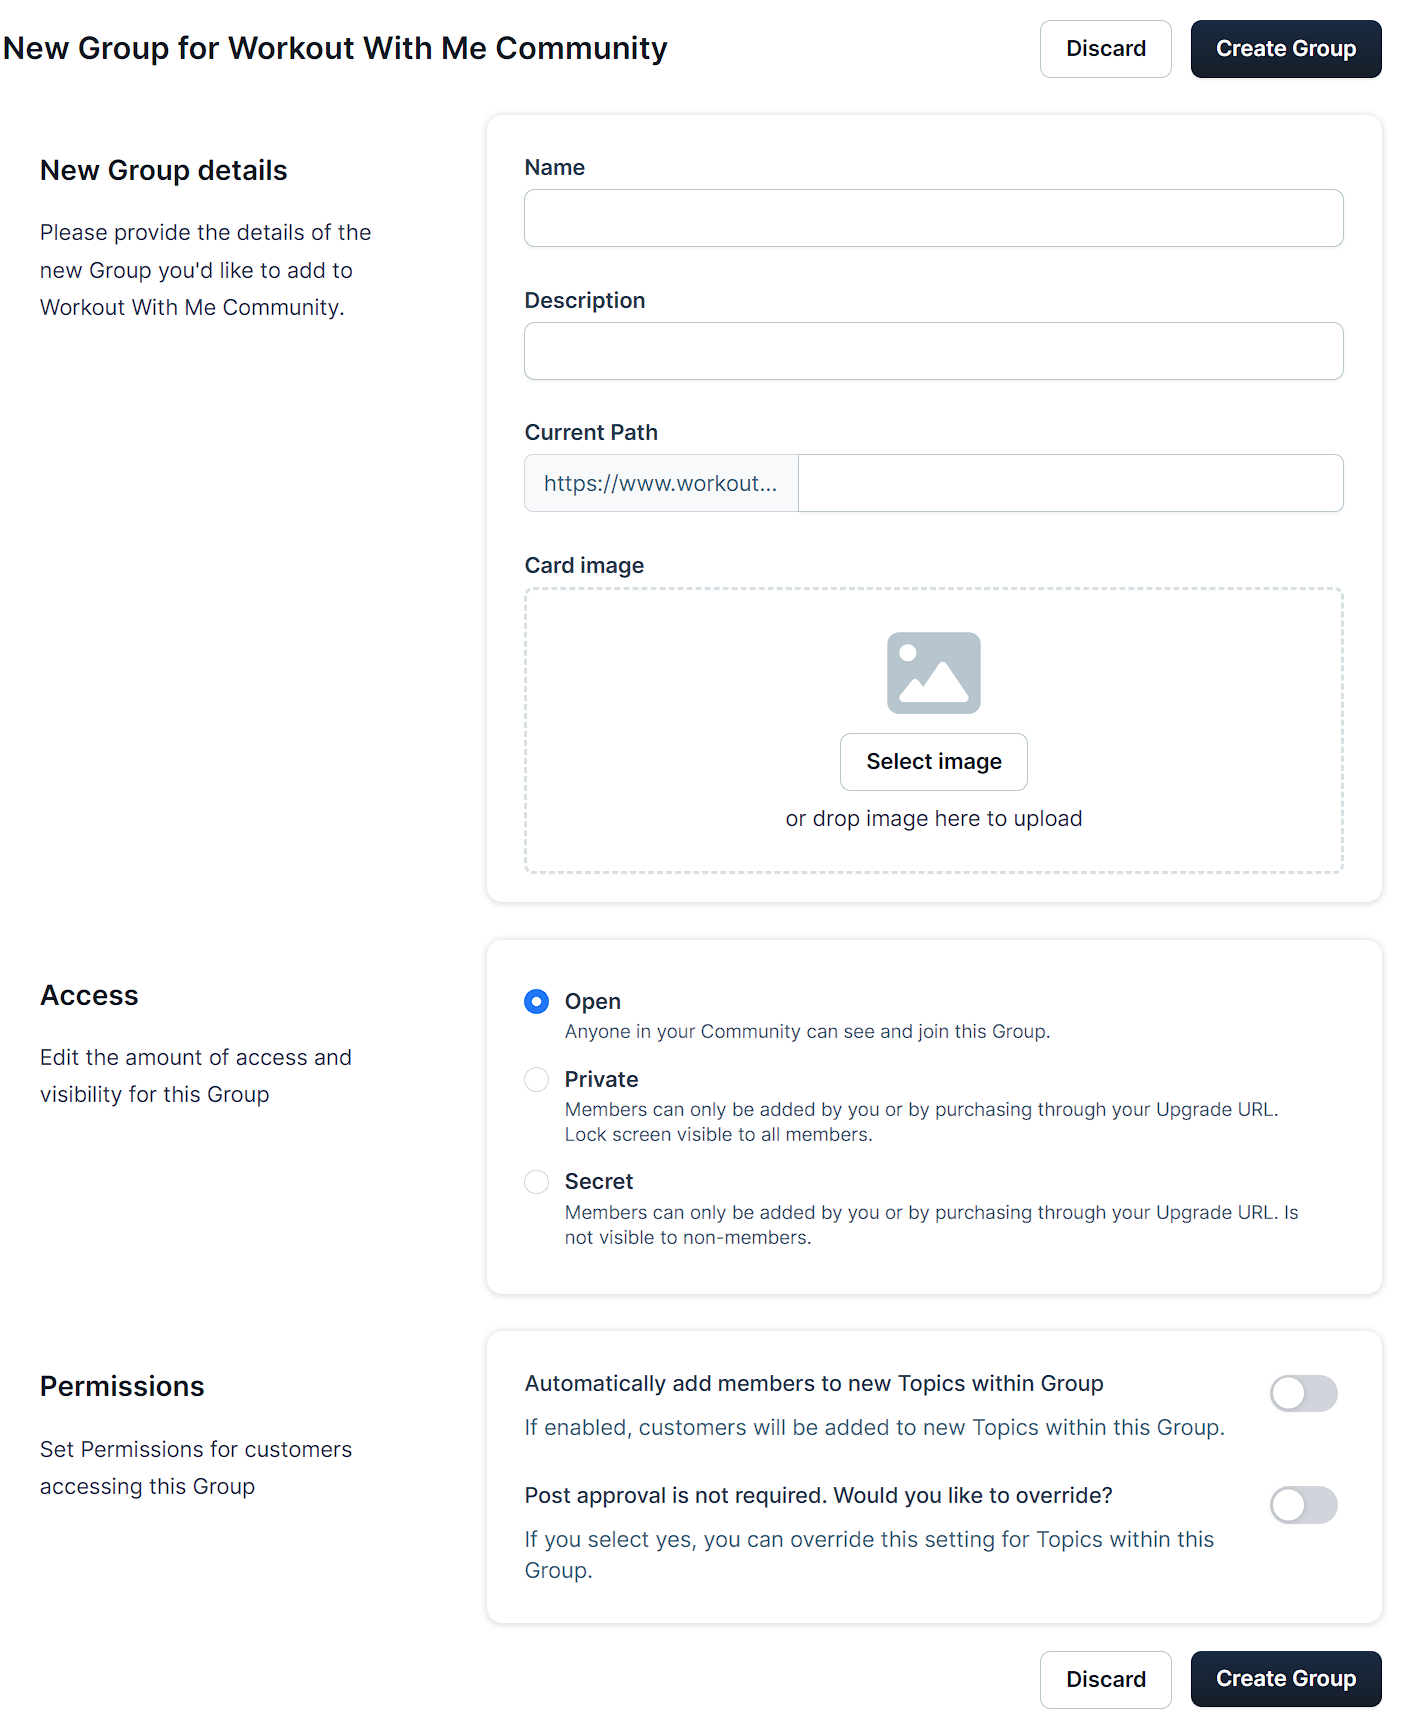
Fill in the following group details:
Name: Choose a name for your Group.
Description: Provide a short description to help members understand the purpose of the Group.
URL Path: Customize the Group’s URL path (e.g., yourdomain.com/community/s/groupname).
Card Image: Upload an image that represents your Group in the community.
Set the group’s access settings:
Open: Anyone in the community can join.
Private: Members can view the Group but need special permissions or a purchase to join. Add an Upgrade URL if necessary.
Secret: The Group is hidden and only visible to manually added members. You can add an Upgrade URL for access.
Configure Permissions:
Automatically add members to new Topics: When enabled, Group members are automatically added to new Topics created within this group.
Override Post Approvals: Choose to override community-level post approval settings for this Group.
Click Create Group to save.
Managing an Existing Group
To edit an existing group, click the Settings ⚙️ icon next to the Group name.
Update the Group details, access, or permissions as needed.
Click Update Group to save changes.
To Preview a group, click the preview icon next to the Group name.
To delete a group, click the Trash icon next to the Group name. Be cautious as deleting a Group also removes all associated Topics.

Creating a New Topic
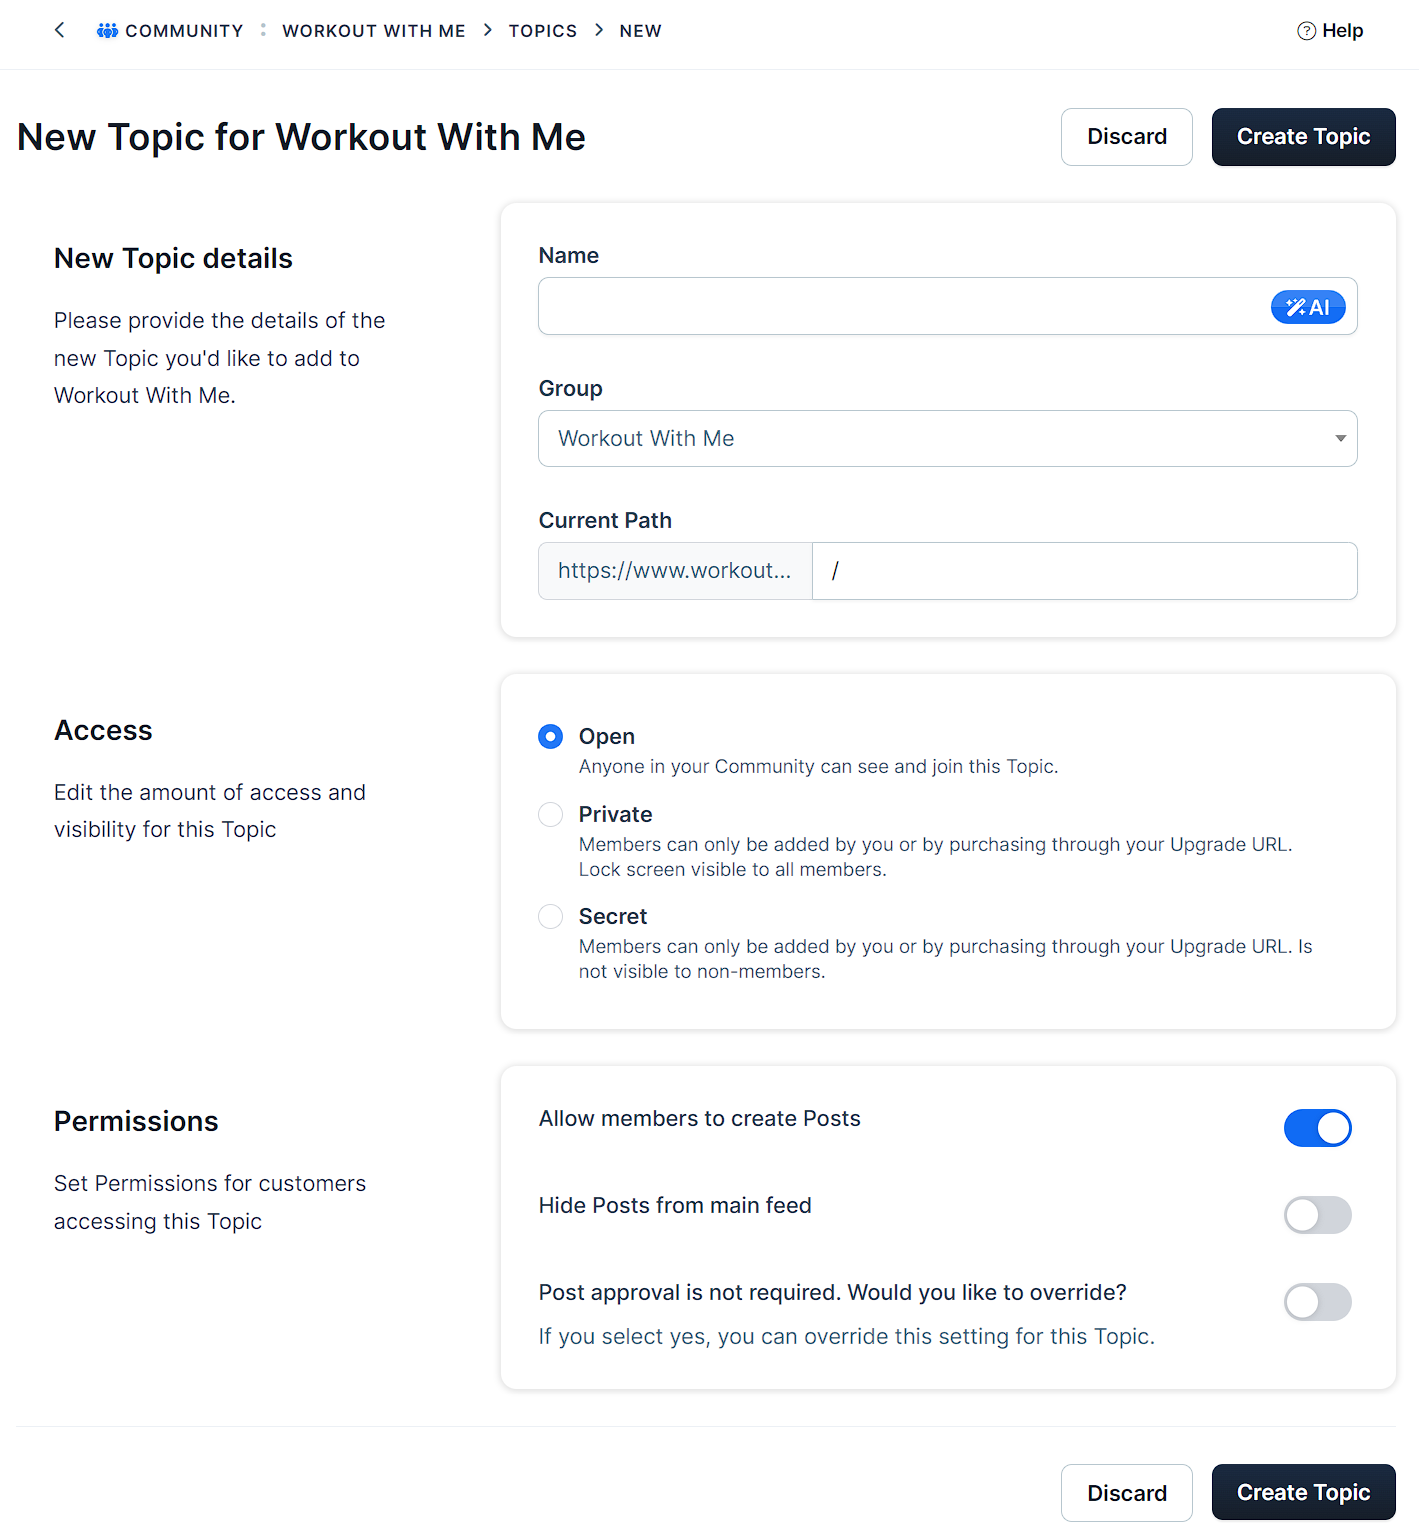
Navigate to the Group where you’d like to add a topic, then click Add new Topic.
Fill in the topic details:
Name: Enter the name of the Topic.
Group: Select the group that this Topic belongs to (if you want to move it to a different group).
URL Path: Customize the Topic’s URL path.
Set the topic’s access:
Open: Anyone in the community can see and join the Topic.
Private: Only members with specific access can join, typically through an Upgrade URL.
Secret: The Topic is hidden and accessible only to manually added members.
Configure Permissions:
Allow Members to Create Posts: Enable this option to allow members to post within this Topic. Disable it for admin-only Topics.
Hide Posts from Main Feed: Use this to hide posts from the main community feed.
Override Post Approvals: If post approvals are not required for the entire Group but needed for this specific Topic, toggle this setting.
Click Create Topic to save.
Managing an Existing Topic
To edit an existing Topic, click the Settings ⚙️ icon next to the Topic name.
Update the Topic details, access, or permissions as needed.
Click Update Topic to save changes.
To Preview a Topic, click the preview icon next to the Topic name.
To delete a Topic, click the Trash icon next to the Topic name. Note that deleting a Topic permanently removes all its posts.
Automating Groups and Topics with Quick Actions
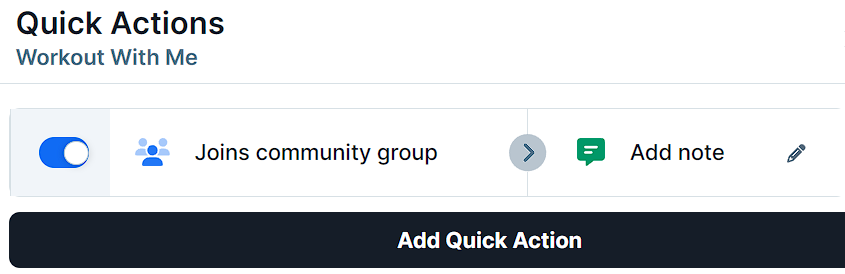
Quick Actions allow you to automate tasks based on specific events in your community. Whether it’s when someone joins a group, a topic, or creates a post, you can set up automated actions to save time and keep your community running smoothly.
Navigate to the Community app and locate the Group or Topic where you’d like to add a Quick Action.
Click the lightning bolt ⚡ icon next to the Group or Topic name to open the Quick Actions panel.
Click Add Trigger to choose what event will activate the Quick Action. The available triggers include:
For Groups:
Joins Community Group: Triggered when a member joins the group.
Creates a Post in the Group: Triggered when a post is created within the group.
For Topics:
Joins Community Topic: Triggered when a member joins the topic.
Creates a Post in the Topic: Triggered when a post is created within the topic.
After selecting a trigger, click Add Effect to define the action that will follow.
Turn on the Quick Action toggle to activate the workflow.
All Quick Actions for Community can be managed in the Automations section of your community dashboard. To learn more about Quick Actions, visit the How to Manage Quick Actions article.