Handling order fulfillment is an essential part of running a successful business. Whether you’re shipping products yourself or using a fulfillment service like Zendrop or ShipStation, ClickFunnels makes it simple to manage the entire process. In this article, you’ll learn how to fulfill orders, track shipments, and ensure your customers receive their products seamlessly.

Requirements
An active ClickFunnels account
An order ready for fulfillment
Optional: Zendrop or ShipStation integration
Understanding Order Fulfillment
Fulfillment is the process of handling and shipping products once an order is placed. Fulfillment can be managed manually through the ClickFunnels dashboard or automated through integrated services like Zendrop and ShipStation.
To ensure products appear in the Fulfillments section when orders are placed, they need to be marked as Fulfillment Required during product creation. This setting allows products to be processed for shipping.
To verify this:
Navigate to the Products section in the left-hand menu.
Click on All Products to view your product listings.
Select the product you want to manage from the list.
In the Inventory & Shipping settings, check the box labeled Fulfillment Required.
For more detailed steps on product setup, refer to the How to Create and Manage Products article.
Manual Fulfillment Process
Once an order is placed, you can manually fulfill it by providing the shipping information and tracking details. Here’s how:
Go to the Customers section in your dashboard, then select Orders and click on Fulfillments.
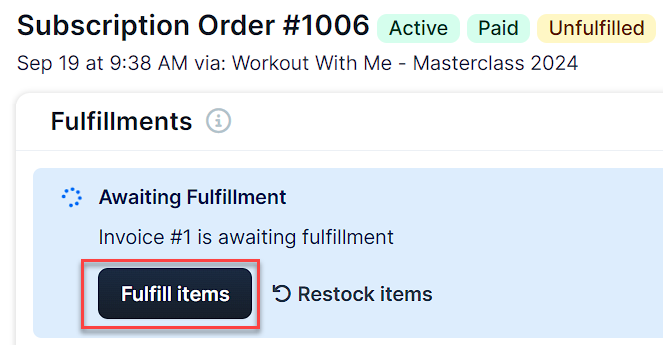
Select the order you want to fulfill and click Fulfill items.

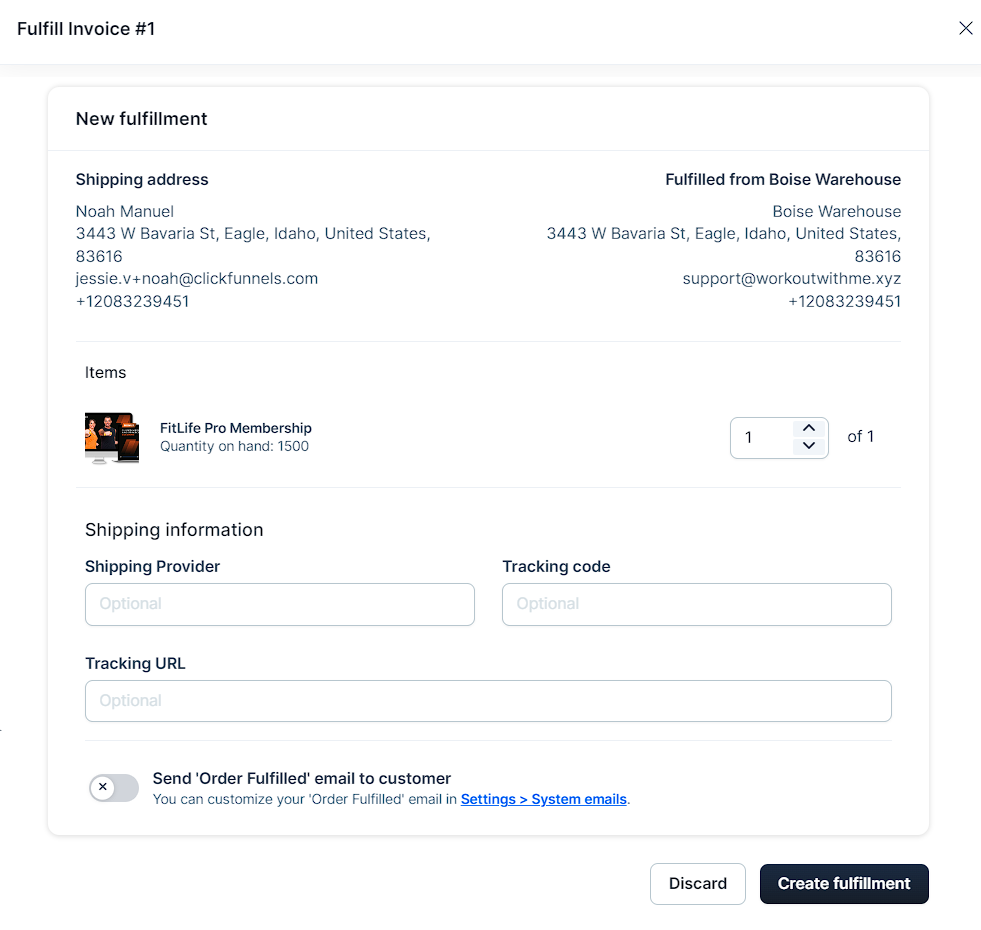
In the New Fulfillment window, review the shipping address and items.
In the Items section, review the product being fulfilled. Adjust the quantity as needed using the arrows next to the item.
Fill in the Shipping Provider, Tracking Code, and Tracking URL fields (optional).
Choose whether to send an Order Fulfilled email to the customer. For more details on customizing system emails, refer to our System Emails article.
Click Create Fulfillment to complete the process.

Once fulfilled, the order status will be updated, and the customer will be notified if you opted to send the fulfillment email.
Fulfilling Orders with ShipStation
If your account is connected to ShipStation, orders are automatically synced for fulfillment. Once an order is shipped in ShipStation, the status is updated in your ClickFunnels dashboard.
Orders are automatically sent to ShipStation once a customer completes a purchase.
The fulfillment status will sync back to ClickFunnels, showing Fulfilled in the Fulfillments section.

For more on integrating ShipStation, check out our Integration article.
Fulfilling Orders with Zendrop
If you’re using Zendrop for dropshipping, the fulfillment process is mostly automated, but you need to manage certain steps manually. Here’s how it works:
Once a customer places an order, ClickFunnels processes the payment and sends the order details to Zendrop.
In your Zendrop dashboard, go to the Orders tab to manage the new order.
Pay Zendrop for the product and shipping fees to fulfill the order.
Zendrop will handle the shipping and tracking, which will automatically update in your ClickFunnels order dashboard.
For more detailed instructions, refer to Zendrop Integration article.
Viewing Fulfilled Orders
You can track all completed orders in the Fulfillments section of your dashboard. This section displays orders that have been processed and shipped.
To access fulfilled orders:
Navigate to the Customers section, then select Orders and click Fulfillments.
You’ll see a list of fulfilled orders, including details like order number, product, and shipping destination.
To view a specific fulfillment, click the gear ⚙ icon next to the order.
In the Fulfillment Details window, review the shipping address, product details, and shipping information.
Click Update Fulfillment to modify the shipping provider or tracking code.
Click Cancel Fulfillment to stop the process if needed.