The Checkout (also known as Smart Checkout) element is a specialized component in ClickFunnels that allows users to collect payments directly on their pages. It integrates seamlessly into your page, offering a customizable interface to guide customers through purchasing. Smart Checkout is designed to optimize the user experience, making it easy for customers to view and select products, enter their payment details, and complete their transactions all within one element. In this article, we will explore the available settings of the checkout element.
.png "image(123).png")
Requirements
An active ClickFunnels account
Supported pages (e.g., funnel checkout page, store checkout page)
Tips:
Before setting up and customizing the Checkout element, we recommend adding your products to the Page Settings. Adding products at this stage enables a preview of the product placeholder to appear in the editor, helping you visualize the product layout while you style the Checkout element. Learn detailed step in the article: How to Add and Manage Products in a Funnel Step.
How the Smart Checkout Works
The Smart Checkout element in ClickFunnels includes everything needed for a seamless payment collection experience. It has pre-built templates and designs that eliminate the need to manually create your checkout form. The element dynamically displays products added to your funnel step, automatically distinguishing main products from bump products.
Smart Checkout adapts based on customer interactions. For returning customers, it reduces input fields, allowing quick payment authorization without re-entering details. It detects active subscriptions for subscription products, presenting options to upgrade or downgrade instead of repurchasing. Additionally, if the customer just completed a purchase in the previous funnel step, Smart Checkout enables a one-time-offer (OTO) state, bypassing the need to re-enter payment information.
This adaptive, customer-aware functionality is why it’s called Smart Checkout.
Adding a Checkout element in the Page Editor
Inside the page editor, add a Section where you want to place the element.
Add a Row within that section.
Click the orange + Plus or Add New Element button inside the row to insert a new element.
From the Checkout category, select the Checkout element.
.png "image(124).png")
Once the Checkout element is added, you can customize its appearance to fit your page design.
Important:
The Checkout element is exclusively available for use on Store and Funnel pages in ClickFunnels, where products can be added and managed. It cannot be used in the Blog or Course editor, as these do not support product integration.
There can only be one Checkout element per page.
Choosing a Pre-Configured Checkout Template
In the Templates tab within the Checkout element settings, you can select from a variety of pre-configured checkout form designs to quickly match your brand's style and color palette. These templates provide a polished layout, allowing you to streamline your setup process by choosing a design that aligns with your aesthetic preferences..png "image(160).png")
Each template offers a unique layout and color options, so you can find one that best complements your brand. If you decide to revert to the default look after applying a template, simply use the Reset button at the top to remove any template-specific styling. This feature lets you explore different design options while maintaining control over your page’s appearance.
Customizing Checkout Element
When you hover over an element, its border will be highlighted in orange. To access an element's settings, click on the gear ⚙️ icon or click directly on the element.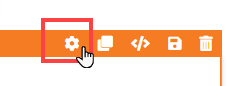
General Style
The General Styles section in the Checkout element allows you to customize the overall appearance and layout of the checkout container and input fields. This includes settings for text, backgrounds, borders, and shadows, providing control over the element’s visual design.
Container Styles:
The Container tab within General Styles controls the styles for the main checkout container.
Top Margin
Adjusts the space above the Checkout element, allowing you to control how it aligns with other page elements. The slider lets you set the exact pixel value for the margin.CTA Headline
This toggle lets you add a Call-to-Action (CTA) headline above the Checkout element. Once enabled, you can enter custom text, such as promotional messages (e.g., “Order Today to Get Free Shipping!”). You can also customize this CTA's font style, size, and color..png "image(142).png")
Text Style
Text Size: Adjusts the font size for all text within the container, ensuring readability across devices.
Text Color: Sets the color of the primary text within the element.
Font Family: Allows selection from available fonts to match your brand’s typography.
Link Color: Customizes the color for any links within the Checkout element, helping links stand out for better user engagement.
Size & Spacing
Width: Defines the width of the Checkout element, either as a percentage or pixel value.
Padding Sides: Sets the internal padding on the left and right sides of the container, adding space around the content for better visual appeal.
Background
Bg Color: This setting sets the background color for the entire Checkout element container, allowing it to blend or contrast with your page design.
Borders
Border Width: Determines the thickness of the border around the Checkout element.
Border Color: Sets the border color to complement the container background.
Corners: This control rounds the corners of the container, helping you create a softer or more defined edge.
Shadow
The Shadow settings allow you to add depth and emphasis to elements by applying shadow effects, enhancing the visual appearance. Here’s how to customize shadow properties:Style: Select one of the predefined shadow styles from your page's style guide. Click on the numbered styles (1, 2, or 3) to apply preset shadow settings defined in your style guide.
Shadow Style: Choose between Inset (shadow within the element) and Outset (shadow outside the element) to achieve the desired shadow effect.
X-direction: Adjusts the horizontal positioning of the shadow. A positive value moves the shadow to the right, while a negative value shifts it to the left.
Y-direction: This controls the shadow's vertical placement. Positive values push the shadow downward, while negative values pull it upward.
Blur: Controls the softness of the shadow edges. Higher values create a more diffused, softer shadow, while lower values keep the shadow sharp.
Spread: Adjust the size of the shadow. Positive values expand the shadow, while negative values make it narrower.
Color: Use the color picker to choose to set the shadow color.
Input Styles
The Inputs settings let you style form fields, checkboxes, and payment methods within the Checkout element.
Active Color: Choose a color for focused or active input fields, making it easier for users to identify where they are entering information.
Input Headlines: You can control the appearance of input section headlines by setting text size, color, divider color, and font family. This helps you organize information visually for a clear user experience.
Input Background & Text: Set background and text colors for input fields to ensure readability and visual harmony with the overall design.
Input Borders & Corners: Define border width, color, and corner rounding for input fields to achieve the desired look, whether sharp and structured or soft and rounded.
Checkout Steps
The Checkout Steps setting allows you to control the structure of the checkout process by choosing between a 1-step, 2-step, or 3-step format. This flexibility is essential for tailoring the checkout experience to your business needs and customer journey.
Note:
Only single step checkout can be used in the Store Checkout page.
.png "image(138).png")
1-Step Checkout
In a 1-step checkout, all fields (product selection, shipping, payment) are on one screen, making it ideal for simple transactions with minimal data requirements and a faster checkout process.2-Step Checkout
A 2-step checkout splits contact/shipping details and payment info onto separate screens. This is helpful for capturing customer details early, allowing you to follow up with abandoned cart sequences if payment isn’t completed.3-Step Checkout
The 3-step checkout divides the process into product selection, contact/shipping, and payment screens. It’s suitable for more detailed transactions, guiding customers through each step and allowing retargeting if they exit before completing payment.
When to Use Each Step Option?
1-Step: Ideal for straightforward checkouts with minimal fields.
2-Step or 3-Step: This is recommended when additional information needs to be collected upfront. If customers don't complete the payment step, this is beneficial for retargeting efforts (e.g., abandoned cart sequences).
Checkout Preview
The Checkout Preview option allows you to view the checkout process based on the selected steps (1, 2, or 3 steps). By using this feature, you can simulate the customer experience for each step:
Select the number of steps for your checkout.
Use Checkout Preview to view each step individually.
For example, if you’ve selected a three-step checkout, you can preview each screen (product selection, shipping information, and payment information) to ensure the layout and content align with your intended flow.
Additional Settings for (2-Step and 3-Step) Checkouts
When selecting a 2-step or 3-step checkout, additional customization options become available to enhance the step-by-step experience for users. These settings help personalize each stage of the checkout process, from step style and labels to colors and text size.
Style:
The Style setting lets you choose how the step indicators appear in the checkout process. There are three options:
Horizontal: This option displays the steps side-by-side at the top of the checkout container, aligning with horizontally arranged page designs.
Vertical: Stacks the steps along the left side of the checkout, suitable for vertically structured layouts.
Hidden: This option hides the step indicators entirely, presenting a clean and simplified look where only the checkout fields are visible. It can be useful when a more streamlined appearance is preferred.
Current Step Style:
Customize the appearance of the current step indicator, such as Arrow within, Scale Up, etc., which makes the active step visually prominent, adding emphasis and guiding the user’s focus.
Headline Text:
Step Text Labels: For each step, you can specify a label (e.g., Select Product, Shipping, Payment). These editable labels allow you to define each step in a way that resonates with your audience.
Font Size Adjustments: Customize the font sizes for the Headline, Subheadline, and Step Number to maintain a visually balanced and brand-aligned look throughout the checkout process.
Colors:
Active Step and Inactive Step Colors: Separate color settings are available for active and inactive steps, letting you create a distinct color contrast. This distinction helps users quickly identify which step they are on and which steps are remaining..png "image(139).png")
Background: Define the background color for active and inactive steps.
Headline: Adjust the headline color for each step to enhance readability.
Subheadline: Set a color for subheadlines to ensure consistency.
Number Background and Number Text: Customize the step number's background color and text color for clear visual separation between steps.
Privacy Text
This field allows you to add a privacy disclaimer, such as “We Never Share Your Information,” at the bottom of the checkout container. This message can reassure customers about data protection, potentially improving completion rates by building trust..png "image(141).png")
The Privacy Text is dynamically positioned based on the selected checkout step format, providing customers with reassurance about data security during the checkout process.
1-Step Checkout: The Privacy Text appears just below the main submit button, visible immediately as customers enter their information and complete the purchase in a single step.
2-Step Checkout: In a 2-step setup, the Privacy Text is displayed at the bottom of the first step, where customers provide their contact information (e.g., name, email). This ensures customers see the privacy message before proceeding to the payment stage.
3-Step Checkout: For a 3-step checkout, the Privacy Text appears in the second step, aligned with the contact information input section. This placement reinforces trust before customers advance to the final payment step.
Contact Form
The Contact Form settings within the Checkout element collect essential customer information, including name, email, and address details. This form is designed to dynamically adjust fields based on the customer’s country, ensuring a smooth and relevant user experience.
Input Fields
The Contact Form includes standard fields like First Name, Last Name, Email, and Address. An optional Phone Number field can be toggled on, depending on whether you want to collect this information from your customers. All input styles, including font and color, can be adjusted within General Styling to maintain a cohesive look across your checkout.
Shipping Information Headline
The Shipping Information Headline section allows you to add a customized title above the shipping information fields. By default, this headline is set to "Shipping Information," but you can edit it to fit your brand voice. Additionally, color and style for this headline can be modified through General Settings.
Billing Address
The Billing Address section provides flexibility in how you collect customer address information during checkout. Here's what you can do:
Disable the Billing Address Field: If you prefer not to collect billing details, you can disable the billing address field. This entirely removes the billing address requirement from the checkout form.
Choose Address Type: If enabled, you can configure the billing address to collect either a Full Address (street address, city, state, etc.) or just the Country & Postcode. Select the appropriate option under the Address Type dropdown based on your business needs.
Headline Text Customization: The section includes an editable headline field, allowing you to label the billing address section as "Billing Information" or another custom title.
In the checkout form, selecting a digital product makes the billing address fields visible, while selecting a physical product displays the shipping address fields. For physical products, users can choose to use the same address for billing or uncheck the option to enter a separate billing address..png "image(415).png")
Important:
If your funnel includes an OTO (One-Time Offer) page with a checkout element, ensure the billing address configuration matches the preceding checkout page in the funnel. For instance, if the billing address field is disabled on the main checkout page, it must also be disabled on the OTO page to prevent payment submission errors.
Dynamic Fields Based on Country
The Contact Form automatically adjusts certain fields according to the customer’s country, such as the phone number field extension, making it adaptable and user-friendly for a global audience. This dynamic setup ensures only relevant fields are displayed, creating a smoother customer experience.
Note:
If the page contains only digital products, the shipping address input fields will not appear at checkout.
Product Select
The Product Select component in the Checkout element allows you to control how products appear to customers during the checkout process. This feature provides a customizable interface for displaying products, with flexible options to match your brand and enhance user experience. Any products added to the page will automatically appear in this section, and options are available to customize individual product presentations further. Here is an example Preview:.png "image(137).png")
Edit Products:
The Edit Products button lets you manage products directly within the funnel page editor. You can add new products, modify existing ones, or delete products without needing to leave the editor. This feature streamlines product management, saving time and making updating offerings on the go easy.
Individual Product Customization:
Clicking the pencil icon next to each product allows for further customization specific to that product. Here, you can adjust settings such as:.png "image(135).png")
Product Image: Toggle the product image on or off based on your preference.
Highlight Label: Add a label like “Best Selling” to highlight certain products and capture customer attention.
Highlight Text Color: Customize the color of the highlighted text to ensure it stands out.
Product Select Headline:
You can add a headline above the product selection area, such as "Select Product." This text can be modified to align with your design preferences, including font style, color, and size adjustments in the General Settings. You can also toggle off the “Product Select Headline.” That way, the title will be hidden.
Product Select:
The Product Select feature offers three distinct layout options for presenting products. If you want the product selector hidden in the checkout form, toggle off the product select option..png "image(136).png")
Classic: A straightforward, traditional layout displaying products in a simple list format.
Modern: An updated layout with a modern design for a sleek and visually appealing presentation.
Grid: This type of display displays products in a grid layout, which is ideal for showcasing multiple products simultaneously in a visually organized way.
Advanced Settings:
In the Advanced Settings of Product Select, you can further personalize the appearance of each product card:
Headline Size: Adjust the font size of the product headline to ensure visibility and readability.
Product Description: Enable or disable product descriptions and set the text size to maintain visual balance and clarity.
Product Image Size: To optimize layout and visual appeal, control the image size within each product card, with a maximum display of 50% of the card’s width. This means that the product image size can not exceed half of the card width. You can also hide the product image by toggling off the “Product Image“ option.
Shipping Options
The Shipping Options component within the Checkout element allows customers to select their preferred delivery method, enhancing flexibility and convenience during checkout. This section provides a clear breakdown of available shipping choices and their respective costs, helping customers make informed decisions..png "image(143).png")
Shipping Options Toggle
You can enable or disable the Shipping Options as needed. When enabled, customers will see a list of available shipping methods, such as Regular or Express, with each option displaying its corresponding price.
Shipping Options Headline
The Shipping Options Headline feature allows you to customize the title for this section. By default, it is set to "Delivery Information," but you can edit it to suit your brand's tone better. Additionally, you can adjust the color and style of this headline through General Settings for a consistent look across your checkout page.
Note:
If the checkout page is configured to sell a digital product, the Checkout element will automatically hide the Shipping Options, even if they are enabled. This ensures a streamlined experience for digital purchases where no physical delivery is required.
Learn more about creating and setting up a shipping profile in the article, How to Create and Manage Shipping Profiles.
Order Summary
The Order Summary component in the Checkout element clearly breaks down the items in the customer’s cart, along with details on taxes, shipping, and the total amount. This section ensures customers have a comprehensive view of their order before purchasing, promoting transparency and reducing cart abandonment..png "image(145).png")
Coupon Field
The Order Summary includes an optional Coupon Field that can be enabled or disabled. When enabled, customers can enter a discount code, which they can apply to see an updated total instantly. This option encourages customers to complete their purchases by allowing them to apply for promotions directly within the checkout.
Learn how to create discount codes for products in the Getting Started with Discounts - Coupons at Checkout article.
Expanded View
By default, the Order Summary section is set to be Expanded, displaying all details openly to the customer. However, you can toggle this setting off if you prefer the Order Summary to appear collapsed initially, with an option for customers to expand it if they wish to review their order in detail.
Note:
If you include the Order Summary element in the Checkout page, the order summary will not be rendered within the Checkout container. Instead, the order summary will be calculated and displayed in the Order Summary element.
Payment Method
The Payment Method component in the Checkout element automatically displays the available payment options configured in your workspace and funnel settings. This component is designed to give customers flexibility in choosing their preferred payment method while allowing you to control the presentation and availability of each option..png "image(146).png")
Inputs Text Size and Font Family
At the top of the Payment Method settings, you can adjust the Inputs Text Size, which changes the font size for all input fields within the payment section. This setting ensures text readability and aligns with your page’s design. Additionally, you can select the Font Family to match your brand’s typography, maintaining a cohesive look throughout the checkout page.
Enabled Payments
The Enabled Payments section lists all available payment methods based on your workspace and funnel settings. The component automatically displays options such as Credit Card, PayPal, and Apple Pay if they’ve been set up in your account. In this section, you can:
Set Priority: Arrange the payment methods by dragging them into your preferred order. The top-listed option becomes the default payment method, guiding customers toward the primary option.
Disable Specific Methods: Toggle individual payment methods off if you prefer not to offer them on this page. For example, you can disable Apple Pay if you only want to collect payments via credit card on this checkout.
Learn more about enabling a gateway in your workspace, store, and funnel in the How to Use Payments AI within ClickFunnels article.
Order Bumps
The Order Bump component in the Checkout element allows you to offer additional products directly within the checkout flow. This feature is a great way to increase order value by encouraging customers to add complementary items to their purchases with a single click.
Edit Products:
The Edit Products button lets you manage products directly within the funnel page editor. You can add new products, modify existing ones, or delete products without needing to leave the editor. This feature streamlines product management, saving time and making updating offerings on the go easy.
Bump Styling
The Bump Styling toggle enables different layout styles for displaying order bumps:
Classic: A straightforward, minimalistic style for the order bump.
Modern: A more visually engaging, updated design.
General Styling
In the General section, you can customize various elements of the order bump:
Background Color: Sets the background color for the order bump container.
Headline Color: Defines the color of the headline text within the order bump.
Description Color: Adjust the color for the description text.
Border Color: Allows you to choose a color for the border around the order bump, making it stand out.
Link Color: Sets the color of any links within the order bump text.
Bump Arrow
You can further draw attention to the order bump using the Bump Arrow settings:
Arrow Style: Choose from different arrow styles, such as Circle, Angel, Chevron, etc, to point towards the bump.
Arrow Color: Customize the arrow color to complement or contrast with the background.
Animation: Optionally, add animation to the arrow for added emphasis.
Image
Enable or disable the Show Bump Image setting to display a product image within the order bump. This visual element helps reinforce the offer and makes the bump more noticeable.
Shadow
The Shadow settings allow you to add depth and emphasis to elements by applying shadow effects, enhancing the visual appearance. Here’s how to customize shadow properties:
Style: Select one of the predefined shadow styles from your page's style guide. Click on the numbered styles (1, 2, or 3) to apply preset shadow settings defined in your style guide.
Shadow Style: Choose between Inset (shadow within the element) and Outset (shadow outside the element) to achieve the desired shadow effect.
X-direction: Adjusts the horizontal positioning of the shadow. A positive value moves the shadow to the right, while a negative value shifts it to the left.
Y-direction: Controls the vertical placement of the shadow. Positive values push the shadow downward, while negative values pull it upward.
Blur: Controls the softness of the shadow edges. Higher values create a more diffused, softer shadow, while lower values keep the shadow sharp.
Spread: Adjust the size of the shadow. Positive values expand the shadow, while negative values make it narrower.
Color: Use the color picker to choose the shadow color.
Buttons
The Button settings in the Checkout element allow you to customize the action and style of the checkout element, providing options to adjust button text, style, and additional links for terms and conditions or down-sell options.
Button Text
In the Button Text section, you can specify the text displayed on various action buttons:
Guest Submit Text: For guest checkouts, the main button text, typically labeled "Submit" or "Complete Order," is used.
Saved Button Text: This text is used for returning customers or when users visit the checkout page in OTO mode. It might read "Rush My Order" or something similar.
Upgrade/Downgrade Button Text: For customers modifying their subscription, you can customize this button with text like "Update My Order."
Clicking the pencil icon next to each button text field allows you to further customize the button by adding both main text (the primary message) and sub-text (a secondary line beneath the main text, such as "Limited Time Offer" or "Secure Checkout"). This flexibility lets you create tailored messages that encourage customers to take action while conveying any additional details about the offer..png "image(152).png")
Submit Redirect Override
This option allows you to redirect customers to a specific URL upon form submission rather than the default next step in the funnel. When you check this option, you can insert an absolute URL (e.g., https://yourdomain.com/thank-you) or relative path(e,g, /thank-you) where the users land after submitting the checkout form.
Terms and Conditions
You can enable a Terms and Conditions checkbox to require customer consent before proceeding. This section allows you to add and format the terms text with basic editing tools (e.g., bold, italic, links), ensuring customers are informed of terms before finalizing their order.
.png "image(147).png")
Downsell Link Text
This option allows you to add a secondary link beneath the main action button, offering customers an alternative choice. For example, you might use text like "No, I don’t want this." This link can be customized with specific text and a URL that leads to the next funnel step or another designated page, providing an option for customers who choose not to proceed with the primary offer..png "image(150).png")
This downsell link is particularly useful on upsell pages. When a customer completes a purchase on the main checkout page and arrives at an upsell offer, they may not wish to take the upsell. By providing a downsell link, you can direct them to the next step in the funnel, which could be a checkout page with a downsell offer. To set up this functionality, use the special command ?next_funnel_step=true as the link action. This command retains the customer’s payment credentials from the previous session, allowing them to proceed without re-entering payment information on the downsell page.
Button Style
This section within the Buttons component allows you to fully customize the appearance of the action buttons on your checkout element. This includes setting styles for the button’s default state, as well as its appearance when hovered over or pressed.
Padding Vertical
This option lets you adjust the vertical padding of the button, controlling the height and spacing around the button text. This can be set in pixels, allowing for precise adjustments to fit your design needs.
Style Options
Choose from several predefined button styles to establish the overall look and feel of your button. These styles help you create a cohesive visual design across the checkout page.
Each button can have unique styles for three interaction states:
Default: The button’s standard appearance before any interaction.
Hover: The style that appears when a customer hovers over the button, providing visual feedback.
Pressed: The style that appears when the button is clicked or pressed, giving a tactile response.
For each state, you can customize the following:
Background Color: Set the background color to define the button’s look in each state.
Text Color: Adjust the color of the button text to ensure readability and consistency with your brand colors.
Sub Text Color: Customize any additional text that appears on the button, such as subheadings or descriptions.
Edit Button Color: Modify the button’s border color to make it stand out or blend in, depending on your design.
Primary Text Style
This section allows you to control the typography of your button text, ensuring it aligns with your brand’s aesthetic. You can select a custom font for the button text, adjust the weight for a bolder or lighter appearance, and set both desktop and mobile font sizes for optimal readability across devices. Letter spacing and line height adjustments help refine the text layout, while text casing options (such as uppercase or title case) allow you to match your brand’s style. Additionally, you can apply text decorations like underlines or strikethroughs for extra emphasis, creating buttons that are both functional and visually cohesive.
Sub Text Style
This section allows you to adjust the appearance of the sub-text on the button, including font, size, spacing, and alignment. You can modify details like margin, font style, letter spacing, and decoration to ensure the sub-text complements the main button text.
Sub Text Shadow
Toggle this setting to add a shadow effect to the sub-text, enhancing its visibility and adding depth to the button design.
Border
The Border setting lets you add a border around the button. You can adjust the color, thickness, and style to frame the button and make it stand out.
Corner
Customize the button's corner radius to create rounded or square edges. You can apply a uniform style to all corners or enable Separate Edges for independent adjustments on each corner.
Shadow
Add a shadow effect to the entire button for a layered, 3D appearance. This setting enhances visual appeal and helps the button stand out on the page.
Loading Overlay
The Loading Overlay component in the Checkout element creates a custom overlay display that appears during payment processing. This visual indicator reassures customers that their transaction is underway and prevents them from navigating away prematurely.
.png "image(155).png")
Loading Overlay Settings
Background Color and Opacity: Customize the background color and adjust the opacity to control the visibility of the page content beneath the overlay, providing a balance between transparency and focus on the loading message.
Loading Icon
Icon Style and Color: Select from various loading icon styles (e.g., long bars, Dots, Dual Rings, etc.) and choose a color that aligns with your brand. The loading icon reinforces that the checkout process is in progress.
Title and Subtitle
Title: The title is the primary text on the overlay, typically used for messages like "Processing Payment." Customize the text, size, and color to match your branding.
Subtitle: An optional line of text beneath the title (e.g., "Don’t leave this page!") that further guides customers. You can adjust its size and color to ensure readability.
Logo Image
Logo Placement: Enabling this setting displays your logo in the top-left corner of the overlay. You can upload a custom image or use the dynamic workspace logo, and adjust the size to ensure it’s visible without overpowering other elements.
Custom Settings
The Custom Settings component in the Checkout element offers additional controls for managing the checkout experience based on specific customer interactions and preferences.
Disable Input Validation on Blur: Imagine a customer is filling out the checkout form, entering their email address in an "Email" field. Normally, with input validation enabled on blur, as soon as the customer clicks outside the email field, the system would instantly check if the email format is correct. If it's incorrect, an error message might pop up, guiding the customer to fix their entry right away.
.png "image(156).png")
However, if you enable Disable Input Validation on Blur, this instant validation won’t happen. Instead, the system will wait until the customer submits the form to check for errors. This setting can create a smoother experience by minimizing on-the-spot error messages, especially if you don’t want customers to be interrupted by validation prompts as they fill out each field.
Disable OTP: Enabling this option prevents the One-Time Password (OTP) verification for returning customers. By default, ClickFunnels recognizes returning customers and sends an OTP to prefill their information for a quicker checkout. However, if you disable this setting, returning customers will not receive the OTP prompt and will proceed through checkout in guest mode, entering their information manually. By default OTO option is disabled. Here is an example preview of OTP option is turned on:
.png "image(157).png")
Enable Subscription Duplicate Detection: This option helps identify returning customers who previously subscribed to one of your products (subscription price) but later canceled. When enabled, ClickFunnels checks the customer’s information during checkout to detect any past subscriptions.
If a match is found, instead of requiring the customer to complete the whole checkout process again, the system will display a Welcome Back message offering them the option to re-activate their previous subscription directly from the Customer Center. This can save time for returning customers and improve their overall experience by avoiding duplicate subscriptions.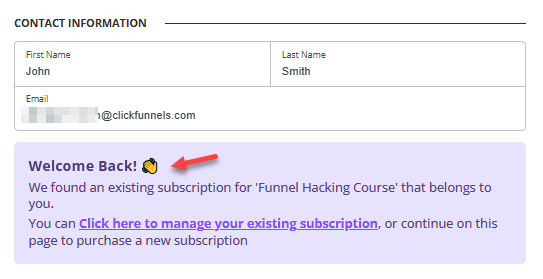
Note:
If you enable this option, we recommend also toggling on the Disable OTP option. When OTP is enabled, customers who verify it will see the Saved Checkout screen instead of the Welcome Back message. Disabling OTP ensures the Welcome Back message appears, allowing customers to quickly re-activate their subscription as intended.
Important:
The Custom Settings component is available only when Payments AI is selected as the payment processor in the funnel settings. If Stripe is set as the payment processor, the Custom Settings component will not appear in the Checkout element settings.
Text Settings
The Text Settings component in the Checkout element provides a centralized location to modify and manage all text labels and placeholders across your checkout page. Instead of navigating through each individual component, you can adjust button labels, input field names, section headlines, and other instructional text in one convenient place.
The customizable sections include:
Button Text: Change labels for actions like submitting orders or updating.
Headlines: Modify section titles such as "Contact Information," "Shipping Information," and "Payment Information."
Contact Inputs Label: Adjust the labels for fields like "First Name," "Email," and "Phone Number."
Shipping Inputs Label: Update fields related to shipping details, including "Address," "City," and "Postal Code."
Billing Inputs Label: Modify labels for billing information fields similar to shipping.
Card Payment Texts: Customize field labels like "Card number," "Expiration," and "CVV."
Summary Texts: Adjust labels related to order summary, such as "Taxes," "Discount," and "Total."
Loading Overlay: Set text for loading messages, including titles and subtitles that appear during processing.
Other Texts: Additional customizable fields, such as placeholders for "Shipping Options" and "Checkout As Guest."
Control Panel
The Control Panel appears at the bottom of every container(Section, Row, Flex, and Element) in the page editor, offering quick access to essential settings and actions for that container. Here’s what each icon represents:.png "image(47).png")
ALL: The container will be visible on all devices (desktop, tablet, and mobile).
Desktop (
🖥️ ) Icon: The container will only be visible in desktop view.Mobile (
📱 ) Icon: The container will only be visible in mobile view.Eye (
👁️ ) Icon: Use this to hide the container from the page. Once clicked, the container will be hidden in the editor but not deleted. You can click the Layout menu in the top navigation bar to find the hidden containers. Select All, Desktop, or Mobile icon to unhide in the editor.Code (</>) Icon: This icon opens the code editor, where you can insert custom CSS or JavaScript code to modify the container's behavior or styling.
Trash (
🗑️ ) Icon: Removes the container from the page editor entirely.
Advanced Settings

To further customize your container (section, row, column, and element), ClickFunnels provides Advanced settings that allow you to control style, advanced CSS, animation, and rendering logic. We’ve separated these advanced features into dedicated articles to avoid overwhelming you with too much content in one place and to keep our documentation concise. Explore the following resources for more details:
Advanced Settings - Customize Styles: Learn how to populate contents dynamically, position containers, and apply z-index.
Advanced Settings - Customize Animation: Learn how to add animations, control entry and exit effects, and adjust animation delay.
Advanced Settings - Customize Logic: Learn how to apply conditional logic to elements and add custom attributes.
Using Custom Slots to Add Block Elements Inside the Checkout Element
The Checkout element in ClickFunnels includes "custom slots," which allow you to enhance and personalize the layout by adding block elements within the checkout flow. These custom slots enable more complex, nested designs. To insert a block element, hover over any component inside the Checkout element, and an orange "Add Element" button will appear. Clicking this button opens up options for adding various block elements, such as sub-headlines, images, or text, for further customization.
.png "image(158).png")
Warning:
Avoid Adding Checkout-Type Elements: Do not insert another Checkout type element (Add to Cart, Checkout, etc) within the Checkout element. Note that there should only be one Checkout element per page.
Responsiveness Check: Adding extra elements may affect the layout on different devices. Be sure to test your design on mobile and desktop views to ensure the Checkout element remains responsive and user-friendly.