The integration of Zapier with ClickFunnels enables you to streamline workflows by linking ClickFunnels to various other applications. Through Zapier, you can transfer data from ClickFunnels to different applications and receive data back into ClickFunnels. In this article, we will detail the Zapier integration and demonstrate how to import and export data to other applications using Zapier.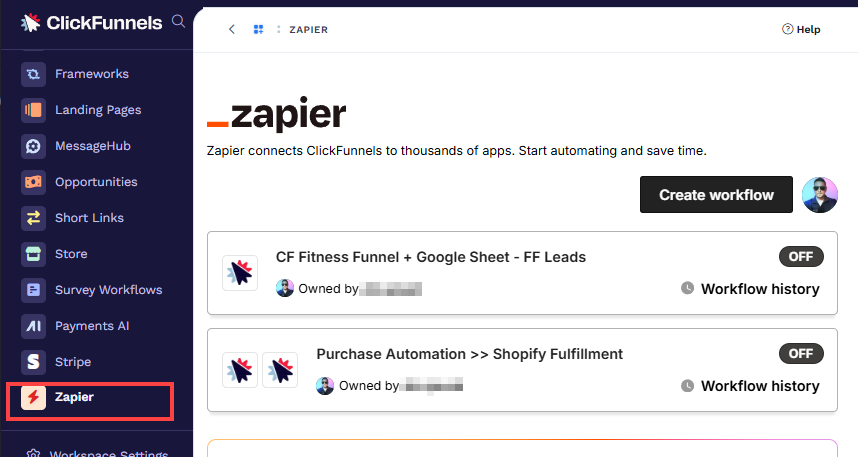
Requirements
An active ClickFunnels account
A Zapier account
What is Zapier
Zapier is a popular automation tool that allows you to connect different apps such as ClickFunnels, Gmail, Slack, Shopify and more. You can use it to automate repetitive tasks without coding or relying on developers to build the integration. ClickFunnels integrates seamlessly with Zapier, enabling you to send and receive data between the two platforms.
With the ClickFunnels Zapier integration, you can:
Trigger actions in Zapier based on events in ClickFunnels
Send data from Zapier to ClickFunnels to create or update records
When to Use Zapier with ClickFunnels
You should use Zapier when you want to:
Automate repetitive tasks between different applications.
Create workflows that involve multiple steps and applications.
Connect applications that do not have direct integrations with ClickFunnels.
Make use of triggers and actions not available with native ClickFunnels Workflows.
Avoid custom API integration and save time.
As an alternative to Make.com, N8N, Zoho Flow, Zluri, Mulesoft, etc.
Three Ways to Connect Zapier with ClickFunnels
There are three primary methods to integrate Zapier with your ClickFunnels account, each suited to different needs and levels of technical knowledge:
Using the Zapier App Inside ClickFunnels: This method allows you to manage workflows directly within your ClickFunnels account, offering a seamless and user-friendly experience.
Integrating ClickFunnels Directly in Your Zapier Account: Ideal for users who prefer to manage their workflows within the Zapier platform.
Advanced Integration Using Webhooks: Designed for advanced users familiar with APIs and webhooks, offering greater flexibility and customization.
Method 1: Using the Zapier App Inside ClickFunnels
This method provides a seamless experience, allowing you to manage workflows entirely within ClickFunnels.
Adding the Zapier App to ClickFunnels
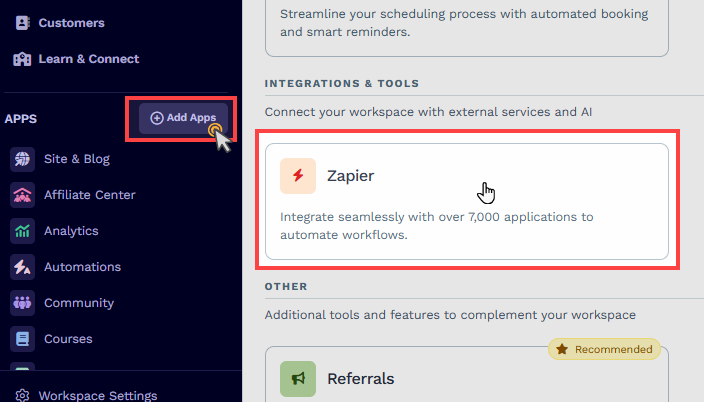
From the main menu on the left, click on + Add Apps.
Scroll down until you find the Zapier app, then click on it.
If you have an existing Zapier account, click Log In, enter your credentials, and authorize the connection.
If you don't have a Zapier account, select Sign Up to create one, then proceed with the authorization.
Note:
If you're already logged in to your Zapier account in the same browser, ClickFunnels will recognize the active session and proceed without requiring you to log in again. If you'd like to use a different Zapier account, make sure to log out of the current account first and then sign in with your desired account.
Creating a Zapier Workflow
Once the Zapier account is authorized, you can create a workflow to connect ClickFunnels with other apps. This can be done in two ways:
Create a Workflow from Scratch:
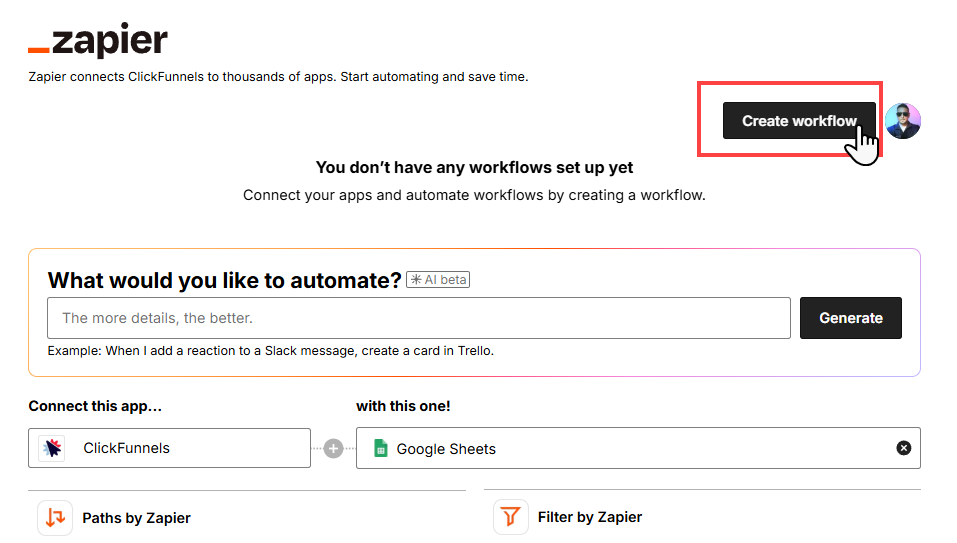
Click Create Workflow to open the Zap editor.
Select ClickFunnels as the trigger app and choose an event (e.g., "Contact Identified").
Authorize your ClickFunnels account if prompted.
Add steps such as filters to refine your workflow, paths to define outcomes, and actions to determine the next steps (e.g., sending data to Google Sheets).
Test and activate the workflow after ensuring it functions correctly.
Use Existing Popular Templates:
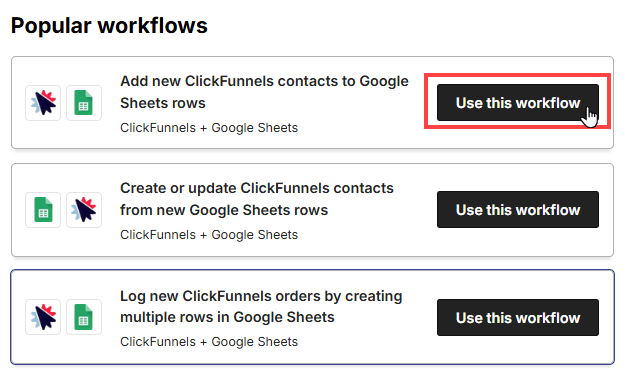
Use the Search Bar in the Zapier app to find templates by entering an app name.
For example, search for "Google Sheets" to find templates for automating data transfers from ClickFunnels to spreadsheets.
Select a template and click Use This Workflow. The template automatically configures the trigger and action steps based on your selection.
Customize the zap template further if needed, such as editing fields or adding extra steps.
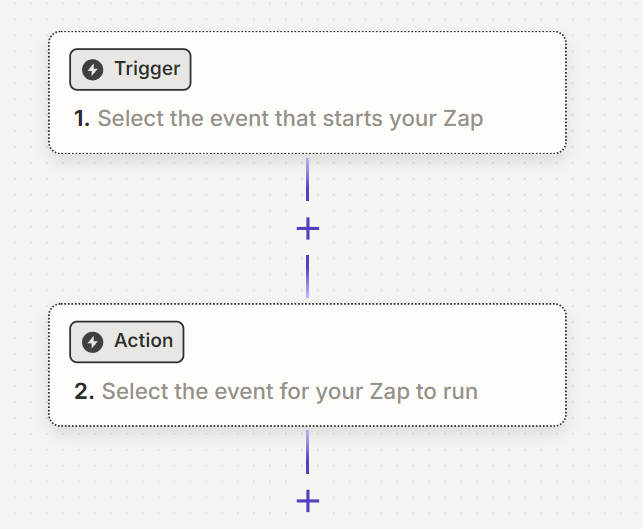
Setting Up Triggers and Actions
If you select a workflow template, ClickFunnels is added as the trigger automatically, along with any predefined actions. You can proceed to customize or test the workflow directly within the editor.
If you create a workflow from scratch, you’ll need to add ClickFunnels as the trigger manually. Choose the specific trigger event (e.g., "Contact Identified") and connect your ClickFunnels account if prompted. Next, build out the remaining steps in the zap. These may include:.png "image(663).png")
Adding filters to specify conditions for triggering the action.
Setting up paths for different outcomes based on the trigger.
Configuring actions, such as sending data to apps like Google Sheets, Slack, or Mailchimp.
Test the zap thoroughly to ensure all steps function as expected. Once the test is successful, activate the zap to automate your processes. If you select a Zap template, ClickFunnels is added as the trigger automatically, and you can proceed to configure or test the Zap.
For detailed guidance on setting up triggers and actions, refer to Method 2 in this article, which comprehensively explains Zapier's steps.
Method 2: Integrating ClickFunnels Directly in Your Zapier Account
This method is ideal for users who prefer managing their zaps within their Zapier account. This approach offers flexibility for users who are familiar with Zapier’s interface and prefer managing integrations directly. In this method, you do not need to log back into ClickFunnels after authorizing the account.
Creating a Zap in the Zapier Account
Log in to your Zapier account.
In your Zapier account, hover over the left sidebar menu and click +Create » Zaps.
The Zap editor will open, allowing you to add the Trigger and Actions.
Sending Data from ClickFunnels
To send data from ClickFunnels, follow these detailed steps:
Step 1: Setup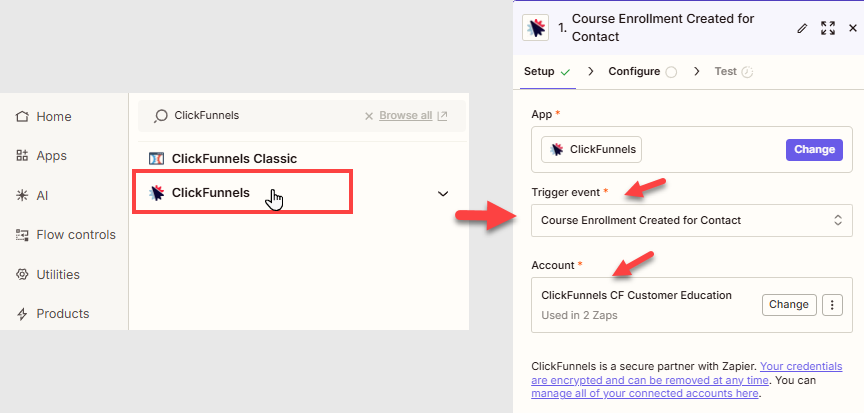
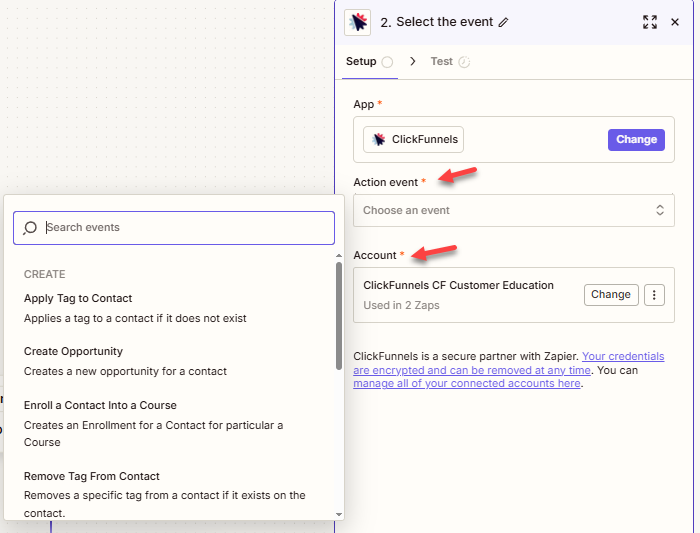
In the Zap editor, search for and select “ClickFunnels” as the trigger app.
Click on the dropdown menu under “Trigger Event” and select the trigger event to start the Zap. You can select only one event. Available trigger events include:
Contact Completed Course: Triggers when a new or existing contact completes a course.
Contact Identified: Triggers when a new contact or an existing anonymous contact is identified by
email addressorphone number.Contact Submitted Form: Triggers when a contact submits an opt-in or order form in your ClickFunnels workspace.
Contact Suspended From Course: Triggers when a contact’s enrollment is suspended from a course.
Course Enrollment Created for Contact: Triggers when a contact is enrolled in a course.
One-Time Order Paid: Triggers when a customer pays for a one-time order.
Subscription Invoice Paid: Triggers when a subscription invoice is paid.
In the Account field. You need to connect your ClickFunnels account. Click on Sign in and follow the instructions to link your ClickFunnels account to Zapier. If you previously connected your ClickFunnels workspace, select it from the list and proceed.
Click Continue to proceed to the next step.
Step 2: Configure
Configure the trigger settings based on the selected event:
For course-related events (such as
Contact Completed Course,Contact Suspended From Course, andCourse Enrollment Created for Contact), you must select the specific course in the Trigger tab.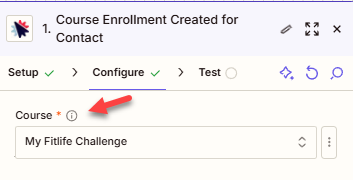
For other events, such as
Contact IdentifiedorOne-Time Order Paid, you can select the specific Funnels and Pages where the trigger event will occur. You can choose multiple funnels and pages, or leave them blank to trigger the zap for the selected event across the entire workspace.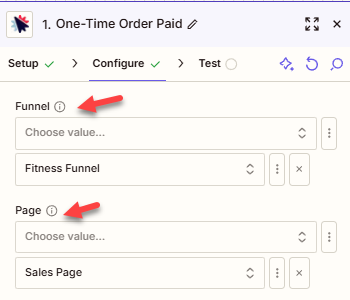
Click Continue to proceed to the next step.
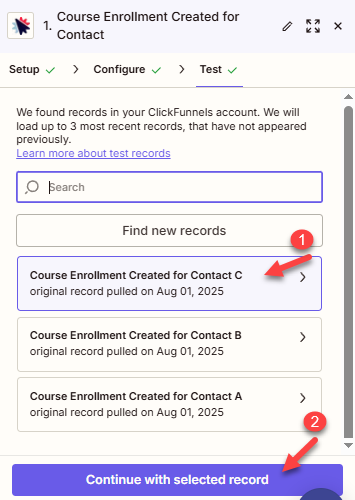
Step 3: Test
Zapier will prompt you to test the trigger to ensure it is set up correctly. Click on “Test trigger” to proceed.
Review the contacts pulled from ClickFunnels. Select a contact and click “Continue with selected record” to complete the step.
Receiving Data in ClickFunnels
To receive data into ClickFunnels, follow these detailed steps:
Step 1: Setup
Access to the Zap Editor.
Choose the app that will send data to ClickFunnels (ex, Shopify, Wix, Webhooks by Zapier, etc). The app needs to be selected as the trigger step in your Zap.
In the action step, search for and select “ClickFunnels”.

Click on the dropdown menu under Action Event and select the action event. Available action events include:
Apply Tag to Contact: Applies a tag to a contact if the tag does not exist in the contact.
Enroll a Contact Into a Course: Creates an enrollment for a contact in a particular course.
Remove Tag From Contact: Removes a specific tag from a contact if it exists on the contact.
Search Contacts by Email or ID: Searches for contacts using the contact’s ID or email address in the selected workspace. The result returns a boolean (true/false). If the contact is not found either by contact ID or Email address then it will return the “_Zap_search_success_on_miss” value as false.
Update or Create Contact (By Email Address): Finds and updates an existing contact or creates one by email address. It only updates present fields with non-empty values for existing contacts so that you won’t lose existing data. Currently, a contact is always created if missing; Zapier’s checkbox “Create ClickFunnels Contact if it doesn’t exist yet?” is ignored when checked off. If you would like a contact not to be created, you can use an additional “Search Contacts by Email or ID” search step to: Optionally, create a contact if none are found.
You will be prompted to connect your ClickFunnels account. Click on Sign in and follow the instructions to link your ClickFunnels account to Zapier. If you have previously connected your ClickFunnels workspace, simply select it from the list and proceed.
Click Continue to proceed to the next step.
Step 2: Configure
In the Configure tab, fill in the required fields for the action event you selected. The fields you need to complete will vary depending on the chosen action. For example, you may need to provide information such as contact email address, contact ID, tag, or course ID.
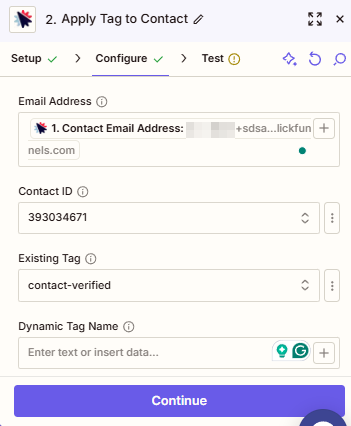
Click Continue to proceed to the next step.
Step 3: Test
Zapier will ask you to verify the action to confirm it is configured properly. Click on the Test step to evaluate the automation. A contact will be created or updated in your ClickFunnels workspace. You can verify that by searching the contact in your ClickFunnels workspace by email address. If it does not succeed, you can modify the trigger and other steps to ensure the setup is accurate. Alternatively, click Skip Test to move on.
When testing is completed, you can give the zap a proper name and click the Publish button to publish it.
Method 3: Advanced Integration Using Webhooks
For advanced users, integrating ClickFunnels with Zapier via webhooks provides greater customization and control. This method is best suited for those with experience in APIs and webhooks.
Learn About Webhook Integration
Note:
This method is recommended only for users with sufficient technical knowledge of APIs and webhooks. For most use cases, Method 1 or Method 2 will suffice.
Zapier Integration FAQs
Can I use a Zapier Free account?
Yes. You can use Zapier’s free account to integrate with ClickFunnels.
What if the event I need is not available in the ClickFunnels app?
If the event you are looking for is unavailable, you can trigger the Zap using the Webhook Connection.
What if the action I need to send data to ClickFunnels is not available?
If the Zapier integration does not support the specific action you require, you can create a custom API integration with ClickFunnels. For detailed guidance on implementing this, please refer to our ClickFunnels API documentation.
Can I connect multiple Zapier accounts with a ClickFunnels workspace?
Yes. You only need to log out and sign in to different Zapier accounts for integration.
Can I connect multiple workspaces from my ClickFunnels account to Zapier?
Yes. When connecting ClickFunnels with Zapier, select the workspace you want to connect. For multiple workspaces, you need to connect each workspace separately.