Managing the same piece of information across multiple funnels, pages, courses, and emails can be tedious. If your webinar day, business hours, or company name changes, you'd normally have to hunt down every place it appears and update each one by hand.
Workspace Attributes solve this. They let you store a reusable value once at the workspace level and reference it anywhere with a merge tag. Update the value in one place, and every page and email that references it updates automatically.
In this article, you'll learn what Workspace Attributes are, how to create them and set their values, and how to use them in your pages and emails.
Requirements
An active ClickFunnels account
Access to Workspace Settings (the ability to edit workspace settings)
What Are Workspace Attributes?
Workspace Attributes are custom, workspace-wide values that you define once and reuse everywhere through merge tags.
They work just like Contact Attributes, with one key difference:
Contact Attributes store a value that is unique to each individual contact (for example, each contact's favorite workout type).
Workspace Attributes store a single value for your entire workspace (for example, this week's webinar date, your business hours, or your company name).
Once an attribute has a value, you reference it with a merge tag in the format:
{{workspace.your_attribute_key}}
When a page is published or an email is sent, that tag is automatically replaced with the value you stored.
Where Can I Use Workspace Attributes?
Once set, a workspace attribute's merge tag ({{workspace.<key>}}) can be used in:
Published pages: funnels, sites, and courses (via the page editor)
Broadcast emails: sent to a list of contacts manually or on a schedule
Workflow "Send Email" steps: automated emails triggered by workflow actions
The email editor: in both the subject line and the email body
Note: Merge tag support for the page editor and the marketing/broadcast/workflow email path is available today. Workspace attributes are not yet wired into transactional/system emails.
How to Create a Workspace Attribute
1. Open Workspace Attributes
In your ClickFunnels account, go to Workspace Settings.
In the settings menu, click Workspace Attributes.
The first time you visit, you'll see an explainer and an Add Workspace Attribute button.
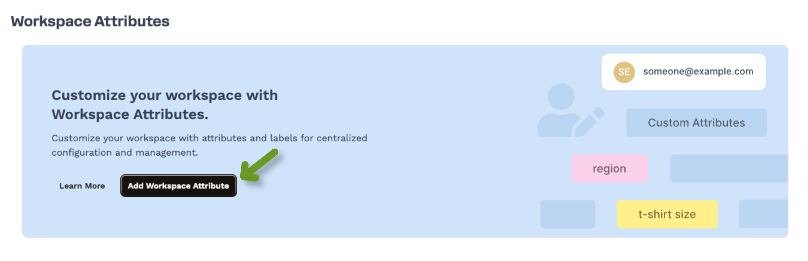
2. Add an Attribute
Click Add Workspace Attribute.
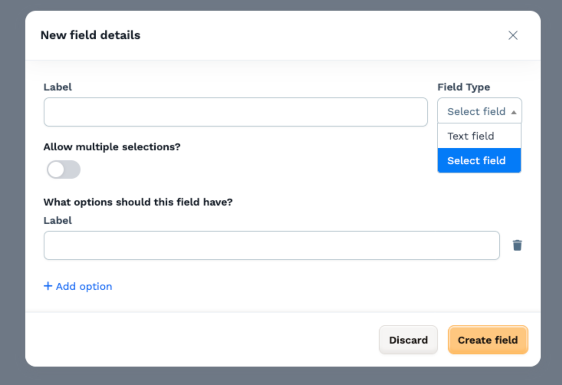
Enter a Label, a human-friendly name for the attribute (for example,
Business Hours,Business Name, orWork Days).Choose a field type:
Text field: a free-form text value (for example,
9–5).Select field: a predefined list of options you create.
If you choose Select field:
Toggle Allow multiple selections on or off.
Off (single choice): the value is chosen with a radio button, exactly one option.
On (multiple choices): values are chosen with checkboxes, one or more options.
Add your options (for example:
Monday,Tuesday,Wednesday,Thursday,Friday).
Click Create field to save the attribute.
Tip (choosing a field type):
Use a text field for values that change freely (a date, a price, an address, a phone number).
Use a single-select field when there's one correct answer from a fixed list.
Use a multi-select field when several options can apply at once (for example, the days you're open).
3. The Key (Auto-Generated)
When you create an attribute, ClickFunnels automatically generates a key from the label. This key is the lowercase, underscore-separated identifier you use in your merge tag.
Label | Auto-generated key | Merge tag |
|---|---|---|
Business Name |
|
|
Business Hours |
|
|
Work Days |
|
|
Note: The key, not the label, is what you reference in merge tags. You'll find it listed next to each attribute on the Workspace Attributes page.
How to Set or Edit an Attribute's Value
Creating an attribute defines what it is; setting its value defines what it contains.
On the Workspace Attributes page, find your attribute in the list.
In the Current Value column, click Set Value (or click an existing value to edit it).
Enter the value:
Text field: type the value (for example,
9–5).Single-select: choose one option from the dropdown.
Multi-select: check all options that apply.
Click Update Value.
The value is now stored and ready to use as a merge tag. Multi-select values render as a comma-separated list. If you set a multi-select attribute to Monday, Wednesday, and Friday, the merge tag resolves to Monday, Wednesday, Friday.

Important (do not store sensitive information): Workspace attribute values may be exposed on published pages and in outgoing emails. Anything you store here may be publicly available, so don't put confidential or sensitive data in a workspace attribute.
Using Workspace Attributes on Pages (Funnels, Sites, Courses)
You can insert a workspace merge tag into any text element on a published page using Liquid syntax.
Open the page editor for your funnel, site, or course page.
Click into a text element (for example, a Headline, Sub-headline, or Paragraph).
Type the merge tag using Liquid syntax (double curly braces), for example:
{{workspace.business_name}}With the element still selected, open the Advanced tab in the element settings.
Turn on the Dynamically populated toggle.
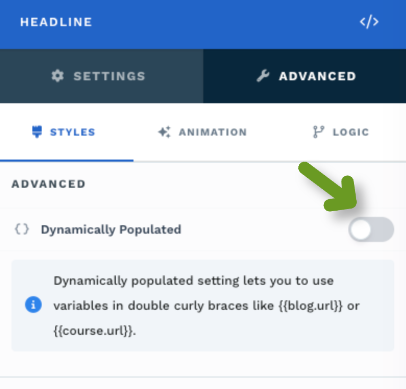
Once Dynamically populated is on, ClickFunnels replaces the tag with the stored value when the page is rendered. For example, a headline whose text is {{workspace.business_name}} will display as Company Name (or whatever value you set), and {{workspace.work_days}} will display as Monday, Wednesday, Friday.
Note: This step is required. A merge tag will only be replaced with your stored value if Dynamically populated is enabled for that element. If it's off, the page will display the literal text
{{workspace.business_name}}instead of the value. This is not required for Button Elements. They will update automatically.
Using Workspace Attributes in Emails
Workspace attributes work in broadcast emails and workflow "Send Email" steps, in both the subject line and the email body.
Open the email (from a Broadcast or a Workflow email step) and edit it.
Insert the merge tag where you want the value to appear, in either:
the subject line, or
a text block in the email body.
You can type the Liquid tag directly (
{{workspace.business_name}}), or pick it from the Workspace group in the email editor's merge-tag menu.
When the email is sent, the tag is replaced with the stored value. For example, a subject line of Join us, {{workspace.business_name}}! is delivered as Join us, Company Name!.
Example: End-to-End
Here's how the pieces fit together in a real funnel:
You create a Business Name attribute and set its value to
Company Name, and a multi-select Work Days attribute set toMonday, Wednesday, Friday.On your opt-in page, the headline element uses
{{workspace.business_name}}with Dynamically populated turned on.On your thank-you page, a line reads "We're open
{{workspace.work_days}}", which renders as We're open Monday, Wednesday, Friday.A workflow attached to the opt-in sends an email whose content references
{{workspace.business_name}}.A visitor opts in, and the thank-you page shows your workdays, and the workflow email arrives with Company Name merged in.
Change the Business Name value once in Workspace Settings, and every page and email that references it updates automatically.
Use Cases
Webinar dates and times: store this week's webinar date once and reference it across every registration page, reminder email, and thank-you page. Update it weekly in a single spot.
Business hours / work days: display the days or hours you're open consistently across your site and funnels.
Company details: company name, address, support phone number, or tagline that appears in many places.
Reusable frameworks and templates: agencies and template creators can build funnels, courses, and email sequences that reference
{{workspace.<key>}}merge tags, then simply instruct each client to fill in their own Workspace Attributes. Everything you've provided instantly becomes customized to that client, no editing of individual pages or emails required.
The common thread: any value you want to keep consistent and easy to change across everything it touches.
Frequently Asked Questions
What's the difference between a Workspace Attribute and a Contact Attribute?
A Contact Attribute stores a value that's different for each contact (like their first name). A Workspace Attribute stores one value for the whole workspace (like your webinar date).
Why isn't my merge tag showing the value on my page?
On pages, the element must have the Dynamically populated toggle turned on (in the element's Advanced tab). Without it, the page shows the literal {{workspace.<key>}} text. Also double-check you're using the key (not the label), and that the attribute has a value set. This does not apply to Button Elements, however.
How are multi-select values displayed?
As a comma-separated list, for example, Monday, Wednesday, Friday.
Can I store sensitive information in a Workspace Attribute?
No. Values may appear on published pages and in outgoing emails, so they may be publicly visible. Don't store confidential data.
Do existing workspaces need any setup or migration?
No. The feature turns on automatically. Your attributes are created the moment you add your first one; there's nothing to enable beforehand.