You might already have a website on your main domain or use a domain registered outside of ClickFunnels, but still want to run funnels, blogs, or campaigns on a separate web address. ClickFunnels makes it easy to connect a subdomain using a simple automated or manual setup process in just a few simple steps. In this article, you'll learn how to connect a subdomain in ClickFunnels using both the automated setup and manual setup methods.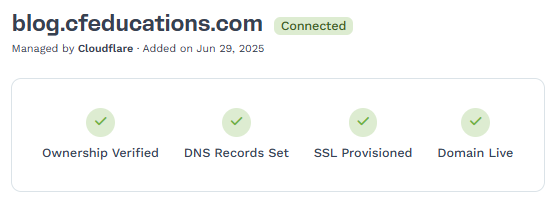
Requirements
An active ClickFunnels account
A domain purchased from a third-party registrar (e.g., GoDaddy, Cloudflare, Namecheap, etc.)
Warning:
We currently do not support Internationalized Domain Names (IDNs). Special characters are letters that are not in the English alphabet. Some examples of special characters are æ, ø, å, ö, ä, ü and é.
Domain names with trademarked phrases cannot be added or used in ClickFunnels. Click here to view restricted phrase list.
What is a Subdomain
A subdomain is a part of your main domain name that helps you organize or separate content on your website. It acts like a separate area of your site but is still connected to your main domain.
Example:
Main domain:
yourdomain.comSubdomain:
blog.yourdomain.com,webinar.yourdomain.com, orshop.yourdomain.com
You may have already come across subdomains in real life, such as:
support.google.comfor Google’s help centernews.bbc.co.ukfor news contentstore.nike.comfor Nike’s online shop
These examples show how subdomains help create dedicated spaces for specific content or purposes without interfering with the main website.
When to Consider Using a Subdomain
You may want to use a subdomain in ClickFunnels for various reasons. Here are some scenarios where using a subdomain makes sense:
You already have a website on your root domain and want to keep it separate from your funnel pages.
You want to host a blog on a dedicated space like
blog.yourdomain.com.You’re running a webinar series and want a branded link, such as
webinar.yourdomain.com.You’re promoting a special campaign or limited-time offer and want it to be separate from your main site.
You want to build a membership area or customer portal under a unique URL, such as
members.yourdomain.com.You want to keep your funnel content distinct from your corporate or brand website for better organization and clarity.
Step 1 – Adding the Subdomain in ClickFunnels
To begin, you'll first add your subdomain to ClickFunnels by following the steps outlined above:
Start by logging into your ClickFunnels workspace.
From the left sidebar menu, click Workspace Settings and then select Domains.
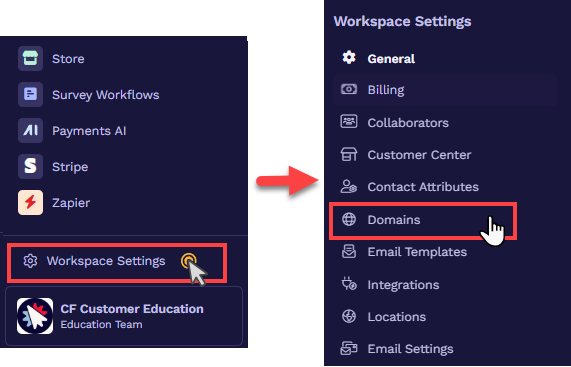
Click Add Domain
In the open prompt, click + Add an Existing Domain..
In the open prompt, enter your subdomain name (e.g.,
blog.yourdomain.com) and click Continue.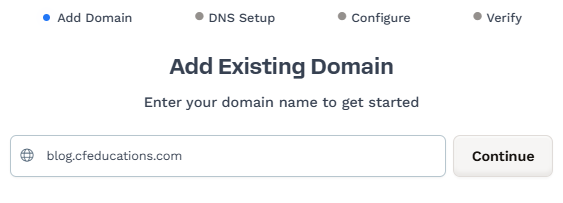
Select Subdomain if it’s not already selected.
Important:
Do not use
wwwwhen connecting a subdomain. Thewwwprefix is itself a subdomain (e.g.,www.example.com), and should not be used in this process.Click “Continue with …” to proceed to the DNS setup.
At this stage, the subdomain has been added to your workspace, but the integration is incomplete. To complete the integration, follow Step 2 below.
Step 2: Setting Up the Subdomain
After adding a subdomain, you need to pick a DNS setup method.
Automated Method (Recommended if your domain provider is supported by automated setup)
Manual Method(If automated setup is not supported)
To complete the integration, you must link your domain registrar or DNS provider account (e.g., GoDaddy, Cloudflare, NameCheap, Bluehost, etc.) with ClickFunnels. Follow either the automated or manual setup instructions below to finish connecting your subdomain to ClickFunnels.
Automated Method
Automated configuration is offered for a selected group of domain registrars and DNS providers. Please refer to our article Supported DNS Hosts for Automatic Setup to determine if your domain registrar or DNS provider is eligible for automated setup. Following that, please adhere to the steps outlined below:
Select Automatic Setup as the DNS setup method.

Click Continue.
A window will open, confirming that ClickFunnels will configure the subdomain. Click the “Continue” button to agree.

The system needs a moment to analyze the root domain and determine the DNS location. Depending on your domain's DNS provider, you might be required to authorize access to your DNS provider account or sign in to that account.
At this stage, the system will add the necessary records to your domain DNS. If your domain DNS has any conflicting records, it will display existing records in the prompt and ask for your permission to update them.
Click the Done button once the subdomain configuration has been confirmed.
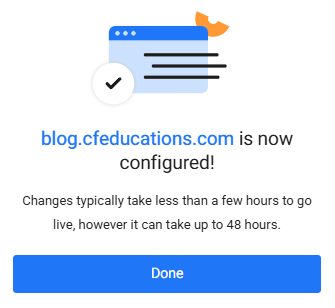
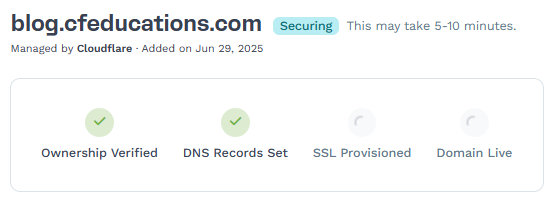
ClickFunnels now checks your domain's DNS configuration to ensure that the DNS settings are set up correctly. At this point, the initial setup is finished; however, ClickFunnels will verify that the records are live in the DNS and begin the SSL deployment for the domain. In most cases, the records are validated quickly. However, depending on the DNS provider, it might take 24 to 48 hours for DNS changes to propagate completely worldwide.
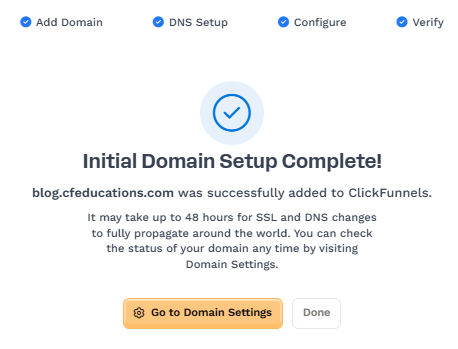
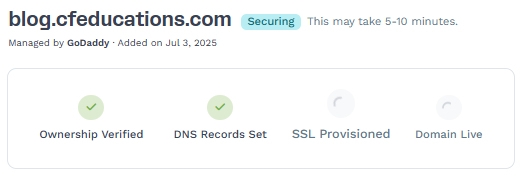
The subdomain has now been added to your ClickFunnels workspace, and the status will display as Securing. At this stage, no further action is required on your part; please allow a few moments for the SSL propagation to complete.
Note:
Allow 5-10 mins for SSL propagation. Occasionally, the securing process may take up to 48 hours to finish.
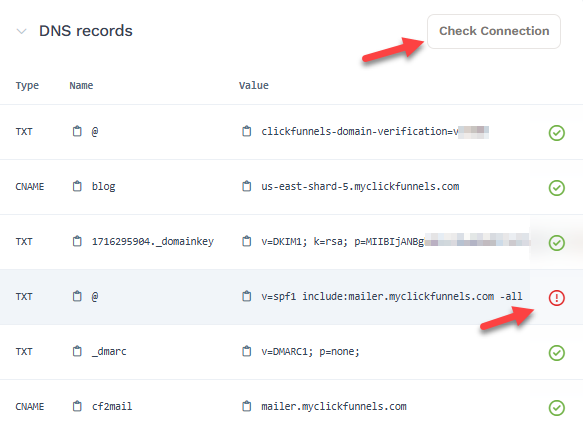
If any record cannot be verified, a red warning icon will appear next to it in the DNS records table. The SSL deployment will only proceed if the required DNS records (TXT for domain verification and CNAME for
www) are valid.You can click the Check Connection button to refresh the status of your records and confirm verification manually.
 sub
subNote:
If the records do not verify after clicking Check Connection, please allow 5 - 10 minutes before clicking Check Connection again to verify the records. Once verified, the records status will display with a green checkmark. Occasionally, the verification of DNS records may take 24-48 hours.
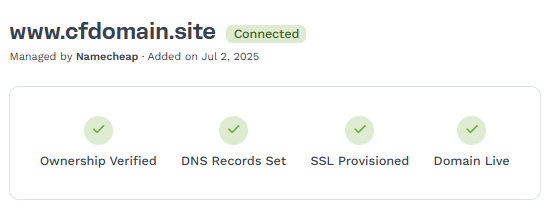
Once all required records are verified and the SSL certificate is issued, the domain status will change to Connected. You may now utilize this domain for the Site and Blog app or Funnels.
Congratulations! You now know how to connect a subdomain in ClickFunnels.
Manual Method
In the manual method, you must add the DNS records individually to your domain registrar or DNS provider account. This can be accomplished by copying the DNS records from ClickFunnels and pasting them into your DNS provider’s DNS editor. Please follow the steps below to add the DNS records manually:
Select Manual Setup as the DNS setup method.
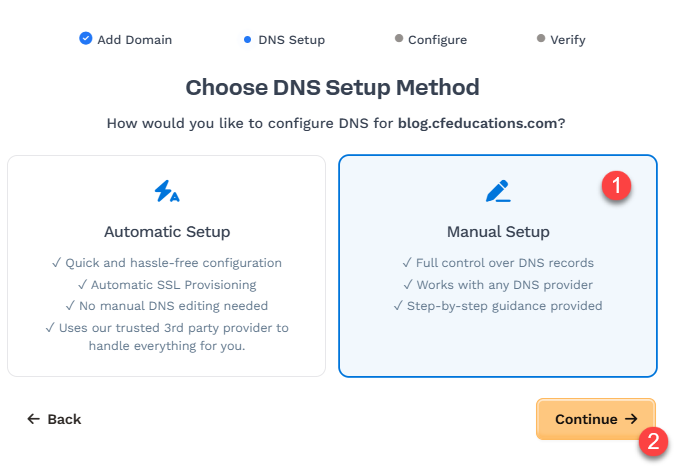
Click Continue.
ClickFunnels will provide the necessary DNS records in the DNS table that you need to add to your DNS provider's account (e.g., GoDaddy, Cloudflare, NameCheap, Bluehost, etc.). There are two sets of records: the first set includes the DNS Records required to verify the subdomain in ClickFunnels, and the second set, referred to as Email DNS Records, is necessary for sending emails using a custom email address associated with your root domain. You must manually copy each DNS record from the DNS table and paste them into your DNS provider’s DNS editor.
Review the DNS Records table. Each row includes three parts:
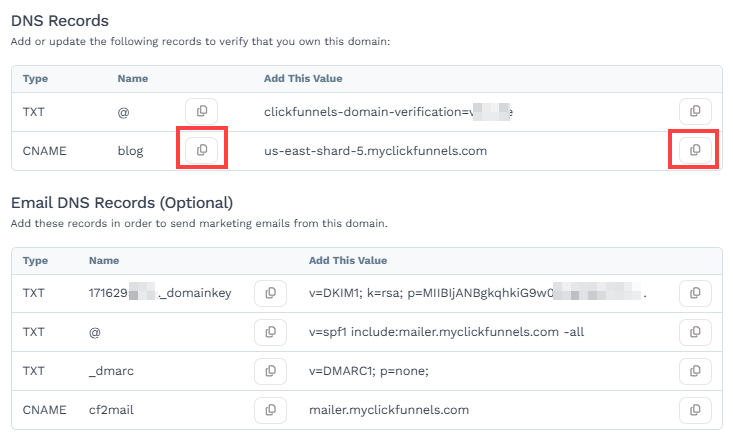
Type: The kind of record to add (e.g., TXT or CNAME)
Name: The host or subdomain (e.g.,
@,blog, or_dmarc)Value: The content of the record (e.g., a verification string or destination URL)
Click the Copy Icon next to each Name and Value to copy them quickly.
Log in to your DNS provider (e.g., GoDaddy, Namecheap, Cloudflare) and open the DNS management section for your domain.
Use the Add Record option and match the fields exactly:

Type: Select the same type shown in ClickFunnels (TXT or CNAME)
Name: Paste the copied name (e.g.,
@orblog)Value/Content/Target: Paste the copied value (e.g.,
us-east-shard-5.myclickfunnels.com)
Note:
We are utilizing Cloudflare as a domain DNS provider for this example. The names of the input fields may differ among various domain DNS providers. For instance, in some DNS providers, the “Value” field may be referred to as “Content” or “Data.”
When copying and pasting records, please ensure there are no extra spaces included with the names and values.
If your root domain is already connected to ClickFunnels, it is possible that this TXT record with
@has already been added to the DNS. The status will indicate green if it has been added previously.
If you plan to send marketing emails from your domain, add the optional Email DNS Records similarly. These records help with email deliverability (DKIM, SPF, and DMARC). Moreover, verifying email DNS records will allow you to create custom email addresses as the sender associated with your root domain, such as
info@yourdomain.com.Note:
If you already have an existing SPF record in the DNS with the root hostname “@”, merge it with the ClickFunnels SPF data by adding the
include:keyword before every domain. For example:v=spf1 include:mailer.myclickfunnels.com include:example.com -all.After the records are added, return to ClickFunnels and click the Continue button to proceed with domain verification.
After clicking the Continue button, ClickFunnels will attempt to verify both the DNS records and Email DNS records automatically.
If the DNS records (required for subdomain verification) are added correctly, ClickFunnels will begin deploying the SSL certificate. During this stage, the subdomain status will display as Securing. At this stage, no further action is required on your part; please allow a few moments for the SSL propagation to complete.
Note:
Allow 5-10 mins for SSL propagation. Occasionally, the securing process may take up to 48 hours to finish.
If any record cannot be verified, a red warning icon will appear next to it in the DNS records table. The SSL deployment will only proceed if the required DNS records (TXT for domain verification and CNAME for the subdomain) are valid.
You can click the Check Connection button to refresh the status of your records and confirm verification manually.
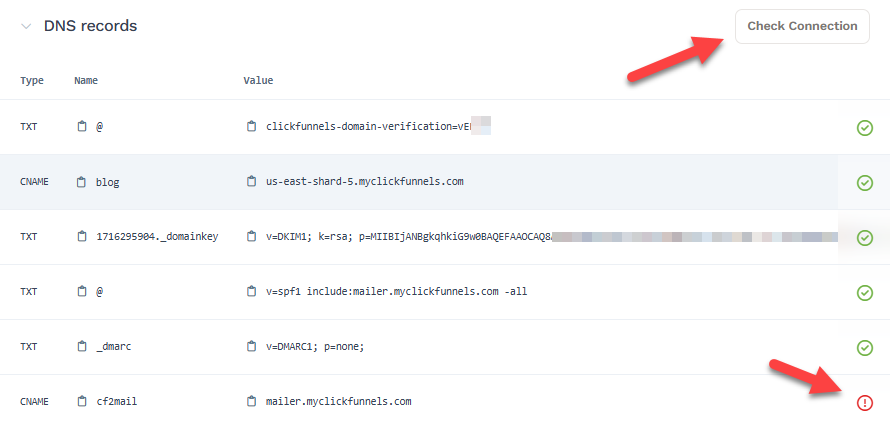
Note:
If the records do not verify after clicking Check Connection, please allow 5 - 10 minutes before clicking Check Connection again to verify the records. Once verified, the records status will display with a green checkmark. Occasionally, the verification of DNS records may take 24-48 hours.
Once all required records are verified and the SSL certificate is issued, the domain status will change to Connected. You may now utilize this domain for the Site & Blog app or Funnels.

Note:
If you do not include the email records in your DNS, the domain will still verify; however, the status will be displayed as Secured.
Congratulations! You now know how to connect a subdomain in ClickFunnels.
Setting Up the Forwarding Rule
Upon completing the integration of your subdomain with ClickFunnels, creating a forwarding rule within your domain's DNS provider may be necessary. This will ensure that any visitors accessing the subdomain with the "HTTP://" prefix (e.g., http://blog.yourdomain.com) are redirected to https://blog.yourdomain.com.
Below is an example of a forwarding rule that can be added to Cloudflare.
Check out our detailed guide about adding forwarding rules in different domain DNS providers in the article, Adding Domain Forwarding Rules.
Connecting the Subdomain to a Workspace Site
After successfully integrating your subdomain with your workspace, follow these steps to connect it to your site:
From your workspace, click on the Site & Blog app in the left-hand menu.
Select Site Settings.
Scroll to the Site Domain section and choose the subdomain you wish to use for your site in the Domain field.
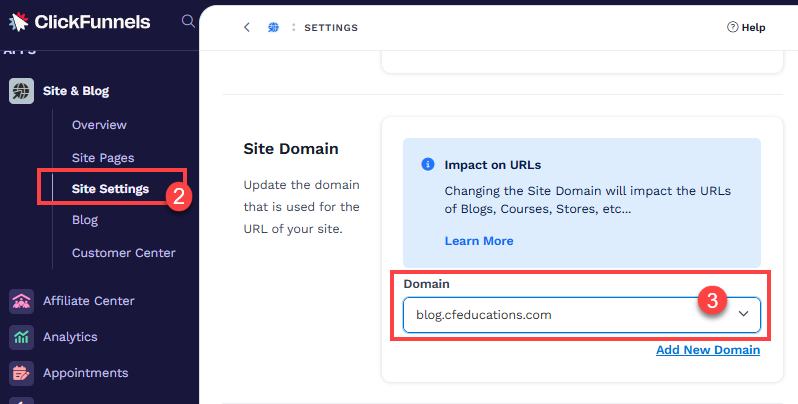
Click the Update site button to save your changes.
Important:
The domain connected to the Site & Blog app is used for Courses, Store, Blog, Customer Center, Landing Pages, and Community. These features must share the same domain connected to the Site & Blog settings.
Connecting a Subdomain to a Funnel
Click on Funnels from the left navigation menu.
Identify a funnel you wish to associate with your subdomain and click the Gear
⚙️ icon to access the funnel settings.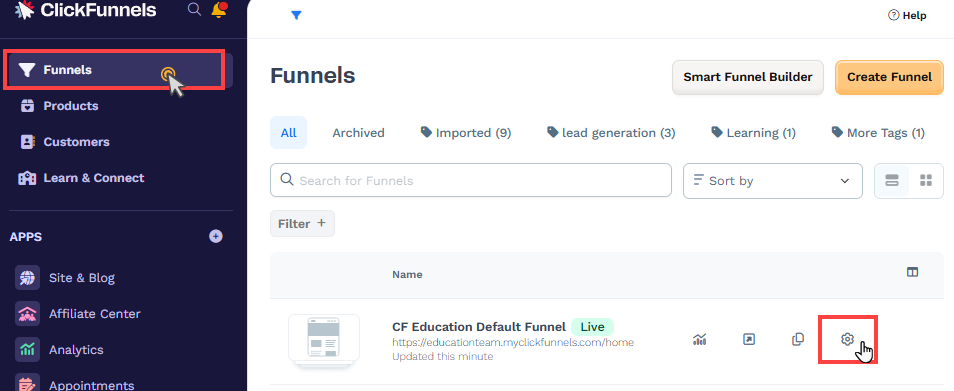
In the Domain field, select the desired subdomain from the dropdown menu.
Enter the desired path in the Funnel Path URL field, such as
/home,/page, or/root. To set this funnel as the subdomain’s default page, enter a single/character.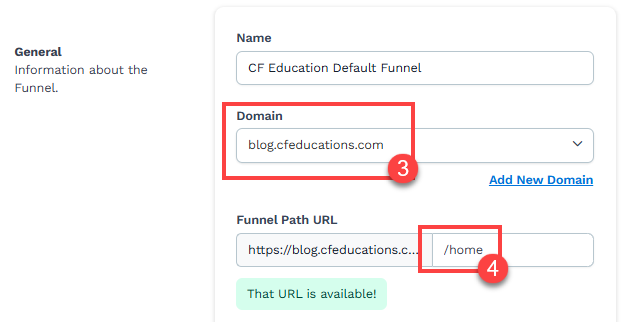
💡 Learn more about setting a funnel as a domain default page in the article, Setting a Funnel as the Domain Default Page.Click Update Funnel to save changes.
Congratulations! Your subdomain is now connected to the funnel. When the subdomain is accessed, the first page of your funnel will be displayed.
Subdomain FAQs
How many subdomains can I connect in ClickFunnels?
There is no limit. You can connect as many subdomains as you need to your ClickFunnels workspace.
Can I connect a subdomain if my root domain is already connected to another platform?
Yes. A subdomain can be connected to ClickFunnels even if your root domain is hosted elsewhere. This allows you to use ClickFunnels without affecting your existing website.
Do I need to pay to connect a subdomain?
No. Connecting a subdomain is included in your ClickFunnels subscription—there are no extra fees. You only need to have access to the domain DNS provider where your domain DNS is located.
Where can I use a subdomain in ClickFunnels?
You can use a connected subdomain across various parts of your ClickFunnels workspace, such as Site & Blog, Funnels and Landing Pages, Courses and Membership Areas, Appointment Scheduling, and more.
I already connected the root domain. Can I still add a subdomain?
Yes, you can connect both the root domain and one or more subdomains. Each subdomain can be used for a separate purpose within your ClickFunnels workspace.
Will my subdomain work with SSL (HTTPS)?
Yes. ClickFunnels automatically provides SSL certificates for connected subdomains, so your pages are secure and display as HTTPS.