A webinar funnel is a type of sales funnel built around a video presentation, often used to teach something valuable and lead into an offer. It's commonly used for launches, product demos, coaching programs, and live training events. Setting up a webinar funnel in ClickFunnels helps you control the journey from registration to follow-up. This article will walk you through how it works and how to build one step by step.
Requirements
An active ClickFunnels account
A video recording or a live webinar plan
A product created in the Products section (only needed for paid webinars or funnels with an offer)
A payment gateway integrated within the workspace (required if you're collecting payments)
How Webinar Funnels Work
Webinar funnels are designed to guide visitors from signing up to watching your presentation, then toward a specific action like purchasing a product or booking a call. They’re often used to deliver educational or promotional content in a structured format that builds trust and interest before introducing an offer.
This type of funnel is especially useful for businesses that rely on teaching before selling. For example, a fitness coach might host a live session on sustainable weight loss strategies and invite attendees to join a monthly coaching program at the end. A nutritionist could run a webinar showing how to meal prep for the week, then offer a digital meal plan bundle or a custom 1-on-1 consultation. Even supplement brands can use webinars to explain ingredient benefits and position a special offer as a natural next step.
One of the key advantages of a webinar funnel is control. You’re not just giving viewers information, you’re guiding their experience. You decide what content they see, when they see it, and how they’re invited to take action. This makes it easier to lead people through a buying decision without being pushy.
Understanding the Webinar Funnel Structure
The standard webinar funnel includes three core pages that guide visitors through registration, attendance, and follow-up. Each step is designed to support the goal of getting people to your presentation and moving them closer to a conversion.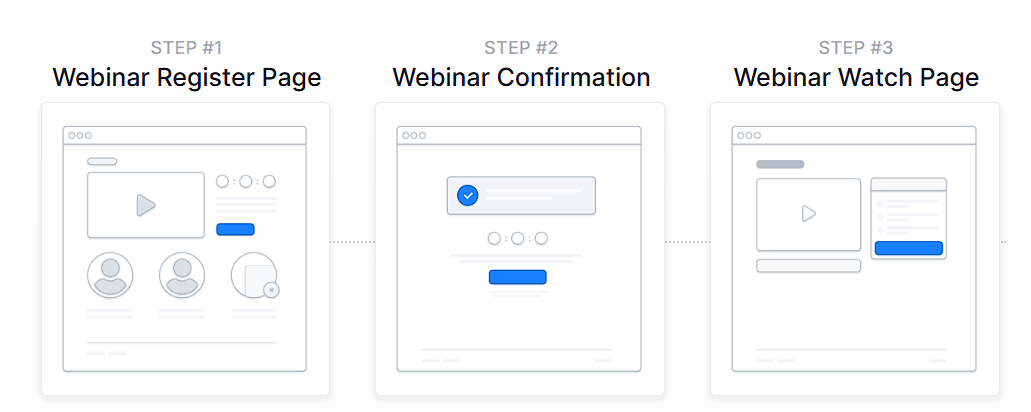
Webinar Register Page: This is the entry point of the funnel. Visitors sign up by entering their name and email to reserve a spot for your webinar. You can use this page to highlight what the presentation will cover and why it matters to them.
Webinar Confirmation Page: After registering, attendees land on the confirmation page. This is where you confirm their spot, share the date and time, and give instructions for what to expect next. You can also use this page to encourage calendar reminders or introduce a VIP upgrade if you're offering one.
Webinar Watch Page (Broadcast Room): This is where your webinar is delivered. It can be a live broadcast or a pre-recorded session. This page often includes the video and a call-to-action button that appears during or after the presentation.
These are the essential steps to get your webinar in front of the right audience and lead them to your offer. You can also add:
Order Form Page: Used when your webinar includes a paid product or service. This page handles the checkout process.
Order Confirmation Page: Shown after purchase to confirm the order and provide instructions or next steps.
Replay Page: Allows you to re-engage people who missed the live webinar or want to review the content again.
These extra pages aren't required, but they’re useful if you're selling directly through the funnel or offering post-event access.
Creating a Webinar Funnel
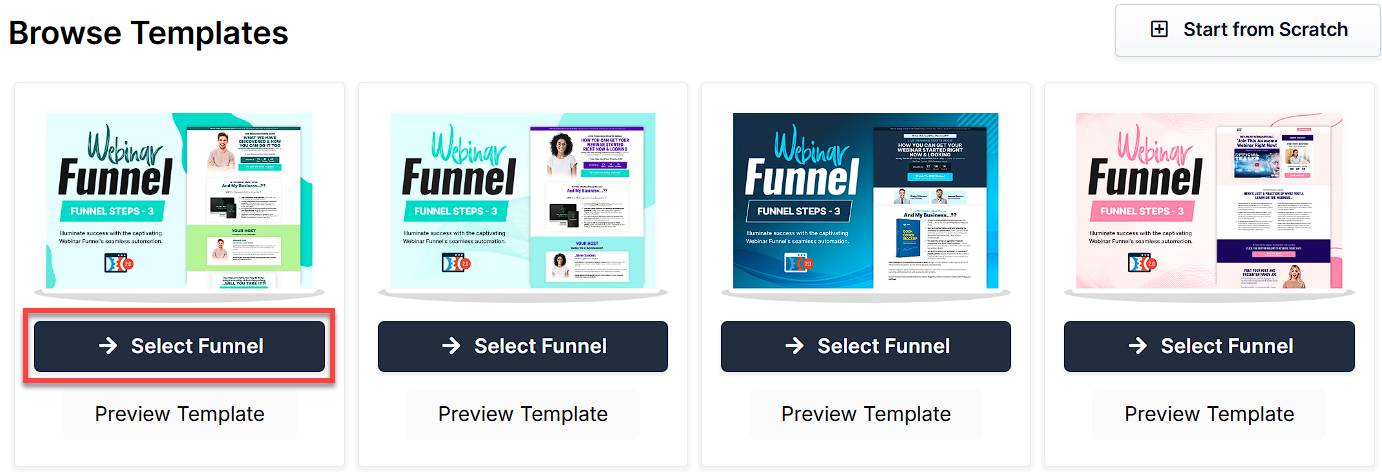
A webinar funnel can be built quickly using ClickFunnels' pre-designed templates. Instead of starting from scratch, you can choose a template that matches your needs, customize it with your content, and launch your funnel in just a few steps.
In ClickFunnels, go to the Funnels section from the left navigation menu.
Click the Create Funnel button.
Browse the available funnel types and select a webinar funnel.
Each funnel type includes a training section with:
Overview: Understanding how a webinar funnel works.
Strategy: Learning how to structure your funnel and offer for maximum impact.
Implementation: A step-by-step guide to customizing your funnel.
You can also watch the full training video at the top of this article. It covers all three parts in one walkthrough.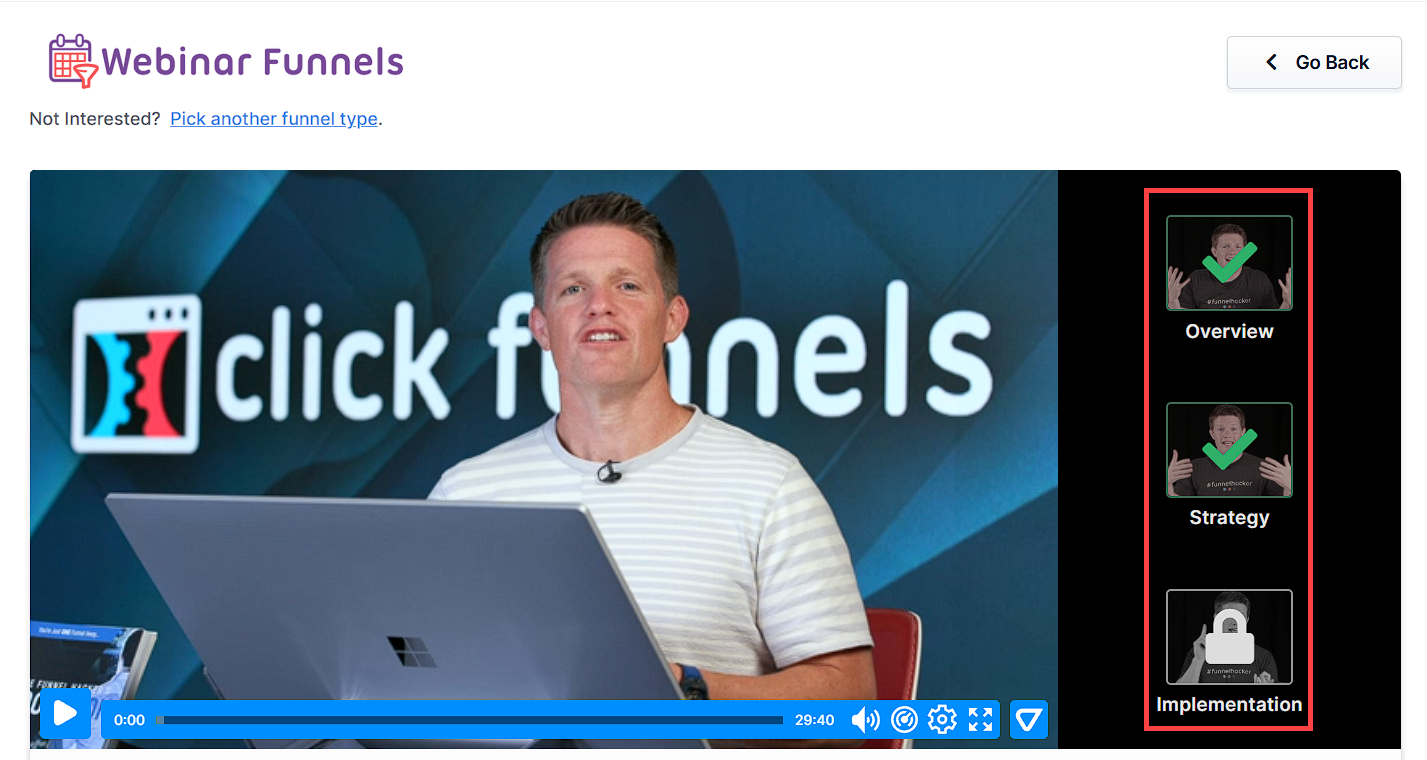
If you prefer a completely custom setup, click Start from Scratch to build your funnel manually. Refer to the How to Create a New Funnel article for instructions.
Scroll through the available templates and click Select Funnel under the one that best fits your business.
Wait for the funnel to install, then:
Click Close to exit the installation window.
Or click Customize Now to start editing your pages, build your workflows, and adjust your call-to-action.
Once the template is loaded into your workspace, you can begin customizing it to fit your product, audience, and sales message.
Editing Webinar Funnel Pages
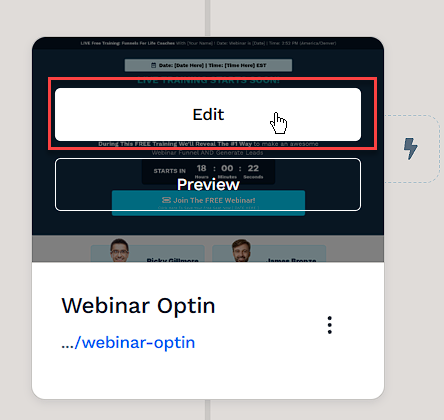
Once your webinar funnel is added to your workspace, you can customize it to match your branding, message, and schedule. You can do this by selecting Customize Now during setup or navigating to the Funnels tab in your dashboard and opening the Funnel Workflow Editor.
Open the Funnel Workflow Editor and click on the webinar funnel. Hover over the page you want to update, then click Edit to open it in the page editor.
Use the page editor to adjust sections, rows, columns, and elements. Here are some areas you may want to update for a webinar funnel:
Registration Form: Collect names and emails to sign users up for your webinar.
Headline and Subheadline: Clearly explain what the webinar is about and what attendees will gain from it.
Video Element: Embed a teaser or replay video, or add your live webinar stream link on the broadcast page.
Countdown Timer: Show how much time is left before the webinar begins or before an offer expires.
Call-to-Action Button: Guide viewers to register, join the webinar, or make a purchase.
Testimonials: Add real feedback to increase trust and show proof of results.
To learn more about editing elements in ClickFunnels, refer to the Getting Started with the ClickFunnels Page Editor article.
Click Save in the top right corner to keep changes.
Use the Preview option to check how the page looks before publishing. Remember to view your funnel on mobile devices to ensure it looks great on all screens. For detailed instructions, check our article on Mobile Optimization Techniques.
Webinar Types: Live vs. Evergreen
When creating your webinar funnel, you’ll need to decide whether to run your event live or use a pre-recorded version that runs on a schedule. Both options can follow the same core funnel structure but differ in how the webinar is delivered and when it's available to attendees.
Live webinars are presented in real time. They’re great for launches, Q&A sessions, and one-time events where you want to interact directly with your audience.
Evergreen webinars are pre-recorded presentations set to run on a recurring schedule. This is helpful if you want your webinar available on demand without needing to go live each time.
Each option has its benefits. Choose the one that fits your audience, your offer, and how involved you want to be during the presentation.
How to Run a Live Webinar
A live webinar is a one-time or scheduled event where you present to your audience in real time using tools like Zoom, GoToWebinar, or WebinarFuel. This approach gives you a chance to answer questions, build real-time engagement, and create urgency around your offer.
To set up a live webinar:
Build your funnel using a template or from scratch.
Edit your opt-in and confirmation pages to include the correct date, time, and timezone for the event.
Use a countdown timer on your pages that points to your live start time.
Integrate your webinar platform (e.g., Zoom or GoToWebinar) with ClickFunnels to auto-register attendees.
Set up a workflow to send confirmation emails and reminders before the event.
Run your live presentation through your selected webinar platform.
For full setup instructions, check out the article: How to Create a Live Webinar Funnel.
How to Run an Evergreen Webinar
Evergreen webinars are pre-recorded presentations that simulate a live experience. Instead of going live each time, you can set your webinar to run on a recurring schedule, like every Tuesday at 3 PM. This lets new visitors register, attend, and watch your presentation without needing you to be there in real time.
To run an evergreen webinar inside ClickFunnels:
Step 1: Set Up the Countdown Timer for Webinar Timing
Most webinar funnel templates include a countdown timer by default. You can use this element to control when the webinar starts using either an evergreen countdown or a calendar-based event. Both options help create urgency, guide users through the funnel, and simulate a real-time experience.
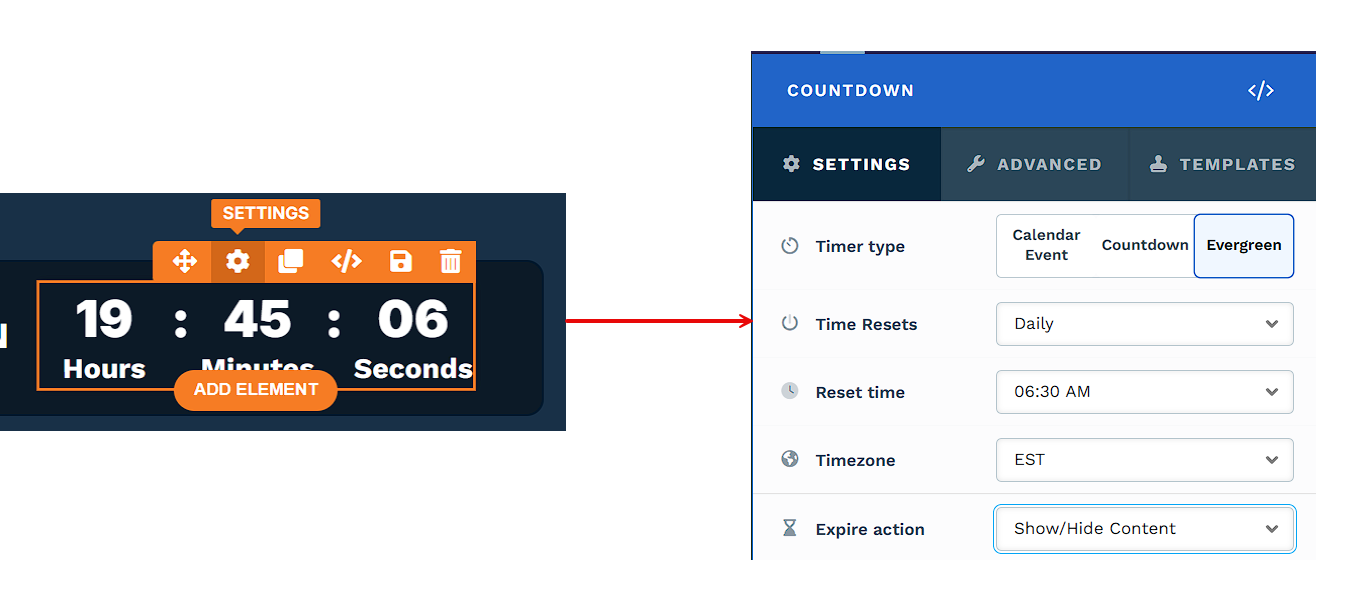
Option A: Use an Evergreen Countdown Timer
Click on the countdown element to open its settings.
Under Timer Type, select Evergreen.
Set the Time Resets option:
Choose Daily, Weekly, or Monthly depending on how often you want the webinar to run.
Set the Reset Time to your desired start time (e.g., 03:00 PM).
Choose the correct Timezone.
Configure Expire Action to hide or show specific elements when the timer runs out.
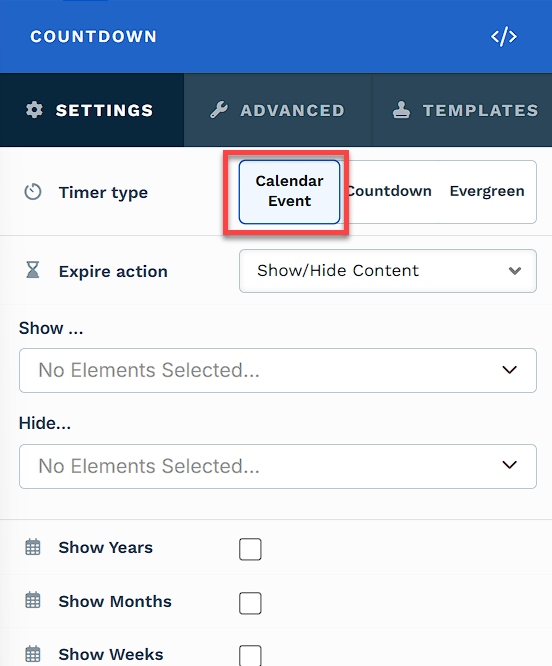
Option B: Use a Countdown Calendar Event
If you prefer to tie the countdown to a fixed date or recurring schedule, you can use a Calendar Event instead of an evergreen reset.
Click on the Countdown Timer element and set the Timer Type to Calendar Event.
Adjust the countdown settings as needed:
Set the Expire Action to Show/Hide Content, which controls what elements appear or disappear when the countdown ends.
Choose a display format (days, hours, minutes, seconds).
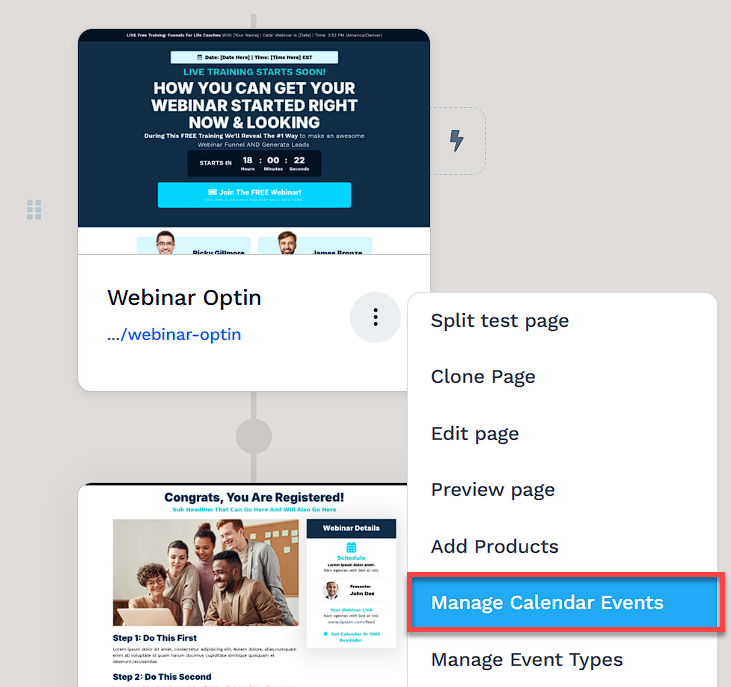
In your funnel workflow builder, click the three dots next to the page and select Manage Calendar Events.
You can create a new calendar event or select an existing one.
Choose the event type (One Time, Recurring, or Hybrid) and configure the event settings as needed.
Attach the calendar event to the page:
Select your Calendar Event from the dropdown.
Choose a Not Registered Action:
Redirect to another page
Register on pageview
Register on form submission
Set a Past Deadline Redirect URL for expired events.
Click Attach to apply the settings.
Step 2: Embed the Webinar Video
Open the Webinar Watch Page in the editor.
Add a Video element and paste the link to your recorded presentation. You can use platforms like YouTube, Vimeo, or Wistia.
Position the video at the top of the page or wherever it fits best in your layout.
Helpful Resources
Adding an Order Page for Paid Access or Post-Webinar Offers
Webinar funnels that include a payment step should have an order page added to the funnel. This is required whether the purchase occurs before accessing the webinar or after the session ends.
Paid access funnels collect payment before registration or viewing. Free webinars often present an offer during or after the webinar, directing attendees to a product or service. In both cases, the order page setup and product configuration process remains the same.
Follow the steps below to add and configure the order page.:
In the Funnel Workflow Editor, click the plus icon to add a new step.
Choose a page type and select an Order Page template.

Click the three-dot (⋮) icon next to the page and select Add Products.
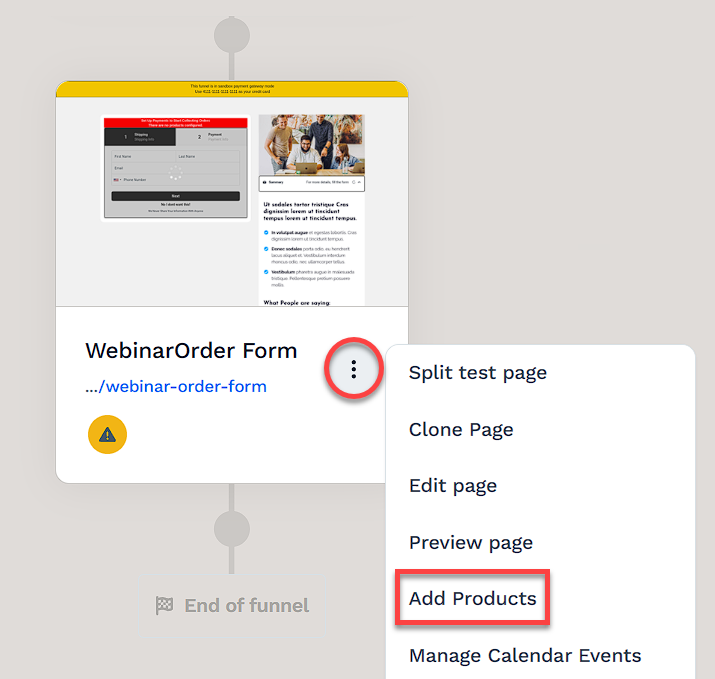
Click Add Product, then choose an existing product or create a new one.
Once added, click the Gear (⚙) icon to adjust product settings, such as the title or description.
Click Update to save changes.
After adding the product, open the page in the Page Editor and update the content to reflect your webinar offer. Customize the headline, supporting text, and visuals to clearly communicate what users are purchasing.
Helpful Resources
Automating Communication with Workflows
Workflows help keep potential customers engaged throughout the webinar without the need for manual messaging. They can send reminders, segment contacts, and deliver content at the right time.
With workflows, you can:
Send reminder emails leading up to the webinar start time.
Tag contacts based on their behavior throughout the funnel.
Send follow-up emails with a replay link or time-sensitive offer.
To create a workflow:
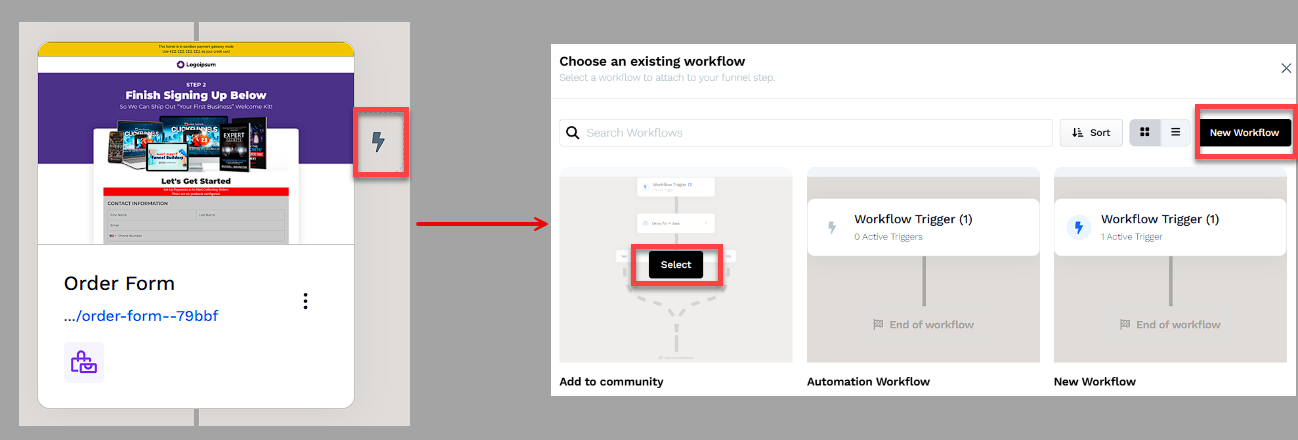
Locate the funnel step where you want to trigger the workflow.
Click the Lightning Bolt icon next to the step to add a new or existing workflow.
Select an existing workflow from the list or create a new one.
Click + (Plus) icon to add actions such as Send an Email, Send an Asset, or Tag Contact.
(Optional) Add a Delay to space out follow-up actions over time.
In the top right corner of the workflow navigation, find the Status option.
Toggle the status option. The workflow status will change from disabled to active.
Helpful Resources
Testing and Publishing Your Funnel
Before making your funnel live, it’s important to test its functionality to ensure everything works as expected.
Test the Funnel
Verify that all pages are connected in the correct order.
Check buttons, forms, and links to confirm they function properly.
Test the funnel on different devices and browsers for a smooth experience.
To run a full checkout test, follow the steps in How to Test Funnel Checkout in Test / Sandbox Mode.
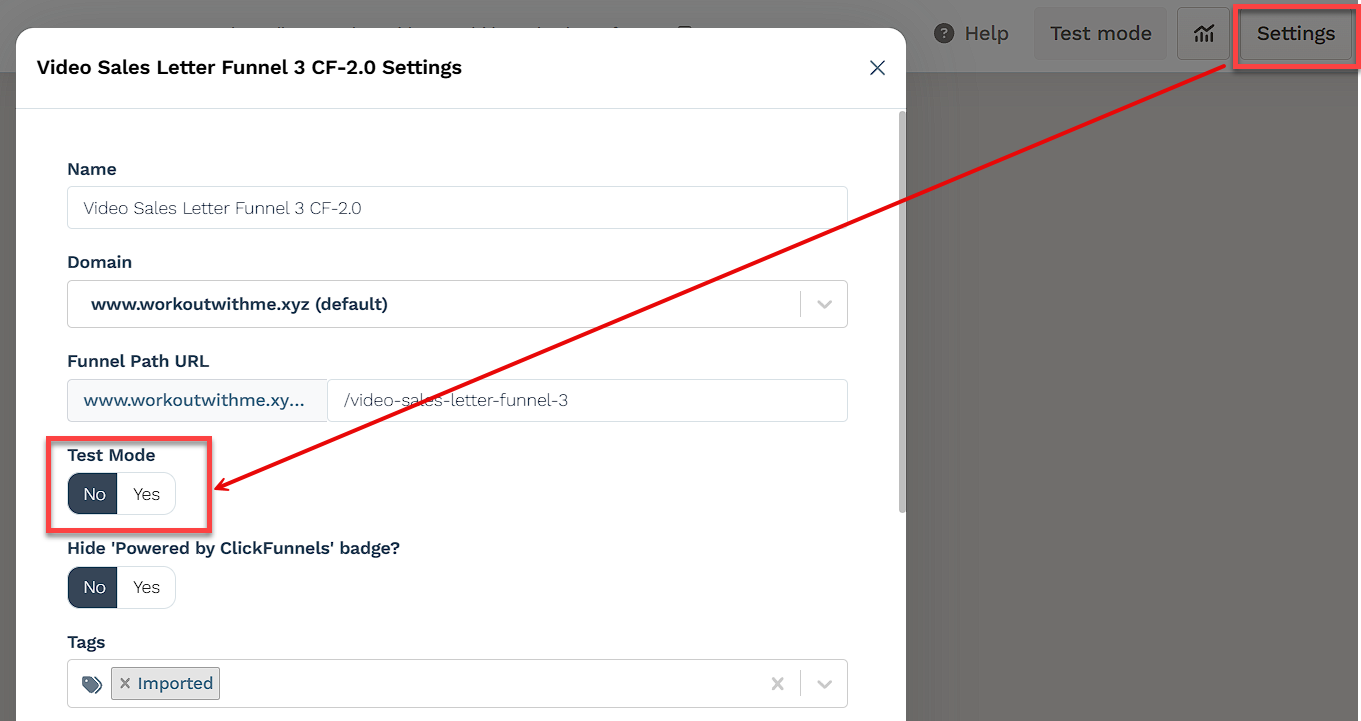
Enable Live Mode
Click the Settings button at the top-right corner of the funnel workflow editor to open the funnel’s settings.
Set the funnel to Live Mode to make it accessible to customers.
Copy and Share Your Funnel URL
Hover over the URL at the top of the funnel workflow page and click to copy.
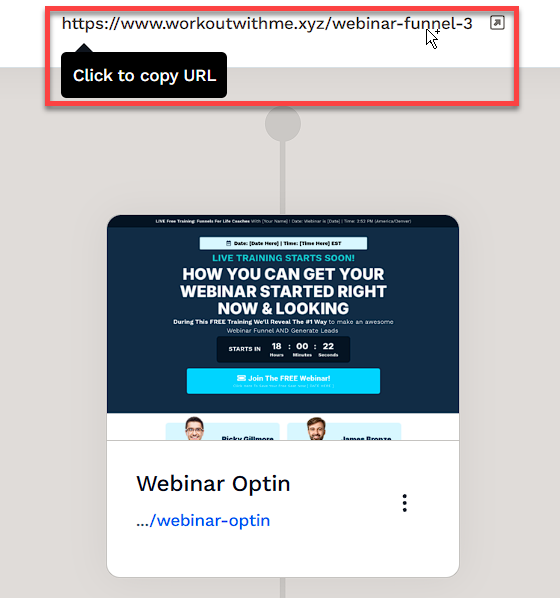
Share the link via your website, social media, or email campaigns.
Learn more about publishing and sharing your funnel in this article.
Funnel Builder Support Options
For additional support building your funnel, explore the Funnel Builder Coaching & Certification Program. The program offers step-by-step training and live coaching for members who want to build with guidance.
To hire a certified funnel builder, visit the Funnel Builder Directory to connect with a verified expert.