The “Calendar Event Delay” step in ClickFunnels workflows allows you to delay actions based on specific countdown calendar event time. This is especially useful for sending reminders or follow-ups relative to a countdown event time. In this article, you are going to learn how to configure the “Calendar Event Delay” step and effectively use it to your automation.

Requirements
An active ClickFunnels account
The workflow trigger step must contain the event Calendar Event - Contact Registered to activate and use the “Calendar Event Delay” step.
Overview of the “Calendar Event Delay” Step
The “Calendar Event Delay” step in ClickFunnels workflows is designed to automate actions based on specific countdown calendar events. Unlike a standard delay step that simply waits for a set duration, the “Calendar Event Delay” step dynamically adjusts its timing relative to a calendar event. This step works by automatically identifying the event associated with a contact, based on the trigger set at the beginning of the workflow. Once the workflow is triggered by a “Calendar Event - Contact Registered” event, the “Calendar Event Delay” step calculates when to execute the next action in relation to that calendar event.
What makes the “Calendar Event Delay” step unique is that you don’t need to select any specific calendar event within the step itself. The step intelligently detects the relevant calendar event tied to the contact that started the workflow, ensuring the workflow actions are perfectly aligned with the event schedule. This capability allows you to automate precise, timely communications and follow-ups, providing a more sophisticated approach compared to regular delay steps that operate on fixed time intervals.
Adding the “Calendar Event Delay” Step to Your Workflow
Open Your Workflow:
From your ClickFunnels dashboard, navigate to the Automations » Workflows menu.
Open an existing workflow or create a new one.
Set Up the Trigger:
For the “Calendar Event Delay” step to function properly, you need to set up a trigger based on a calendar event. Select “Calendar Event - Contact Registered” as the event type.
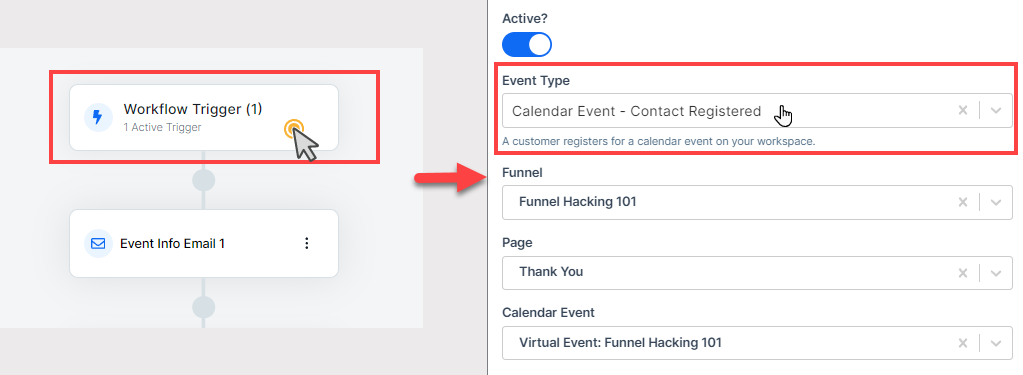
Choose the appropriate Funnel and Page where the calendar event is linked, and then select the specific Calendar Event (e.g., “Virtual Event: Funnel Hacking 101”).
Add the “Calendar Event Delay” Step:
Click on the Plus Icon (+) in your workflow editor.
In the right-hand panel, select the “Calendar Event Delay” option under the “Internal” category.

Configuring the “Calendar Event Delay” Step
Once you’ve added the “Calendar Event Delay” step to your workflow, you can configure it to fit your specific needs:
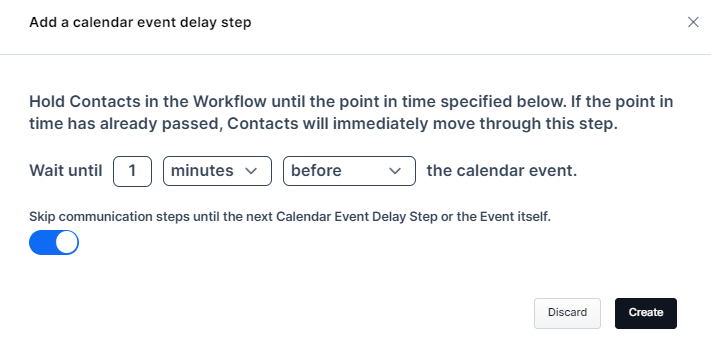
Set the Delay Timing:
Choose when the delay should occur relative to the calendar event. Options include days, hours, or minutes before or after the event. This flexibility allows you to schedule actions that align perfectly with your event timeline.
Skip Communication Steps:
Enable or disable the Skip communication steps option. When enabled, this option will skip any communication steps (e.g., “Send Email”) that fall between the current date and the selected calendar delay date. Non-communication steps (e.g., Add Tag, Add Note) will still be executed in order.
Example Scenario:
Suppose you have a calendar event scheduled for the 15th of the month. You set up a workflow to send a series of reminder emails:
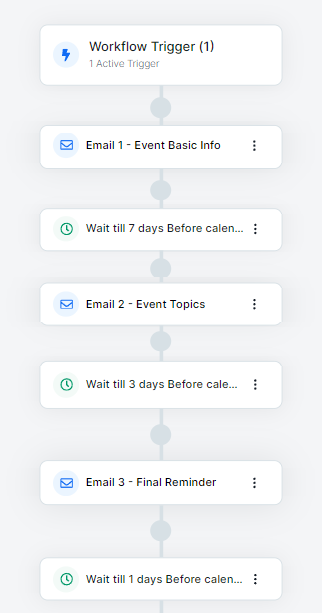
Email 1 - Event Basic Info
(Wait until 7 days before the event)Email 2 - Event Topics
(Wait until 3 days before the event)Email 3 - Final Reminder
(Wait until 1 day before the event)
Here’s how the “Calendar Event Delay” step behaves:
If a contact joins the workflow on the 9th (after the delay period for 7 days before the event), the workflow will skip past the “Wait till 7 days Before calendar event” step because that waiting period has already passed.
If “Skip communication steps” is unchecked: The contact will still receive Email 1 - Event Basic Info immediately when they reach that step, even though the delay period has passed.
If “Skip communication steps” is checked: The contact will skip Email 1 - Event Basic Info and move directly to the next waiting step or email.
This setup ensures that if a contact joins the workflow after some reminder times have already passed and the “Skip communication steps” option is enabled, they will only receive the emails that are still relevant to them before the event. This approach provides a more targeted and timely communication strategy.
Save Your Settings:
After configuring the delay and other options, click the Create button to save your settings and return to the workflow editor.
IMPORTANT
Key Consideration:
Communication Steps: Only “Send Email” steps are classified as skippable communication steps. Other steps like “Send MessageHub Message” or “Send Asset” will not be skipped.
Non-Communication Steps: Steps such as “Add Tag,” “Add Note,” or “Grant Community Access” will execute in the order they appear, regardless of the “Skip communication steps” option.
Standard Delay Steps: Regular delay steps are not affected by the “Skip communication steps” option. They will always execute as configured.
Conditional Split Paths: If a “Calendar Event Delay” step is within a split path, the delay logic is scoped only to that specific branch of the workflow.