The Customer Center in ClickFunnels is a sophisticated self-service portal designed to empower customers by providing them with a centralized hub for managing their interactions and accessing valuable resources. This feature showcases available courses, digital downloads, and communities that users have previously joined, all from one convenient location.
Requirements
An active ClickFunnels account
What is a Customer Center?
The Customer Center in ClickFunnels serves as a comprehensive platform where customers can effortlessly access and manage various resources. It provides a seamless interface for users to browse and enroll in available courses, download digital assets, and engage with communities they have joined. By centralizing these functions, the Customer Center enhances the user experience by offering a single, easy-to-navigate location for all relevant content and resources.
Benefits of Customer Center:
Centralized Resource Access: Customers can find and access all their purchased content, including courses and digital downloads, communities in one place.
Enhanced User Engagement: By providing easy access to all available resources, the Customer Center encourages users to engage more deeply with the content.
Efficient Account Management: Customers can also manage their account settings through the “My Account” section, ensuring their information is always up-to-date.
Example:
Consider a fitness coach who offers five different online courses. When a customer subscribes to one of these courses, they gain access to the Customer Center. Here, they can view and enroll in additional available courses, download digital assets related to their subscriptions, interact in communities and manage their account details. For instance, they can update their billing information, address, and payment methods by navigating to the “My Account” section.
This not only enhances the customer experience by providing them with a comprehensive and user-friendly portal but also reduces the administrative burden on the coach, allowing them to focus on delivering high-quality content and services.
Accessing the Customer Center Feature in ClickFunnels
To access the Customer Center in ClickFunnels, follow these steps:
Log in to your ClickFunnels account.
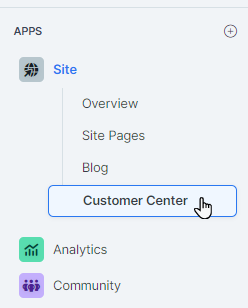
From the left-hand menu, click on the Site app.
Select Customer Center to open the Customer Center settings.

On the right side of the page, you will find the “Customer Center” settings.
How to Set Up and Manage Customer Center
Setting up the Customer Center involves configuring various settings to ensure it meets your business needs. Here’s how to do it:
Name: Customize the public name of your Customer Center to reflect your brand. The “Name” appears in “My Account”.
Logo: Upload a logo for the Customer Center. Alternatively, workspace site logo will be used as default in the customer center navigation.
Brand Color: Select a brand color that will be consistently reflected across the sign-in screen, community, and courses pages within the Customer Center.
Customer Self-Service: Configure what information customers can manage within “My Account” in the Customer Center. Options include:
Order History: Displays a record of past purchases made by your customer within a specified timeframe.
Billing Information (email and billing address): Shows the email address and billing address associated with your customer’s account.
Payment Method: Allows customers to add, edit, or remove payment methods associated with their accounts.
Subscription: Provides options for users to modify subscription plans, terminate their subscription, or temporarily suspend their subscription without canceling it entirely.
Course Enrollments: Shows a customer’s registration or enrollment in specific courses or educational programs.
Credit Memos: Displays credits issued to a customer, indicating a credit owed for returned or undelivered goods.
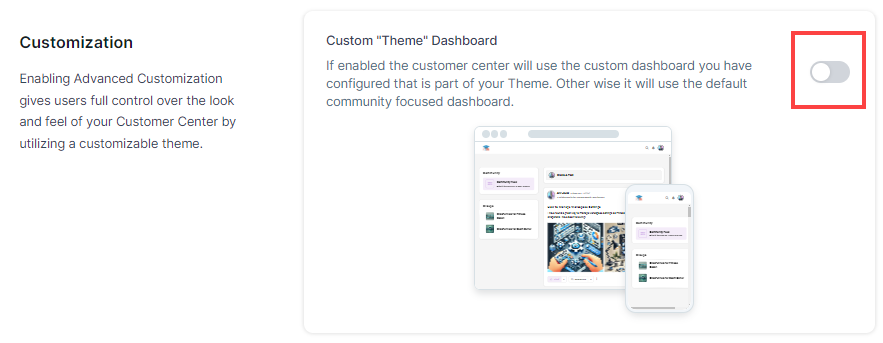
Custom “Theme” Dashboard: Enable this feature to use a dashboard that matches your site’s theme, ensuring a consistent look and feel. Toggle this feature off if you prefer to use the system’s default Customer Center dashboard. Customizing the Customer Center in the page editor is not necessary if you use the system’s default dashboard.

Single Sign-On (SSO): The Single Sign-On (SSO) feature in ClickFunnels allows you, as the account owner, to streamline the login process for your customers. By using a JWT (JSON Web Token) key, you can enable automatic authentication, allowing your customers to access their Customer Center directly from another application without needing to log in with a username, password, or magic link.
How It Works:Retrieve the JWT Key: In the Customer Center settings, you will find a JWT Key. Copy this key to integrate it with your custom application.
.png)
Use the SSO URL: Construct an SSO URL with the JWT key to grant access to the Customer Center. When customers click this link, they are automatically authenticated and logged in.
Below is an example of an SSO URL using a JWT key:
https://richstone.myclickfunnels.com/sso?identifier=sso-customer@clickfunnels.com&strategy=email&token=eyJhbGciOiJIUzI1NiJ9.eyJzdWIiOiJzc28tY3VzdG9tZXJAY2xpY2tmdW5uZWxzLmNvbTpyaWNoc3RvbmUubXljbGlja2Z1bm5lbHMuY29tIiwibmJmIjoxNzM1ODE4NTYxLCJleHAiOjE3MzU4MjIxNjEsImlhdCI6MTczNTgxODU2MX0.ae7FEo28GmrREy7s6bod6WtazYMnZt8l4B6ZxyvOd1M
For further technical details and implementation guidance, refer to the official documentation ClickFunnels SSO.Note:
Single Sign-On (SSO) is only required when you need to enable login to the Customer Center from an external application. This feature is intended for advanced users and requires sufficient knowledge of custom coding. In most cases, your customers can easily log in to their Customer Center using their username and password or the magic link sent to their email, which is sufficient for standard use.
After configuring these settings, click Update Customer Center to apply the changes.
Using the Dynamic Customer Center Default Page
The Customer Center dynamically displays content based on the user’s access permissions, ensuring that customers are presented with the most relevant content upon logging in:
Customers with access to the Community will see the Community page as the default view.
If a customer does not have access to the Community but does have access to Courses, the Courses page will appear first.
When customers have access to both Community and Courses, the Community page will load by default.
To enable this dynamic display, ensure that the “Custom “Theme” Dashboard” feature is toggled off in the “Customer Center” settings. The system will then automatically determine which page is most appropriate to show based on each customer’s permissions.
How to Customize Customer Center in the Editor

ClickFunnels allows you to customize the customer center dashboard using the page editor. You can adjust the layout, colors, and other design elements to match your brand’s identity. The Customize button opens the editor, enabling you to make changes to the design and layout of the Customer Center to align with your brand.
The Customize button only appears when you toggle on Custom “Theme” Dashboard option.
We recommend using the default theme provided by ClickFunnels rather than customizing the Customer Center unless absolutely necessary. The default design and template utilize dynamic content across the Customer Center interface, some of which may not be fully accessible or functional. You should toggle off the Custom “Theme” Dashboard option to ensure full compatibility with the default dynamic content.
If you enable the Custom “Theme” Dashboard option in the customer settings, you can customize the Customer Center in the editor. If this feature is toggled off, you can skip customizing, and the system will use the default community-focused dashboard.
For a comprehensive guide on customization, refer to our separate article How to Customize Customer Center in the Page Editor.
Previewing the Customer Center Dashboard

ClickFunnels provides a specific URL for the Customer Center, which customers can use to access their accounts. At the top of the page of customer center settings, you can copy the customer center URL.
For administration preview, you can click the Eye icon and it will open the customer center in a new tab in the browser.